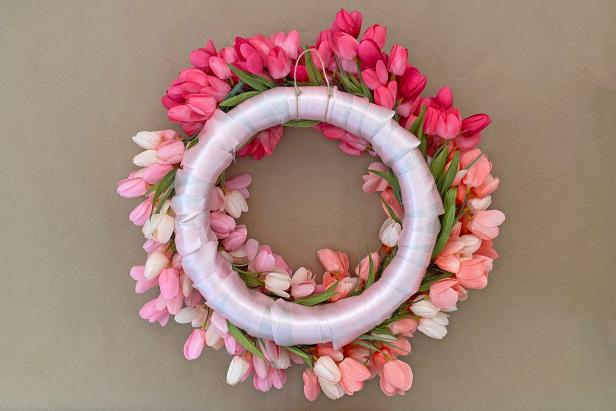
Make a Fresh, Faux Tulip Wreath to Welcome Spring
With an easy ombre pattern and just a 30-minute build time, this lush DIY wreath may be the best way to usher in spring.

Cassidy Garcia

A seasonal wreath is always a trendy way to add a dash of colorful curb appeal to the block — but sticker shock might be keeping your shopping cart empty. Stop scrolling and make your own at home with a handful of basic crafting supplies. HGTV Handmade's Danielle Boaz shares easy, step-by-step instructions to make a fresh, faux tulip wreath that will wow all the neighbors.

Materials + Tools
- 15 faux tulip bouquets, three colors in the same hue
- 13-1/2'' foam wreath form
- 25-yard spool of 2'' ribbon
- low-temp hot glue gun
- wire cutters
- 15'' piece of jute twine

Cassidy Garcia
1: Trim Stems + Start Ribbon
First, use wire cutters to snip off the tulip bouquet stems to shorten for use (Image 1). Tip: Snip several bouquets at the same time to speed up the process. Next, use a low-temp hot glue gun to add a dot of glue to the edge piece of the 2-inch ribbon spool. Press the ribbon edge firmly onto the back of the foam wreath form. Once secure, wrap the ribbon around the foam form four times. Leave the ribbon attached to the spool.

2: Add Bouquets
Note: To make an ombre pattern with tulips, start by using the darkest color first, the medium color second and the lightest color last. Use a low-temp hot glue gun to add a few dots of glue to the stems of the hot pink tulip bouquets, then press them firmly onto the foam wreath form. Next, wrap the spool of ribbon around the stems twice and add a dot of hot glue to the wrapped ribbon; wrap the ribbon once more over the dot of hot glue to secure (Image 1). Continue the steps above to add more bouquets to the form (Image 2). Once you return to the starting point, tuck the stems from the last bouquet into the wrapped ribbon of the first secured bouquet. Then wrap the stems with ribbon several times and secure with a dab of hot glue (Image 3). Trim the ribbon from the spool and glue the end piece to the back of the wreath.



Danielle Boaz
3: Twine Loop
Create a loop at the top of the wreath by using a 15-inch piece of jute twine. Wrap one end of the twine around the top of the foam form and tie a knot to secure. Leave about 4 inches of twine in the middle to make a loop, then wrap the other end around the foam form and secure with a knot (Image 1). Then display this fresh, festive wreath on the front door to celebrate springtime (Image 2).
Danielle Boaz

Cassidy Garcia
Spring Crafts
17 DIY Wreaths to Freshen Up Your Front Door for Spring 31 Photos
Give your front door a freshen-up with one of our colorful spring wreaths.
Upcycle a Vintage Birdcage Into a Cute Succulent Planter
Show off those succulents with a few basic supplies and a quick trip to the thrift store.
Make This Stylish, Acrylic Bird Feeder With Midcentury Flair
Let all the neighborhood birds know the perfect place to hang out.


