


Upcycle a Vintage Birdcage Into a Cute Succulent Planter
Show off those succulents with a few basic supplies and a quick trip to the thrift store. Plus, learn how to care properly for those delicate little desert plants.

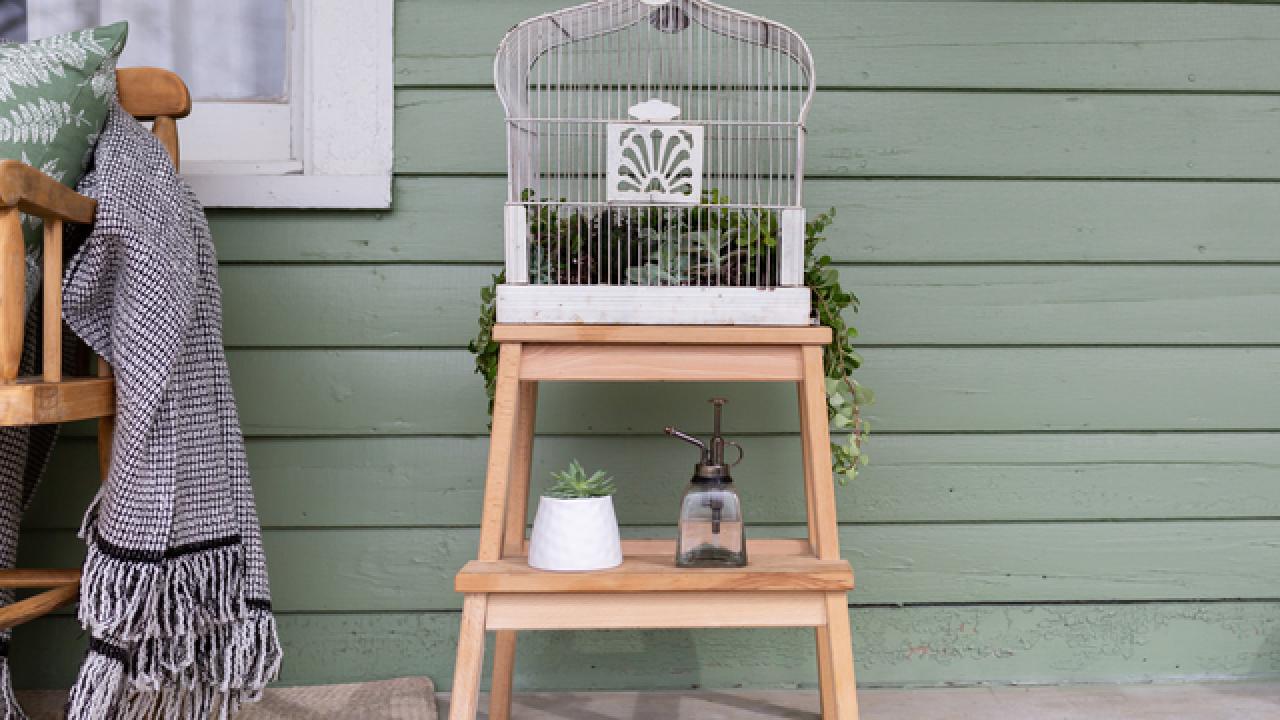
Vintage Birdcage Succulent Planter: Horizontal
HGTV digital host Marianne Canada teaches you how to take a vintage birdcage and turn it into an upcylced succulent planter. Follow along for the how-to on HGTV.com.

Photo by: Cassidy Garcia
Cassidy Garcia

Vintage flips aren't just for real estate. Take a stroll through a thrift store, and with a little imagination, come out with something entirely new. HGTV.com digital host Marianne Canada shares tips and tricks to upcycle a vintage birdcage (she found hers at the World's Longest Yard Sale) into a trendy succulent planter. Read on for the how-to and make this cute little planter for yourself.
Materials + Tools
- vintage birdcage
- various succulents
- aluminum baking pan
- succulent potting soil
- perlite
- rocks
- clear sealer (non-yellowing)
- plant mister
- gardening gloves
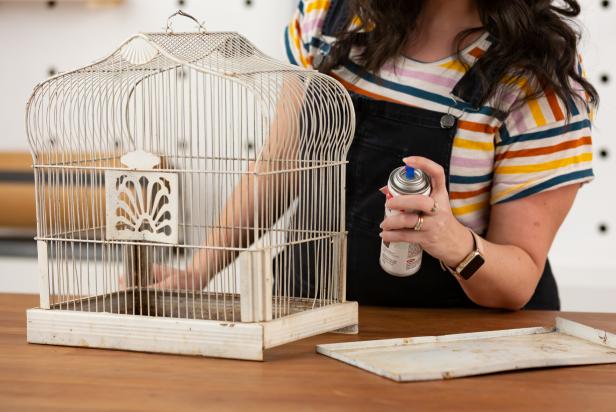
Clean + Seal Cage
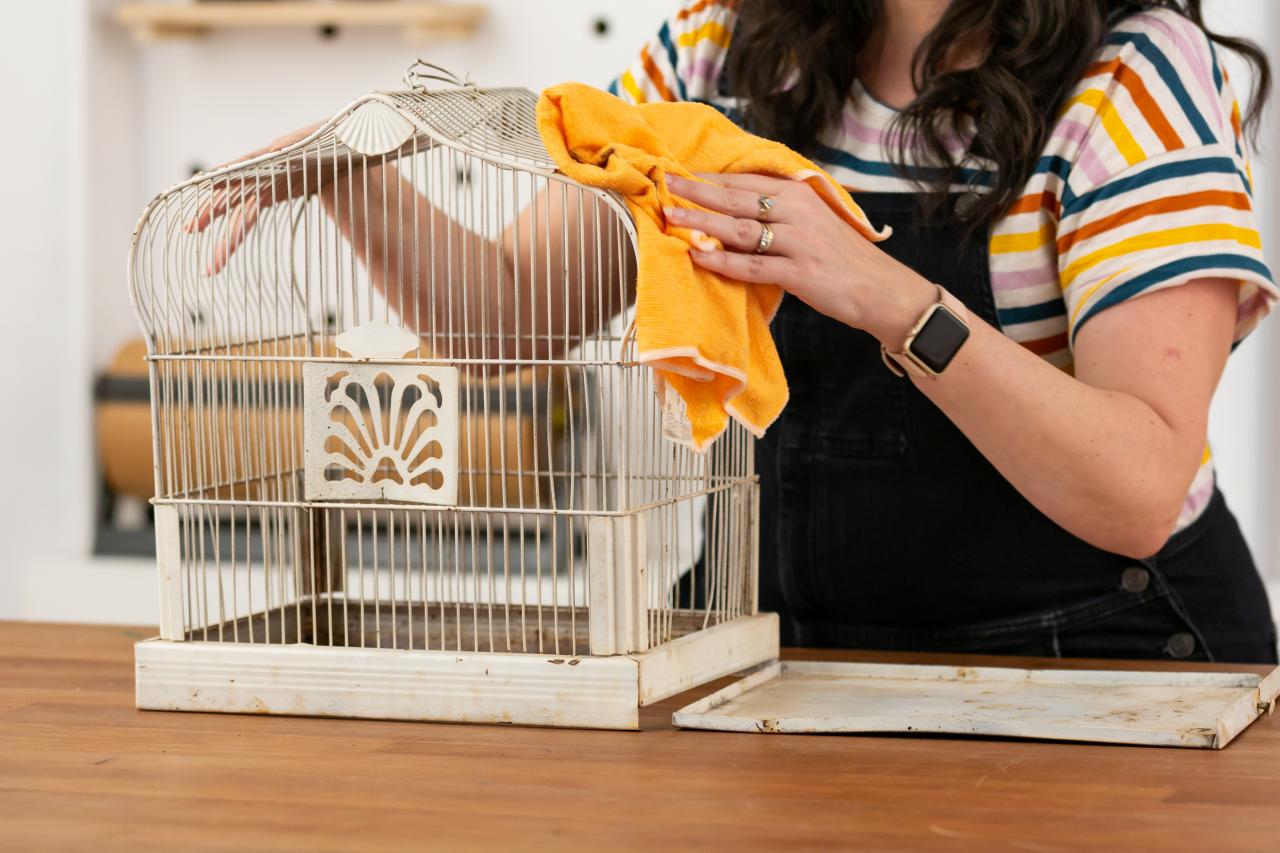
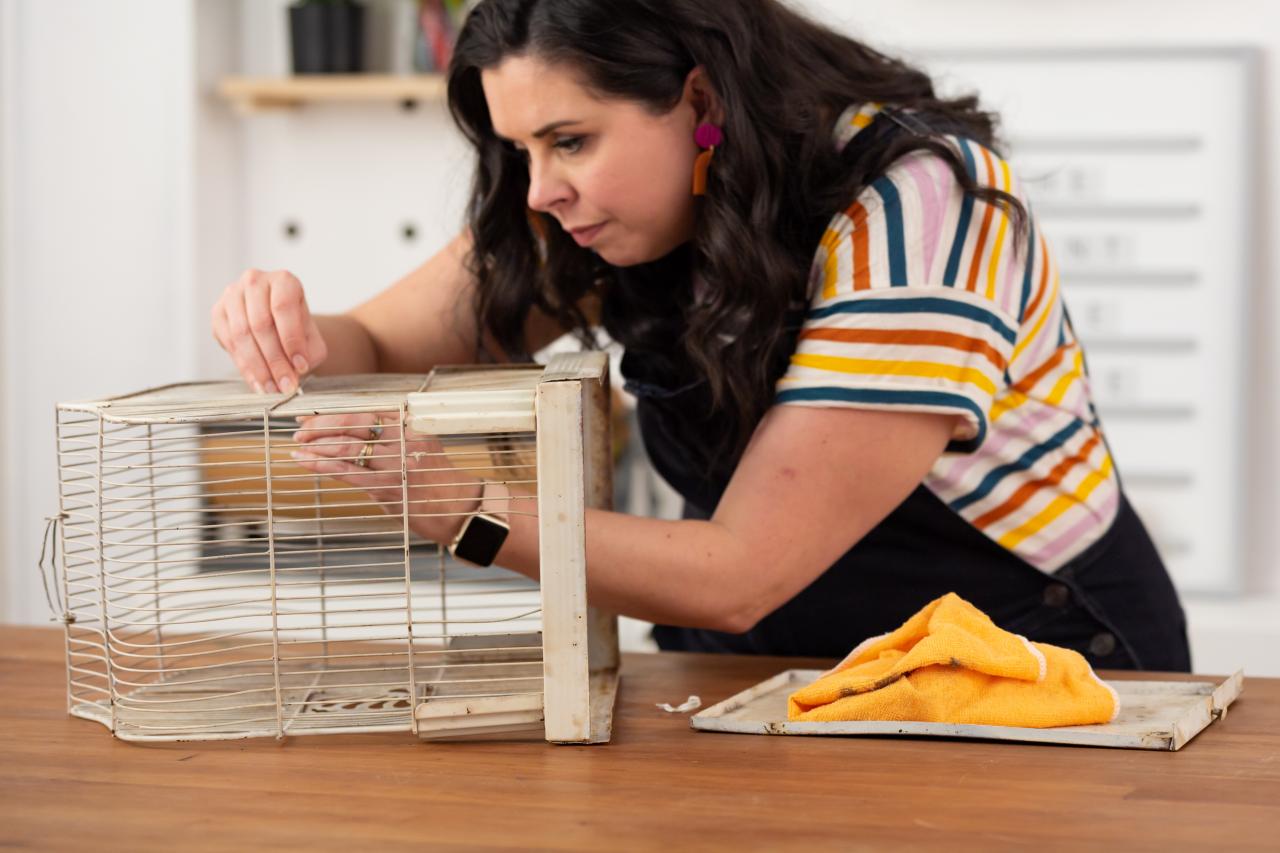
Prep the birdcage by wiping down the inside, outside and tray with a damp rag to remove dust and dirt (Image 1). Remove any plastic or unwanted parts from the cage (Image 2). Next, coat the entire birdcage with a non-yellowing, clear sealer (Image 3). Note: Non-yellowing sealer is important, especially for items that will be left in direct sunlight. Coat the cage twice to ensure proper coverage. Let it dry for one hour per coat.

Cassidy Garcia

Cassidy Garcia
Cassidy Garcia
Vintage Birdcage Succulent Planter: Clean Cage
Prep the birdcage by wiping down the inside, outside and tray with a damp rag to remove dust and dirt. Remove any plastic or unwanted parts from the cage.
Photo By: Cassidy Garcia
Vintage Birdcage Succulent Planter: Remove Plastic
Prep the birdcage by wiping down the inside, outside and tray with a damp rag to remove dust and dirt. Remove any plastic or unwanted parts from the cage.
Photo By: Cassidy Garcia
Vintage Birdcage Succulent Planter: Coat Cage
Next, coat the entire birdcage with a non-yellowing, clear sealer. Non-yellowing is important, especially for items that will be left in direct sunlight. Coat twice to ensure proper coverage. Give the birdcage an hour to dry with each coat.
Photo By: Cassidy Garcia
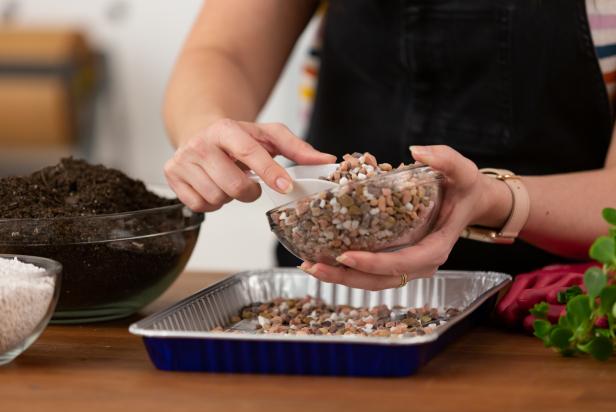
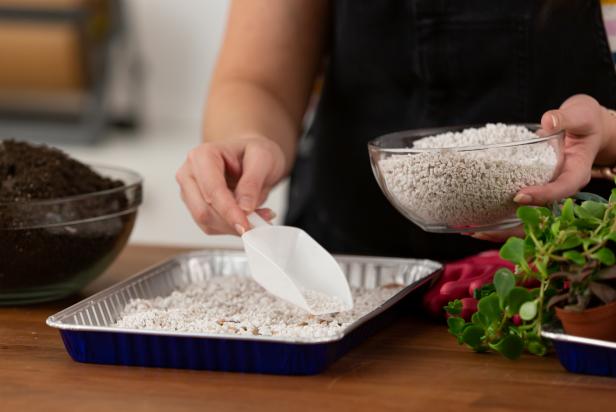
Prep Pan + Add Rocks
An aluminum pan will be used to house all the plants inside the birdcage. Every vintage birdcage is different; pick a disposable aluminum baking pan that best fits the tray inside your cage (Image 1). As succulents are desert plants and don’t thrive well with moisture in their roots, start by adding a bed of rocks to the aluminum baking pan (Image 2). Then, add a layer of perlite (Image 3). This helps to promote proper drainage.

Cassidy Garcia
Cassidy Garcia
Cassidy Garcia
Vintage Birdcage Succulent Planter: Aluminum Pan
As each vintage birdcage is different, pick a disposable aluminum baking pan that best fits the tray inside your cage. As succulents are desert plants, they don’t thrive well with moisture in their roots, or in humid air, so start by adding a bed of rocks to the aluminum baking pan. Then, add a layer of perlite; this helps to promote drainage and keeps the hanging planter light-weight.
Photo By: Cassidy Garcia
Vintage Birdcage Succulent Planter: Add Rocks
As each vintage birdcage is different, pick a disposable aluminum baking pan that best fits the tray inside your cage. As succulents are desert plants, they don’t thrive well with moisture in their roots, or in humid air, so start by adding a bed of rocks to the aluminum baking pan. Then, add a layer of perlite; this helps to promote drainage and keeps the hanging planter light-weight.
Photo By: Cassidy Garcia
Vintage Birdcage Succulent Planter: Add Perlite
As each vintage birdcage is different, pick a disposable aluminum baking pan that best fits the tray inside your cage. As succulents are desert plants, they don’t thrive well with moisture in their roots, or in humid air, so start by adding a bed of rocks to the aluminum baking pan. Then, add a layer of perlite; this helps to promote drainage and keeps the hanging planter light-weight.
Photo By: Cassidy Garcia
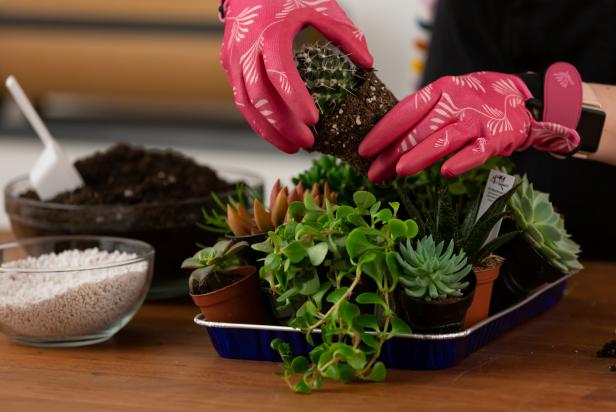
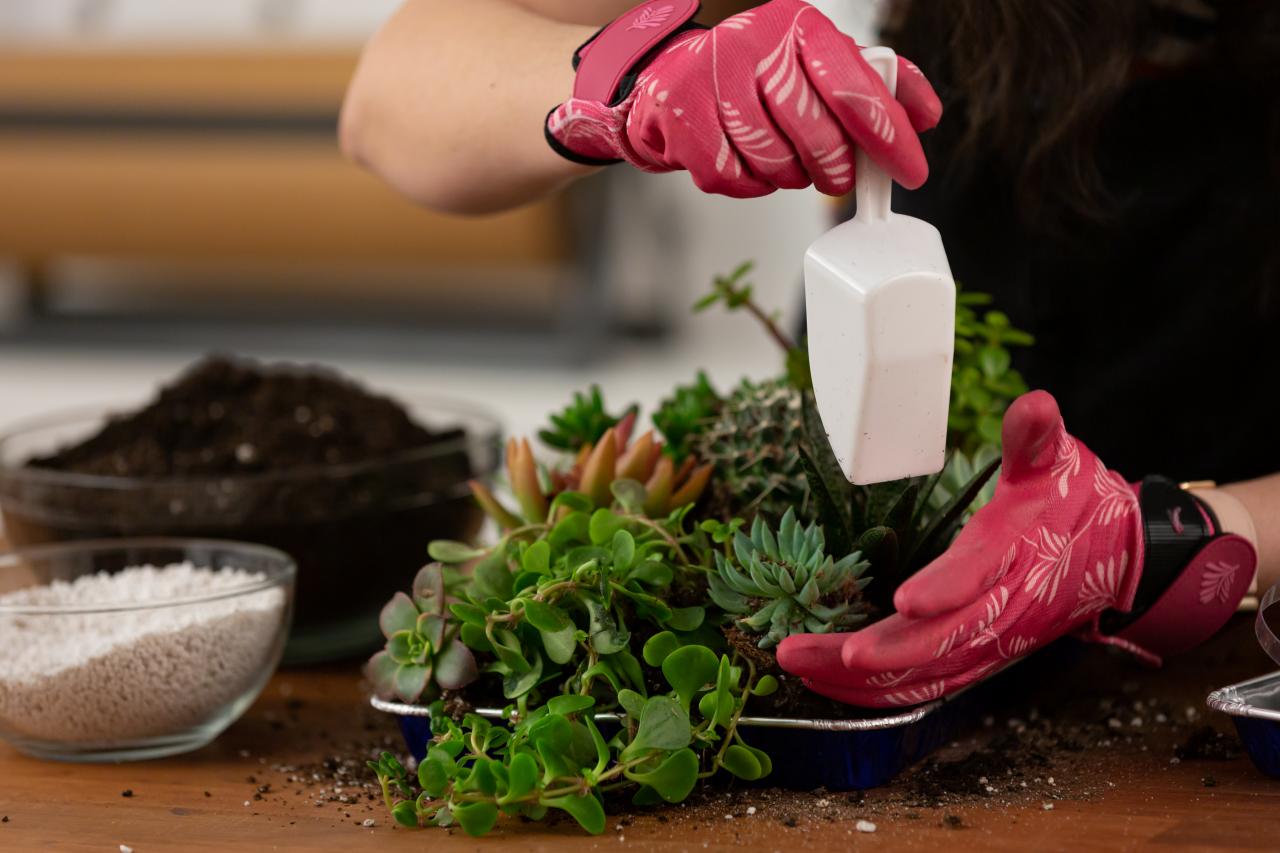
Arrange + Plant
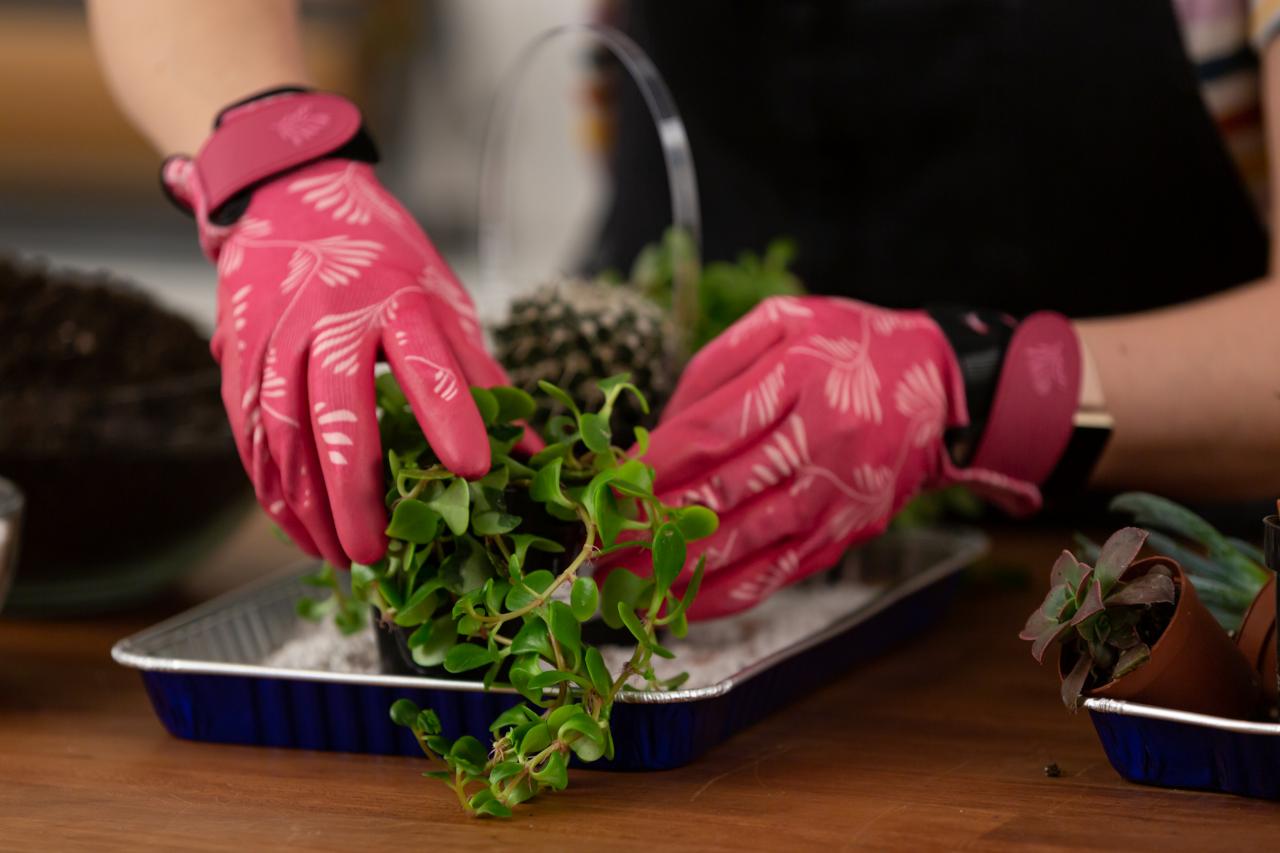
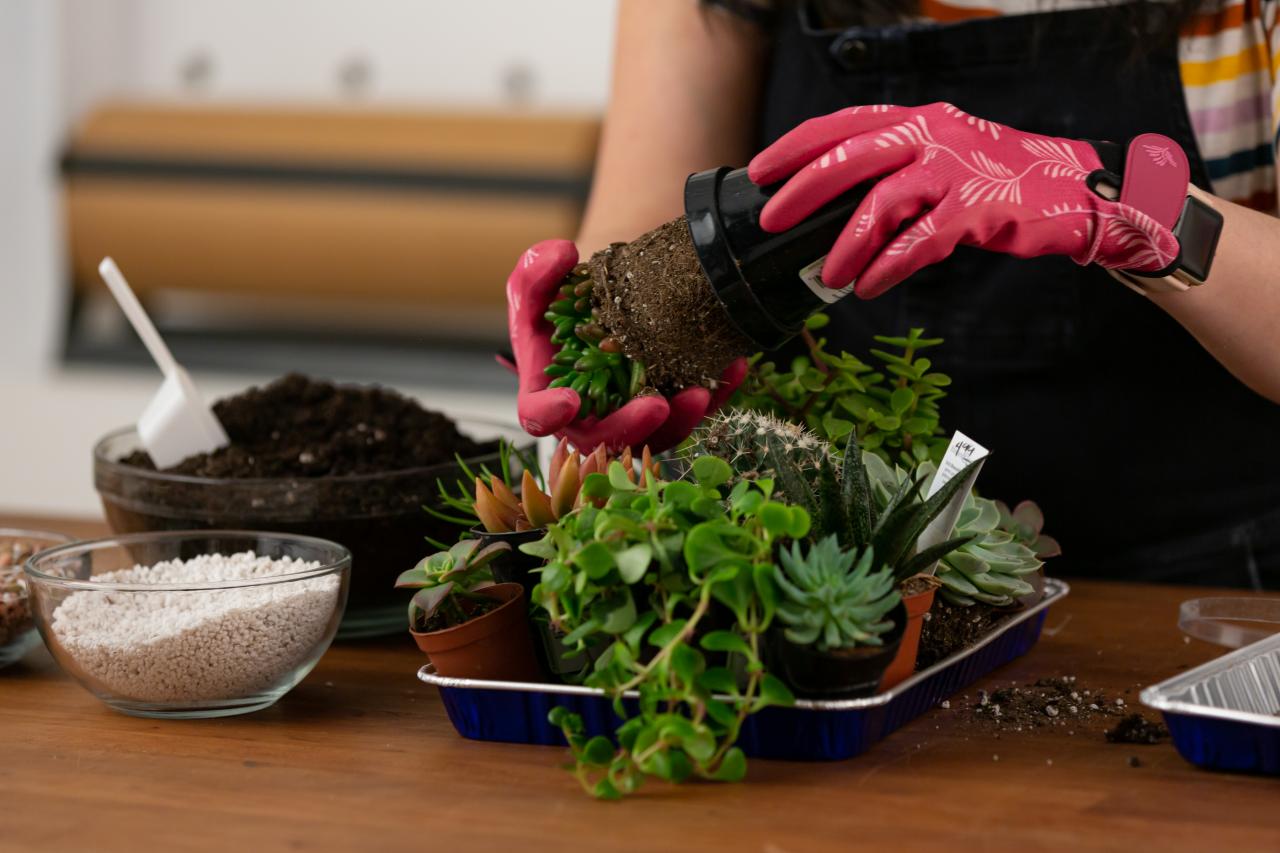
Wearing gloves, arrange a variety of succulents on the tray of rocks and perlite, keeping them in the containers (Image 1). Arrange succulents to best fit your vintage birdcage. Once arranged to your liking, remove the succulents from their individual containers (Image 2). Lightly break up the bottom part of the potting soil to encourage root growth and nestle the succulents into place (Image 3). Then, add a layer of succulent potting soil (Image 4).

Cassidy Garcia

Cassidy Garcia
Cassidy Garcia

Cassidy Garcia
Vintage Birdcage Succulent Planter: Arrange Plants
Wearing gloves, arrange a variety of succulents and cacti on the tray of rocks and perlite, keeping them in the containers for now. Arrange to best fit your vintage birdcage. Once arranged to your liking, wearing gloves, remove the succulents from their individual containers. Lightly break up the bottom part of the potting soil to encourage root growth, then place the succulents in the designed place. Then, add a layer of succulent potting soil around the freshly potted plants.
Photo By: Cassidy Garcia
Vintage Birdcage Succulent Planter: Remove Containers
Wearing gloves, arrange a variety of succulents and cacti on the tray of rocks and perlite, keeping them in the containers for now. Arrange to best fit your vintage birdcage. Once arranged to your liking, wearing gloves, remove the succulents from their individual containers. Lightly break up the bottom part of the potting soil to encourage root growth, then place the succulents in the designed place. Then, add a layer of succulent potting soil around the freshly potted plants.
Photo By: Cassidy Garcia
Vintage Birdcage Succulent Planter: Pot Plants
Wearing gloves, arrange a variety of succulents and cacti on the tray of rocks and perlite, keeping them in the containers for now. Arrange to best fit your vintage birdcage. Once arranged to your liking, wearing gloves, remove the succulents from their individual containers. Lightly break up the bottom part of the potting soil to encourage root growth, then place the succulents in the designed place. Then, add a layer of succulent potting soil around the freshly potted plants.
Photo By: Cassidy Garcia
Vintage Birdcage Succulent Planter: Add Succulent Soil
Wearing gloves, arrange a variety of succulents and cacti on the tray of rocks and perlite, keeping them in the containers for now. Arrange to best fit your vintage birdcage. Once arranged to your liking, wearing gloves, remove the succulents from their individual containers. Lightly break up the bottom part of the potting soil to encourage root growth, then place the succulents in the designed place. Then, add a layer of succulent potting soil around the freshly potted plants.
Photo By: Cassidy Garcia
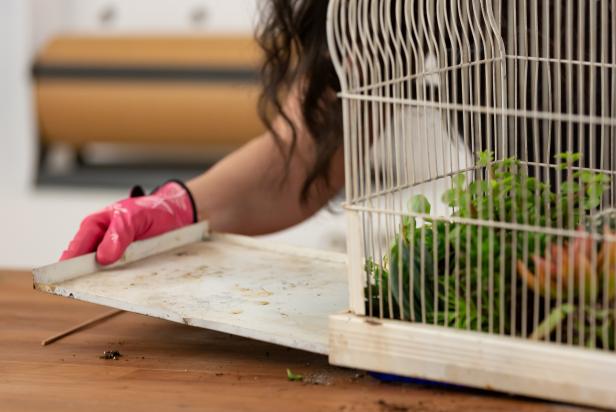
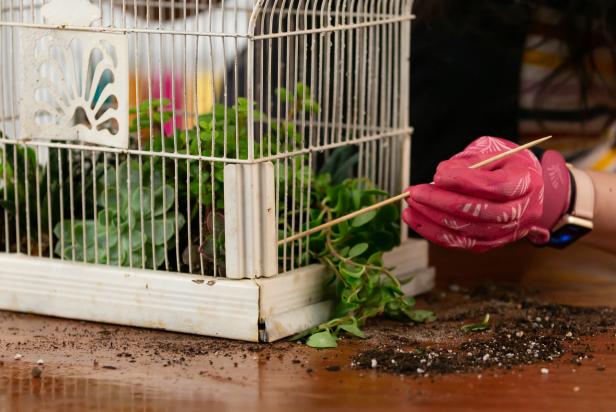
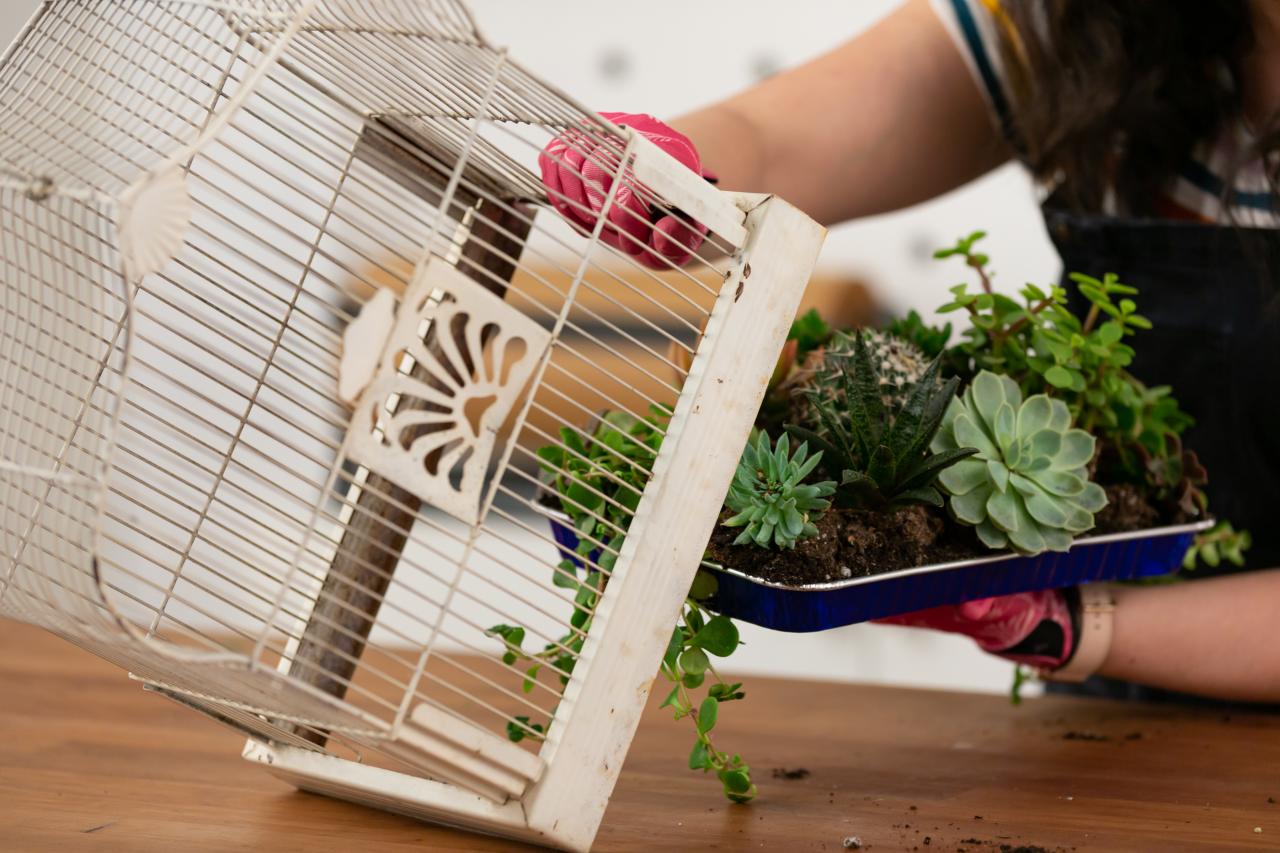
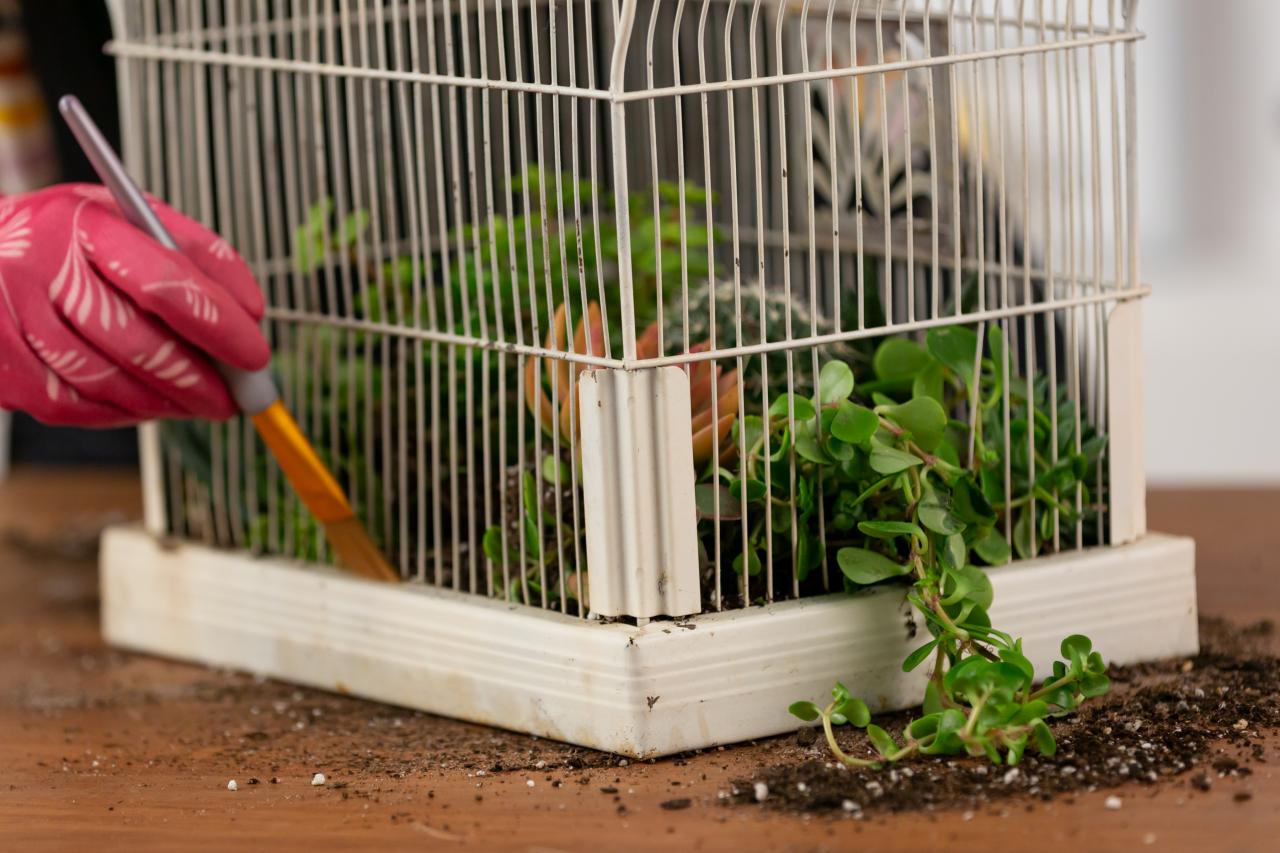
Complete the Look
Place the aluminum pan of succulents carefully inside the birdcage (Image 1). Then, add the tray back to the birdcage (Image 2). Use a skewer to rearrange any misplaced leaves or stems from the outside (Image 3). Remove excess dirt from the birdcage with a paintbrush (Image 4).

Cassidy Garcia
Cassidy Garcia
Cassidy Garcia

Cassidy Garcia
Vintage Birdcage Succulent Planter: Place Inside Cage
Lastly, place the aluminum pan of succulents inside the birdcage and onto the tray. If anything has moved in the process, use a skewer to rearrange from the outside.
Photo By: Cassidy Garcia
Vintage Birdcage Succulent Planter: Add Tray
Lastly, place the aluminum pan of succulents inside the birdcage and onto the tray. If anything has moved in the process, use a skewer to rearrange from the outside.
Photo By: Cassidy Garcia
Vintage Birdcage Succulent Planter: Arrange Petals
Lastly, place the aluminum pan of succulents inside the birdcage and onto the tray. If anything has moved in the process, use a skewer to rearrange from the outside. Use a paintbrush to remove any excess dirt from the birdcage.
Photo By: Cassidy Garcia
Vintage Birdcage Succulent Planter: Clean Dirt
Lastly, place the aluminum pan of succulents inside the birdcage and onto the tray. If anything has moved in the process, use a skewer to rearrange from the outside. Use a paintbrush to remove any excess dirt from the birdcage.
Photo By: Cassidy Garcia
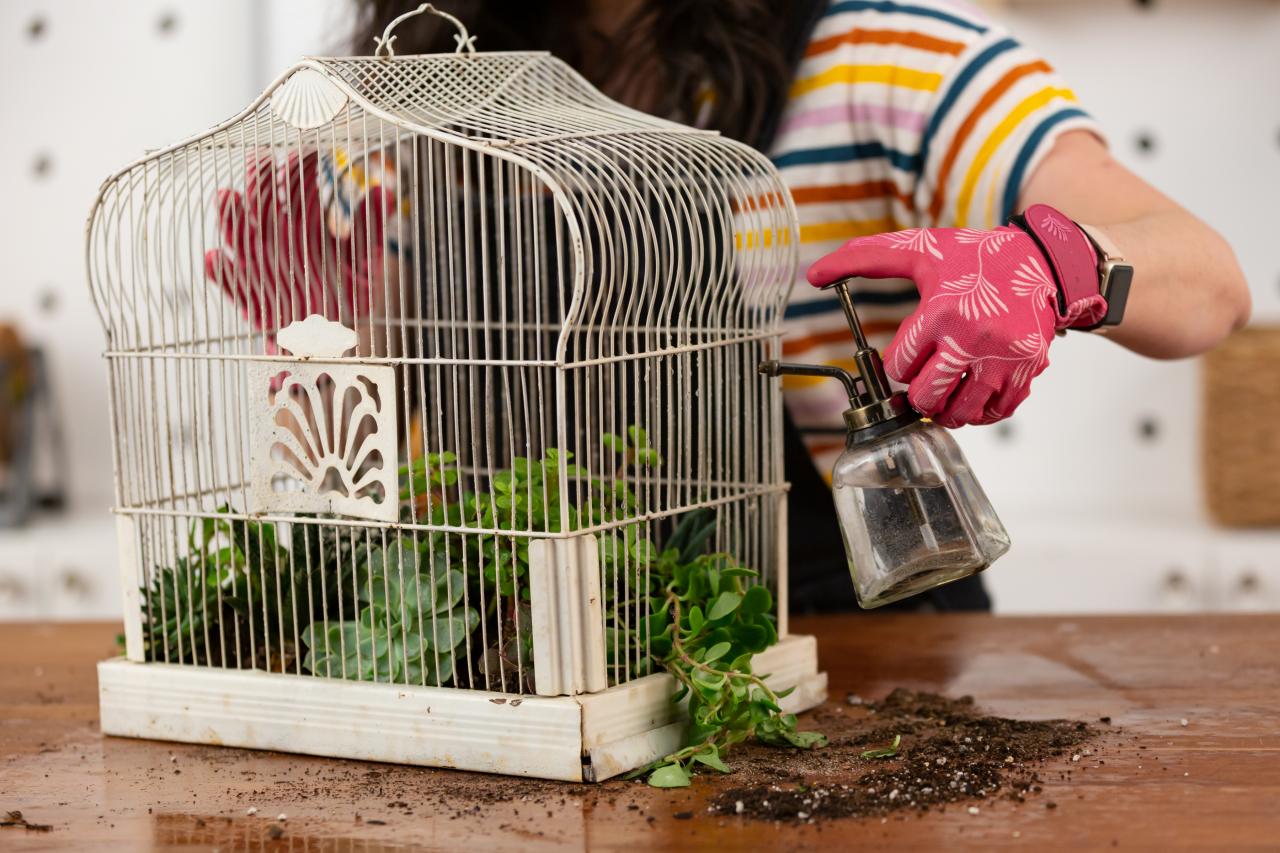
Tip: Caring for Succulents
By nature, succulents only need a little bit of water to thrive. Use a plant mister to spritz the succulents, and only water when the soil is completely dry (Image 1).

Cassidy Garcia
Vintage Birdcage Succulent Planter: Use Mister
Properly care for the plants. Using a plant mister, spritz the succulents with water. As they are desert plants, they only need a little mist of water on occasion. If you don’t have a mister, lightly add a bit of water to each plant keeping in mind there are no drainage holes in your pan.
Photo By: Cassidy Garcia

How to Care for Succulents
Succulents are often regarded as the ultimate low-maintenance plant, but even seasoned gardeners have seen them perish under their care. Read our growing guide to help keep them happy indoors and out.

How Often Do You Water Succulents?
These tough plants don’t need daily water. Here’s how to give them the amount they need to keep them thriving.
DIY Succulent Planters

Make a Succulent Table 13 Photos
Author Sharon Asakawa turns the tables on overpriced floral design in seven steps.

DIY Succulent Sphere 01:23
Create a beautiful succulent sphere for your garden, deck or patio.

DIY Succulent Book Planter
Upcycle a damaged or outdated reference book into a one-of-a-kind planter.


