


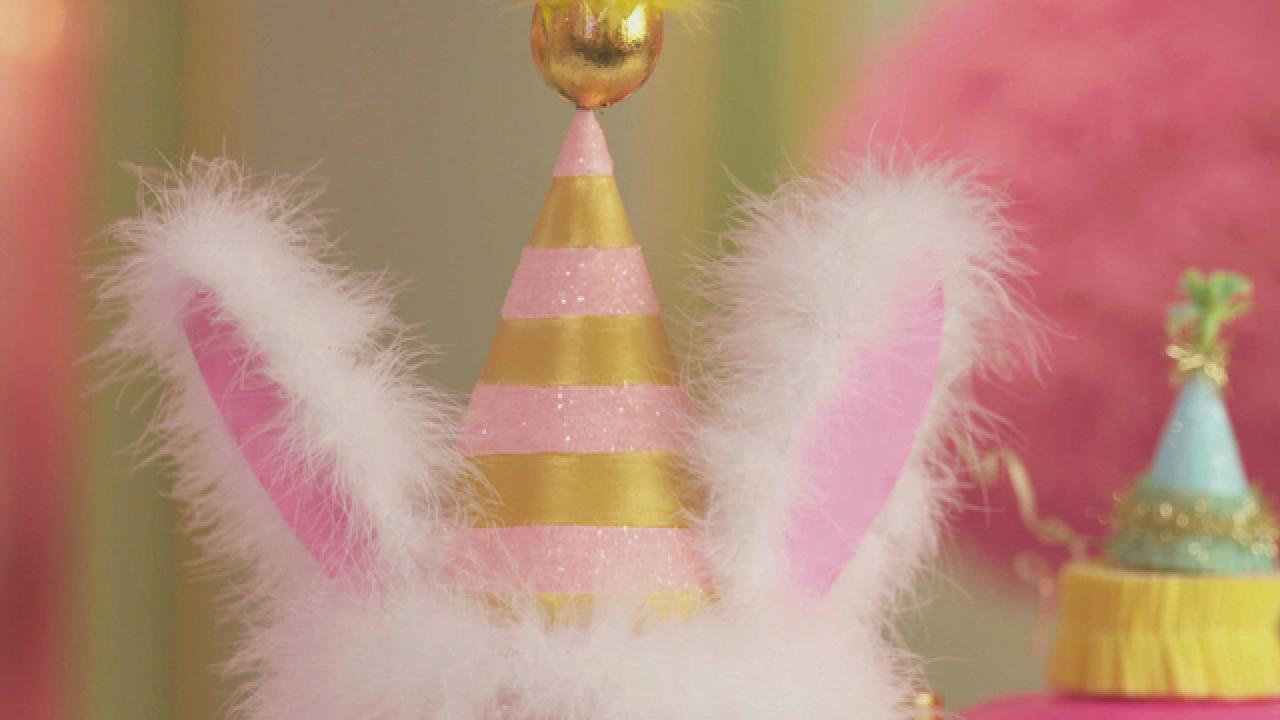
How to Make an Easter Bunny Ear Party Hat
Make a fuzzy bunny bonnet with Stephen Brown of Glitterville Studios. Kids (and adults) will want to wear this DIY party hat long after the Easter Bunny's visit.

Tomas Espinoza

Who can resist a good party hat? This fuzzy bunny bonnet will be a fun, festive addition to Easter egg hunts or liven up the party at Easter brunch. The bunny ear party hats can be customized in any color or size; you can even leave off the ears and use this project as a template to create a basic party hat.
Materials + Tools
- brown kraft paper
- cardboard
- pencil
- scissors
- stapler
- small bowl of water
- paper towel
- white gesso (optional)
- sandpaper (if using white gesso)
- ruler
- acrylic paint
- paintbrushes
- glitter (we're using glass glitter)
- tacky glue
- tray or plate lined with parchment paper
- low-temp hot glue gun
- crepe paper
- needle and thread
- small hole punch
- ribbon
- white and yellow marabou
- paper mache craft egg or plastic egg
- small black beads
- orange felt
- bamboo skewer
How to Measure Your Hat
Figuring out the size and pattern can be tricky, but here's a recipe to make it easier: If you want a party hat that is 3 inches tall — like for Glitterville Studios' chicken mascot, Dolly Poulet — then the circle you cut to make the cone should be 6 inches. So, the circle should be double the size of your desired hat size. You'll cut the circle in half, and be able to make two party hats per cut-out circle.
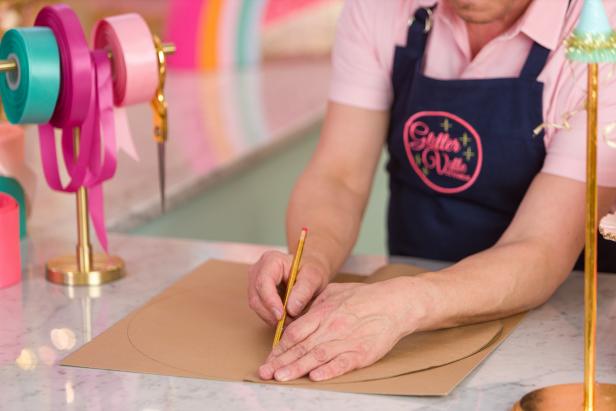
Create Template
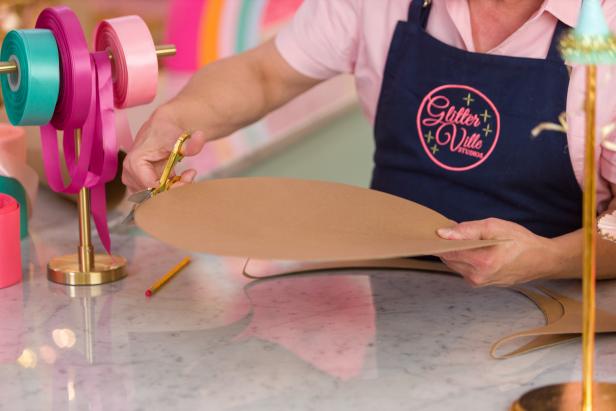
For this project, we made a 9-inch hat, and started by using an 18-inch platter to trace the circle onto a piece of brown kraft paper and onto a piece of thin cardboard. You could also use posterboard or card stock instead of cardboard for the base of your hat. Cut out the kraft paper circle, then fold it in half; then use the kraft paper circle as a template, lining it up one side of it with the edges of the cardboard circle to find the center line (Image 1). Once in place, draw a line down the folded edge with a pencil (Image 2). Set the kraft paper circle aside and use it as a template for another hat. Cut out the circle (Image 3) and then carefully cut down your center line (Image 4). You should have two cardboard semi-circles; set one aside for making a second hat if desired.

Tomas Espinoza
Tomas Espinoza
Tomas Espinoza

Tomas Espinoza
Shape the Party Hat
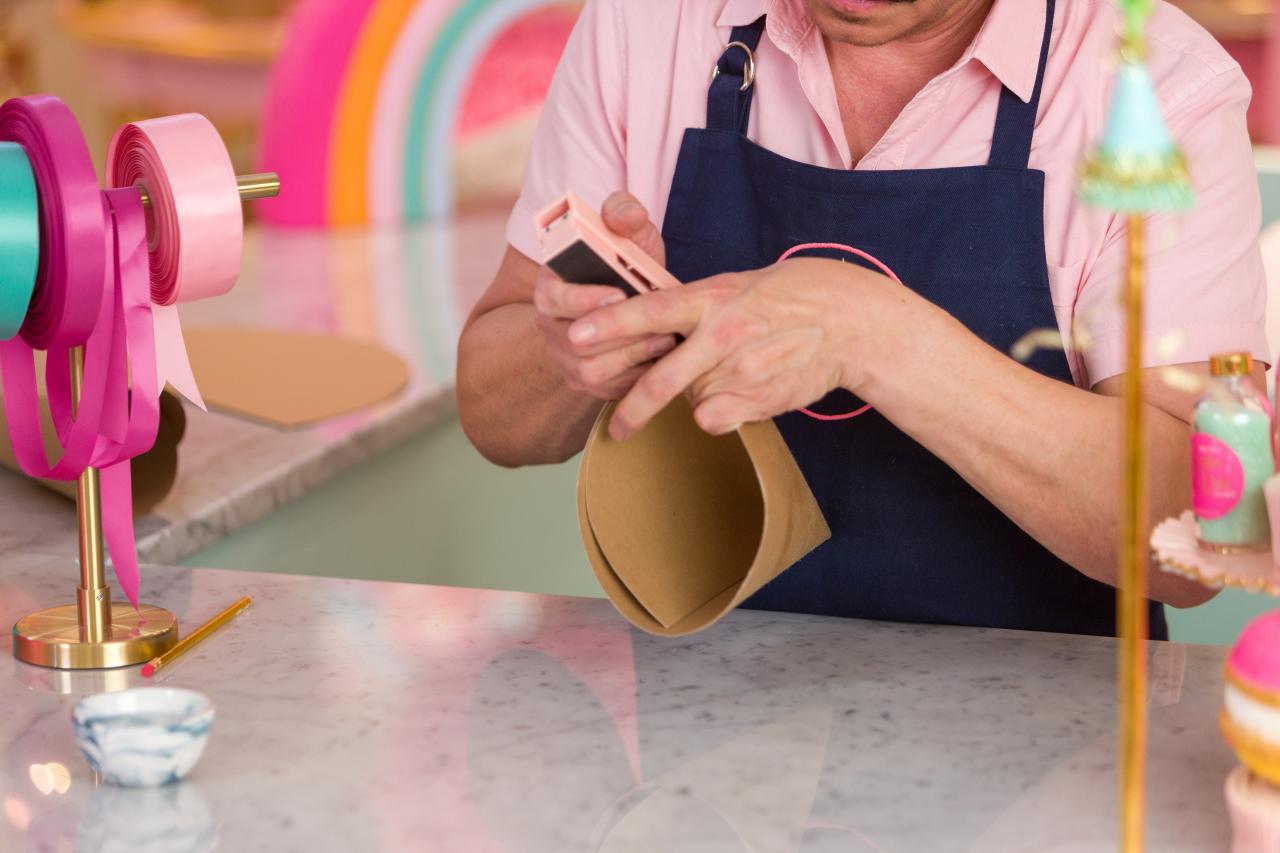
Try this trick to make folding the cardboard into a cone easier: Dip a paper towel into a small dish of water, removing any excess water, then lightly brush over both sides of the cardboard to slightly dampen (Image 1). Then, take two ends of the semi-circle and pull them towards each other to roll the cardboard into a cone (Image 2 + 3). Secure the bottom with a staple (Image 4).

Tomas Espinoza

Tomas Espinoza

Tomas Espinoza

Tomas Espinoza
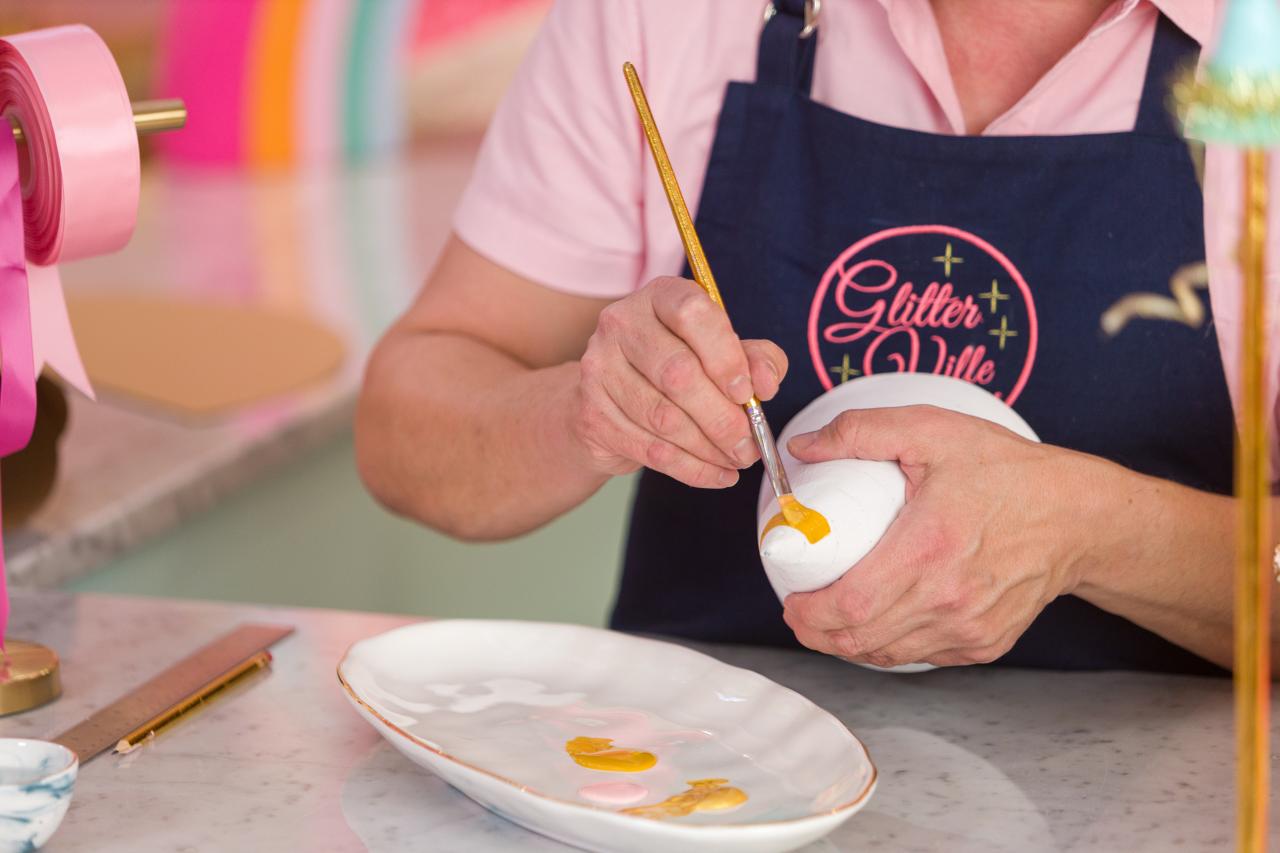
Optionally, after forming your cone you can prime the cardboard for painting with a layer of white gesso. Gesso, which translates to "plaster" in Italian, is a thick coating typically used by artists to prime canvas or other surfaces, like paper mache, for acrylic painting. The white gesso will make the colors pop against the cardboard and also give the party hat extra durability. Let the gesso layer dry completely, and then use a fine-grit sandpaper to smooth down any rough edges.
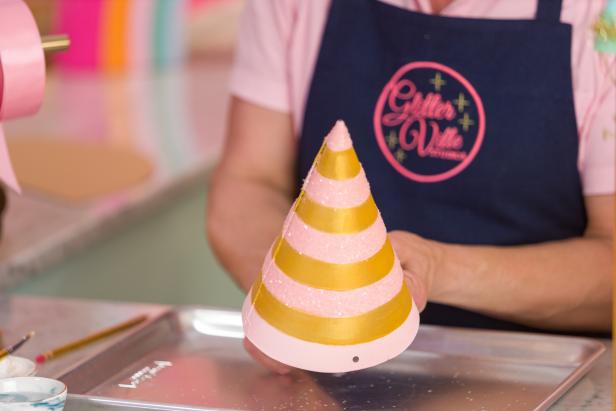
Create Your Design and Paint
From here, you can add any design you like. Use a pencil to create your design before filling it in with acrylic paint, or you can paint using stencils or even attach colorful paper.
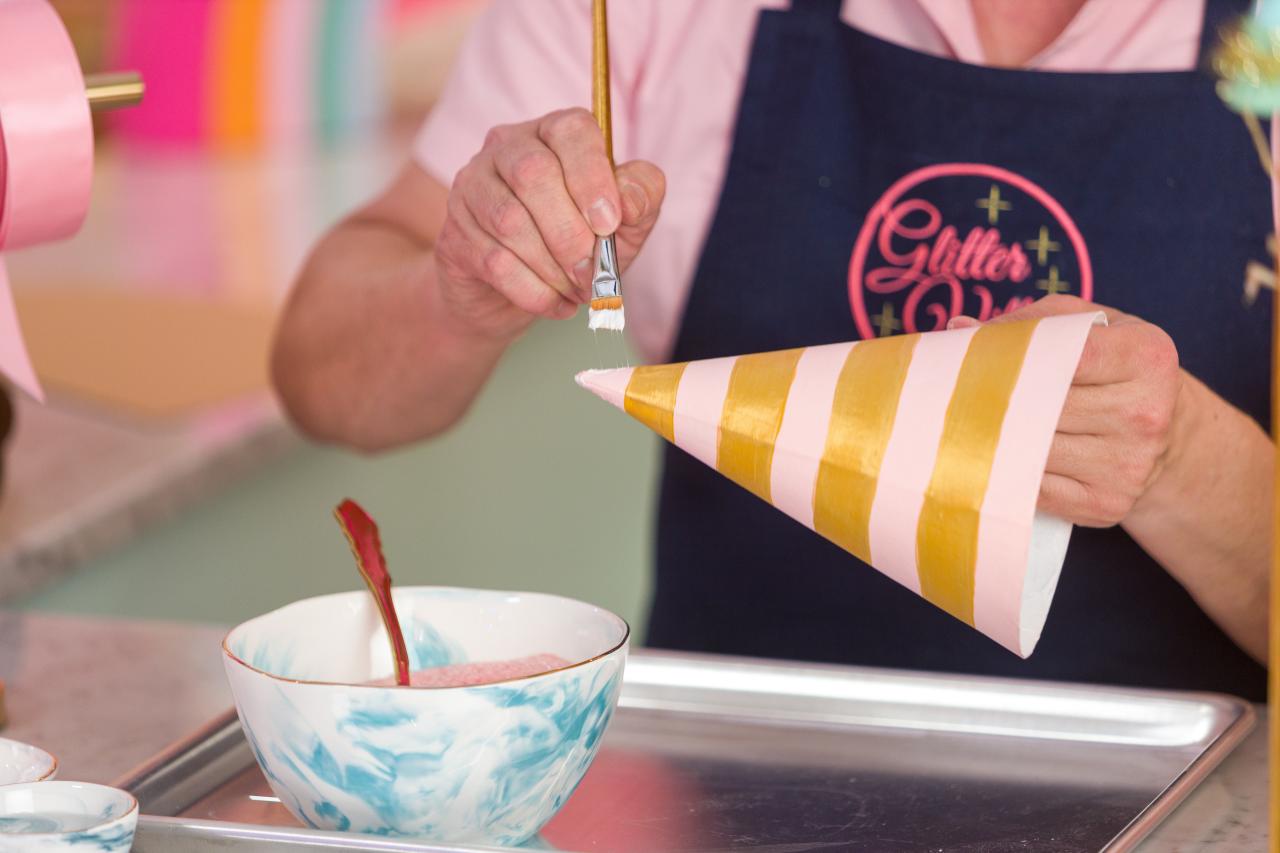
To create crisp horizontal lines, hold a ruler parallel to the hat. Use a pencil to make a small mark at every inch-mark until you reach the top of the hat (Image 1). Twist the hat around and repeat this process until you reach your initial markings, then use a pencil to carefully connect the dots to form the stripes (Image 2). Once you're happy with the design, fill it in with 1-2 coats of paint, letting it dry between coats (Image 3). We painted ours with gold and pink stripes.

Tomas Espinoza

Tomas Espinoza

Tomas Espinoza
Tip: For metallic paints, choose an opaque undercoat before adding a top coat of the desired metallic paint. For our gold stripes, we chose an ochre yellow as a base before adding the layer of gold metallic paint.
Add Glitter (It Is Glitterville, After All!)
We decided to add pink glass glitter to the pink stripes. To add glitter, start by setting up a tray lined with parchment paper to catch the loose glitter. Paint a layer of tacky glue onto the desired areas (Image 1); a thick tacky glue helps embed the glitter into the glue and prevent fallout on the finished hat better than other glues. With the glue applied, add the glitter (Image 2). We put our glitter in a bowl and applied it with a spoon, then used a finger to tamp the glitter down. Avoid putting glitter or other ornate decoration near the bottom inch of the hat; this is where we'll need to cut the holes to tie on the hat's ribbon.

Tomas Espinoza

Tomas Espinoza
Punch Holes
Use your pencil to make a mark about a half inch from the bottom of the hat, then make a second mark on the opposite side of the hat (Image 1). Use the ruler to help make the marks even if necessary. Then, use a small hole punch to punch out the holes at the marks (Image 2).

Tomas Espinoza
Tomas Espinoza
Make the Ears
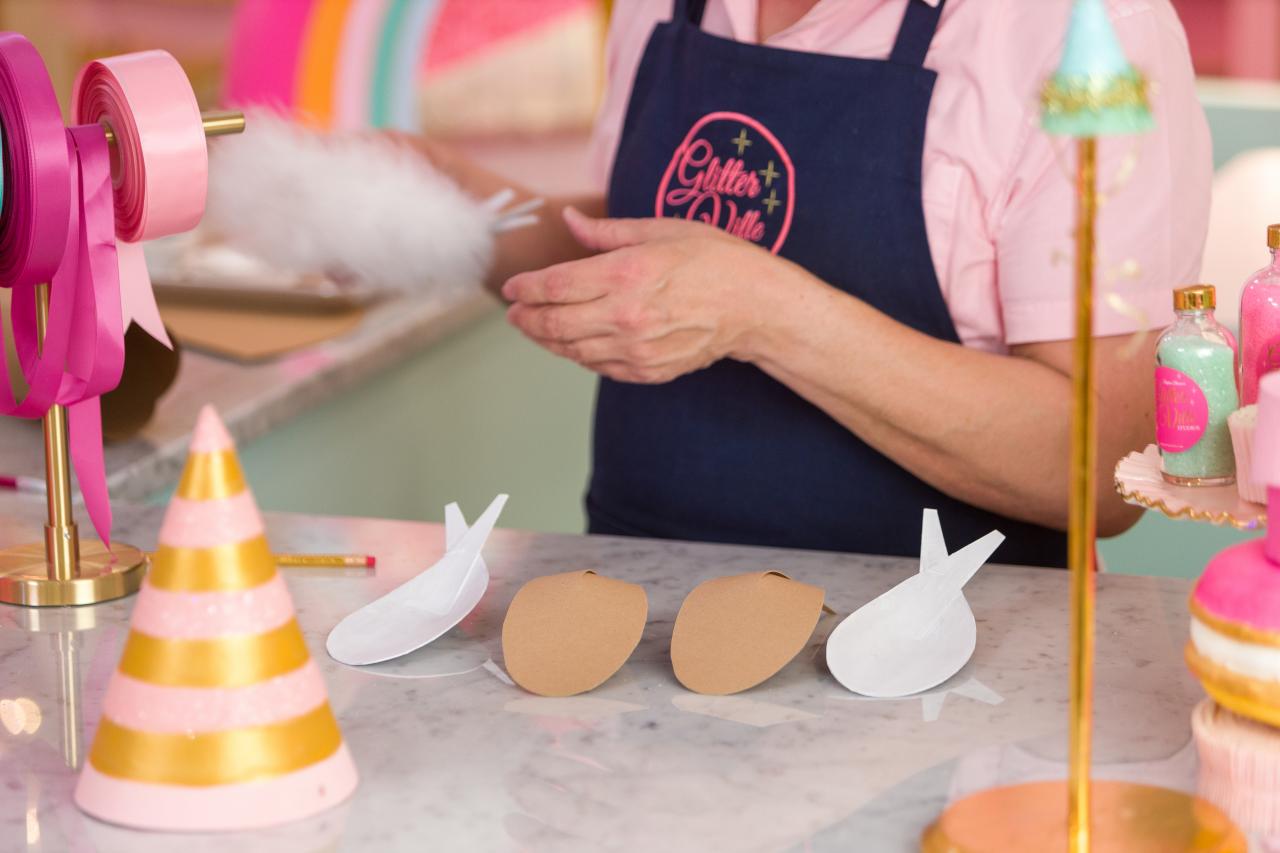
Set the hat aside to make the ears. On the same thin cardboard that you made the base of the hat from, trace two ear shapes by making a rounded oval that is narrow at the bottom. Ours are about 4 inches tall, but you can make them any size you like. Cut them out. To create a more natural bend in the bunny ears, cut a line about halfway up the narrow length of the ear to create two flaps (Image 1). Fold the flaps you just created over one another (Image 2) and secure with a staple (Image 3). It's okay if there is overhang, they'll be covered up and we'll trim any excess in the next step. Repeat the process with the other ear shape.

Tomas Espinoza

Tomas Espinoza

Tomas Espinoza
When you're happy with the shape of the ears, they're ready to paint and decorate. If you added a layer of white gesso to the hat, you can also add it to the ears before painting. We painted ours white (Image 1 + 2), then painted the inside of the ears hot pink. To make the ears fuzzy, we cut lengths of white marabou to size and adhered them to the back side of the ears using a low-temp hot glue gun (Image 3).

Tomas Espinoza

Tomas Espinoza

Tomas Espinoza
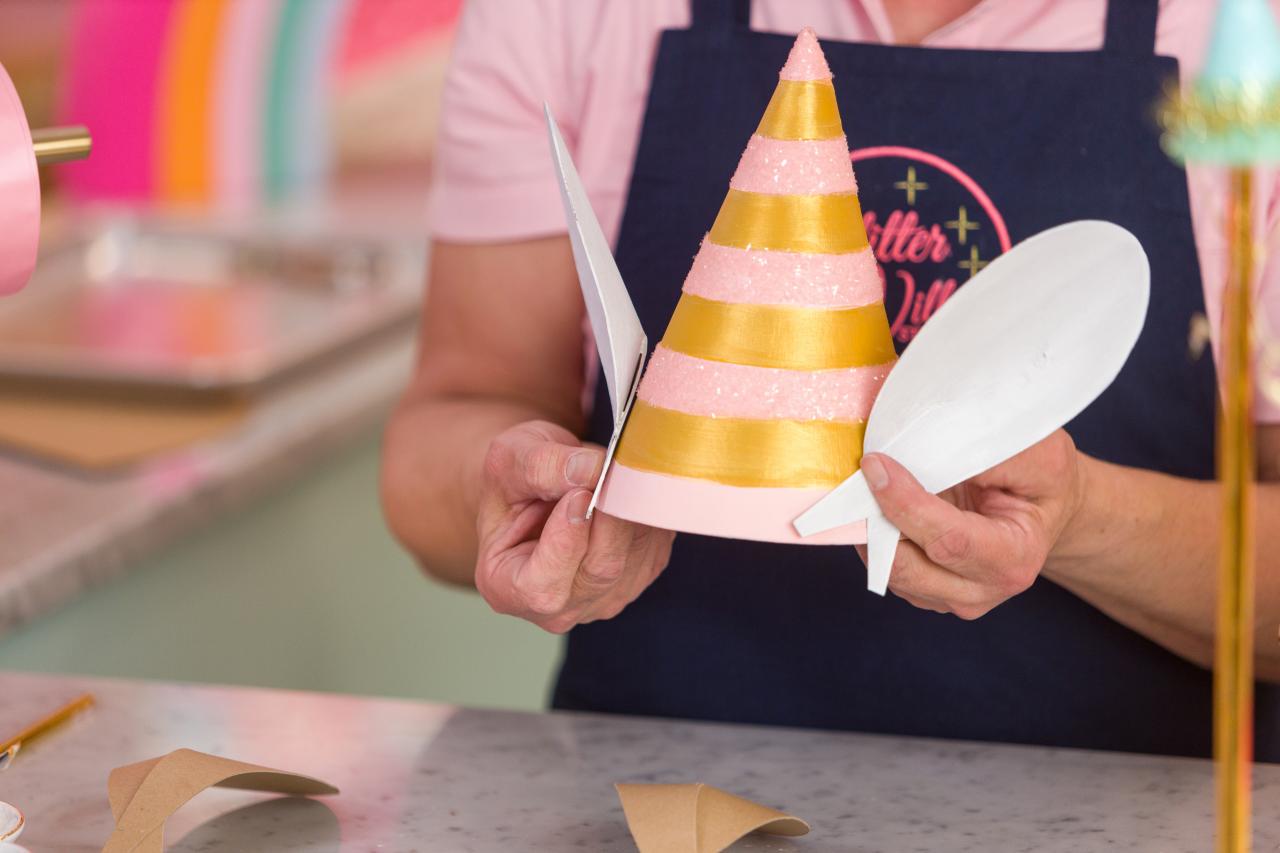
Attach the Ears to the Hat
Use a low-temp hot glue gun to adhere the ears to the side of the hat (Image 1). You can use a paperclip to hold the ears in place while you glue. Once the glue is dry and your ears are secure, use scissors to trim the ear flaps so there's no overhang (Image 2).

Tomas Espinoza

Tomas Espinoza
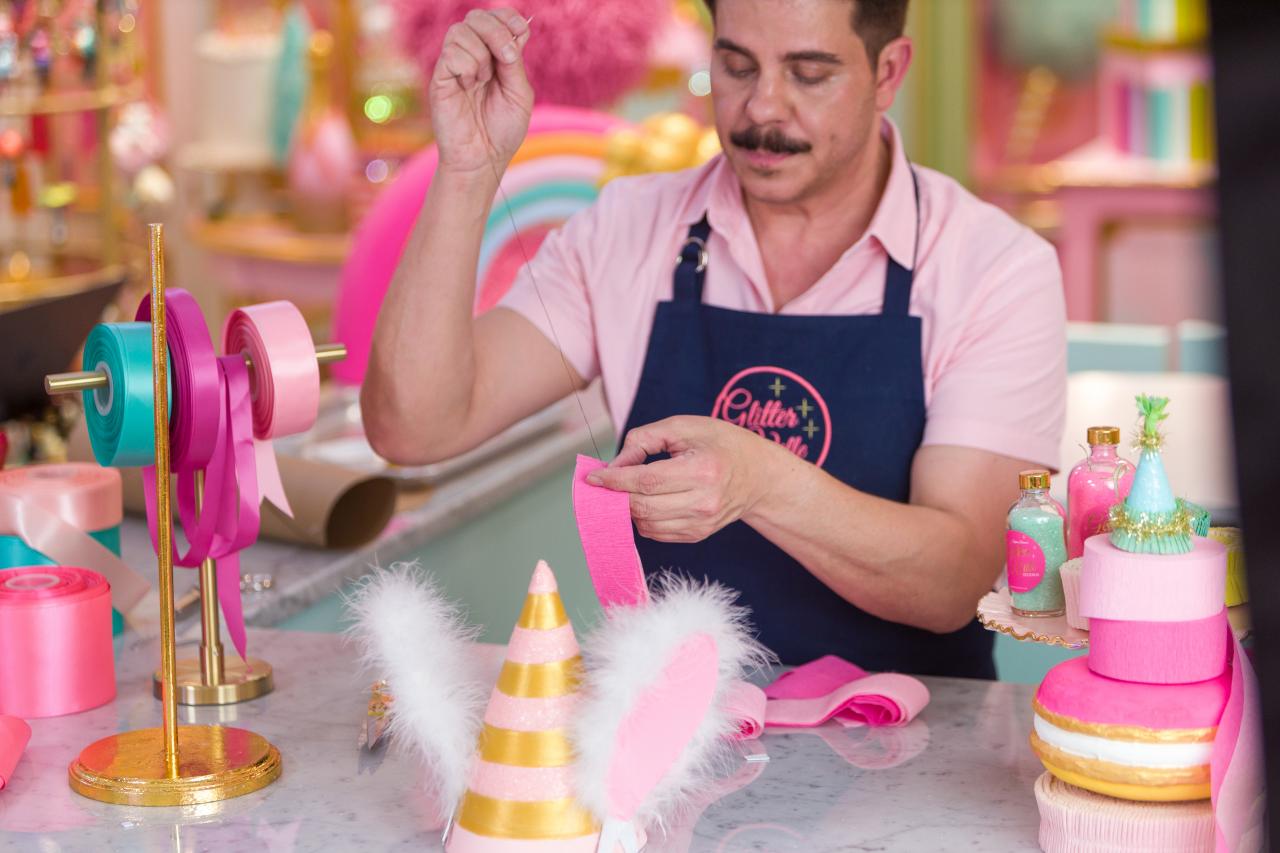
Create the Festooning
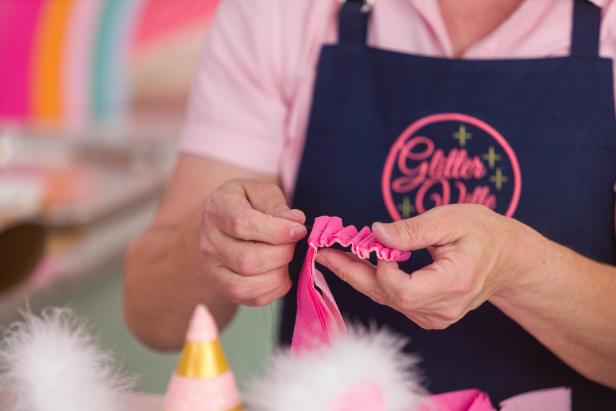
Festooning is layers of crepe paper that have been ruched together to create a decorative accent often used in party decorations. This can be made with a sewing machine with a pleating foot, but our favorite way is to sew it by hand. To do so, line up eight layers of crepe paper. The crepe paper should be four times the length of the base of your party hat. Then, thread a needle and pull it through the top center of the layers of the crepe paper (Image 1). Then, pinch a small layer of the crepe paper to start an accordian stitch, ruching the crepe paper before threading the needle again (Image 2). Repeat the stitch until you have enough festooning to cover the base of your hats (Image 3), then tie off the thread. Set aside.

Tomas Espinoza
Tomas Espinoza
Tomas Espinoza
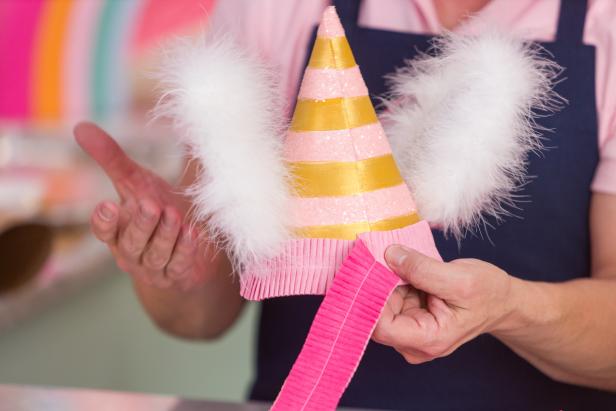
Add Ribbon
Measure a length of ribbon for each side of the party hat — it's better for it to be too long than too short, as you can always trim it later. Pull one end of the ribbon together to create a loop, then push the loop through one of the holes you created at the bottom of the hat. Tie a knot and then trim any excess ribbon (Image 1). Repeat the process to add the second length of ribbon to the party hat (Image 2). You could also use elastic or another material for this step.

Tomas Espinoza
Tomas Espinoza
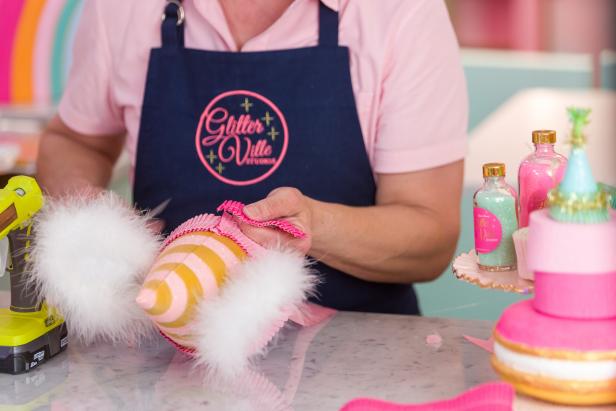
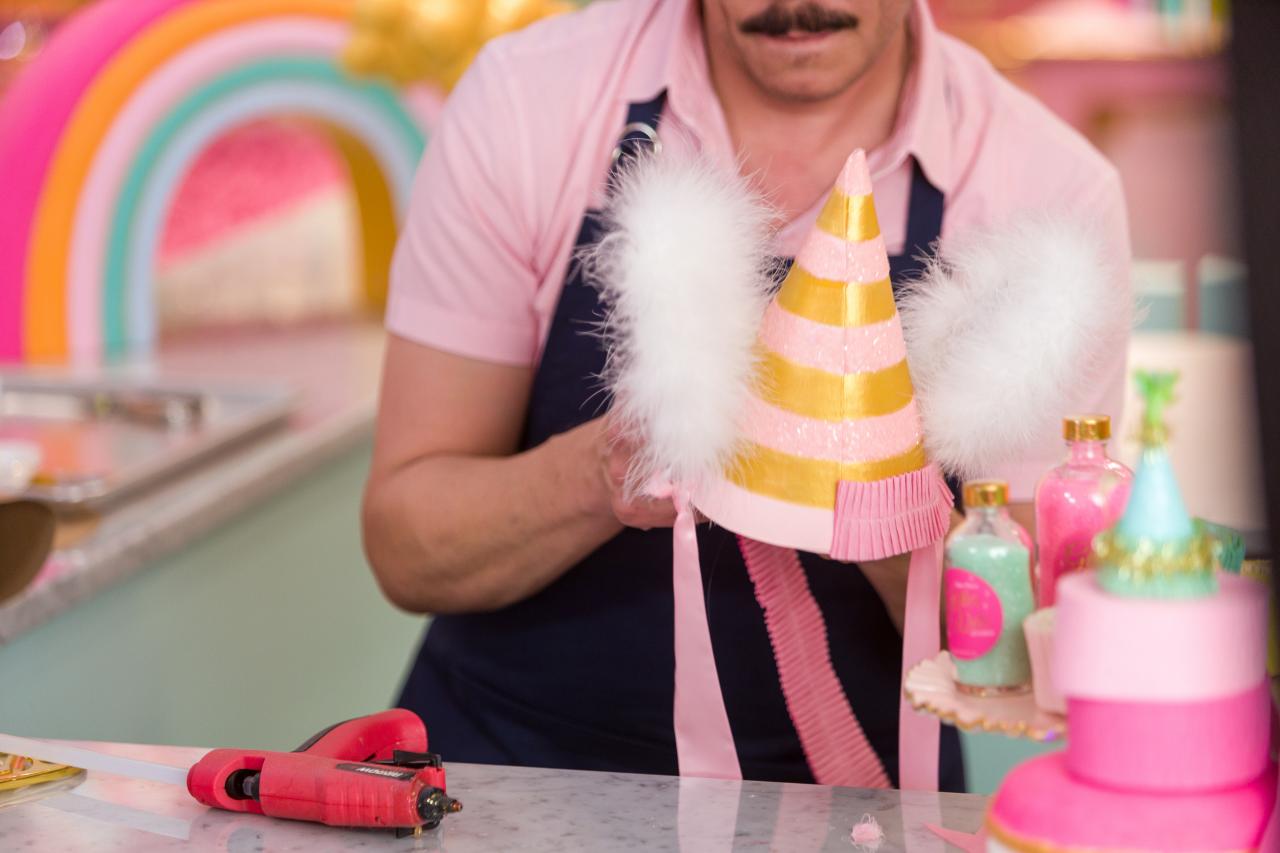
Attach Festooning + Marabou
Once you've added your ribbons, cut the festooning down to size and use hot glue to attach it to the base of your hat (Image 1). Work in small sections to keep the festooning in place. When your festooning is attached, trim any excess (Image 2). Optionally, hot glue a layer of white marabou on top of the festooning.

Tomas Espinoza
Tomas Espinoza
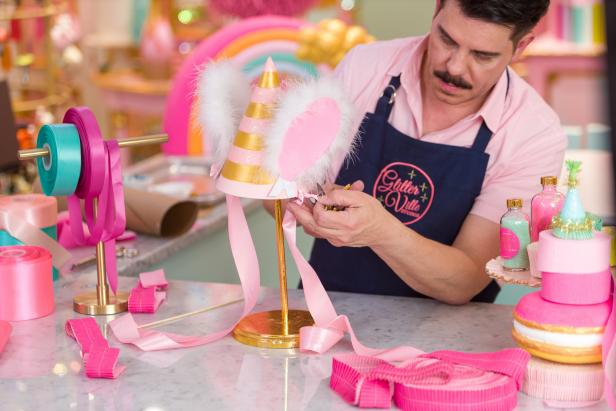
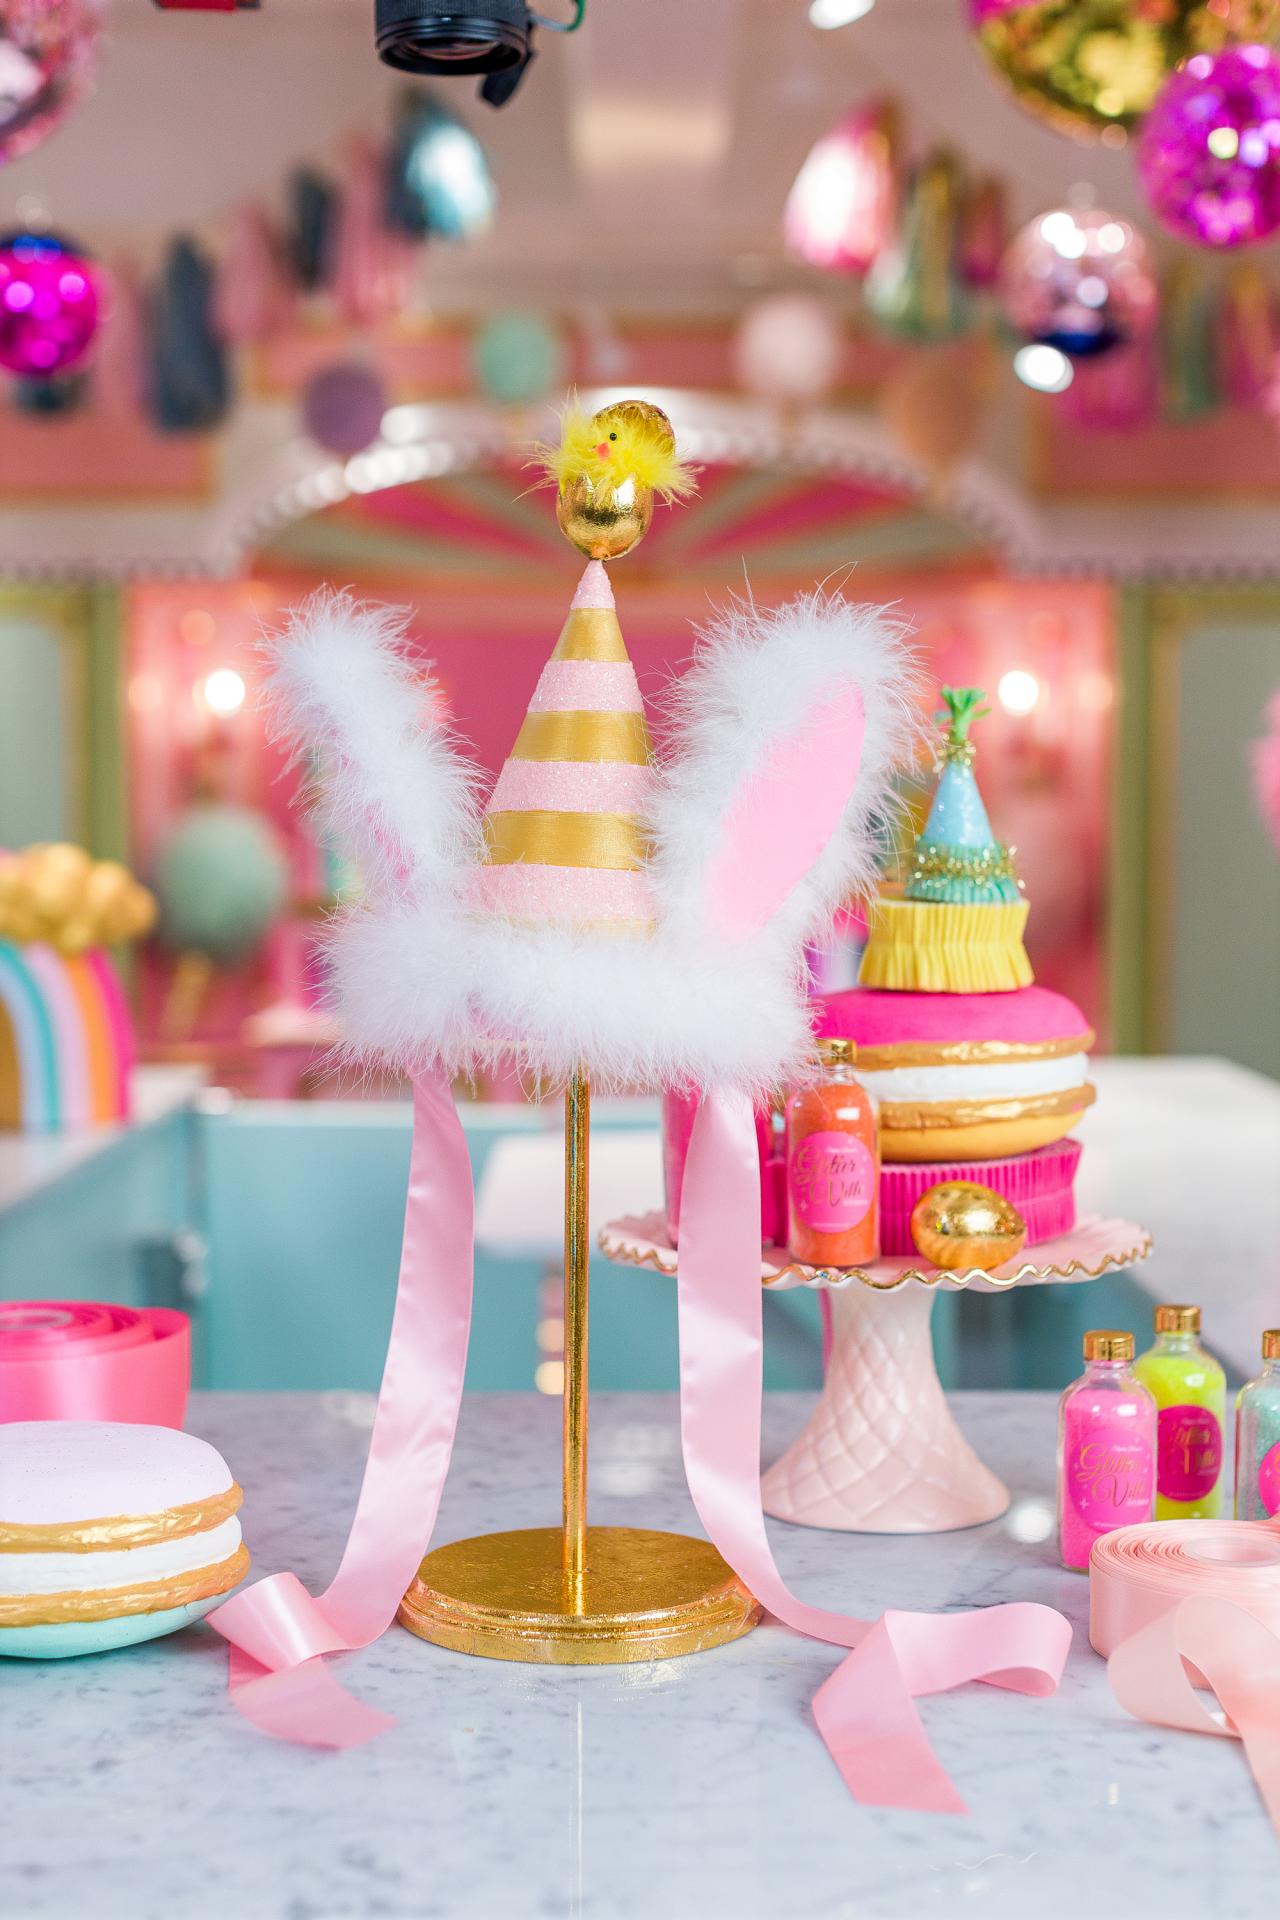
Create the Egg Topper
To add even more whimsy to our party hat, we created a topper by gold leafing a paper mache egg, drilling a hole in the bottom and then using scissors to cut it open and cut zig-zag shapes to create a hatching effect. You could also use a plastic Easter egg for this step. To attach the egg to the hat, push a bamboo skewer through the hole in the top of the hat, then push the egg down onto the top of the skewer. Turn the hat upside-down, and fill the inside tip of the hat with hot glue to hold the skewer in place (Image 1). Use scissors or snips to cut the excess skewer. Add hot glue inside the egg to secure if necessary. Finish off the topper by cutting a small piece of yellow marabou and hot glue it inside the egg (Image 2). Create a face for the chick by hot gluing two small beads for the eyes, and a small triangle of orange felt for the beak.

Tomas Espinoza
Ready to Wear
Now the party hat is officially ready for Easter. This over-the-top bunny ear hat will delight wearers and onlookers alike. Use this project template to make a hat for any occassion; it's a group crafting project that kids can help with.

Tomas Espinoza
Tomas Espinoza
Easter Crafts and Decorating DIYs

60 Fresh + Fun Easter Craft Ideas for All Ages 60 Photos
Hop into the holiday with these egg-cellent craft projects, DIY decor, printables, recipes and more.

Make These Easy Easter Egg Bath Bombs
Mix up this spring DIY in a jiffy using plastic Easter eggs and some basic kitchen and bath supplies. Then sneak a few bath bombs into an Easter basket.

DIY Easter Egg Bunny Gnomes
It’s time to hop into some spring crafting. Use everyday craft materials and a sheet of moss to turn a plain paper mache egg into an adorable Easter Bunny gnome.

5 Crafts to Make With Peeps 13 Photos
If you just can't stop yourself from buying these adorable traditional Easter treats, try our five creative—and delicious—ways to use them this holiday.


