How to Make a Chenille-Stem Tabletop Christmas Tree
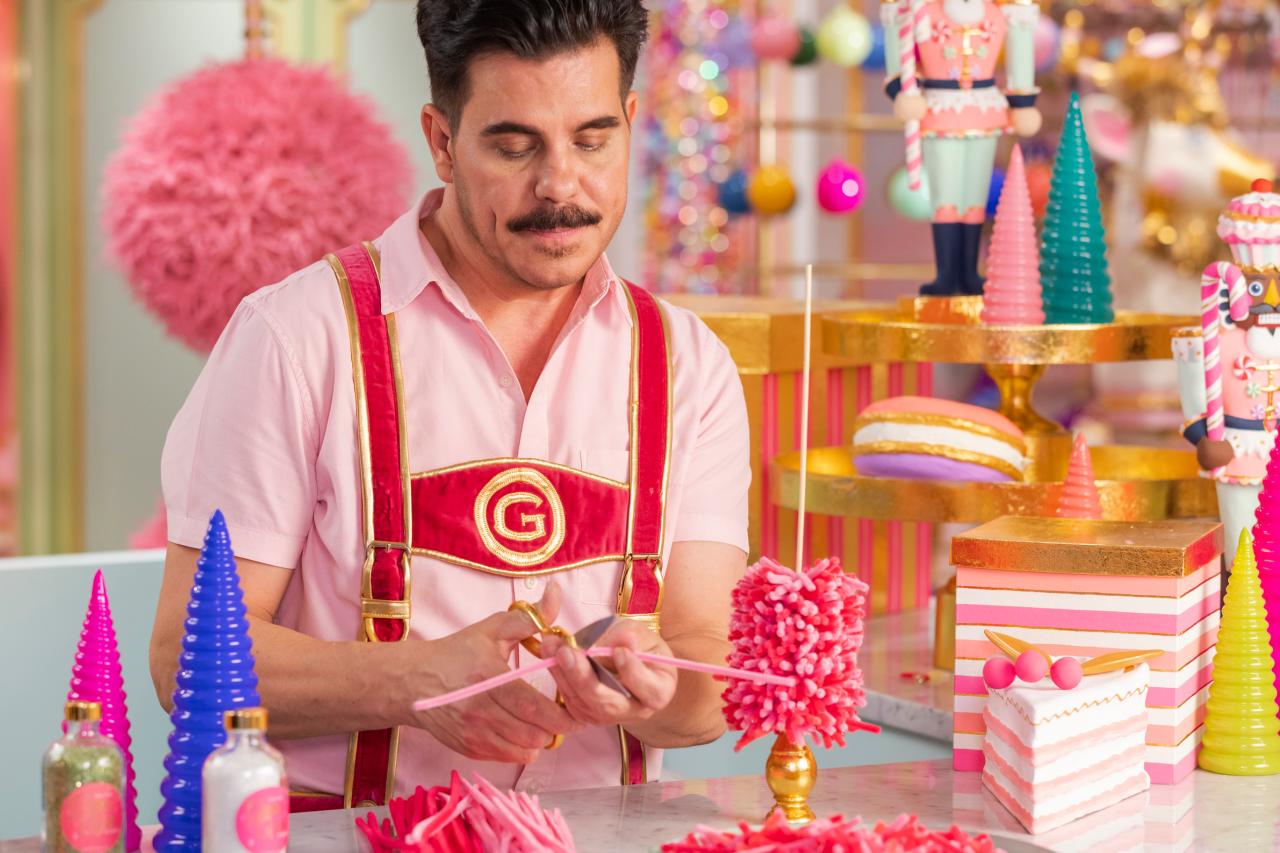
Create custom holiday decor with this chenille-stem pine tutorial from Stephen Brown at Glitterville Studios.
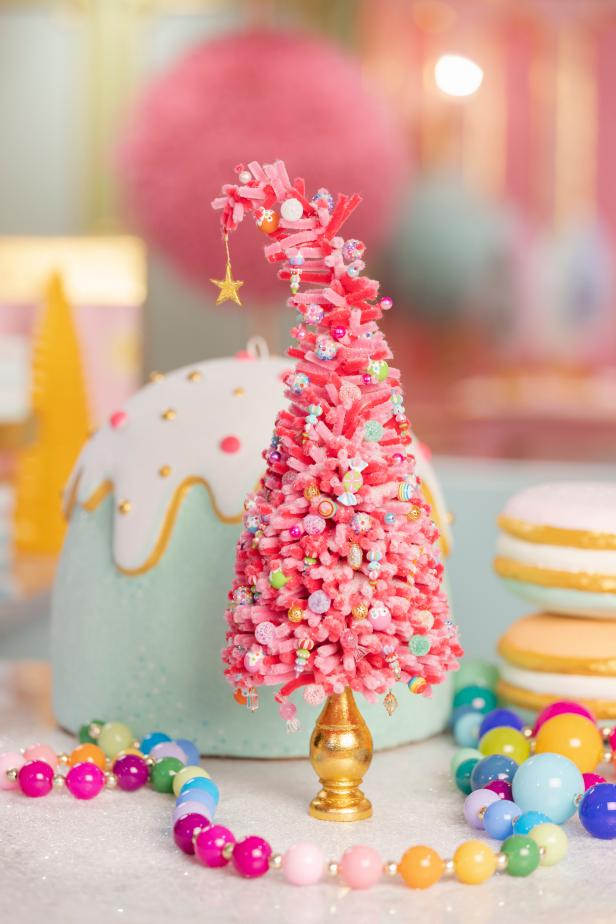
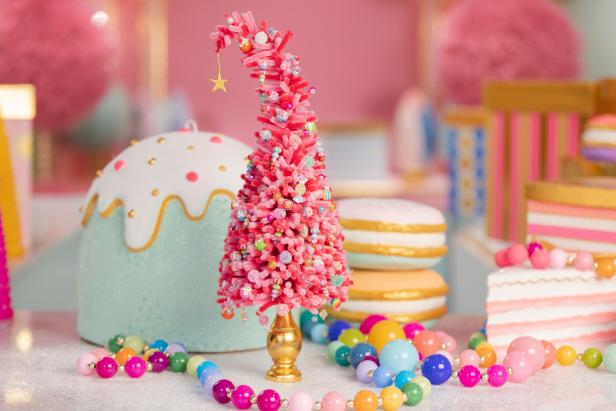
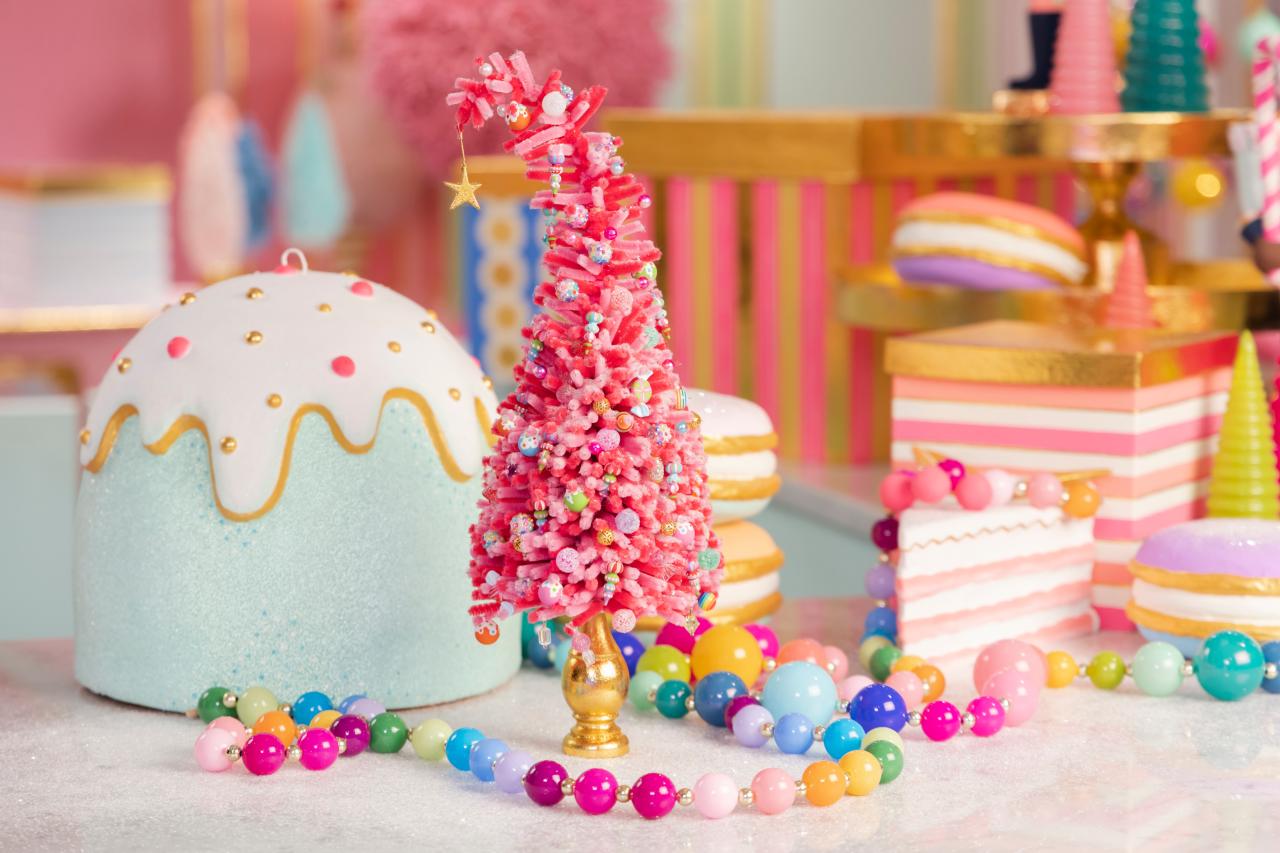
Chenille Stem Christmas Tree: Handmade Craft on Display
A chenille stem Christmas tree is a whimsical way to decorate for Christmas. Create the handmade tree by using a variety of chenille stems, floral foam, and beads to create an adorable forest of brightly colored trees that you can display on your tables, mantles and kitchen islands.
Chenille-stem Christmas trees are completely customizable and work great for DIY holiday centerpieces or trees for small spaces. Learn how to create a whimsical handmade Christmas tree display that you can use throughout your home this Christmas season.
We're sorry, there seems to be an issue playing this video. Please refresh the page or try again in a moment.If you continue to have issues, please contact us here.
Loading Video...
Chenille-Stem Tabletop Christmas Tree
05:49
Glitterville's Stephen Brown's pretty-in-pink, chenille-stem Christmas tree is decorated with colorful ornaments made from a variety of craft beads.
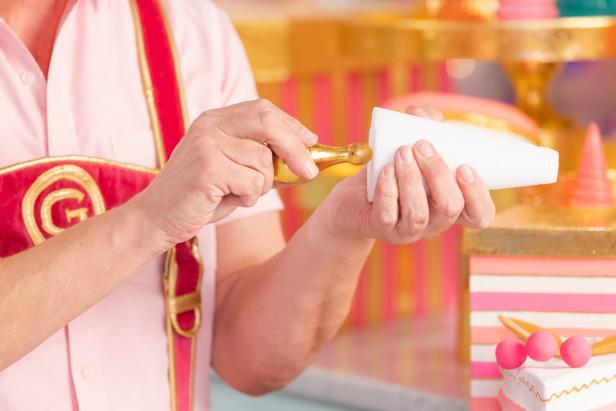
The wood finial will serve as the base of your chenille-stem tree. Paint it a color of your choosing. Add glitter or other embellishments as you wish (Image 1). Insert the end of the finial approximately 1.5 inches deep into the bottom of the cone or until it seems secure enough to support the tree (Image 2). Remove the finial, coat the inside of the foam hole with white glue, and reinsert the finial.
Emilee Ramsier
Emilee Ramsier
Chenille Stem Christmas Tree: Prepare and Insert Finial
The base of the chenille stem Christmas tree is a painted finial inserted into the floral cone. Prepare the finial by painting it the color of your choice. Press it a few inches into the base of the cone, remove it, apply glue, and then reinsert it and let it dry.
Photo By: Emilee Ramsier
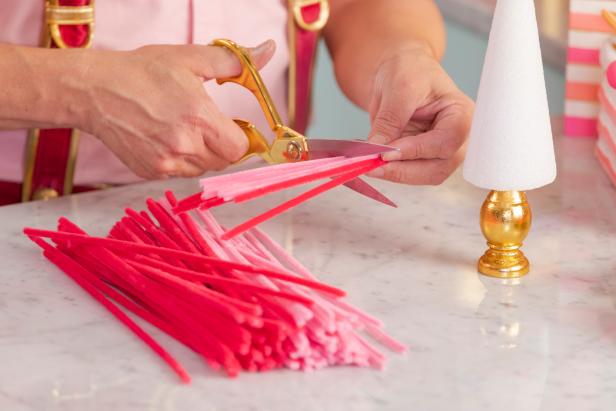
2. Cut Chenille-Stem Branches
Choose a color and pick chenille stems in 2-3 shades of that color. The tree branches are made by cutting the stems into pieces ranging from 1.5 to 3.75 inches long. Use wire cutters or scissors to cut approximately 25 stems into branch pieces (Images 1 + 2).
The branches of the chenille stem Christmas tree are created by blending at least two shades of the same color chenille stem and cutting them in various lengths to serve as the branches. Customize your chenille stem tree by using more than one color of stem.
The branches of the chenille stem Christmas tree are created by blending at least two shades of the same color chenille stem and cutting them in various lengths to serve as the branches. Customize your chenille stem tree by using more than one color of stem.
Photo By: Emilee Ramsier
3. Make the Tree
Begin inserting the stems into the bottom edge of the floral cone (Images 1 + 2). To help it keep the tree shape, use the longer chenille-stem pieces along the bottom and work up to smaller pieces as you get closer to the top of the cone (Image 3). Take care that you insert enough branches to make a full tree, but not so many that the foam structure breaks down. You can always add more chenille stems later if you find you have a sparse spot in your tree.
Emilee Ramsier
Emilee Ramsier
Emilee Ramsier
Chenille Stem Christmas Tree: Make the Tree
Attach the branches to the chenille stem tree by inserting the stems into the floral cone. To create the classic tree shape, use longer pieces at the bottom and shorter pieces towards the top. Take care to make a full tree without compromising the structure of the foam.
Photo By: Emilee Ramsier
Chenille Stem Christmas Tree: Make the Tree
Attach the branches to the chenille stem tree by inserting the stems into the floral cone starting at the bottom and working your way around. To create the classic tree shape, use longer chenille stem pieces at the bottom and shorter pieces towards the top.
Photo By: Emilee Ramsier
Chenille Stem Tree: Make the Tree
Attach the branches to the chenille stem tree by inserting the stems into the floral cone. To create the classic tree shape, use longer pieces at the bottom and shorter pieces toward the top until the entire cone is covered. Take care to make a full tree without compromising the structure of the foam.
Photo By: Emilee Ramsier
4. Extend the Tree
When the exterior of the floral cone is covered in chenille-stem branches, press a kitchen skewer into the top of the floral cone to give the tree more height (Image 1). Cut more full-length chenille stems in half to wrap around the skewer and build the tree up (Images 2 + 3). Optionally, once the skewer is covered in chenille stems, add another piece of chenille stem to create a curved piece and cover it in more short sections of stems to make it look like the treetop is drooping (Image 4).
Emilee Ramsier
Emilee Ramsier
Emilee Ramsier
Emilee Ramsier
Chenille Stem Tree: Extend the Tree
The top of the chenille stem Christmas tree is made by inserting a kitchen skewer into the top of the floral cone after it is covered in chenille stems. The kitchen skewer is then covered in more chenille stems to make the tree taller. Cut your kitchen skewer to customize the tree's height.
Photo By: Emilee Ramsier
Chenille Stem Tree: Extend the Tree
The top of the chenille stem Christmas tree is made by inserting a kitchen skewer into the top of the floral cone after it is covered in chenille stems. The kitchen skewer is then covered in more chenille stems that have been cut in half to make the tree taller.
Photo By: Emilee Ramsier
Photo By: Emilee Ramsier
Chenille Stem Tree: Extend the Tree
The top of the chenille stem Christmas tree is made by inserting a kitchen skewer into the top of the floral cone after it is covered in chenille stems. Once the skewer is covered in more chenille stems, extend the tree even further and give it a droopy tip by attaching another chenille stem. Then, add small pieces of chenille stems to it.
Photo By: Emilee Ramsier
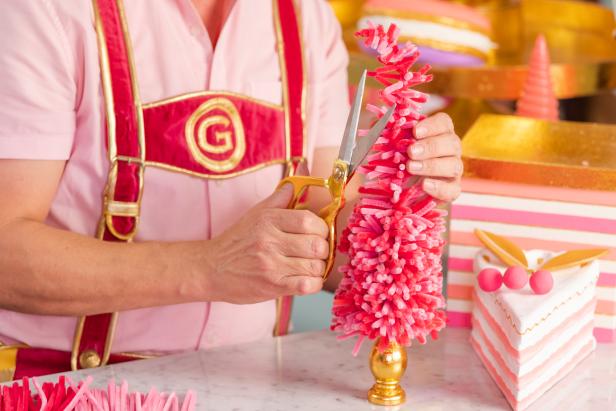
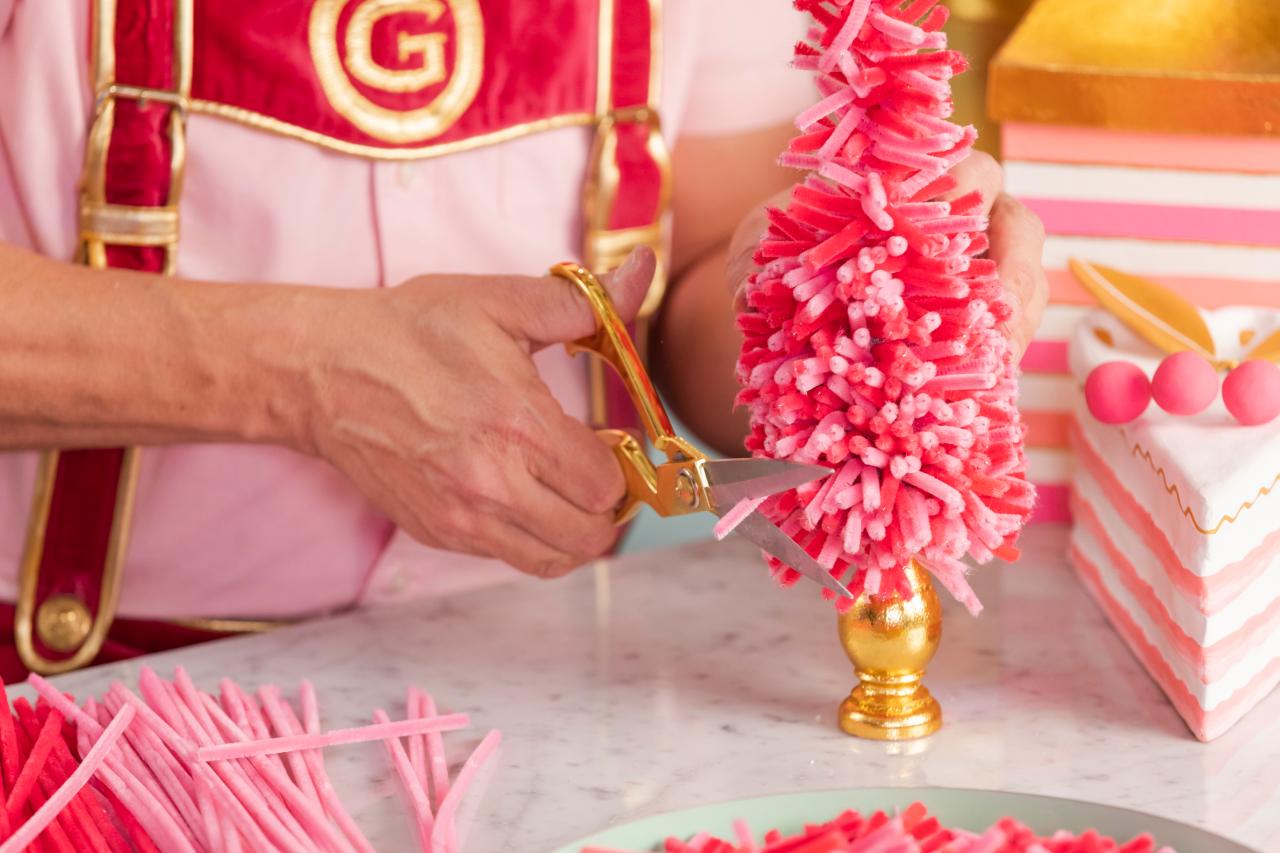
5. Trim the Tree
Take a step back and study the shape of your tree. Fill in any bare areas with more chenille stems and feel free to trim any out-of-place pieces with scissors (Images 1 + 2).
Emilee Ramsier
Emilee Ramsier
Chenille Stem Tree: Trim the Tree
After the chenille stem tree is complete, fill in any bare spots with more stems and then use scissors to trim up any uneven sides and make sure the piece is tree-shaped. Fluff the stems and spread them apart if there are any bunched closely together.
Photo By: Emilee Ramsier
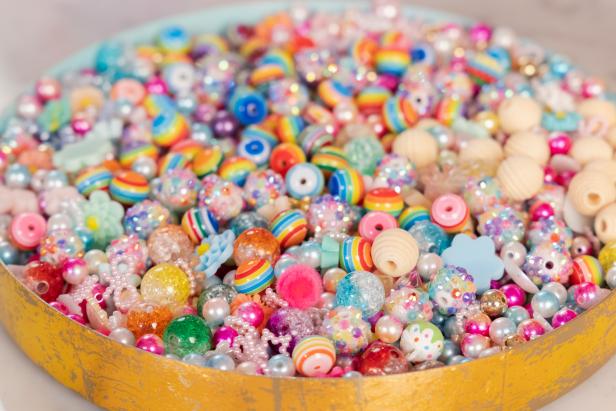
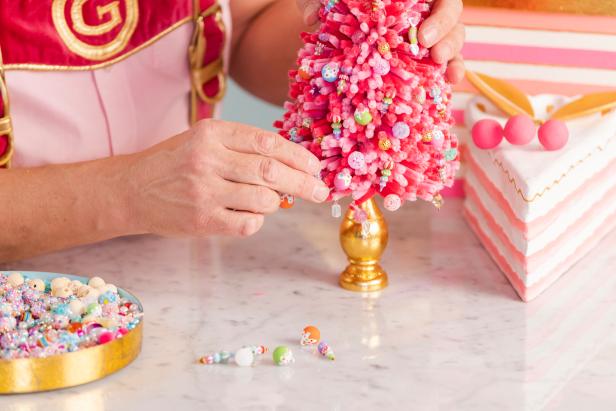
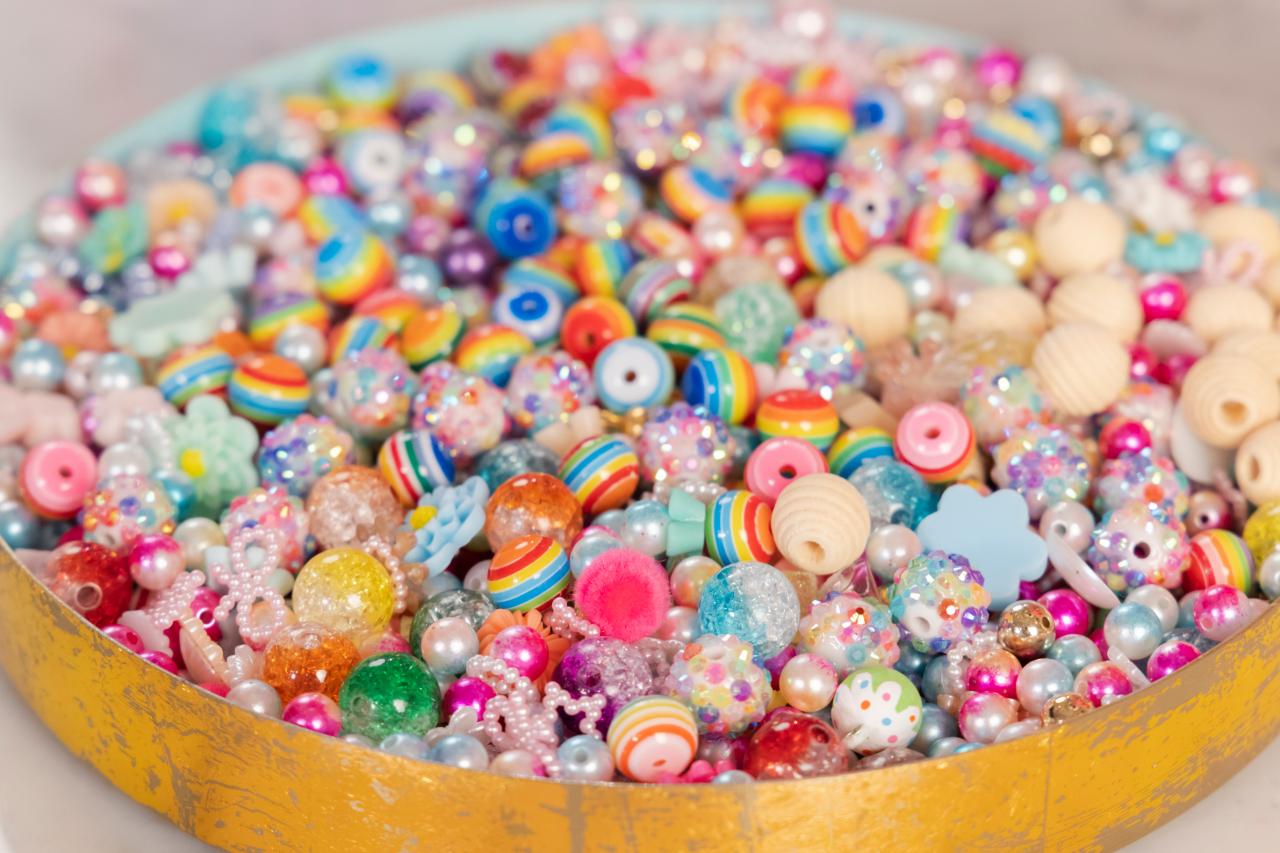
6. Prepare and Hang the Ornaments
You can get as detailed as you want with the ornaments. Use regular circular beads in varying colors and textures from the craft store, or purchase wood beads and paint your own for a handmade look (Image 1). Plan on three different types of ornaments to give the tree some extra visual interest. Slide the beads onto the chenille stems to decorate your tree (Images 2 + 3). Hang a star bead from the droopy tip (Image 4).
Emilee Ramsier
Emilee Ramsier
Emilee Ramsier
Emilee Ramsier
Chenille Stem Tree: Prepare and Hang the Ornaments
Ornaments for the chenille stem Christmas Tree are simply beads from the craft store. You can get as ornate as you want with this project by attaching several beads together to make intricate ornaments or simply slide the round ornaments onto the chenille stem branches. You can hand-paint your own ornaments if you want.
Photo By: Emilee Ramsier
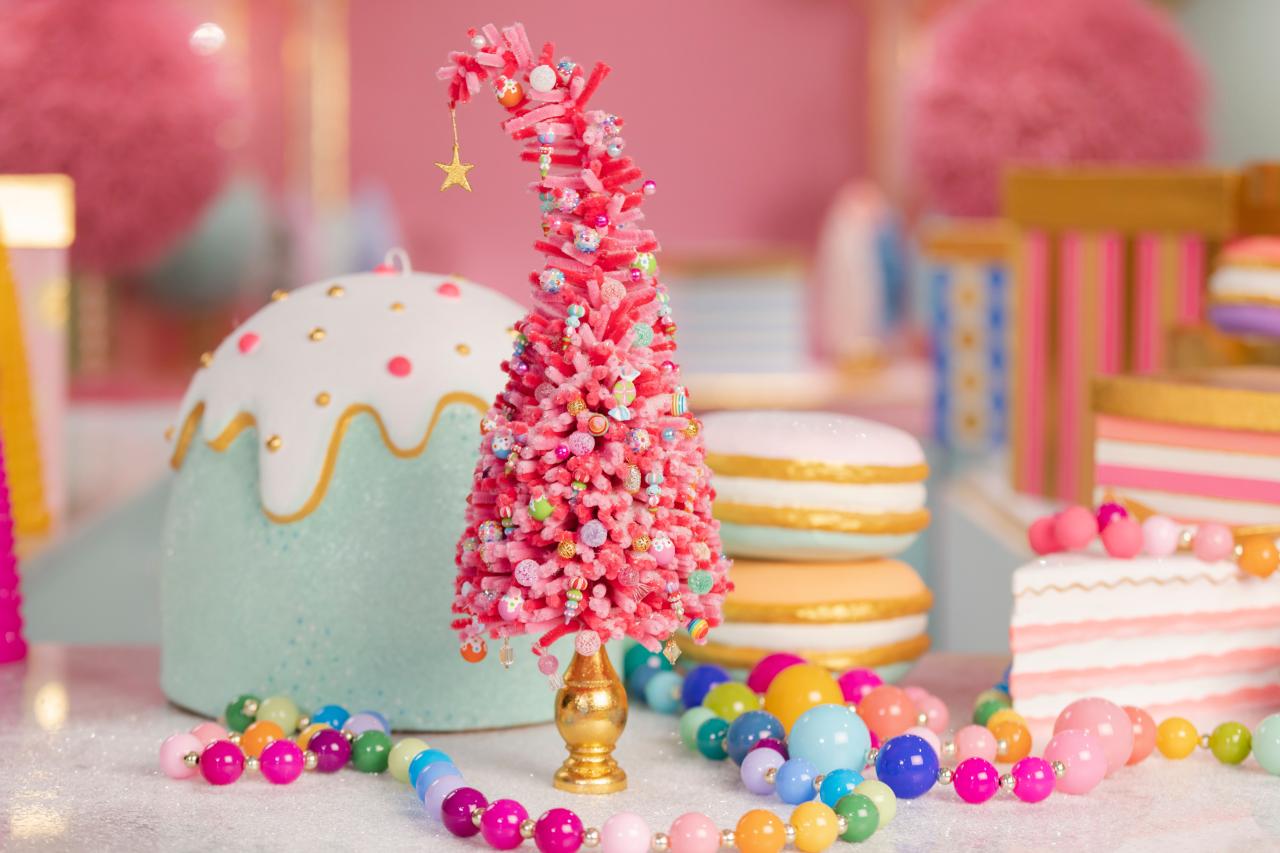
7. Display and Enjoy
Use the tree by itself as a centerpiece or make an entire forest using different-sized finials and floral cones to create a larger display. Chenille-stem trees can be used to decorate mantels, hearths, kitchen islands and side tables this holiday season.
Emilee Ramsier
Emilee Ramsier
Chenille Stem Tree: Display and Enjoy
Once the chenille stem tree is complete, add a final star bead to the top and then decorate for Christmas by placing the piece on your hearth, mantle, table or kitchen island. Create an entire forest of whimsical chenille stem trees in multiple colors for the holidays.
Photo By: Emilee Ramsier
We're sorry, there seems to be an issue playing this video. Please refresh the page or try again in a moment.If you continue to have issues, please contact us here.
Loading Video...
Make a Frosty Folly Snowman Figure With Glitterville's Stephen Brown
17:04
Stephen Brown is ready to let it snow with a frosty figure made from paper clay, wire and a little colorful creativity.
We're sorry, there seems to be an issue playing this video. Please refresh the page or try again in a moment.If you continue to have issues, please contact us here.
Loading Video...
Tour Glitterville Studios
08:41
Stephen Brown makes everyday a holiday in his magical studio and storefront, Glitterville.
After you've decked your halls and your tree, it's time to take the holiday glow outside. We've rounded up the best sparkle and shine for your home's exterior.
Subscribe now to get our latest decorating tips, household hacks and more delivered to your inbox daily.
By entering your email address, you agree to our Terms of Use
and acknowledge the Privacy Policy.
HGTV and
its affiliates
may use your email address to provide updates, ads, and offers.
To withdraw your consent or learn more about your rights, see the
Privacy Policy.
Follow Us Everywhere
Join the party! Don't miss HGTV in your favorite social media feeds.


