


3 No-Sew Ways to Upcycle Your Old T-Shirts
Help save the planet one shirt at a time.

Did you know that the average person goes through 82 pounds of textile waste in a year? You can do your part to help save the planet by buying less fast fashion, but sometimes you can't help but accumulate T-shirts from work functions, marathons and family reunions.
When your dresser drawers overflow with shirts to the point where you can barely close them, it's time to take action.
Instead of those promotional shirts collecting dust in your closet or sitting in a bag that never gets donated, try upcycling them into something more useful like a stylish reusable bag, headband or a drawstring pouch.
All three of these DIY projects can be completed in an hour and can be made out of one T-shirt. Even better, they're all no-sew!

REUSABLE BAG
Materials Needed:
- T-shirt
- scissors
- washi tape
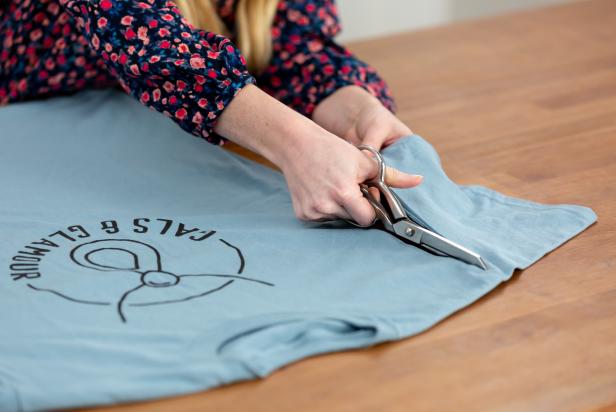
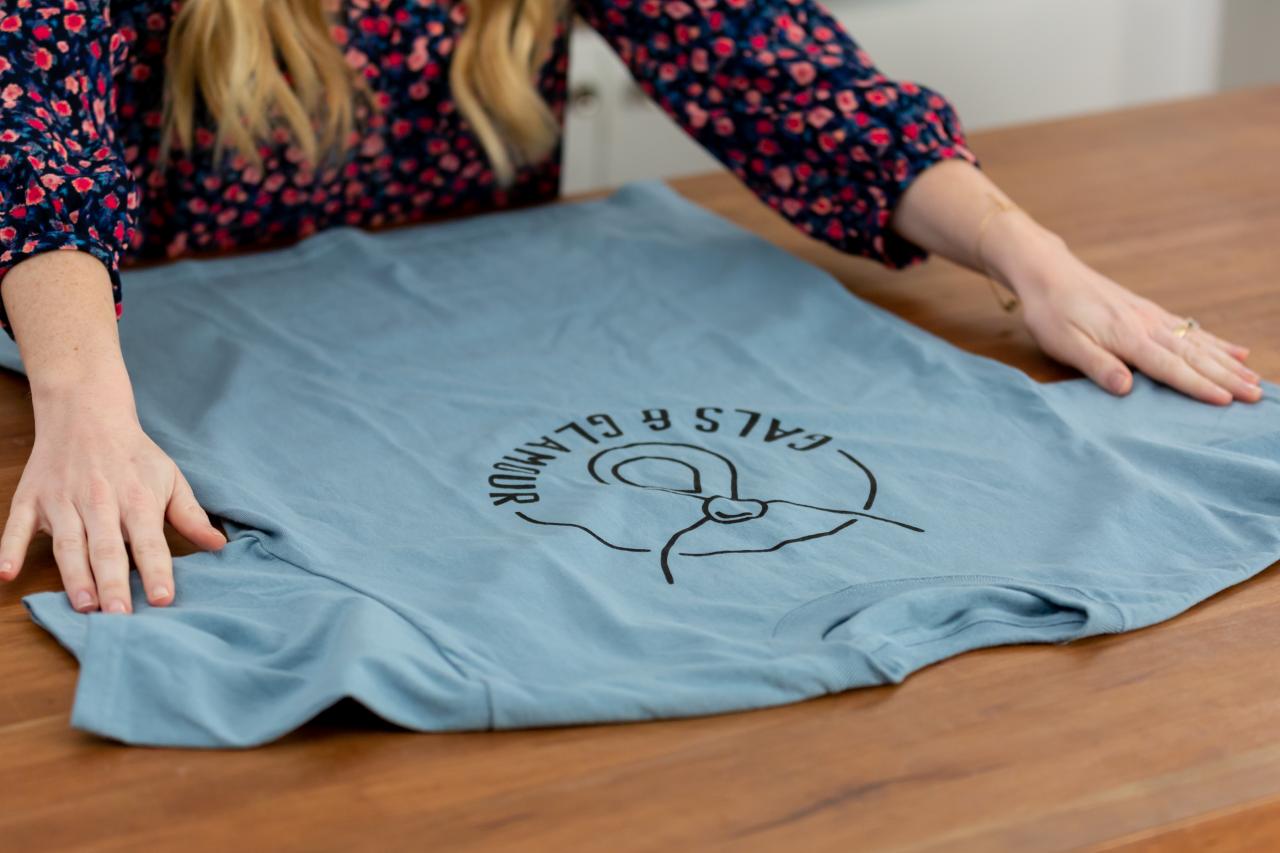
Cut the Sleeves Off

Cassidy Garcia
Cassidy Garcia
Lay a T-shirt flat on a craft table and cut on the inside of both sleeves and set them aside to use on the third project later. This will become the handle of your bag.
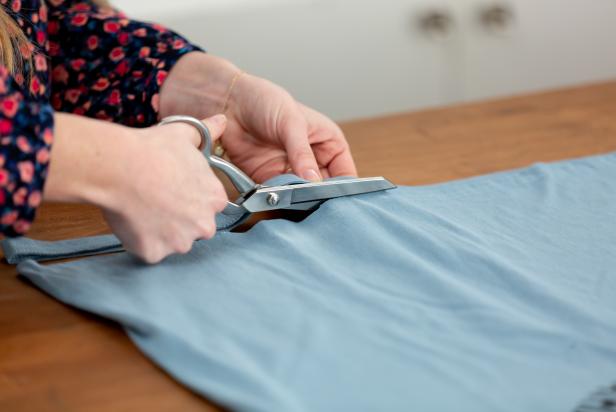
Cut Around the Collar

Cassidy Garcia
The next step is to create the opening of the bag. Start at the middle of one shoulder and cut a deep loop that dips several inches below the collar and finishes at the other shoulder. Remove the neck you just cut out and your shirt should now resemble a basketball jersey.
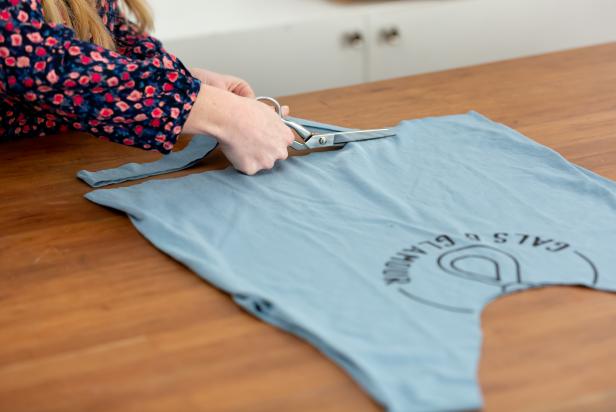
Trim

Cassidy Garcia
Fold the shirt over and even it out by cutting off any part of the shirt that doesn't quite align so that both sides of the shirt are symmetrical.
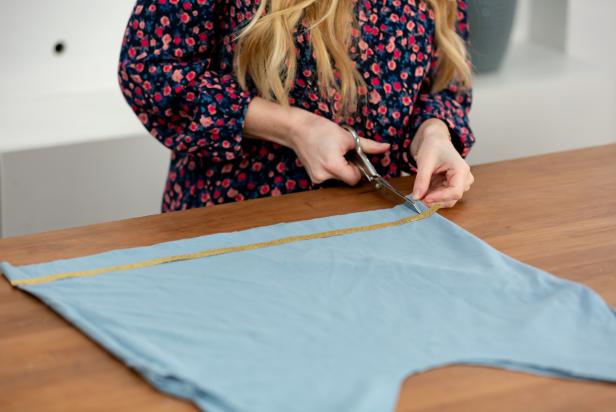
Remove the Hem and Turn Inside Out
Cassidy Garcia
Cassidy Garcia

Cassidy Garcia
Cut off the hem line at the bottom of the shirt and then cut another inch of width from the bottom again. Set that part aside to use for the next project. If you like the design that's on your T-shirt, continue to the next step. If the pattern is less than ideal, simply turn the shirt inside out.
Add Fringe

Cassidy Garcia
Cassidy Garcia
Lay the shirt flat again and straighten it out. Then, instead of dragging out the sewing machine, tie the bag together to give it that trendy fringe look. You want to cut your fringe about an inch up from the bottom and to help you stay on track, we recommend using washi tape to mark how high you want the fringe to go. We made the fringe on our bag shorter to leave more room in the bag.

Cassidy Garcia
The fringe width is up to you but for our bag, we went with a quarter of an inch. For this step, the most important thing is to remember is to make sure you cut through both layers of the shirt.
Stretch and Tie

Cassidy Garcia
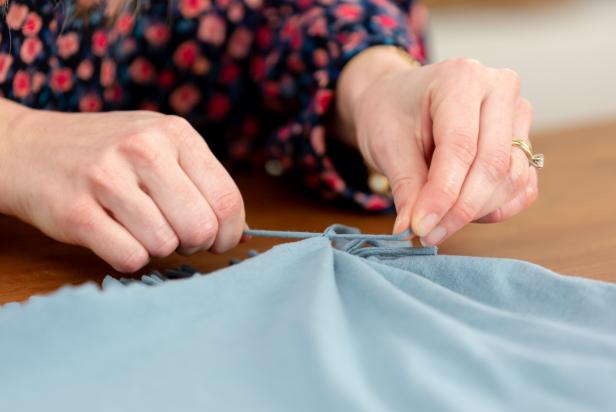
Cassidy Garcia
Before tying off the fringe, stretch them out to give the bag a more free-flowing look. Remove the washi tape and double-knot the fringe together but make sure to save the two end pieces for last and tie them to themselves.
Review

Cassidy Garcia

Cassidy Garcia
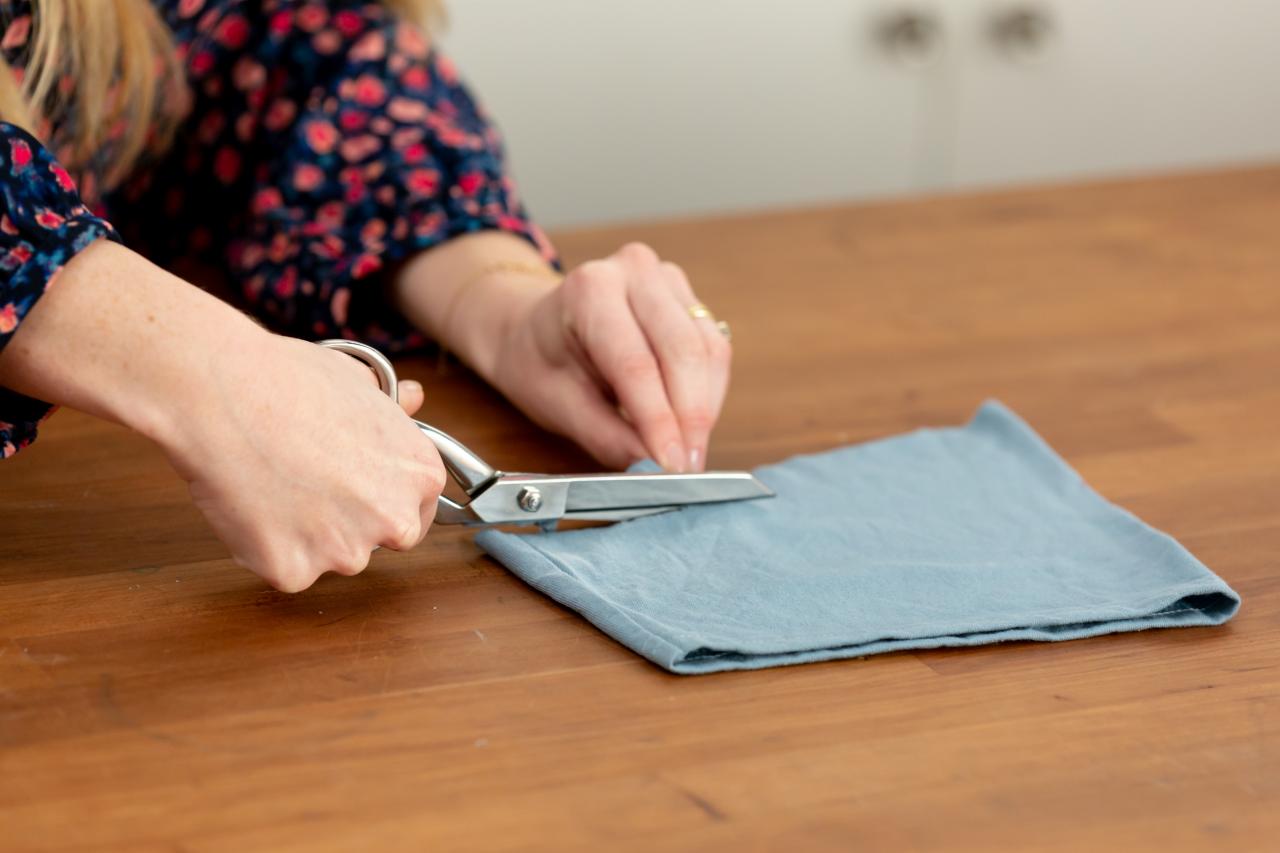
Look everything over one final time and use scissors to trim off any loose fabric.
HEADBAND
Materials Needed:
- strip of fabric from previous project
- scissors
Fold, Cut, and Stretch

Cassidy Garcia

Cassidy Garcia

Cassidy Garcia

Cassidy Garcia
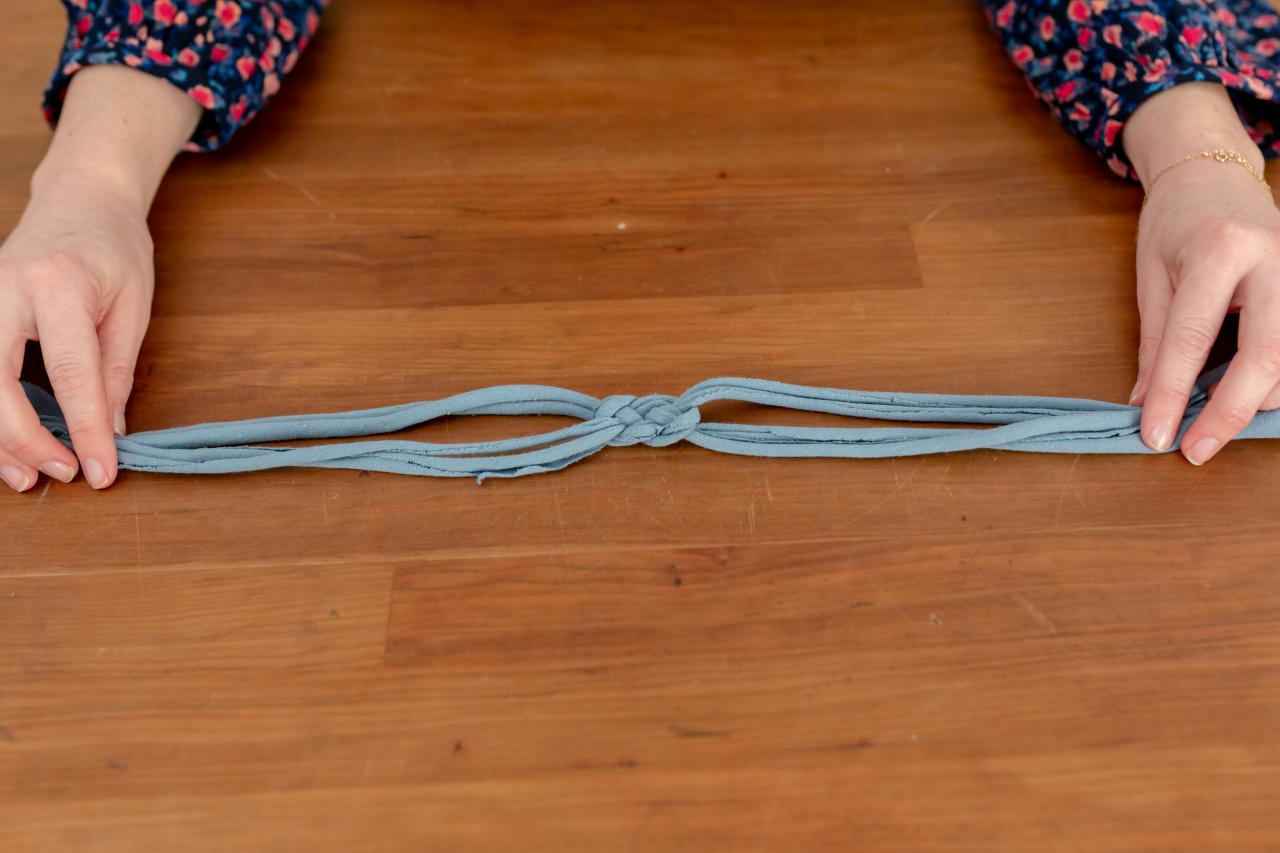
Remember that inch-thick strip of fabric you cut out from the previous project? Fold it over and cut it in half so that you have two thin strips. Then, stretch the two strips to make T-shirt yarn and tie them together with a sailor's knot.
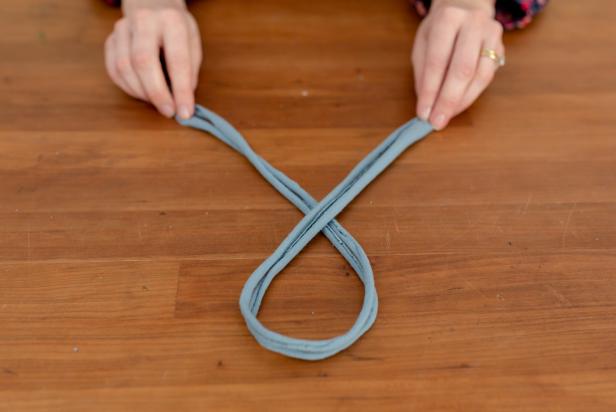
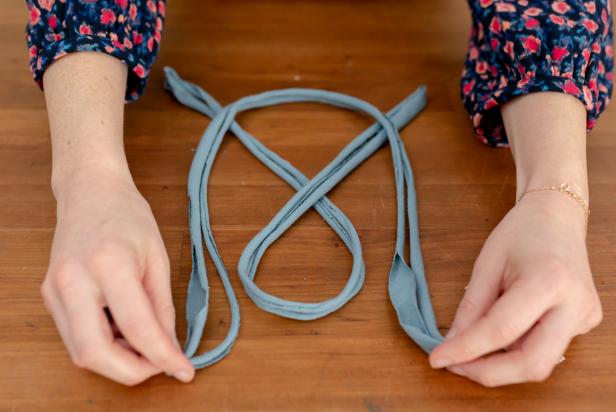
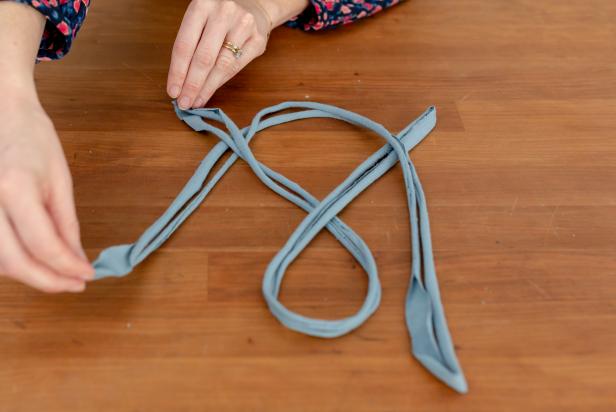
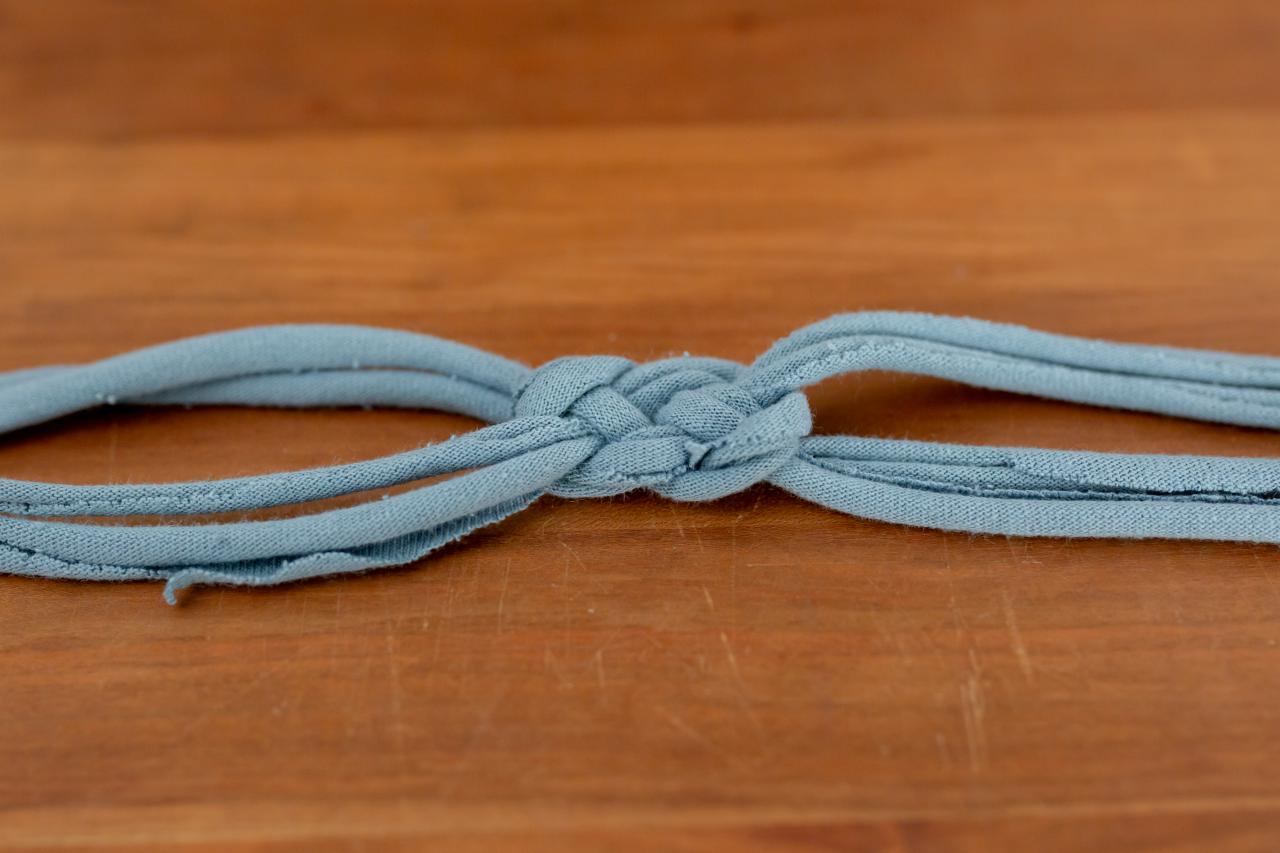
How to Make a Sailor's Knot
Cassidy Garcia
Cassidy Garcia
Cassidy Garcia

Cassidy Garcia

Cassidy Garcia
To make a sailor's knot, make a loop with one piece of fabric and then a "U" shape with the second piece of fabric, tucking one end under the right leg of the loop. Take the other end and tuck it under the top of the loop. Grab your right tail, and then weave it under itself but over the first loop. Pull the ends at the same time to tighten, and you have a sailor's knot.

Cassidy Garcia

Cassidy Garcia
Cassidy Garcia
This simple headband only takes a few minutes and looks super chic.
DRAWSTRING POUCH
Materials Needed:
- sleeve from T-shirt
- scissors
- hem tape
- iron
- safety pin
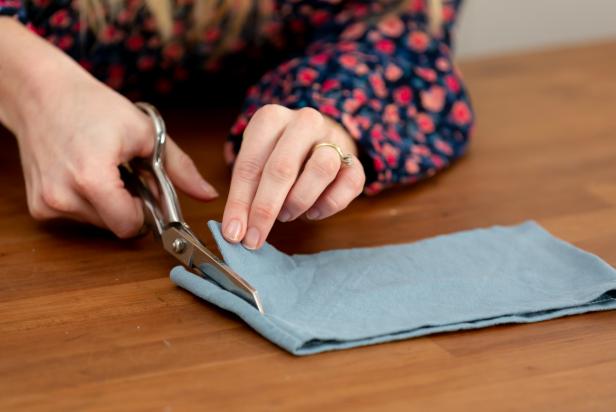
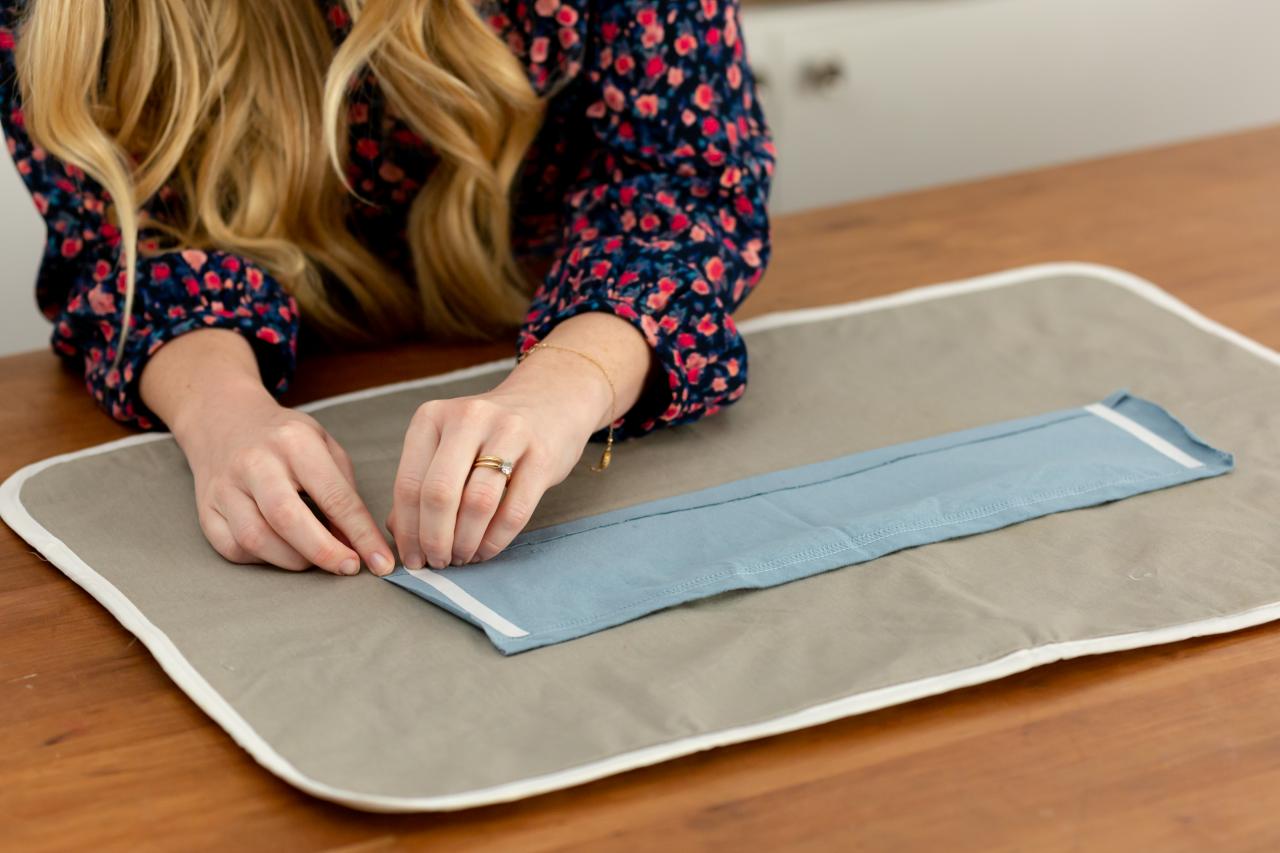
Rectangle or Square?

Cassidy Garcia
Before starting this project, decide if you want your pouch to be a rectangle or a square. We opted to make a rectangle pouch. Also, it's important that you remember to keep the hem of the sleeve at the top because that is where the drawstring is going to tie into at the end.

Cassidy Garcia
Cassidy Garcia
Use scissors to trim off the bottom of the sleeve and then cut inside the hem to square off all of the angles. This will create the rectangle (or square) shape.
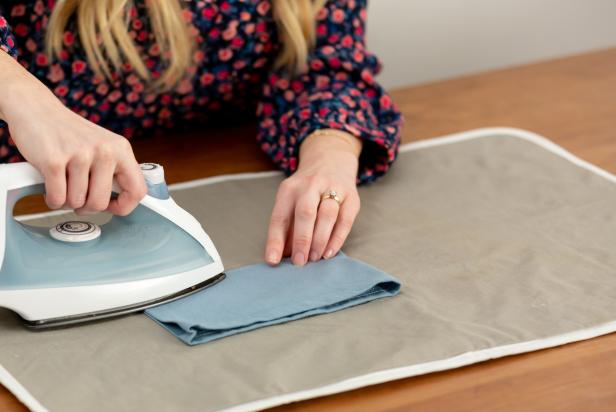
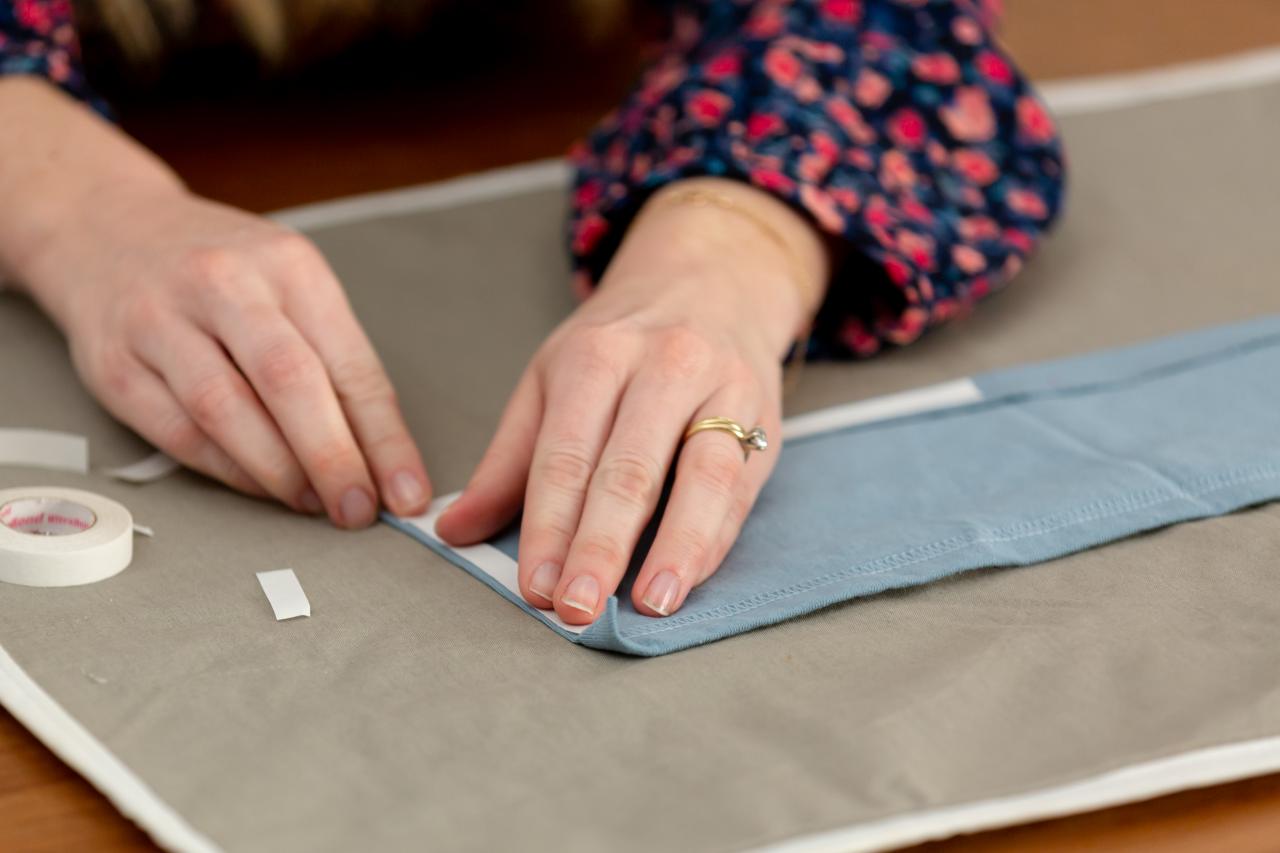
Make New Seams
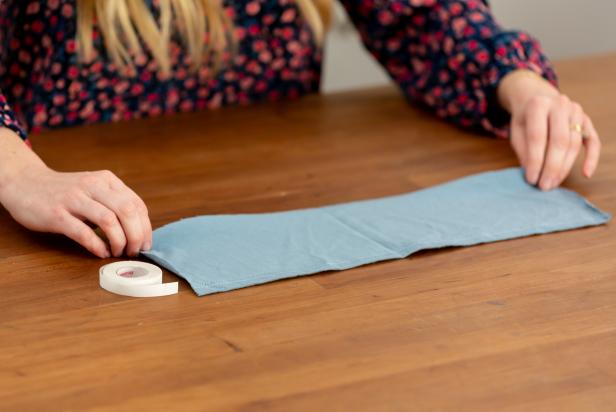
Cassidy Garcia

Cassidy Garcia

Cassidy Garcia
Open up the fabric and lay it flat. Use hem tape to make seams on the rough edges at the bottom. Cut the hem tape to the length of the fabric and then place the paper side up a little higher than where you're going to fold.

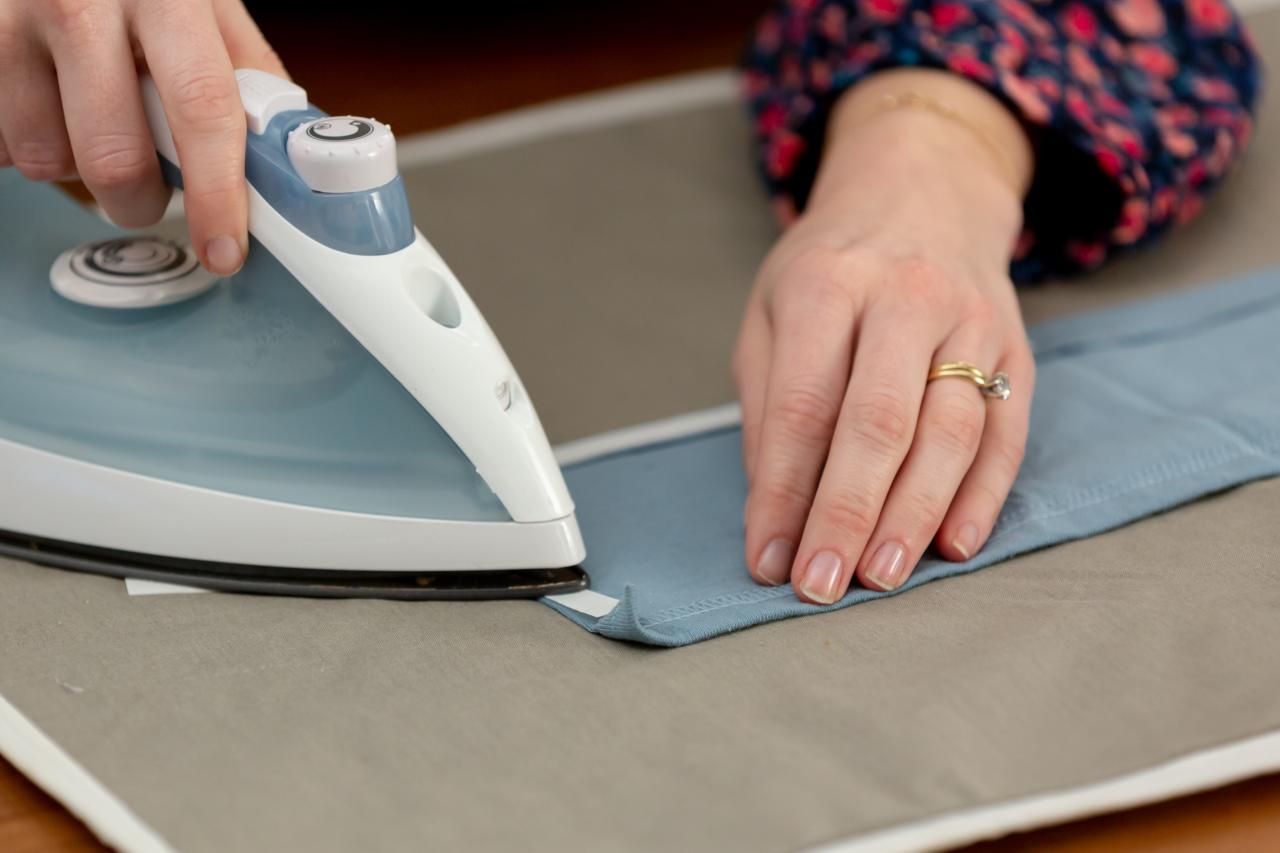
Cassidy Garcia

Cassidy Garcia

Cassidy Garcia
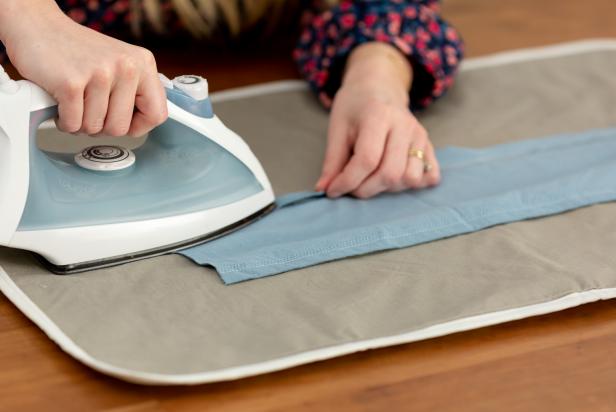
Cassidy Garcia
Hold the iron over the hem tape for just a couple of seconds. Once cooled, peel away the paper side. If it doesn't peel off easily, run the iron over it once more. Fold the bottom raw edge up and iron again. That will bond the fabric together without the use of a sewing machine.
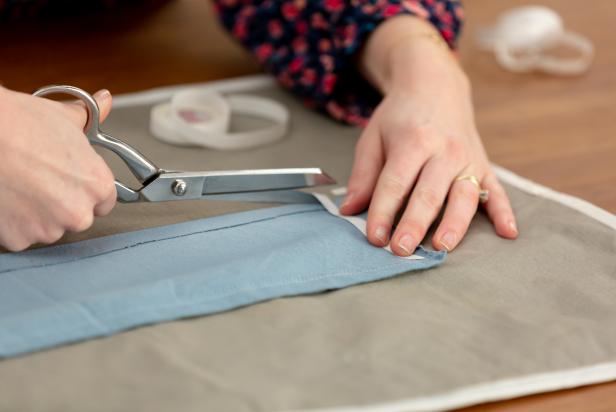
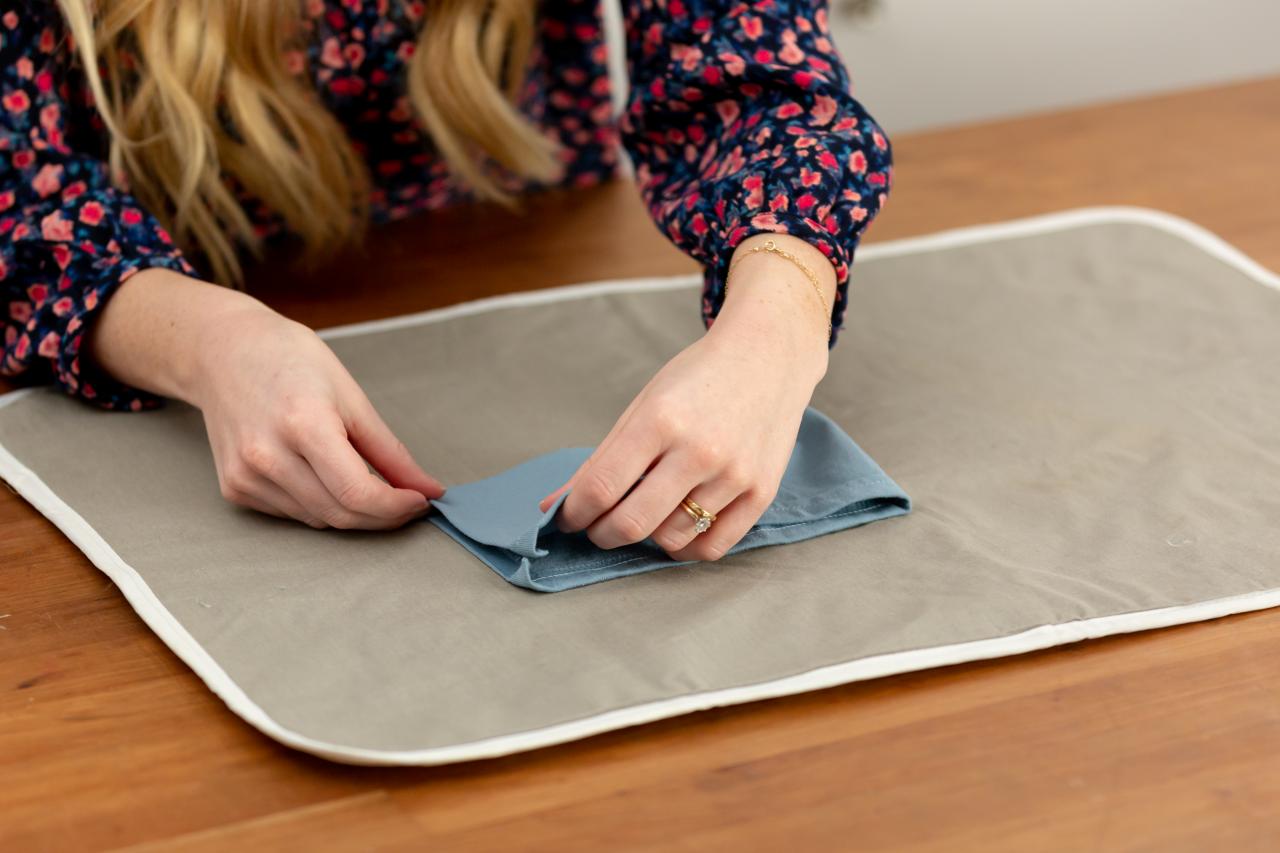
Cassidy Garcia

Cassidy Garcia

Cassidy Garcia

Cassidy Garcia

Cassidy Garcia
Now for the sides. When bonding the fabric, make sure to place the hem tape just a little bit under the hemline on both sides. Run an iron over the tape, peel off the paper side, fold the raw edges over and bond the seams with an iron as you did before with the bottom of the pouch.

Cassidy Garcia

Cassidy Garcia

Cassidy Garcia

Cassidy Garcia
Cassidy Garcia
Use hem tape one more time to close everything up. Place the hem tape on half of the bottom of the pouch and on one side as well. Run an iron over the tape then peel off the paper side and fold over the fabric like a book. Bond the fabric together by hitting the seams with the iron again. The structure of your pouch is now complete but you still need to add the drawstring.
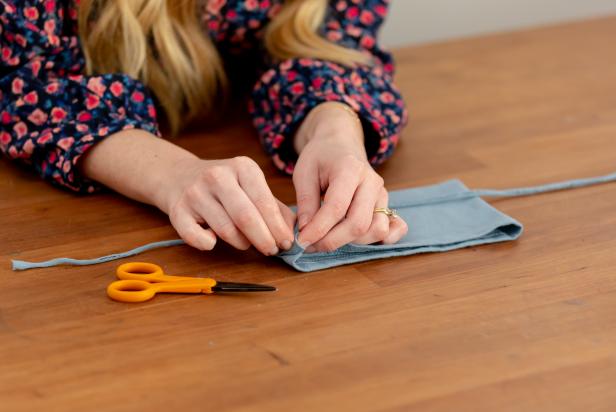
Make the Drawstring

Cassidy Garcia
Using the scrap of fabric from the sleeve that you cut off earlier, trim a thin strip and stretch it until it's long enough to resemble a drawstring.
Feed It Through
Cassidy Garcia
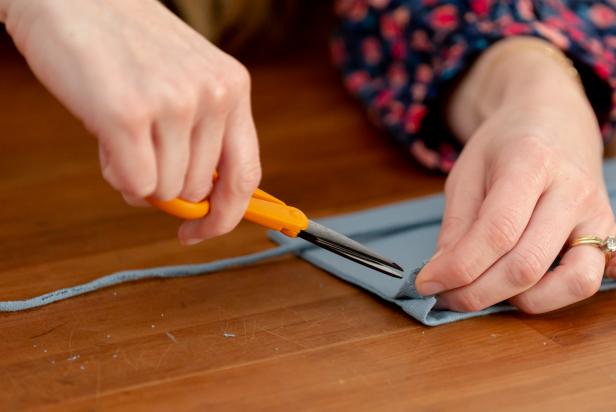
Cassidy Garcia

Cassidy Garcia
Cut a small hole at the top of the hem of your pouch but only go through the top layer. To do this, pull the fabric apart and use your scissors to cut a little hole for the drawstring to go through.

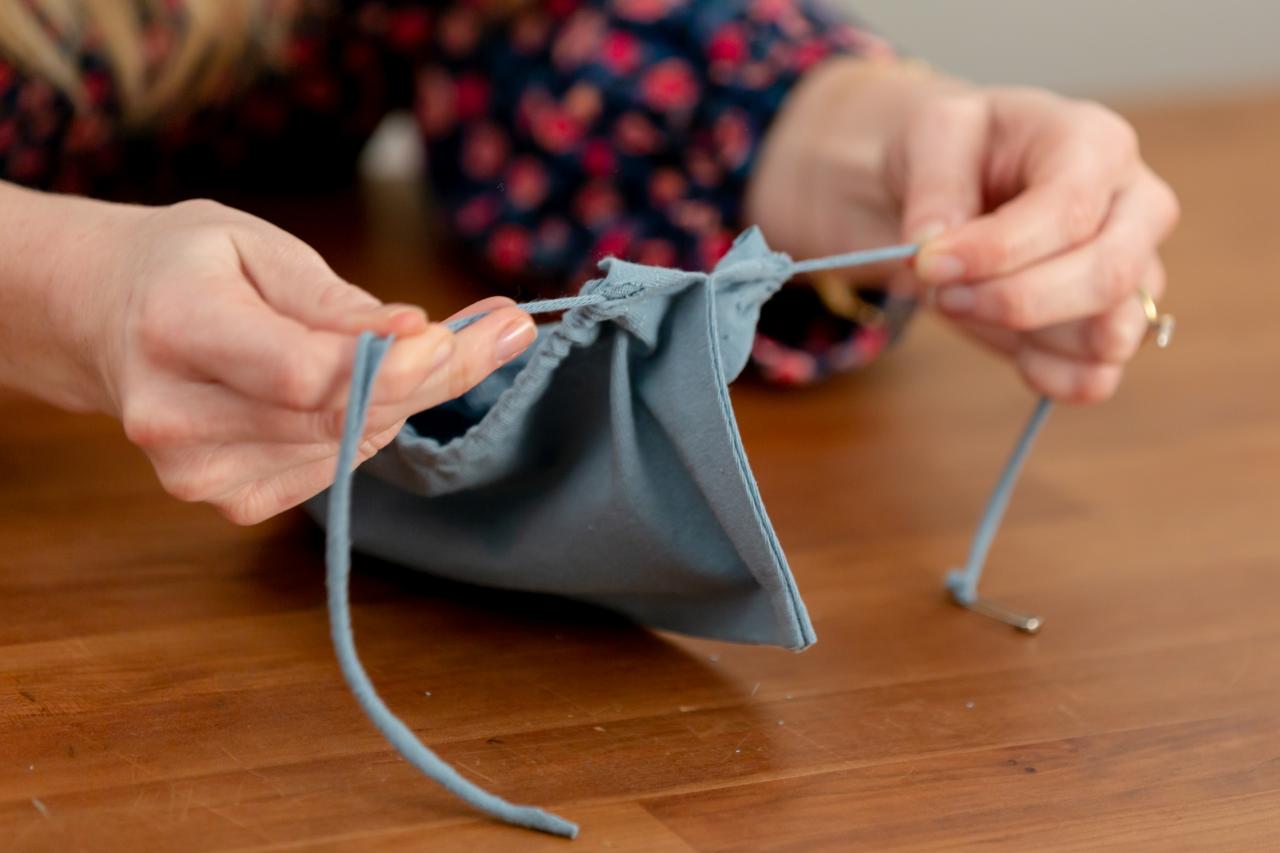
Cassidy Garcia

Cassidy Garcia

Cassidy Garcia
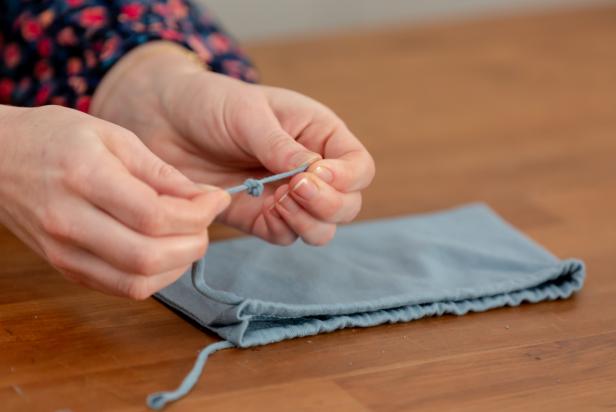
Cassidy Garcia
To pull the drawstring through, clip a safety pin to the end to make it easier to pull it around the top of the pouch. Keep pulling until the ends of the drawstring are even. Finish the project by removing the safety pin and tie a couple of knots on the ends of the drawstring so they don't accidentally slide back through.
Use your cute new pouch to store makeup, jewelry and anything else small when traveling or keep it in your purse to stay organized while running errands.
Reduce, Reuse, Upcycle

12 Unexpected Ways to Recycle an Egg Carton 12 Photos
Instead of throwing away your egg cartons, try these organization hacks and gift ideas instead.

3 Planters You Can Make From Upcycled Items 22 Photos
Amp up your curb appeal (and save some cash) by transforming an old tire, trash can or laundry basket into an eye-catching planter.

22 Clever Ways to Repurpose Furniture 22 Photos
Find new ways to reinvent old furniture and upcycle unwanted junk into funky new treasures.


