Create Designer Digs for Your Dog Using an Upcycled Pallet
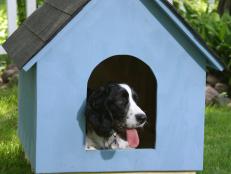
Here's an easy-to-build doghouse that's not only adorable (check out that rooftop garden!), but it puts a wooden pallet to good use.

Flynnside Out Productions
Materials
- (1) pressure-treated 2x4
- (1) pressure-treated 1x4
- (1) pressure-treated 1x2
- (1) wood pallet
- scrap sheet metal or PT plywood
- deck screws
- wood stain
- exterior-grade silicone sealant
- paintbrush
- old rags
- drop cloth
- roofing materials
- plants + soil
Tools
- measuring tape
- pencil
- eye protection
- compound or circular saw
- jig saw or reciprocating saw
- drill
- clamps
- compressor and nail gun
STEP 1: Repurpose a Wooden Pallet
Building a custom doghouse can be a snap when you create the base from an old wooden pallet. Using a reciprocating saw or a jig saw, cut the pallet in half (approximately 24"x26"), leaving the vertical braces intact (Image 1A). Flip the pallet upside down, then secure the pressure-treated 2x4s to the inside rails using galvanized nails or deck screws (Image 1B). Don't skip this step; any wood that's in contact with the ground should always be pressure-treated. Flip the pallet right side up, then add 1x4s across the top to give the doghouse a chic "hardwood floor."

Flynnside Out Productions
IMAGE 1A

Flynnside Out Productions
IMAGE 1B
STEP 2: Frame It Out
Next, fasten vertical corner boards to the pallet using deck screws (Image 2A). (We alternated using leftover 1x4s from building the fence and 1x2s to achieve a vertical groove siding look.) If you're using screws rather than nails, you may want to drill pilot holes to avoid splitting your wood. Use 2x4s to frame out the top horizontally (at a slight angle if you like the sloped roof look). Then, fasten a 2x4 brace across the middle to reinforce the roof (Image 2B).

Flynnside Out Productions
IMAGE 2A

Flynnside Out Productions
IMAGE 2B
STEP 3: Install Siding
With the framing in place, continue building out the sides. Alternate 1x2s by fastening to the upper and lower horizontal boards with 1x4s. Always use whole boards on the corners, so you can rip the middle boards to size. Trim vertical boards to follow the line of the upper horizontal 2x4s you installed in the previous step. Use a circular saw or reciprocating saw to do this, and if it helps, you can always pop a chalk line as a guide.

Flynnside Out Productions
STEP 4: Raise the Roof
Measure across the top of the doghouse, then mark and cut your roofing material to size. This is another opportunity to upcycle leftover materials. We cut some scrap sheet metal to size using a jig saw, then secured it to the top of the doghouse with screws. With your "roof deck" in place, you can add shingles (be sure to install felt paper or some type of weather shield underneath). To create a shallow rooftop garden, we added an extra-tall lip along the edge using additional trim. Be sure to seal any seams with an exterior-grade silicone to prevent rainwater from seeping into the interior.

Flynnside Out Productions
STEP 5: Stain It
Protect your new dog digs with a stain/sealant combo. Whether you rag, brush or spray it on, you'll be glad you did. The stain will protect the wood from moisture and UV rays that can eventually cause wood to warp, crack, mildew or rot. TIP: You won't need much, so utilize some leftover from a previous project.

Flynnside Out Productions
STEP 6: Extra, Extra
Once the doghouse is stained and dry to the touch, move it into place. It's best to install it near a garden hose for easy cleanups to the exterior and a periodic spray out of the interior. And don't forget to utilize the roof of the doghouse in some way, whether it's a shallow planter for colorful blooms or a cute storage container to house toys and bowls.

Flynnside Out Productions
STEP 7: Finishing Touches
Finally, add a dog bed, fun outdoor-only toys and a water bowl to create a welcoming environment your pet is sure to love.

Flynnside Out Productions
Build a Dog Run 12 Photos
Create the ultimate dog run, complete with stylish digs and artificial turf.


