


How to Regrout Tiles
If your tile is looking worse for the wear, you might be able to spruce things up with a simple regrout job. As long as your tiles are adhered properly and in good condition, laying new grout is a job almost any homeowner can tackle on their own.

Getty Images/abbesses

Materials and Tools
- oscillating tool with carbide blade
- handheld grout saw
- utility knife with dull blade
- 2 medium-sized buckets
- dry grout
- triangular grout trowel
- grout float
- 2 grout sponges
Step One: Preparation
Grout removal is messy business and tends to throw dust everywhere, so it’s a good idea to put up some plastic sheeting around your work area. Next, you’ll want to make sure you have a dust mask and some eye protection to keep yourself safe from any potential debris that might come your way. It’s also helpful to keep a spray bottle of water and a shop vacuum handy to keep the dust under control — more on that in a minute.
Step Two: Grout Removal
While there are a number of tools designed to remove grout from between tiles, we’ve found that the best combination is an oscillating tool equipped with a carbide grout removal blade, alongside a basic handheld grout saw. The oscillating tool makes short work of the vast majority of the grout lines, while the handsaw is perfect for corners and other hard to reach areas that require a little extra elbow grease.
Spray a little water on your grout lines before using your oscillating tool to saw out the grout in between all of the tiles. The water helps to reduce the amount of dust and keeps your blade from overheating, so it’s a good idea to re-spray frequently as you work. Try not to linger in any one spot for too long with the oscillating tool; the heat can build up quickly and scorch or crack your tiles.
Once you’ve removed as much grout as you can with the power tool, take the handheld grout saw and grind out any grout that you couldn’t reach earlier. If your grout saw is still too large, a dull utility knife is also handy for small crevices and tight corners. After you’re sure you’ve removed as much grout as humanly possible, use your shop vac to clear out any dust and debris that remain in between your tiles. This is also a good time to tidy up around your work area, because odds are good that you’ve got a small mess on your hands by now.
Step Three: Mixing Your Grout
Put the recommended amount of dry grout into a medium-sized bucket and mix in roughly half the amount of water needed. Mix thoroughly using your trowel and continue to add water gradually until your grout reaches the consistency of peanut butter. It should be a near paste-like consistency and just slightly beyond pourable. Go slowly and remember that you can always add water to achieve the right consistency, but it's difficult to rescue oversaturated grout.
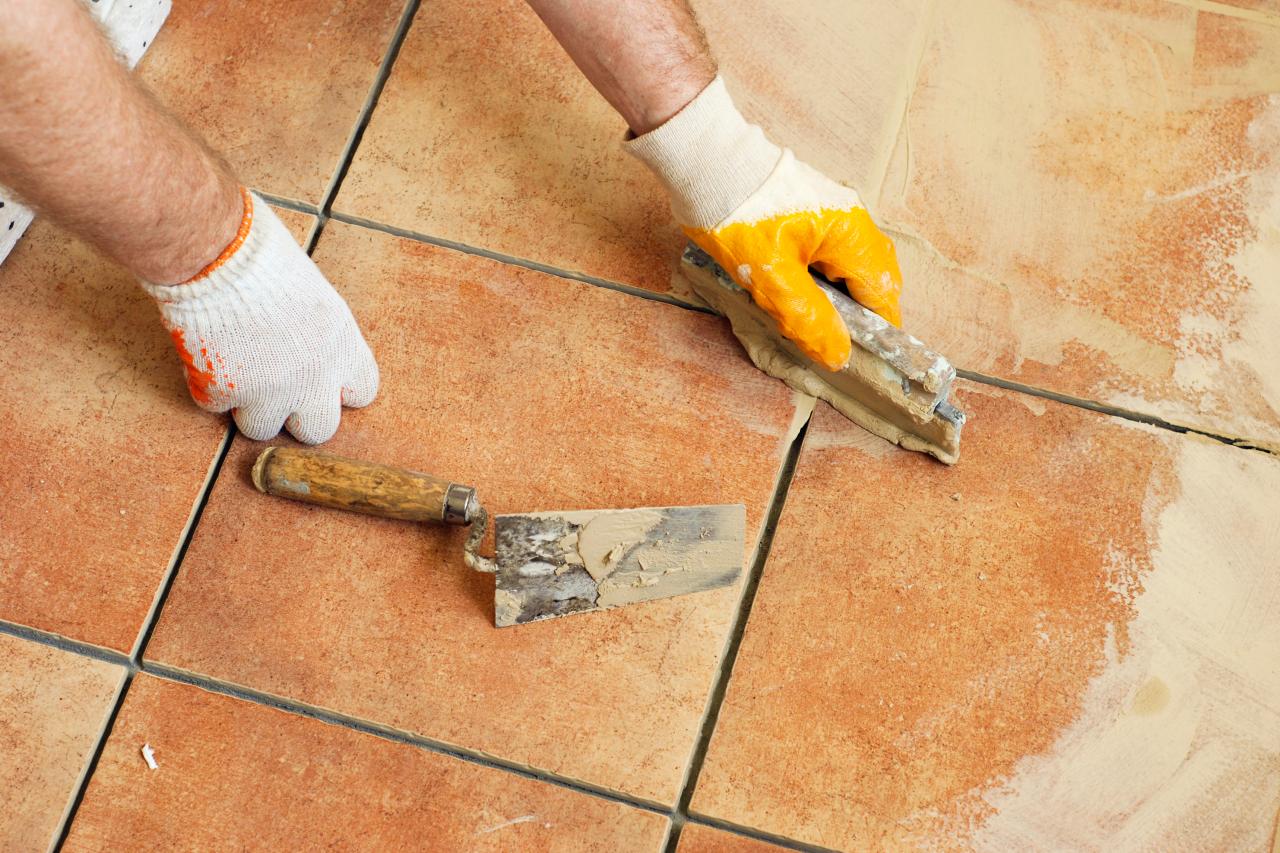
Step Four: Press Grout Into Joints
Take your trowel and liberally spread some grout over your tile joints. You’re just trying to lay down some material to work with, so this doesn’t need to be terribly precise. Next, take your rubber grout float at a sharp angle and press your grout into the joints using a sweeping/spreading motion. Keep spreading the excess grout around to nearby joints until you need to apply more from your bucket. The objective is to fill all of your joints completely without leaving an excessive amount of grout laying on your tiles.
Step Five: The First and Second Sponge-Down
Using a lightly dampened sponge, wipe down all of your joints and surrounding tiles. You want to do this gently so you don’t disturb your new joints but with enough moisture that you’re cleaning up excess grout. Continually rinse and squeeze out your sponge during this process until you’ve cleaned your surface completely. Allow your grout to dry for 24 hours before attempting to clean anymore.
After 24 hours, you’ll notice that a light haze has appeared over your recently grouted area. Using a fresh sponge, repeat the process of cleaning your tiles once more to remove any excess. The process of cleaning grout haze can take a day or two, but don’t worry — that haze won’t stick to your tiles. Once your second sponge job has dried, you can come back with some soft towels to give everything a nice clean shine. For problematic spots, you can use a de-hazing product to help get your tiles perfectly clean. Your home center will have lots of options, so find out which one is right for your application.


