


Make a Boho Beaded Macramé Curtain With a Built-In Planter Hanger
Turn on the lava lamp and get groovy with this retro hanging curtain (woven directly onto a tension rod!) by the Crafty Lumberjacks.

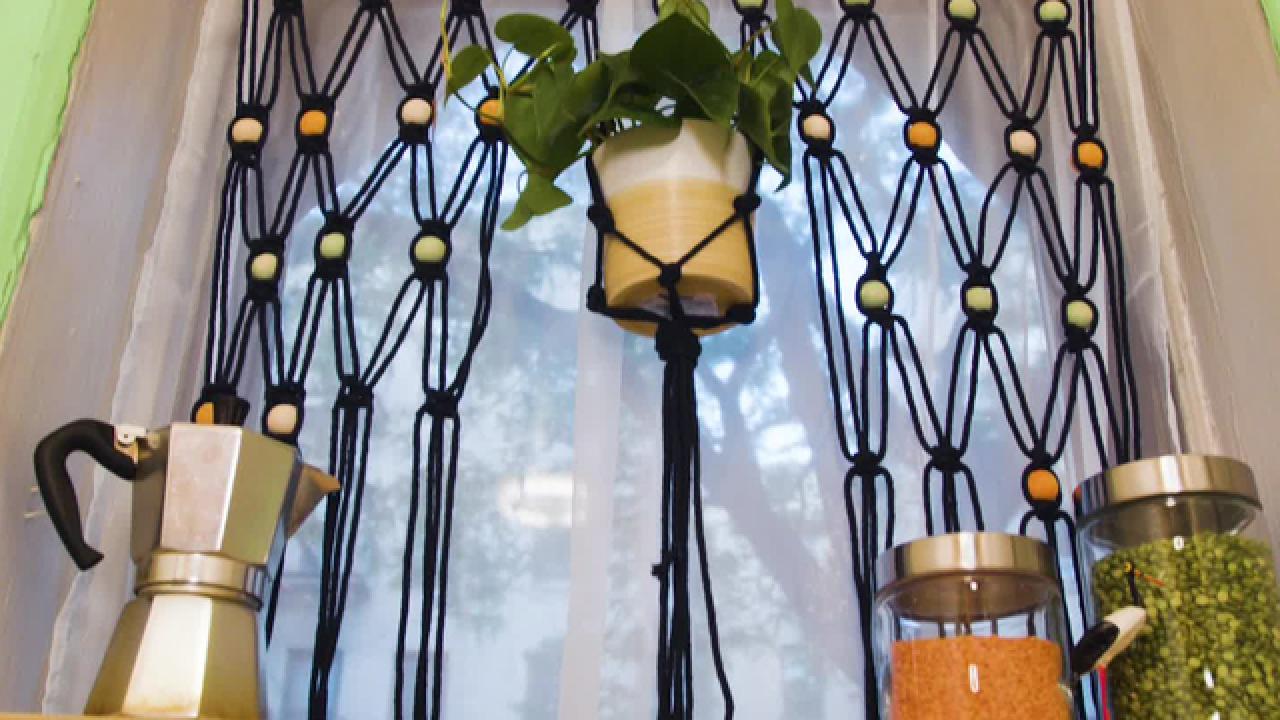
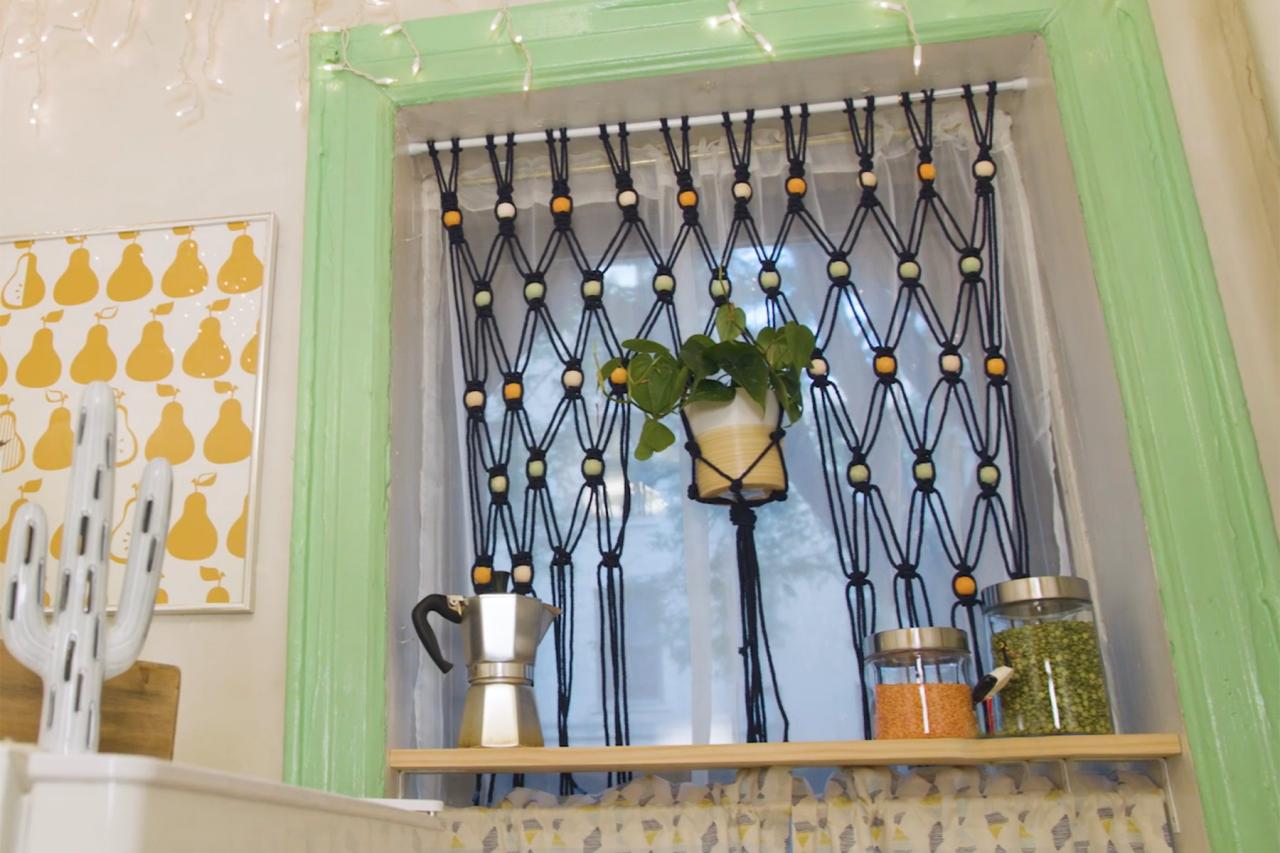
Boho Macrame Beaded Curtain: Finished
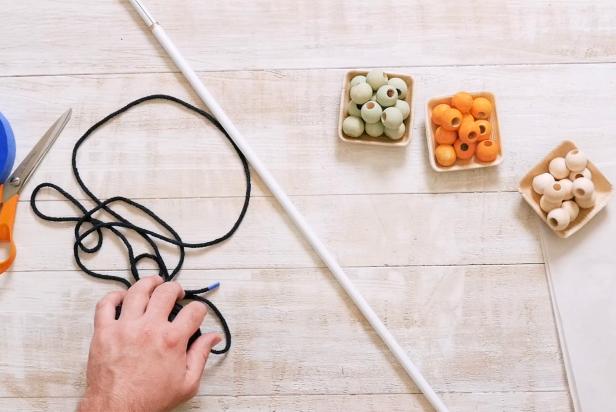
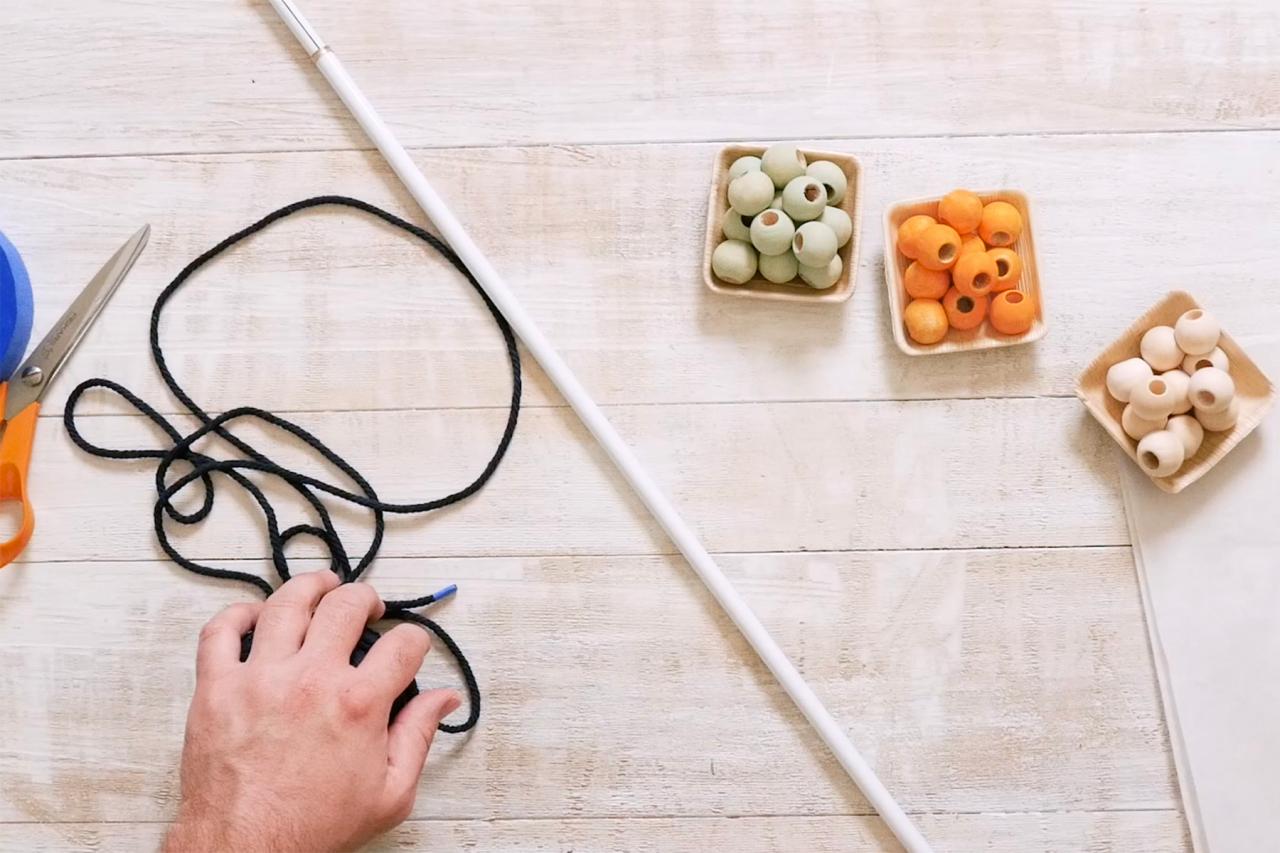
The Crafty Lumberjacks teach you how to make a funky, macrame beaded curtain with a plant holder in the middle. To start, you will need navy rope cording, wooden ball spacer beads, orange and teal acrylic paint, a tension rod, scissors, painter's tape, tape measure and a piece of sandpaper.

Photo by: Caitlin Dabbs
Caitlin Dabbs

Remember those funky macramé beaded curtains that always seemed to be hanging beside a basement record player? Secretly want to make your own? Turns out, creating a modern and stylish macramé curtain isn’t as complicated as it looks. The Crafty Lumberjacks show you how to make this copacetic curtain with a bonus knot-tying refresher. Read on for the how-to and braid your very own.
Materials Needed:
- navy macramé rope cord
- wooden ball spacer beads
- orange acrylic paint
- teal acrylic paint
- tension rod
- scissors
- painter's tape
- tape measure
- sandpaper
Note: When purchasing a tension rod, take note of the weight limitation. It's best to use a heavy-duty tension rod for this project, especially when adding the built-in planter. Do not exceed the weight-bearing limitation of the curtain rod or it could cause damage or personal injury.
Knots You'll Need to Know
Before you begin, you'll need to learn two different knot-tying methods:
Lark Head's Knot: Fold the cord in half (Image 1). Then, push the folded side of the loop away from you and wrap over the edge of the tension rod (Image 2). Push the ends of the cord through the loop and pull tightly (Image 3).
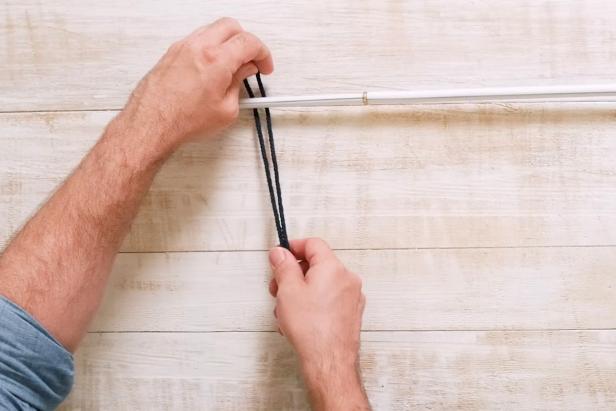
Caitlin Dabbs
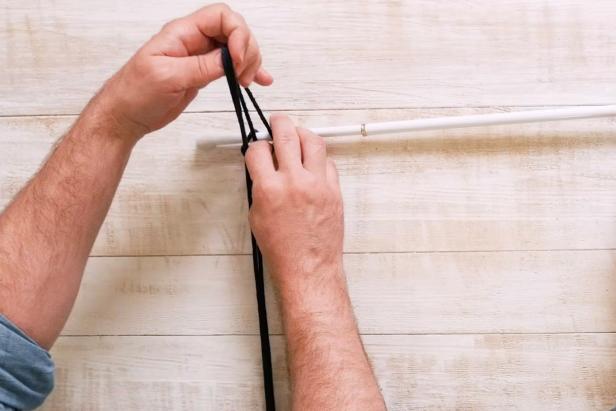
Caitlin Dabbs
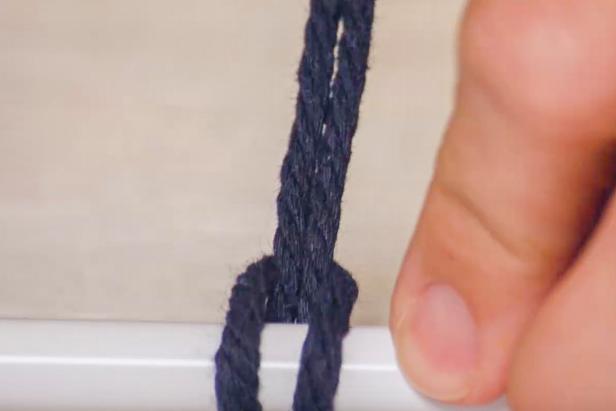
Caitlin Dabbs
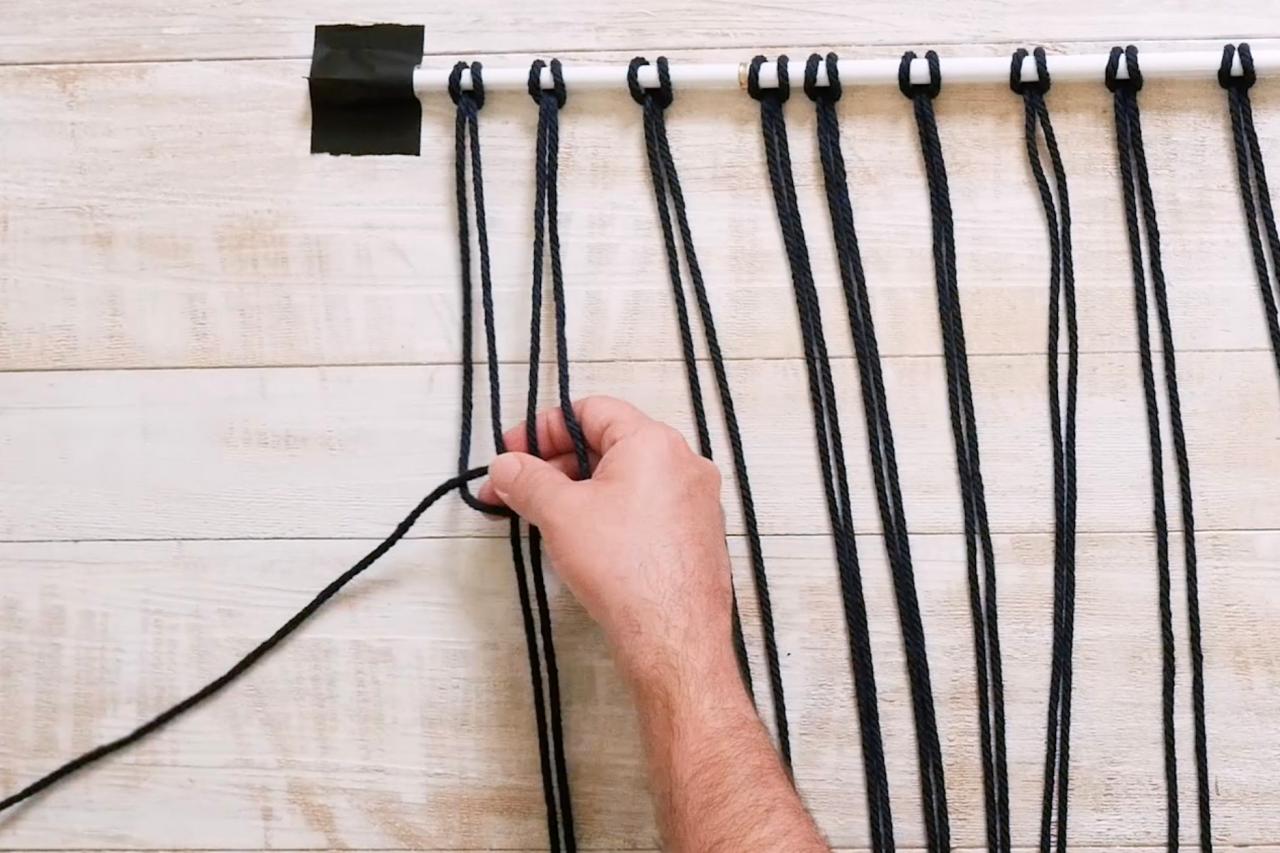
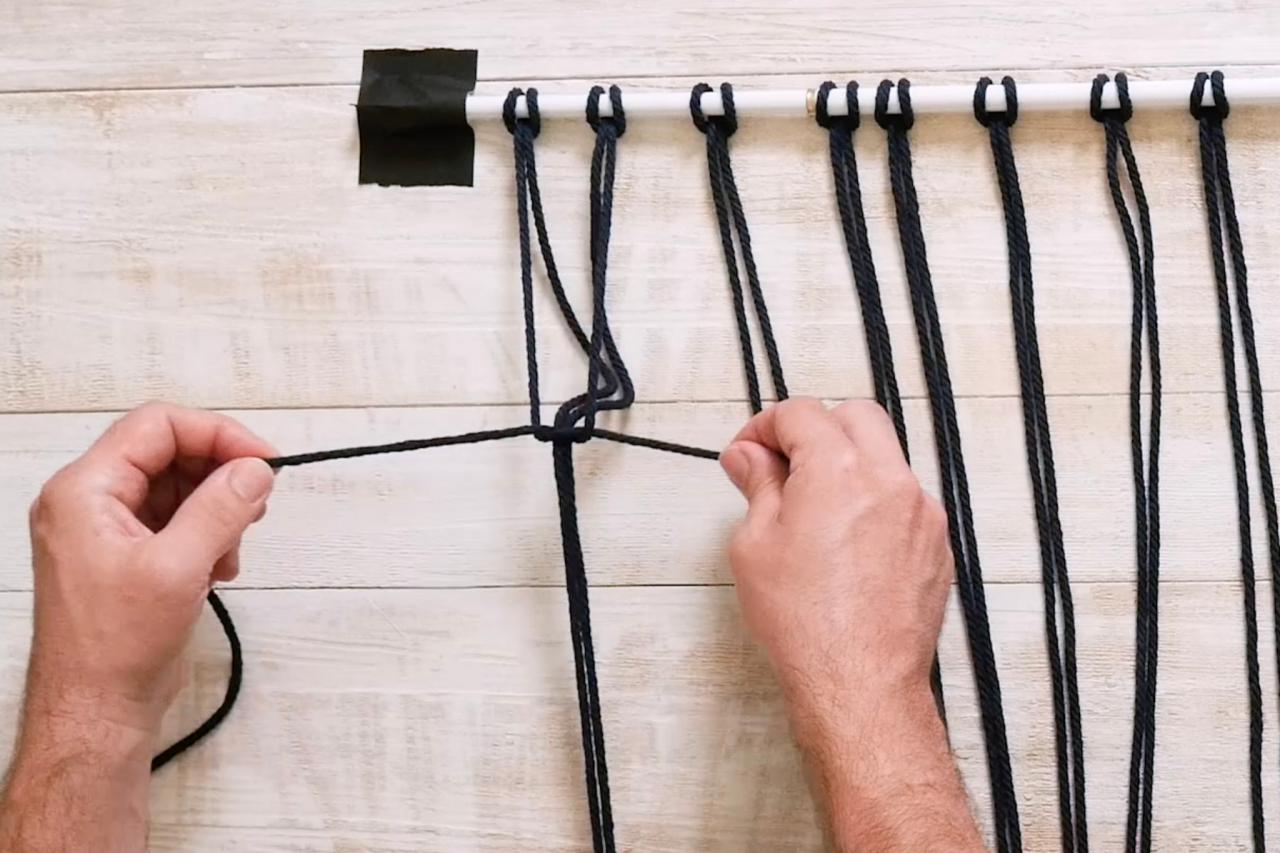
Square Knot: Place four cords in front of you. Cross the leftmost cord over the two middle cords so that it forms an “L” shape (Image 1). Then guide the rightmost cord under the end of the "L" shaped piece (Image 2), behind the two middle cords, and then through the middle of the “L” shape (Image 3). Pull to tighten the cords (Image 4).

Caitlin Dabbs
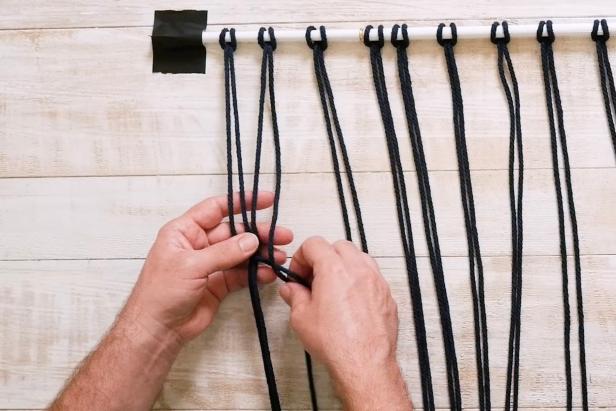
Caitlin Dabbs

Caitlin Dabbs

Caitlin Dabbs
Repeat the steps from above, starting with the leftmost cord and passing it behind the middle two cords and through the “L” shape of the rightmost cord (Image 1). Tighten the knot (Image 2).
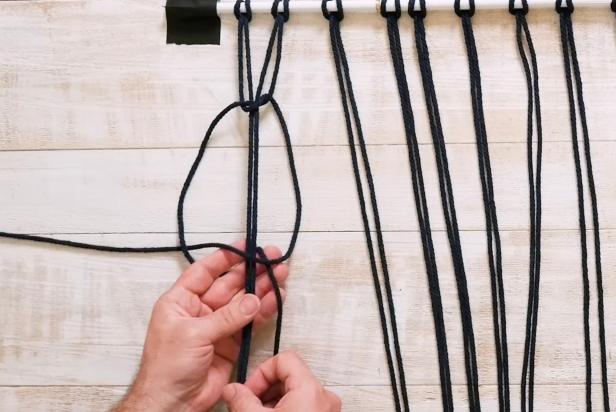
Caitlin Dabbs

Caitlin Dabbs
Boho Macrame Beaded Curtain: Square Knot Final Step
Create a square knot using the step-by-step guide.
Photo By: Caitlin Dabbs
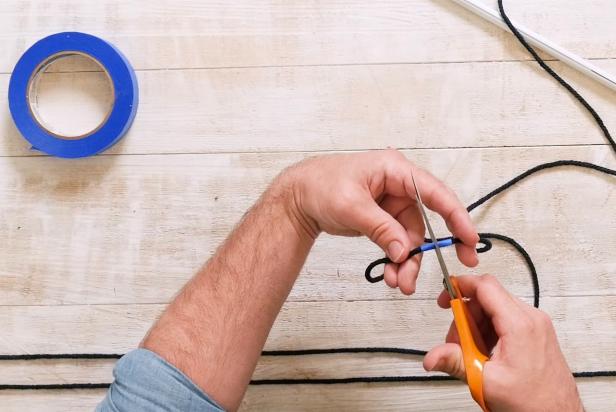
Step 1: Measure + Cut Cords
Using a tape measure, measure 20, 100-inch pieces of cord and cut with scissors. Tip: Wrap painter’s tape at each 100-inch mark and cut in half to prevent the cord from fraying.
Caitlin Dabbs
Boho Macrame Beaded Curtain: Cut Cords
Using a tape measure, measure 20, 100-inch pieces of rope and cut with scissors. Tip: Wrap painter’s tape at each 100’’ mark and cut in half to prevent the cords from fraying.
Photo By: Caitlin Dabbs
Step 2: Paint Beads
Set aside 11 natural-colored beads. Paint 15 beads with orange acrylic paint (Image 1). Paint 11 beads with teal acrylic paint. Let the painted beads dry thoroughly (Image 2). Once the beads are dry, lightly rub each one with sandpaper to create a weathered, vintage look.
Caitlin Dabbs
Caitlin Dabbs
Boho Macrame Beaded Curtain: Paint Beads
Set aside 11 natural-colored beads. Paint 15 beads with the orange acrylic paint. Then paint 11 beads with the teal acrylic paint. Let the beads dry thoroughly. Once dry, lightly sand with sandpaper to create a weathered vintage look.
Photo By: Caitlin Dabbs
Boho Macrame Beaded Curtain: Materials
The Crafty Lumberjacks teach you how to make a funky, macrame beaded curtain with a plant holder in the middle. To start, you will need navy rope cording, wooden ball spacer beads, orange and teal acrylic paint, a tension rod, scissors, painter's tape, tape measure and a piece of sandpaper.
Photo By: Caitlin Dabbs
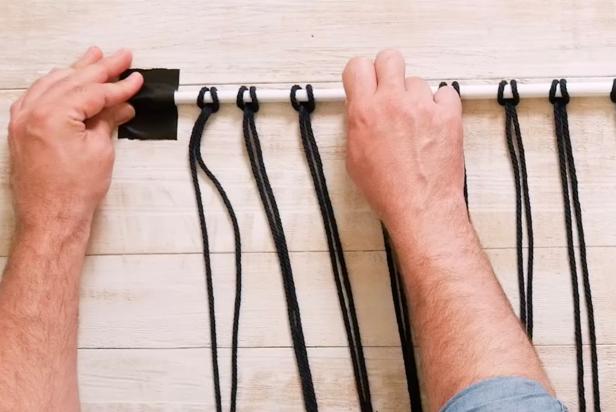
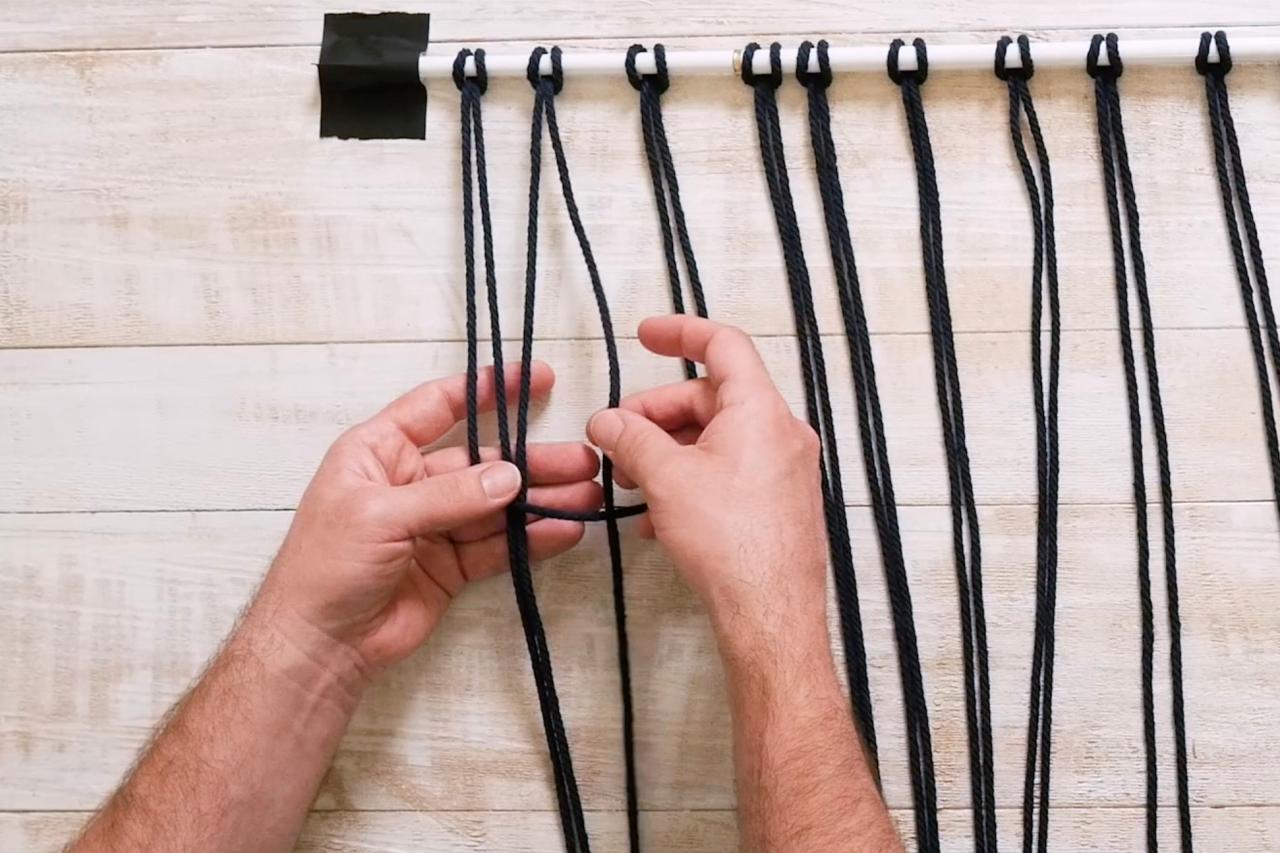
Step 3: Add Cords + Tie Knots
Add all 20 pieces of cord to the tension rod using a Lark's Head Knot (Image 1). Then, tape the tension rod to a firm surface so that each knot will be tight when you pull the cords (Image 2).

Caitlin Dabbs
Caitlin Dabbs
Boho Macrame Beaded Curtain: Tie Lark's Head Knots
Tape the tension rod to a firm surface to hold in place. Then begin tying lark's head knots on each cord.
Photo By: Caitlin Dabbs
Boho Macrame Beaded Curtain: Tape Tension Rod
Tape the tension rod to a firm surface to hold in place. Then begin tying lark's head knots on each cord.
Photo By: Caitlin Dabbs
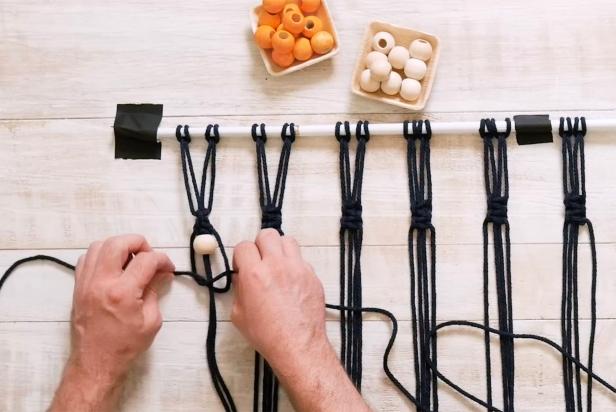
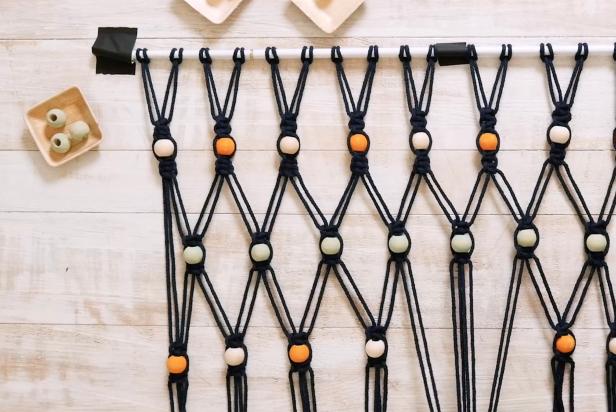
Step 4: Braid the Curtain
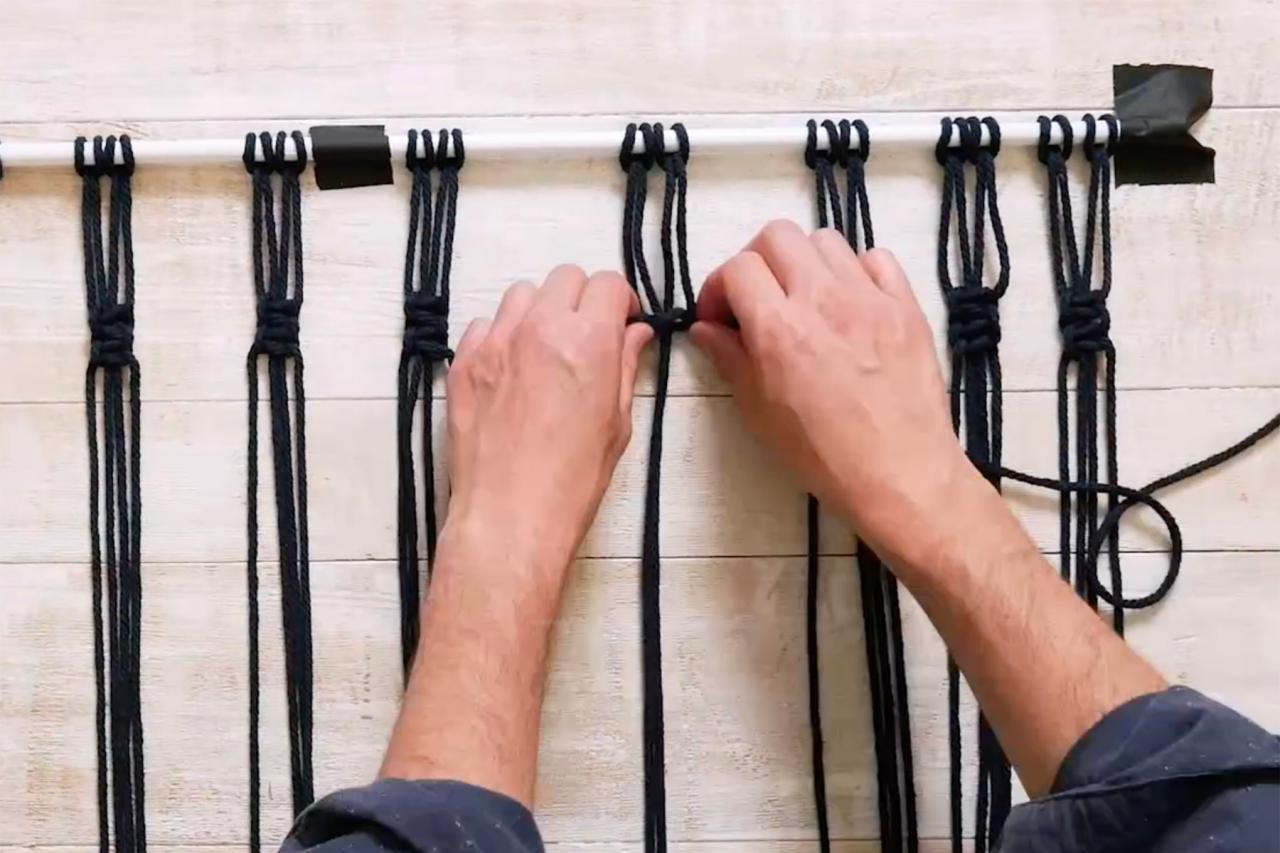
Measure 3 inches down from the top of the tension rod and tie 10 Square Knots across the row (Image 1). Then, add a spacer bead around the center ropes of the square knots and slide up the cords (Image 2). Be sure to alternate color beads with natural beads as you work across. Next, tie 10 square knots directly below the beads to keep them in place (Image 3). Tie 10 more square knots across the row. Then, measure 3 inches down from the last Square Knot. Start with the third cord and tie nine Square Knots. Add a color spacer bead around the two center ropes and slide them up (Image 4). On the next row down, tie nine Square Knots directly below the bead. Then, measure 3 inches down from the last square knot. On the next row, start with the first cord and tie four Square Knots. This knot pattern continues alternating beads and adding spacers on every row until you reach the planter pattern.

Caitlin Dabbs
Caitlin Dabbs
Caitlin Dabbs
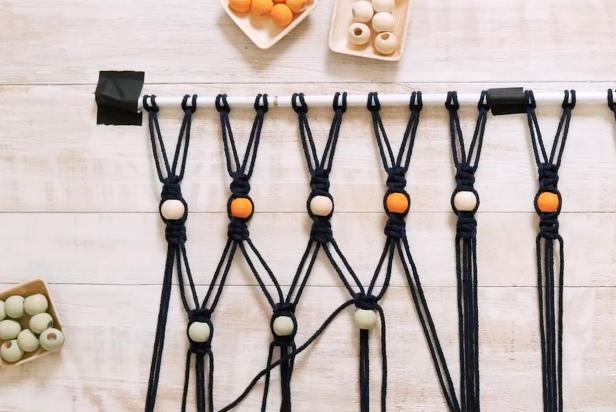
Caitlin Dabbs
Boho Macrame Beaded Curtain: Tie Square Knots
Create the first row of square knots using the step-by-step guide.
Photo By: Caitlin Dabbs
Boho Macrame Beaded Curtain: Add Beads to Knots
Add the first neutral bead to the row and tie a square knot. Use the step-by-step guide to create a square knot.
Photo By: Caitlin Dabbs
Boho Macrame Beaded Curtain: Square Knot
Tie a square knot to the first two sets of cords. See step-by-step for knot-tying how-to.
Photo By: Caitlin Dabbs
Boho Macrame Beaded Curtain: Second Row
Add alternating color and natural beads to the second row of the curtain. Refer to the step-by-step guide to tie a lark head's knot.
Photo By: Caitlin Dabbs
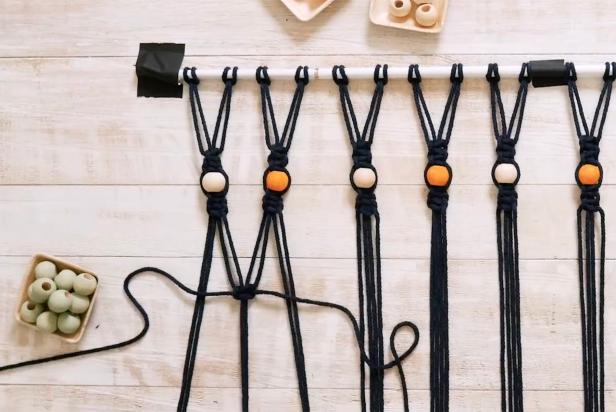
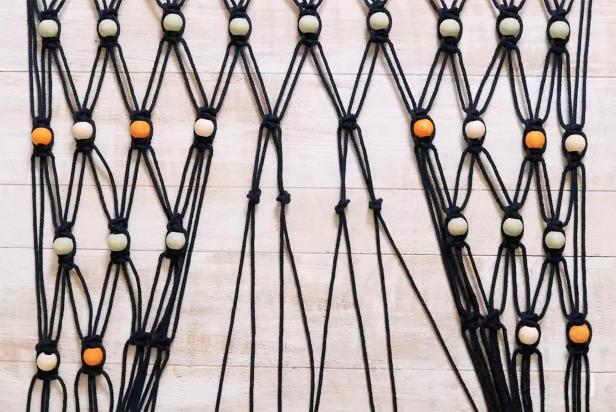
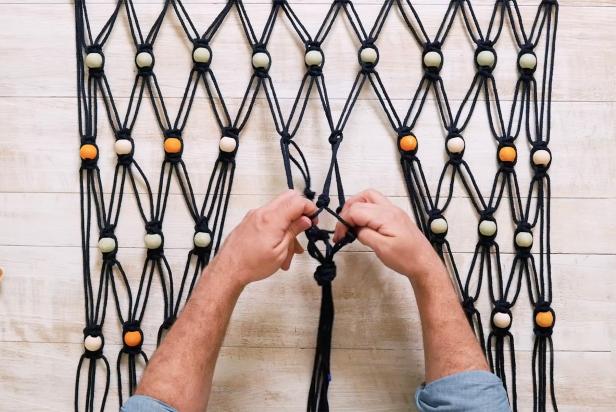
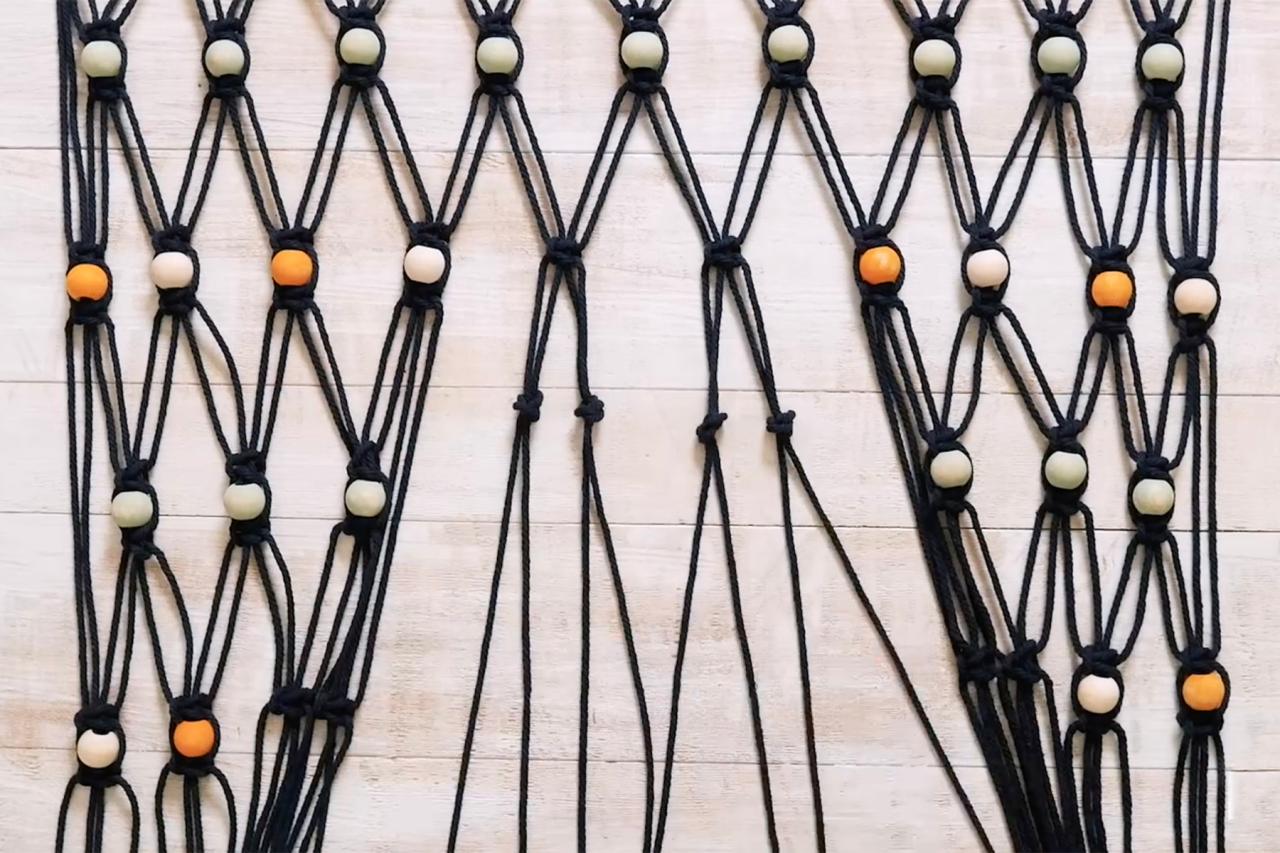
Step 5: Create the Planter Hanger + Trim Cords
To create the planter pattern, start with the eight center cords. On row two, divide the cords into four groups of two (Image 1). Tie a basic knot in each pair. You will then have four knots that line up horizontally. Measure 2 inches down. On row three, take one string from two adjacent knotted pairs and tie together in a simple, basic knot creating a basket-like zigzag (Image 2). Measure 2 inches down. On row four, tie all pieces of the cording together to create one large final knot (Image 3). Place a small pot directly above the large knot. Pull the cords evenly around the pot for a snug fit.
Using scissors, trim any uneven cord ends to complete the look.
Caitlin Dabbs
Caitlin Dabbs
Caitlin Dabbs
Caitlin Dabbs
Boho Macrame Beaded Curtain: Completed Knots
Continue tying lark's head knots and square knots adding alternating neutral, orange and teal beads in between. See step-by-step for knot-tying instructions.
Photo By: Caitlin Dabbs
Boho Macrame Beaded Curtain: Create Planter Spot
Using the step-by-step guide, create a planter spot in the curtain.
Photo By: Caitlin Dabbs
Boho Macrame Beaded Curtain: Space for Planter
Using the step-by-step guide, create a planter spot in the center of curtain using basic knots this time.
Photo By: Caitlin Dabbs
Boho Macrame Beaded Curtain: Finished
The Crafty Lumberjacks teach you how to make a funky, macrame beaded curtain with a plant holder in the middle. To start, you will need navy rope cording, wooden ball spacer beads, orange and teal acrylic paint, a tension rod, scissors, painter's tape, tape measure and a piece of sandpaper.
Photo By: Caitlin Dabbs
Boho Crafts

Make a Jute Rug With Two Cheap Doormats
Add some color and boho flair to any space with this easy DIY jute rope rug using materials found at the hardware store.
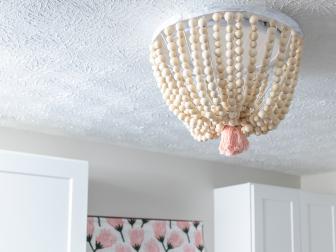
How to Make a Beaded Boho Chandelier
If you love the look of high-end beaded bohemian light fixtures but they're out of your budget, update an existing fixture with this DIY version.

How to Make a Macrame Plant Hanger 20 Photos
Knotted plant hangers are making a comeback. Make your own stylish hanger with a few simple materials.


