


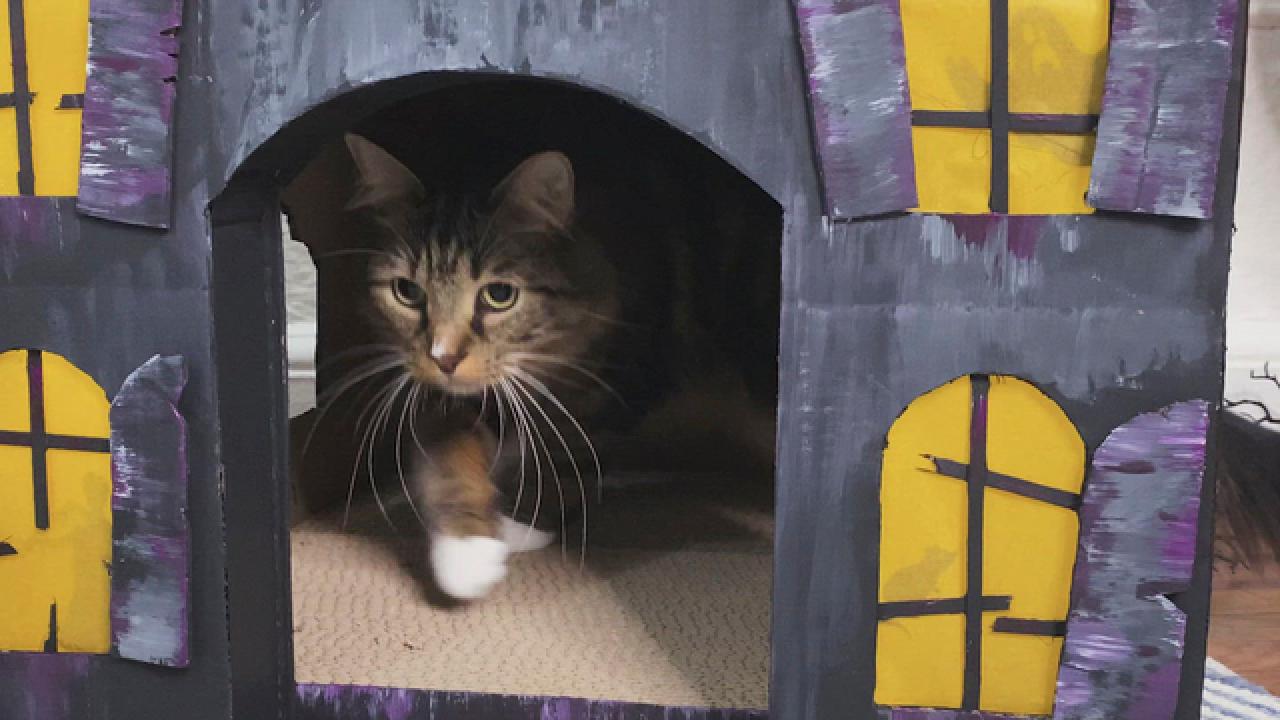
Build a Light-Up Haunted House for Your Cat
Get crafty this Halloween by turning old shipping boxes into an epic, light-up haunted house (scratch pad included!) for your cat.

Crafty Lumberjacks

Have a scaredy cat? Repurpose cardboard shipping boxes and create a DIY light-up haunted house for your cat. This spooky scratch pad is the perfect ‘boo-it-yourself’ project for this time of year to get the whole family involved. Not only will your cats love it, it will become a seasonal addition to your Halloween decor.
Materials + Supplies
- cardboard boxes (x2)
- craft mat & ruler
- pencil
- craft blade
- scissors
- acrylic paint (black, purple, white)
- paint brushes
- kite paper
- hot glue
- LED lights
- wooden coffee stirrers
- tape
- mini halloween silhouette cutouts
- cat scratch pads
Sketch Out the Facade
Take apart the first box and lay flat on a cutting mat. Sketch an outline of a Victorian-style house. In the center, draw a door with a rounded top that is large enough for your cat to walk through. Tip: Search the internet for inspiration for your haunted house style.

Crafty Lumberjacks
Cut Out Two Facades
Use a craft blade to carefully cut out the outline of the house (Image 1). Once done, place the cut house onto the second piece of cardboard and trace it. Cut out a second facade and put it aside for later (Image 2).

Crafty Lumberjacks

Crafty Lumberjacks
Cut Out the Windows
Draw a window with a rounded top on a scrap piece of cardboard and cut it out to use as a template. Trace two windows on each side of the doorway, keeping them as symmetrical as possible. Draw a more elaborate window above the doorway and on the top peak of the house. Cut the windows out with a craft knife and turn the cut pieces into shutters by cutting them in half vertically. Tip: Use items around the house like jars and small bowls for round windows or rounded edges.

Crafty Lumberjacks
Glue Window Panes
Turn the facade over to the back and glue coffee stirrers across each window vertically and horizontally for window panes. Break some of the coffee stirrers and glue them crooked for a creepy look.

Crafty Lumberjacks
Glue Roof Details and Shutters
Make the house more dimensional by adding cardboard details. Cut pieces to match the size of the roof that is drawn on the facade. Create a slanted look by gluing small scrap strips of cardboard towards the bottom of the roof and glue into place (Image 1). Rough up the shutter pieces by cutting cracks and hot gluing them slanted to the outside of each window (Image 2).

Crafty Lumberjacks

Crafty Lumberjacks
Paint the Facade
Add a base coat of black acrylic paint to the house, making sure to get all the nooks and crannies (Image 1). While the paint is still wet, add texture by mixing in different colors and sloppily painting them on (Image 2). Tip: Drag a semi dry brush down from window edges and roof tops to create a weathered look.

Crafty Lumberjacks

Crafty Lumberjacks
Tape Kite Paper + Silhouettes to Windows
Once the paint is dry, carefully flip over the facade. Cut a piece of kite paper slightly larger than each window. Tape around each side of the kite paper while making sure it is as taught as possible. Glue storebought or machine cut silhouette cardstock cutouts to the widows for a haunting detail once it is all lit.

Crafty Lumberjacks
Add LED Lights
Unravel a strand of LED lights and find the center. Place the center of the strand at the top of the house and begin to glue the lights and the cords around the windows as evenly spaced as possible. Try to keep the lights and cords away from the windows so they are not seen when lit. Make sure to keep the end of the plug peeking out at the bottom so it is easy to access once assembled.

Crafty Lumberjacks
Create a Border
Add a border around the perimeter of the house to contain the light and give a polished look. Cut a handful of two inch thick strips from scrap pieces of cardboard and paint them black. Add hot glue along the perimeter and place the strip upright on the glue and hold it in place until the glue is dry (Image 1). Tip: It’s easier to work in sections with shorter strips. Continue around the perimeter of the house and the inside of the doorway (Image 2).

Crafty Lumberjacks

Crafty Lumberjacks
Add the Backside of the Facade
Place the cut backing on top of the border to make sure it lines up. Starting at the bottom of the facade, add glue on top of the border and press the backing on top. Don't forget to keep the end of the plug sticking out before gluing everything together.

Crafty Lumberjacks
Create the Structure of the House
Put together the other box and draw a doorway the same size as the one on the facade. Cut out additional windows and doors on other sides of the box if desired. Paint the exterior of the box with a base coat of black and add similar details to match the facade.

Crafty Lumberjacks
Add the Scratch Pads
Once the box is dry, add cat scratch pads to the inside of the box (Image 1 + 2). Close the lid of the box and tape it shut. Add hot glue to the top of the box and place the scratch pads on top (Image 3). Tip: If the scratch pads are too large to fit, cut them down to size by scoring them with a craft blade or box cutter.

Crafty Lumberjacks

Crafty Lumberjacks

Crafty Lumberjacks
Glue on the Facade
Line up the facade’s doorway to the cut doorway of the box (Image 1). Add an ample amount of hot glue to the box and carefully press the facade to it. Finally, plug in your cat's new haunted manor.

Crafty Lumberjacks

Crafty Lumberjacks

Crafty Lumberjacks
Crafty Lumberjacks

Crafty Lumberjacks
Halloween DIYs for Pets

Make Cat Costumes Inspired by Iconic Halloween Movie Villains
You only need a handful of supplies to craft up these classic costumes.

DIY Pet Costumes for Halloween 37 Photos
Include your furry friend in this year's Halloween celebrations by crafting a handmade costume for your dog or cat.

DIY This Dog-Friendly Boo Basket for Halloween
Give your neighborhood doggos something to bark about with a few DIY boo baskets made with love.


