


DIY Rolling Storage Bench
Easily build a functional bench that doubles as a storage locker for your patio using basic DIY skills and a few tools.
Keep in mind: Price and stock could change after publish date, and we may make money from these links.


Tools and Materials Needed
- 4x8 x 3/4" AC-grade sheet of plywood rated for outdoor use
- (8) 1x2 x 6' pieces of pine
- (8) 1x6 x 8' pieces of pine
- circular saw
- clamps
- speed square
- (3) 3/4” stainless steel hinges
- box of 1-1/4" #8 exterior screws

Sarah Busby
Cut Plywood Into Parts

Derek Trimble
The first thing you need to do is to break down your big sheet of plywood into the dimensions shown. Red areas denote scrap pieces. Using a straight edge, measure your cuts being sure to account for your circular saw’s offset from the blade guard. Once you’ve broken your sheet down, it’s a good opportunity to sand your pieces if needed.
Assemble the Sides

Sarah Busby
Using clamps and a speed square, begin to secure the front and side panels. Place the side panels to the INSIDE of the front and rear panels as shown above. Run a bead of adhesive along the joints and drive three screws into each corner. Be sure to use a countersink bit to pre-drill your holes before driving your screws. After you’ve secured each side, use wood filler to fill in the holes. Allow that to dry; then lightly sand the sides.
Attach the Bottom

Sarah Busby
Use the same process to attach the bottom piece to the box (drill countersink, glue and screw). At this point, you need to fill your screw holes with wood filler and sand them flush. Next, run a thick bead of clear silicone around the inside of the box. Be sure not to leave any holes to help keep your box water tight.
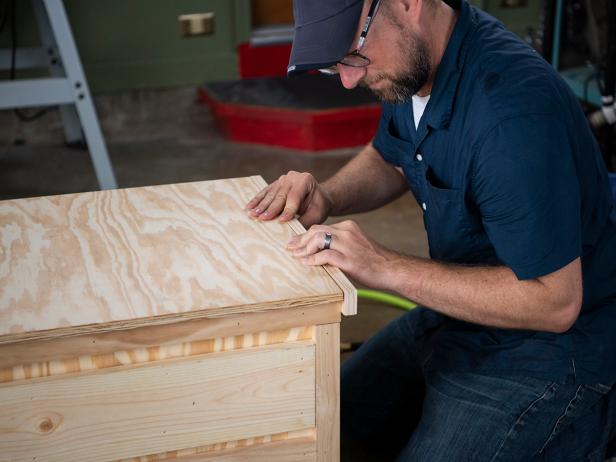
Apply Exterior Trim

Sarah Busby

Sarah Busby

Sarah Busby

Sarah Busby

Sarah Busby
Using your 1x2s and 1x6s, trim out your box as shown. Start with the corners and the top, and then measure and cut the side pieces to fit. Use a bead of adhesive under each piece and attach with finish nails. You can drive these by hand, or if you have a nail gun, that will speed the process up for you.
Once your trim is fully attached, take the time to fill all of the nail holes and any unsightly cracks (if any). Sand your wood filler flush and give the box a final sanding.
Attach Lid With Hinges

Sarah Busby
Place the lid on the box, align it neatly with the sides, and attach your hinges as shown.
Install Wheels on Bottom

Sarah Busby
Clamp the lid shut, rock your box onto its side, and attach your casters. Be sure to align them evenly and square so that the box won’t tip when you sit on it.
Add Trim to Lid
Sarah Busby
Use 1x2s to trim out the front and the two sides of the lid. Attach them with a bead of adhesive followed by finish nails, and then use wood filler in the holes. Sand everything smooth one last time.
Apply Waterproof Finish

Sarah Busby
Apply an outdoor quality finish to your project. Look for one that's waterproof and right for your climate and application.
Enjoy!

Sarah Busby
Use your bench for extra storage outside or add a pillow for comfy seating. However you choose to enjoy it, this versatile project is sure to add style to your outdoor decor.


