


How to Install a French Cleat Storage System
Turn an unused wall in any room into a stylish, customizable and sturdy storage system with the addition of French cleats.

Supplies Needed
- (3) 1x4x10 whitewood board
- (2) 2x4 studs cut to 9 1/2”
- table saw
- interior paint
- paintbrush
- stud finder
- pencil
- level
- drill
- 1 1/2” finishing screws
- #6 x 3/4” wood screws
- storage crates
- cup hooks
Create and Paint Cleats
Create a french cleat by cutting each 1x4 board to your desired length, then cut it in half longways at a 45-degree angle (Image 1). Paint the wood with interior paint and let dry (Image 2). Label the back of each cleat with coordinating numbers to ensure the pairs stay with each other during the mounting process.

Shain Rievley

Shain Rievley
Mount Bottom Half
Use a stud finder to locate studs in the wall where you will attach the cleats, and mark with a pencil (Image 1). First, locate the bottom half of the cleat — the piece that is flat on the bottom and angled at the top. Using a level, make sure the cleat is straight, and secure to the wall with finishing screws, the angled portion facing the wall (Image 2). To vertically space out the cleats quickly, use 2x4 pieces as spacers. Place the spacers on top of the cleat, then rest the next bottom cleat on top of the spacer and secure to the wall (Image 3). Repeat the process until all bottom halves are installed. Remove the spacers when done.

Shain Rievley

Shain Rievley

Shain Rievley
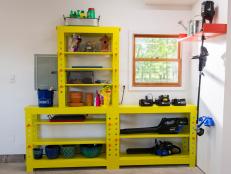
Attach Crates and Hooks
Attach crates to the top cleat in desired pattern using wood screws (Image 1). Switch up the orientation of the crates to accommodate more as well as add visual interest (Image 2). Attach hooks to accommodate accessories such as jackets, hats, backpacks, etc.

Shain Rievley

Shain Rievley
Connect Top Half
Check the labeling on the back of each cleat to pair them with their partner on the wall. Carefully nestle the top half of the cleat — the piece flat on top and angled on the bottom — into its corresponding piece. Finally, fill the crates and hooks with your items, and watch your cluttered catchall space on the floor disappear.

Shain Rievley

Shain Rievley

Shain Rievley


