


3 Totally Unique Ways to Make (and Wear) a Corsage
Whether you're headed to prom or dressing up for your best friend's wedding, ditch the basic wrist corsage and pretty-up your ensemble with a gorgeous, DIY flower-decked necklace, ring or trendy arm cuff.

Fun fact: The word "corsage" is French for "bodice." Ladies used to pin small bouquets of flowers to their dress bodices on special occasions and, over time, the bouquets became synonymous with that part of the dress. But as fashion evolved, sleeves got shorter and necklines lower, the corsage gravitated to the wrist and has remained there ever since ... until now. If you're looking to break the mold this prom or wedding season, step out with a not-so-common corsage of fashion-forward blooms arranged on a statement-making jewelry piece. Not a DIYer? Screenshot your fave look and text it to your florist for inspiration.

Style #1: Necklace Corsage

Cassidy Garcia
Materials Needed
- floral adhesive
- fresh flowers (details below)
Prep Necklace
Cut the elastic off a standard wrist corsage elastic (found at the craft store or online) and bend the metal arms of the corsage base around the necklace bar (Images 1-4). The metal piece provides a larger base for flower arranging and protects the necklace so you can wear it again. Use pliers to clamp the arms in place (Image 5).

Cassidy Garcia

Cassidy Garcia

Cassidy Garcia

Cassidy Garcia

Cassidy Garcia
Arrange Flowers
Cut all flower stems as close to the blooms as possible and cut all filler flowers and greenery into 3" or 4" pieces (Image 1). For this project, we used pink and white anemone, green hellebore, astrantia, white wax flower and Italian ruscus greenery. Lay the necklace on a flat surface and "dry arrange" all flowers on the surface until you achieve the look you like (Image 2). You may need to re-cut some stems to fit just right. Once you're happy with the arrangement, remove the flowers and apply a layer of floral adhesive directly to the metal corsage base (Image 3). Add a dab of corsage glue to the first stem (I usually start with greenery) and slide it into the glue on the base (Images 4 & 5). Repeat with remaining flowers until the arrangement is complete, then let the glue dry for about 15 minutes. Store in a corsage box in a cool place for up to 24 hours. If storing in the fridge, take care not to place it near the sides or roof to avoid freezer burn.

Cassidy Garcia

Cassidy Garcia

Cassidy Garcia

Cassidy Garcia

Cassidy Garcia
Style #2: Trendy Arm Cuff

Cassidy Garcia
Materials Needed
- pheasant feathers
- fresh flowers (details below)
Prep Cuff
For this project, you'll follow the same basic steps as above. First, cut the elastic off of a wrist corsage elastic and bend the metal arms of the corsage base around the bottom end of an adjustable upper arm cuff (Image 2). Use pliers to clamp the metal piece in place (Image 3).

Cassidy Garcia

Cassidy Garcia

Cassidy Garcia
Add Feathers & Flowers
First, prep all blooms and accessories. Cut flower stems as short as possible and snip filler flower and greenery into 1" or 2" pieces. Trim feathers to the desired length and shape for your project. It helps to have a general idea of how you want the finished piece to look before gluing. Once all blooms are prepped, add a thin layer of floral adhesive to the metal base and allow it to get tacky — about 30 seconds (Image 1). Apply a dab of glue to the end of the first feather and insert it into the glue on the corsage base (Image 2). Hold in place until secure − about 10 seconds. Repeat with second feather. Then, glue and place statement flowers in the center of the base (we used pink ranunculus). Once dry, place greenery along the outer edges, following the asymmetrical shape of the feathers, and fill in gaps with filler blooms such as thistle, white wax flower, pink astilbe and astrantia (Images 3 & 4).

Cassidy Garcia

Cassidy Garcia

Cassidy Garcia

Cassidy Garcia
Style #3: Lovely Flower Ring

Cassidy Garcia
Materials Needed
- small fresh flowers (details below)
Glue & Go
This project is as easy as it gets! First, choose a handful of small, hearty flowers. Cut stems close to the blooms and snip greenery or filler flower into one or two-inch sections. Slip an adjustable ring with a flat base onto your non-dominant pointer finger and angle the base toward you (Image 1). Apply a layer of floral adhesive to the base and allow it to get tacky — about 10 seconds (Image 2). Apply glue to the end of the first "statement" flower (we used blue thistle) and hold it on the base until it doesn't wiggle around anymore — about 30 seconds (Images 3 & 4). Continue with remaining flowers, arranging as you go. We finished the look with white wax flower and hot pink astilbe (Image 5).

Cassidy Garcia

Cassidy Garcia

Cassidy Garcia

Cassidy Garcia

Cassidy Garcia

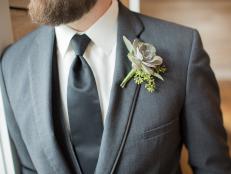
How to Make an Easy, Stylish Corsage & Boutonniere 22 Photos
Save money on your wedding day, prom or other flower-worthy occasion by handcrafting a gorgeous boutonniere and corsage from inexpensive grocery store flowers.


