Turn Recycled Cardboard Into a Fun DIY Car for Pets

Transform those cardboard scraps into a cool, colorful car for Fluffy or Fido using only a few materials you likely have on hand.

Cardboard Hangout

Cardboard Hangout

Cardboard Hangout

Photo by: Flynnside Out Productions

Flynnside Out Productions

Materials Needed

  • recycled heavy-duty cardboard scraps
  • ruler or straight edge
  • measuring tape
  • pencil or marker
  • utility knife
  • hot glue gun
  • hot glue sticks
  • strong duct tape
  • non-toxic tempera craft paint, in desired colors
  • several foam paintbrushes
  • paint palette

Sketch + Cut Out Sides 

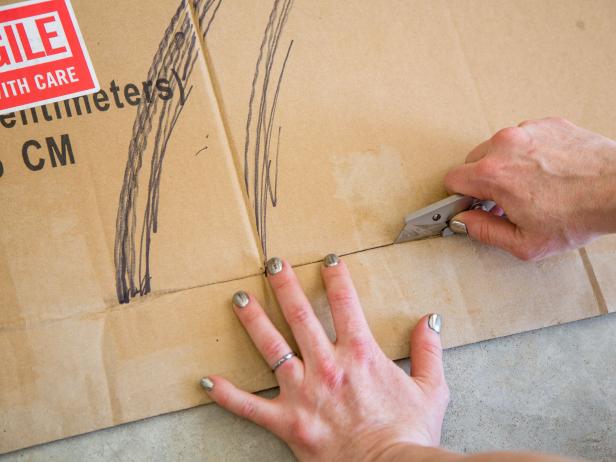
Using a pencil or marker, draw a half-circle shape on a scrap of cardboard (Image A). Utilize any fold on the box so you have a nice, level base (Image B). Cut out the shape, then use it as a template to create the other side (Image C).

Measure for Base + Roof 

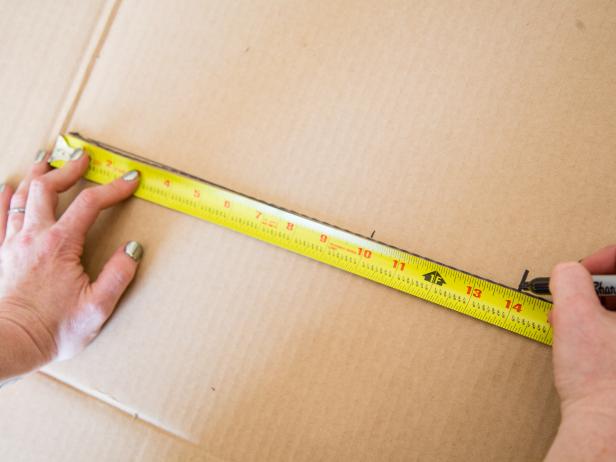
To create the base and roof of the car, measure along the bottom of the half circle to determine the length (Image A). Next, hold up each side of the car and measure the desired distance between the two pieces. We went with a 10-inch width (Image B).

Add Windows

Once both sides are sketched, draw windows onto the side of the car and cut them out with a utility knife. Use that to trace a template on the other side. This way, you'll have perfect symmetry on either side of the car.

Step 3- Add Windows
Once both sides are sketched, draw windows on to the side of the “car or house” and using a utility blade, cut them out. Use that to trace a template on the other side. This way you’ll have perfect symmetry on either side of the car or house.

Cardboard Hangout

Step 3- Add Windows Once both sides are sketched, draw windows on to the side of the “car or house” and using a utility blade, cut them out. Use that to trace a template on the other side. This way you’ll have perfect symmetry on either side of the car or house.

Photo by: Flynnside Out Productions

Flynnside Out Productions

Measure, Score + Cut Base

With your 10-inch width in mind, add four more inches, which will allow for a two-inch lip on either side (Image A), and cut out. Then, with the bottom side up, lightly score the cardboard with a utility knife along the sides for easy folding (Image B).
Attach Base to Sides

To assemble, attach the base piece to the sides using duct tape (Image A) along the interior for reinforcement (Image B).

Cut Out Sunroof

Measure and mark the roof onto the cardboard (14-by-38 inches), then cut out a small sunroof. We used a small children's book as our template.

Step 6- Cut Out Sunroof
Measure and mark the roof onto the cardboard (14x38-inches), then cut out a small sunroof. We used a small children’s book as our template

Cardboard Hangout

Step 6- Cut Out Sunroof Measure and mark the roof onto the cardboard (14x38-inches), then cut out a small sunroof. We used a small children’s book as our template

Photo by: Flynnside Out Productions

Flynnside Out Productions

Notch + Attach Roof

Notch the roof's two-inch lip to allow for the curve, then secure the sides, one at a time, to the roof using hot glue.
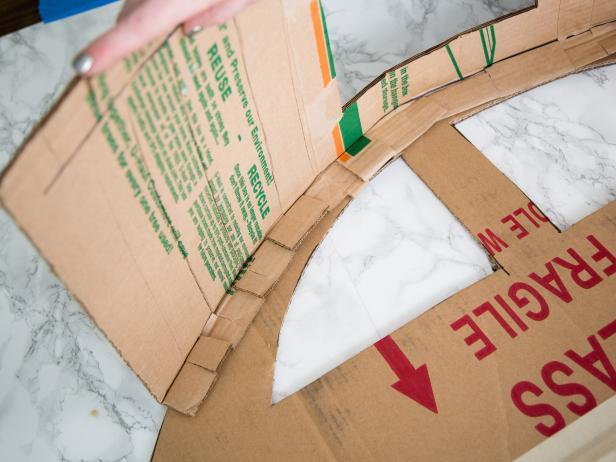
Step 7- Notch & Attach Roof
Notch the roof’s two-inch lip to allow for the curve, then secure the sides, one at a time, to the roof using hot glue.

Cardboard Hangout

Step 7- Notch & Attach Roof Notch the roof’s two-inch lip to allow for the curve, then secure the sides, one at a time, to the roof using hot glue.

Photo by: Flynnside Out Productions

Flynnside Out Productions

Paint Cardboard 

Once fully assembled, paint the interior of the car with a non-toxic tempera craft paint in your desired color, and let dry. Next, paint the exterior of the car in your favorite color, then let dry. Use cups of varying sizes to trace the wheels, then paint those, too.
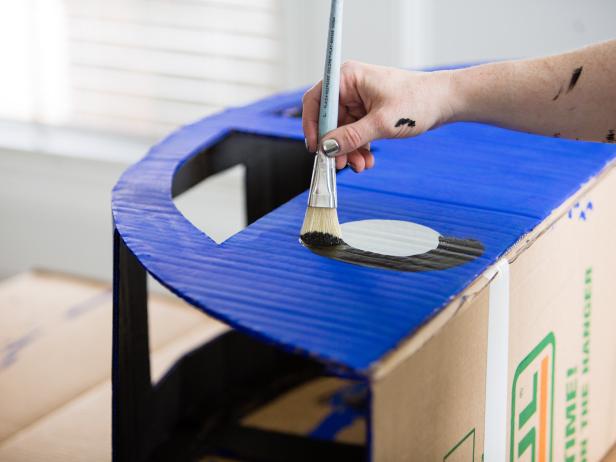
Step 8- Paint Cardboard
Once fully assembled, paint out the interior of the hangout with a non-toxic craft paint. Next, paint out the exterior of the car with a bright color. Use cups of varying sizes to trace the wheels, then paint those, too.

Cardboard Hangout

Step 8- Paint Cardboard Once fully assembled, paint out the interior of the hangout with a non-toxic craft paint. Next, paint out the exterior of the car with a bright color. Use cups of varying sizes to trace the wheels, then paint those, too.

Photo by: Flynnside Out Productions

Flynnside Out Productions

Ready to Play

Once the car is completely dry, set it out and watch your furry friend go wild. If they need some coaxing, toss in a few toys or treats.

Next Up

How to Make a Fun Backseat Organizer for Kids

Getting ready for a road trip? Keep kids content in the car with this backseat organizer that holds all the basics, plus a whole lot more.

Back-to-School DIY: Easy Ways to Customize a Kid's Backpack

Let kids create a backpack that's truly unique and representative of who they are.

Make a Dreamy, DIY Play Canopy for a Kid's Room

This magical night sky canopy is a simple, no-sew project to make on a rainy day. Using materials readily found in your local big box store, you can create a special place for your child to read books, relax and play with toys. Best of all, this project is easy on the wallet and doable for novice DIYers.

How to Make a Halloween Night-Light From a Plastic Bottle

Let your kids illuminate Halloween by crafting a witch night-light made from an upcycled 2-liter bottle.

How to Make Halloween String Lights on the Cheap

The secret to making them on the cheap? Toilet paper rolls. If you or your kids can use scissors and decoupage glue, you can make a set of these festive Halloween string lights.

How to Make Terrazzo-Style Candles From Crayons

Don't toss those broken crayons. Instead, upcycle them into colorful candles.

DIY Bike Stand: Upcycle a Crib Rail Into a Bike Stand

Don't toss that old crib rail; upcycle it into a handy DIY bike rack with helmet hooks to keep your kids' bikes and gear safely stowed away.

Mother's Day Kids' Craft: Fingerprint Table Runner

Get the kids involved in crafting and decorating for Mother's Day brunch by personalizing a plain white table runner with colorful fingerprints.

The Best Egg Decorating Kits for At-Home Easter Fun

No plain, white eggs this season! Create the most eye-catching Easter eggs with these vivid color and pattern ideas.

The Best Christmas, Hanukkah and Winter Craft Kits for Kids

Get your children excited for the season with activities and projects for Christmas, Hanukkah and winter.

What's New in Handmade

On TV

Follow Us Everywhere

Join the party! Don't miss HGTV in your favorite social media feeds.