


How to Paint a Wooden Outdoor Barn Quilt
Looking to add color and style to your porch or patio? Check out how easy it is to make a decorative quilt barn to hang in your outdoor or indoor space.
A barn quilt is a large piece of plywood painted to look like a quilt block. They are a form of American folk art that has been around for hundreds of years. During American colonial times, settlers from central Europe hung wooden barn quilts and hex signs on their barns to identify and celebrate their heritage. They also believed that this artwork would protect their barn and animals and bring them luck.
Today people travel all over rural America and Canada to see barn quilts. Many states have barn-quilt trails, which are essentially guided road maps that will take you past elaborate and colorful barn quilts.
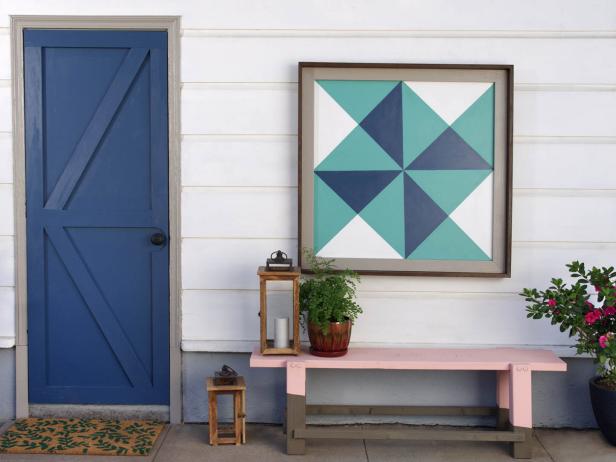
Even if you don’t have a barn, you can still decorate your outdoor space with a geometric barn quilt. This project requires minimum woodworking and painting skills. We added a frame and mat around our barn quilt for a finished look. Be sure to use exterior-grade materials so your barn quilt will last for years to come.

Tools and Materials
- drill
- exterior-grade screws
- measuring tape and straight edge
- paint, paintbrushes and a roller
- painter's tape
- circular saw
- D-rings and picture-hanging wire
- (1) 4' x 8' x 3/4" sheet of plywood
- (2) 1x4 x 8' for frame
- (2) 1x3 x 8' for mat
- wood putty
- pattern template
- wood stain
- pneumatic staple gun and staples

1. Cut Plywood to Size
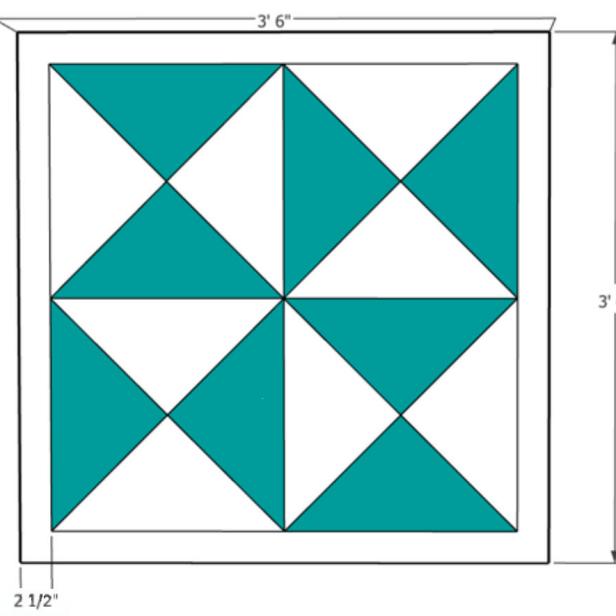
Barn art is traditionally square. Start with a 4’ x 8’ sheet of plywood and cut it to the size appropriate for your space. We made ours 42” x 42”.

Gary Payne
2. Prime and Paint Base Coat
Use a combination of primer and paint in one for your base coat.

Gary Payne
3. Lay Out Design
Download the template to make laying out your pattern easier. Use a straight edge to mark out your design. Our design starts with four square quadrants, each divided into four triangles. Remember to leave a 2-1/2” border on all sides to account for the 1x3 wood mat that will sit on top of the canvas. To avoid mistakes, use a pencil to lightly mark each triangle with the color you intend to paint it.

Gary Payne

Gary Payne

Gary Payne
4. Tape + Paint Lightest Color
Use painter's tape to mark off the sections for your lightest color. Painting in order from the lightest color to the darkest color will allow for any mistakes to be easily masked. Paint all the taped-off sections. When done, peel off the tape at a 45-degree angle just before the paint is fully dry to get a clean edge.

Gary Payne

Gary Payne

Gary Payne
5. Tape + Paint Darkest Color
After the lighter color has dried, tape off the lines for the next color. Continue along this pattern until each color or section has been painted.

Gary Payne

Gary Payne
6. Add a Mat
The 1x3 mat should be cut to the length of the canvas with 45-degree mitered corners. These can be cut with a circular saw or a miter saw. Lay them on the canvas to test fit. Paint or finish the pieces as desired; we stained the mat and frame in two different shades. Staple the four boards together with a pneumatic staple gun. Apply wood glue to the back of the mat then lay it on top of the art. Nail the mat to the canvas. Add wood putty to the nail holes if necessary.

Gary Payne
7. Frame It
The 1x4 frame will fit outside the mat and will be attached to the edge of the canvas and mat. Miter-cut the four frame boards on end to 42-3/4” long. Before fastening all four pieces together, test-fit them around the canvas to ensure you have a snug fit. Paint or finish as desired. Fasten all four pieces together at the corners. Lay the frame around the canvas and attach it to the canvas and mat with screws along the outside edges.

Gary Payne
8. Add Hanging Hardware
Add two D-rings to the back of the board and run a wire through, securely wrapping it around the D-rings for a strong hold. Hang your new artwork and enjoy!

28 Best Outdoor Wall Decor for Your Porch, Deck & Patio
Perk up your porch with our favorite all-weather wall art and decor for every outdoor style.


