


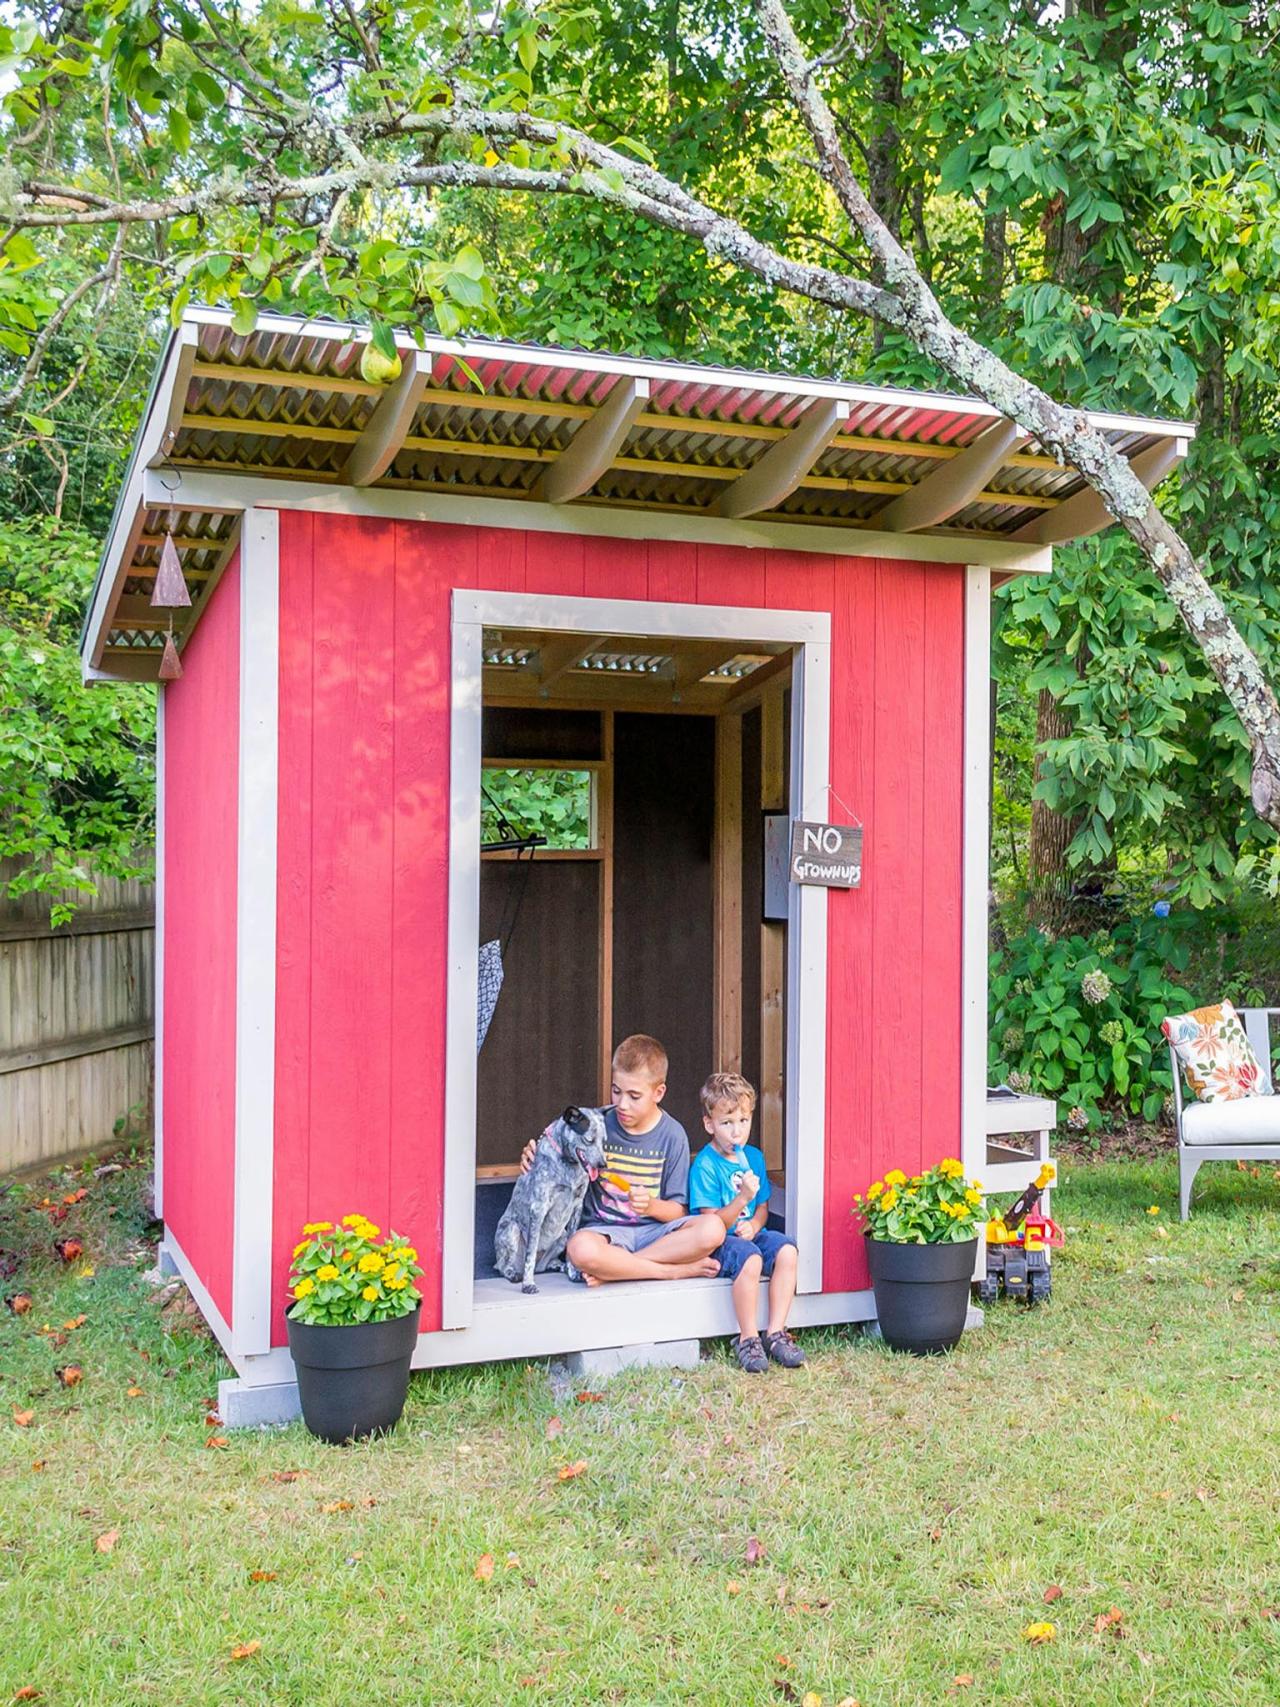
Create a Custom Kids' Backyard Playhouse
Make a budget-friendly playhouse for the kids. When they grow out of it, turn it into a potting shed.


Debbie Wolfe
Materials and Cut Sheet:
*This project requires intermediate to advanced carpentry skills.
Base
- headers: (2) pressure treated 2x6 96 inches
- joists: (7) pressure treated 2x6 93 inches
- floor: (2) pressure treated 23/32 plywood full sheets
Front Wall
- sill: (1) 2x4, 96 inches long
- cap: (1) 2x4, 96 inches long
- studs: 24 inch spacing front wall (4) 2x4, 81 inches long and (1) 2x4, 9 inches long
- doorway uprights: (2) 2x4, 70 ½ inches long
- doorway header: (1) 2x4, 46 ½ inches long
- siding: (2) sheets of exterior paneling cut (from the top) to 87 inches tall. From the left piece, cut out a section 24 inches wide and 75 inches tall from the lower right corner for half of the doorway. From the right piece, cut out a section 24 inches wide and 75 inches tall from the lower left corner for half of the doorway.
Rear Wall
- sill: (1) 2x4, 96 inches long
- cap: (1) 2x4, 96 inches long
- studs: 24 inch spacing rear wall (4) 2x4, 69 inches long, (1) 2x4, 46 ½ inches long and (1) 2x4, 9 inches long
- window frame: (2) 2x4, 46 ½ inches long and (2) 2x4, 12 inches long
- siding: (2) sheets of exterior paneling cut (from the top) to 75 inches. From the left piece, cut out a section 24 inches wide and 12 inches tall, beginning 12 inches down from the top right corner for half of the window. From the right piece, cut out a section 24 inches wide and 12 inches tall, beginning 12 inches down from the top left corner for half of the window.
Side Walls
- sills: (2) 2x4, 92 inches
- caps: (2) 2x4, 92 ¾ inches, both ends mitred to 8 degrees.
- studs: 23 inch spacing on sides (all tops mitred to 8 degrees), (2) 2x4, 81 inches long (2) 2x4, 78 inches long, (2) 2x4, 75 inches long, (2) 2x4, 72 inches long and (2) 2x4, 69 inches long
- siding: right side (2) sheets of exterior paneling cut 87 inches tall on the left ( with the first four inches level), tapering to 75 inches tall on the far right (last four inches level). Left side (2) sheets of exterior paneling cut 75 inches tall on the far left (first four inches level), tapering to 87 inches tall on the right (last four inches level).
Roof
- supports: (4) 2x4, 120 inches long and (2) 2x4, 92 3/4 inches long mitred 8 degrees edgewise
- rafters: (6) 2x6, 144 inches long
- purlins: (9) 1x4, 120 inches long
- drip edge: (4) sticks of drip edge 120 inches long and (2) pieces of drip edge 27 inches long
- roofing: (5) sheets of 2.17 x 12 foot corrugated metal roofing
Trim
- front corners: (4) 1x4, 87 inches
- rear corners: (4) 1x4, 75 inches
- door: (2) 1x4, 75 inches (1) 1x4, 55 inches
- window: (2) 1x4, 55 inches (2) 1x4, 12 inches
Tools and Hardware
- mitre saw
- jigsaw
- drill (with various drill bits)
- hammer
- hand saw
- speed square
- level
- 2 inch exterior screws
- 3 inch galvenized nails
- 1 1/2 galvenized nails
- 3 inch exterior screws
- 1 inch roofing screws with gaskets
- paint (and painting accessories)
- workbench
Assemble the Base

Debbie Wolfe
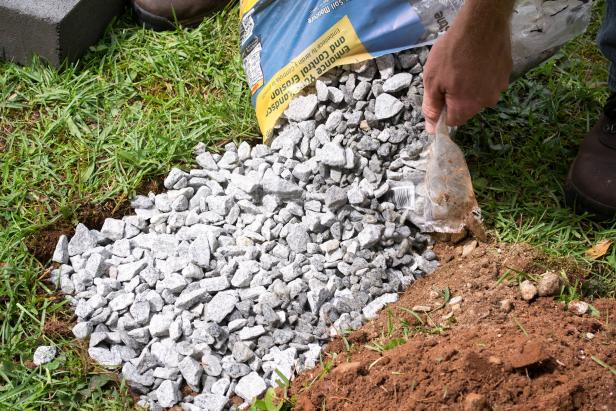

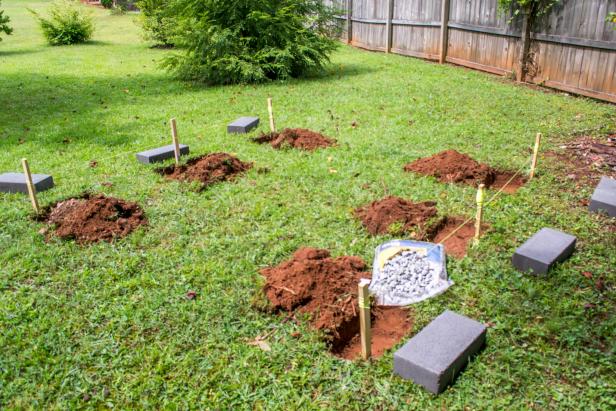
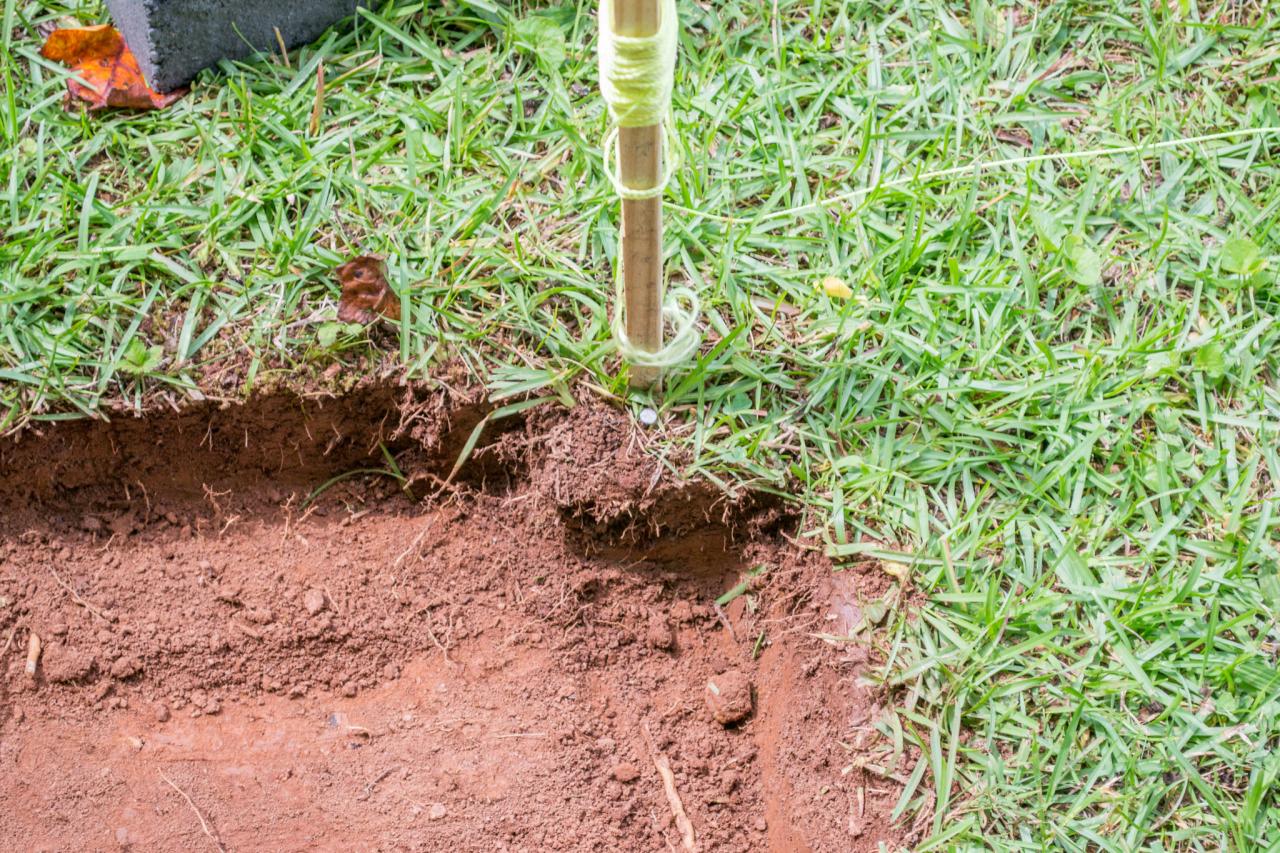
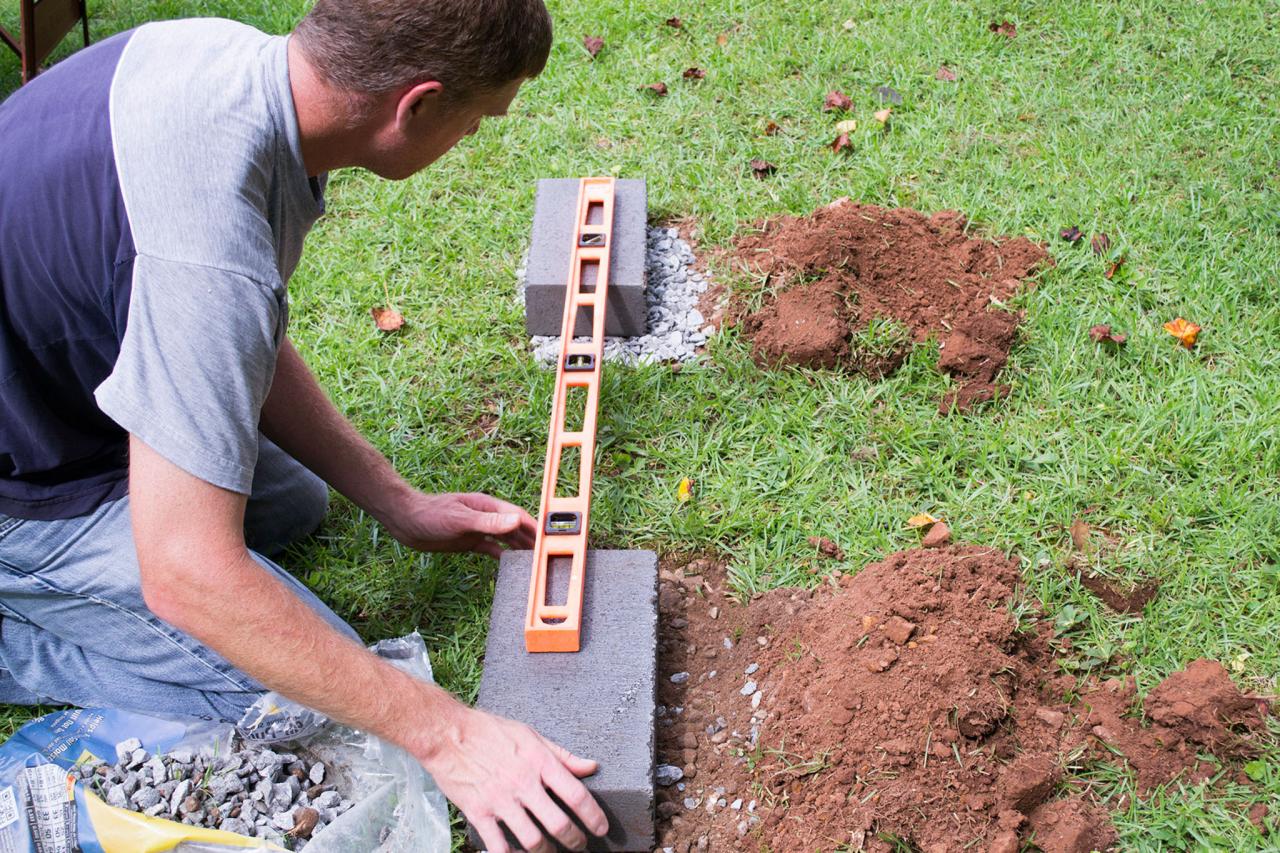
On level ground, mark the locations for the foundation blocks in two rows: three blocks for the front and three for the back. Allow a little more than 8 feet from the front edge of the front row of blocks to the back edge of the back row, and from end to end (Image 1). Dig a 6-inch deep footprint for each block (Image 2). Fill the footprints a little more than halfway with gravel and pack them tightly (Image 3). Place the blocks on the footprints and check that they are level. Start with the highest block and work toward the lowest, adjusting each block by adding or removing the gravel base material until all six blocks are level individually and with one another (Image 4).

Debbie Wolfe

Debbie Wolfe
Debbie Wolfe
Debbie Wolfe
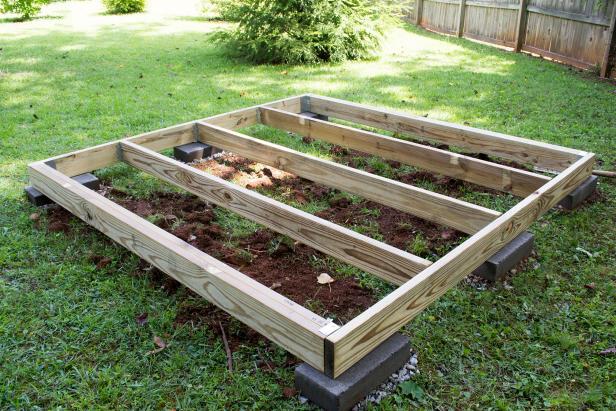
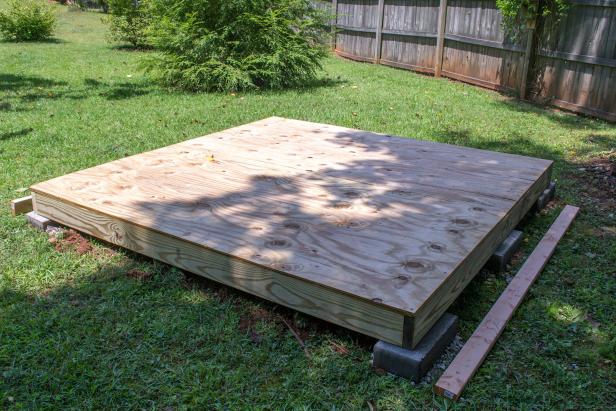
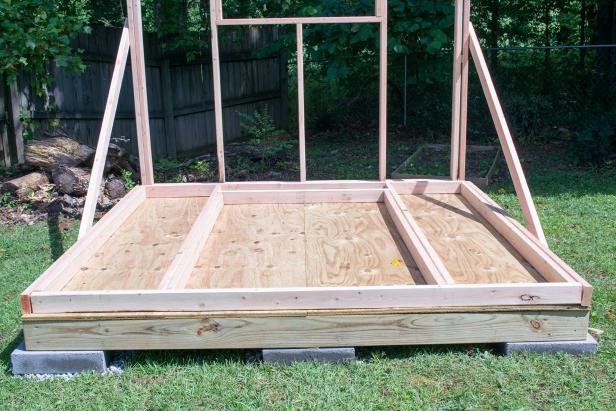
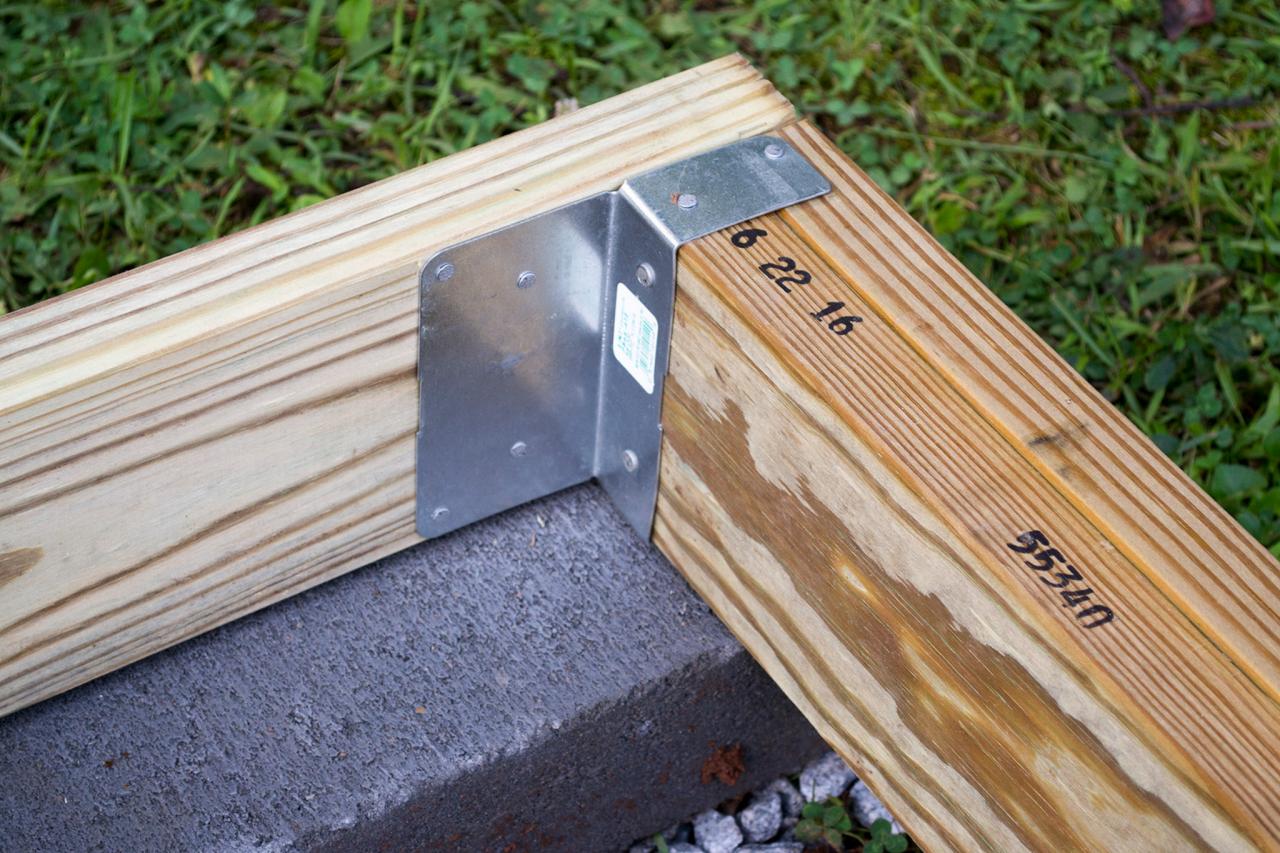
Mark the locations of the three middle joists at 24, 48, and 72 inches on both header boards. Attach the joist hangers, centered on these measurements, using 1 1/2 inch galvanized nails. Lay one header across the front foundation blocks and one across the rear (Image 1). Assemble the double rim joists using 2 joists for each. Fasten them at the ends with steel post caps using 1 1/2 inch galvanized nails. The tabs on the post caps need to face the same direction. Lay one double rim joist on each side of the foundation, tabs facing inward. Attach the corners of the frame by lining up the ends of the rim joists with the ends of the headers (headers cover the ends of the joists) and nailing the tabs of the rim joists to the inner face of the headers. When the four corners are attached, check to make sure the foundation is square. Finally, drive (2) 3-inch galvanized nails through the headers, into the ends of the rim joists at each corner (Image 2). Fit the remaining three joists into the joist hangers and nail them into place using 1 1/2 inch galvanized nails through the holes in the joist hangers (Image 3). Attach the plywood floor using 2-inch exterior screws spaced twelve inches apart around the edges and along the joists. Ensure that the frame remains square by lining up the edges of one end and one side of the plywood with the edges of the foundation and screwing them down first. Mark the location of the joists on the plywood to guide the location of the screws (Image 4).
Assemble the Walls
Debbie Wolfe


Debbie Wolfe
Debbie Wolfe
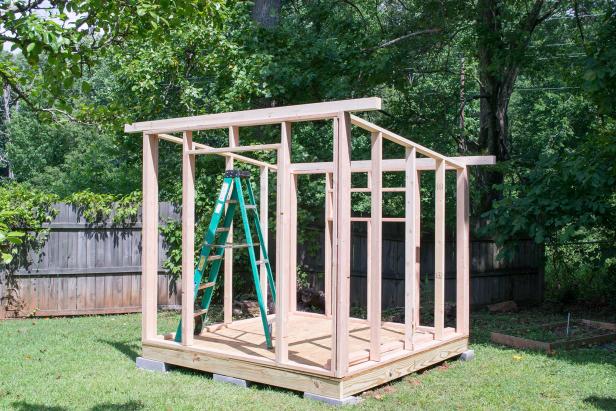
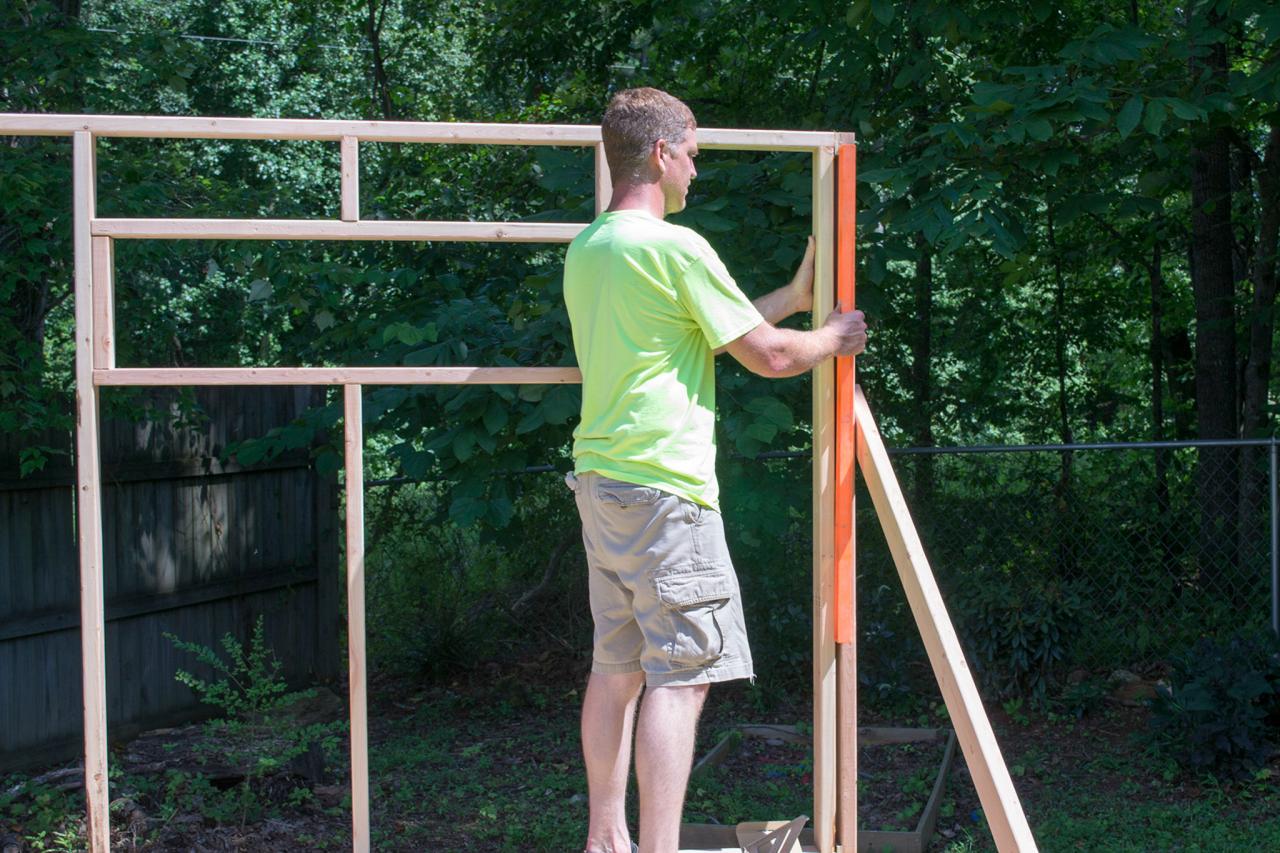
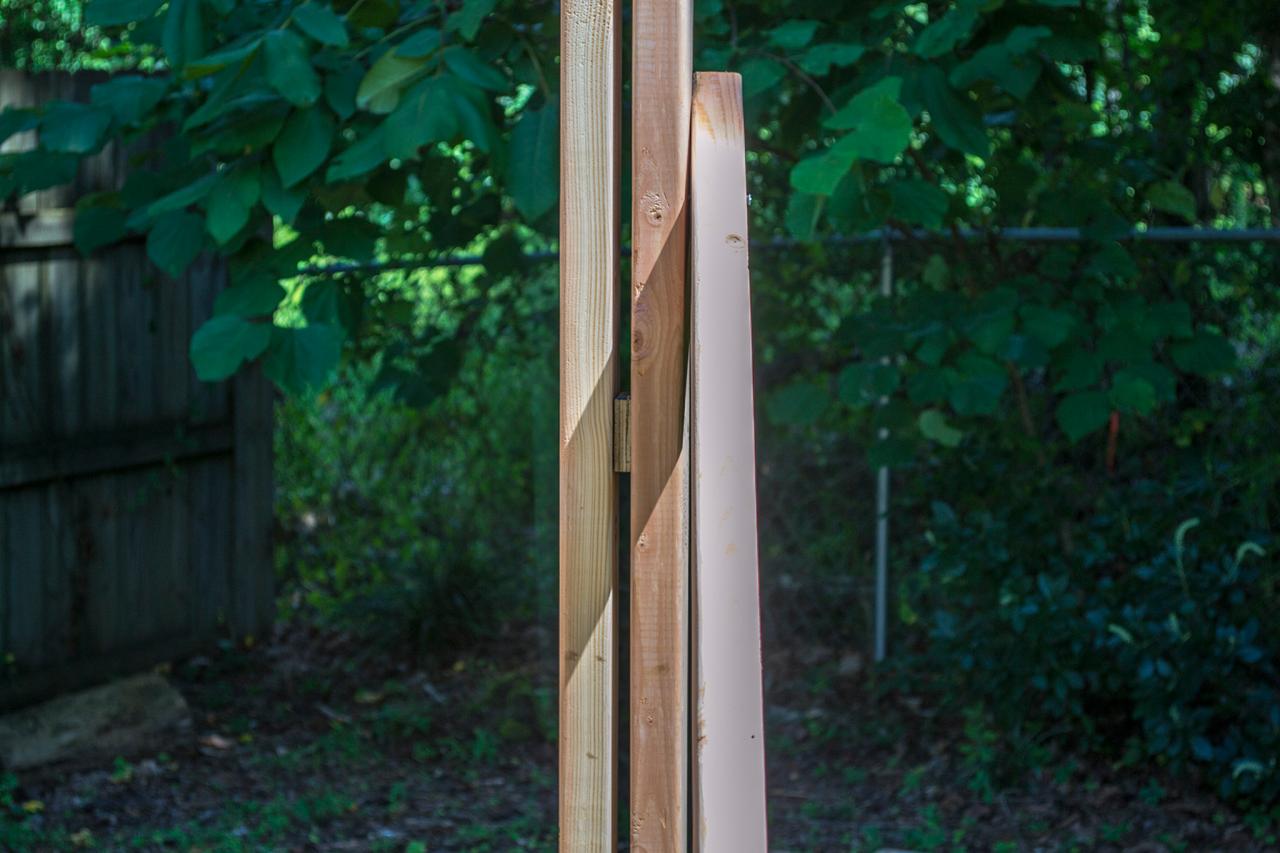
Lay out the wall frames on the floor. The front and rear walls will be the full width of the floor—they will be built first and second. The side walls are framed in between the front and rear, and will be built and raised third and fourth. Mark the locations of the studs at the ends and 24, 48 and 72 inches on both the wall sill and the top plate. Use 3-inch galvanized nails to fasten them (Image 1). For the rear window, make a box frame and nail it to the studs. Use short studs above and below the middle of the box frame. Utilize the full length of the sill for the front wall; the section in the walkway will be removed later. As you raise each wall, check that it is plumb (vertical) before you move on to the next wall. Frame the doorway with the sides supporting the header and a short stud over the middle. Mitre the tops of the sidewall studs with an 8-degree angle to accommodate the slope (Image 2). When each wall is assembled, raise the frame into place and secure it to the floor with 3-inch nails. When all four walls are raised, use 3-inch nails to fasten the end studs of adjoining walls to one another. Use boards to temporarily brace the walls into place until all walls are complete and fastened together (Image 3). Make (2) roof supports by nailing (2) 10-foot 2x4’s double thick for each one. Use 3-inch exterior screws to attach the roof supports over the front and rear walls by screwing up through the wall plate from below. Attach a 2x4 edgewise, with 8-degree mitred ends, over each sidewall, between the two roof supports (Image 4). Cut out the siding, allowing a three inch overlap at the floor, and attach it to the walls with galvanized siding nails. Make sure the walls are plumb in both directions as you go (Image 5).
Assemble the Rafters (Back)

Debbie Wolfe
Debbie Wolfe
Debbie Wolfe
Debbie Wolfe
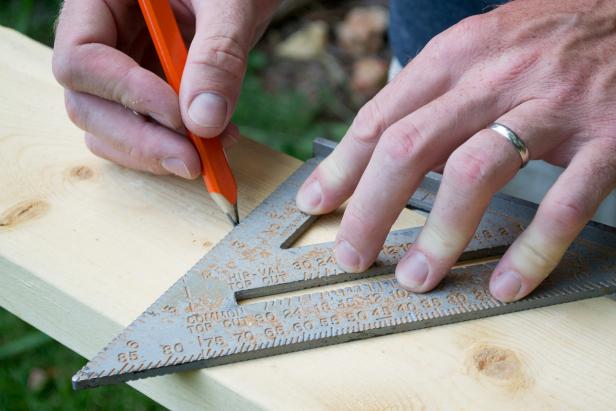
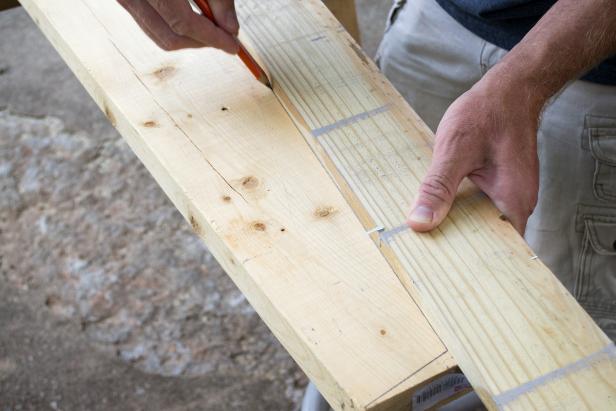
As you face the board, follow these instructions to mark the cut locations, working from right to left. “Top” is the side away from you, “bottom” is the side closest to you. The back end is to the right, the front end is to the left. Mark all cuts before cutting.
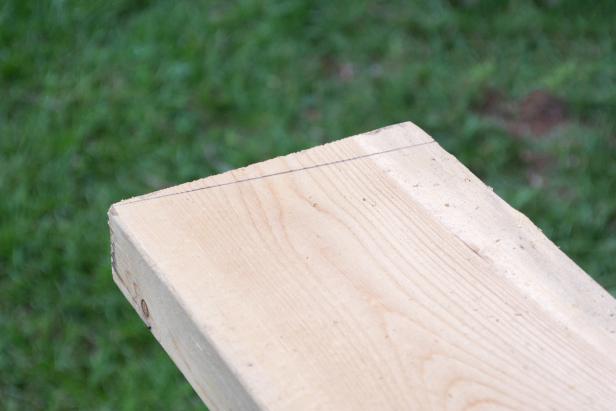
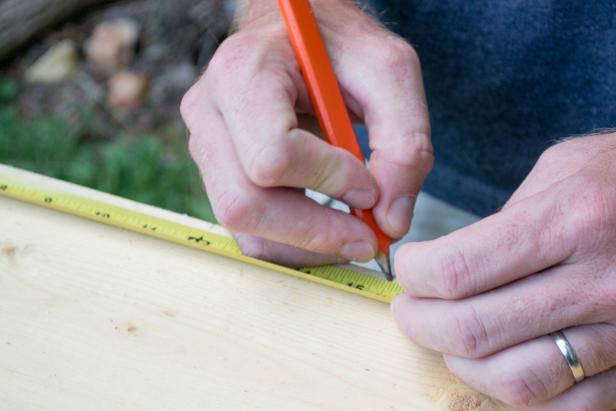
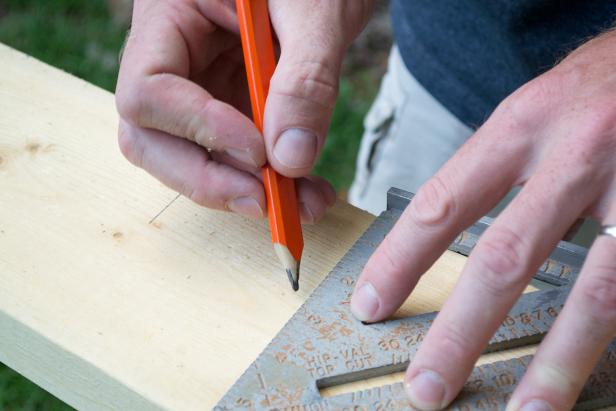
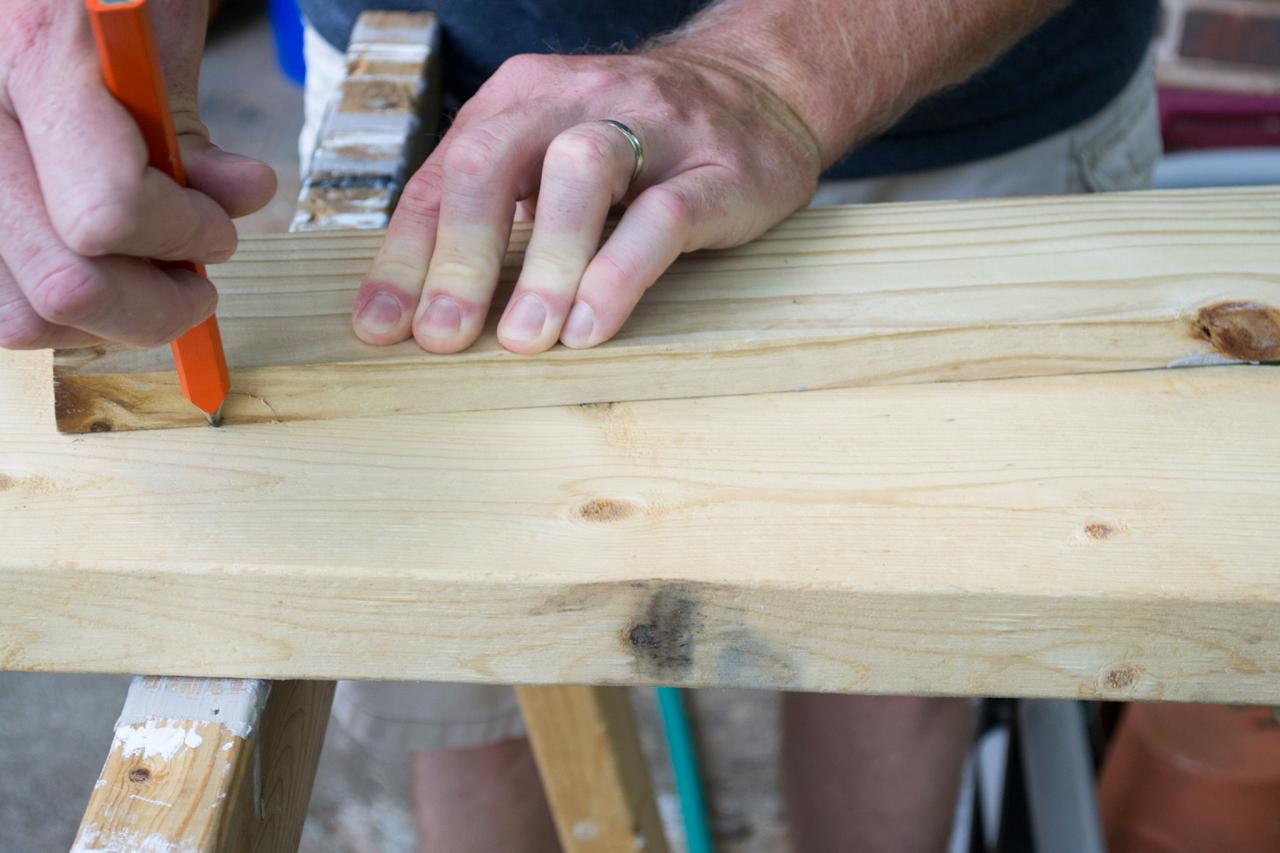
Beginning at the back end, use a speed square to measure an 8-degree angle (Image 1). Mark the angle with the open end on the bottom (Image 2). Measure twelve inches from the back end (Image 3). Mark an 8-degree angle with a speed square from the bottom edge, 2 1/2 inches long (Image 4).
Debbie Wolfe
Debbie Wolfe

Debbie Wolfe
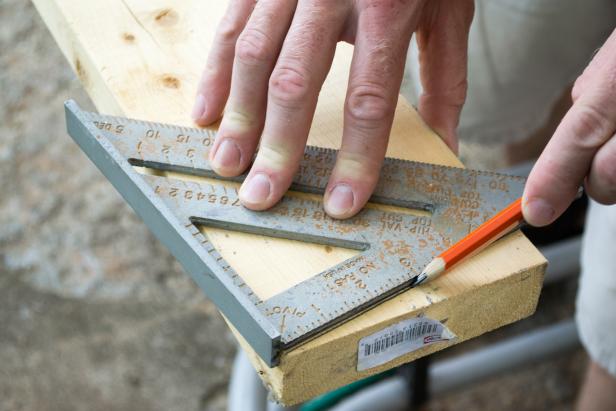
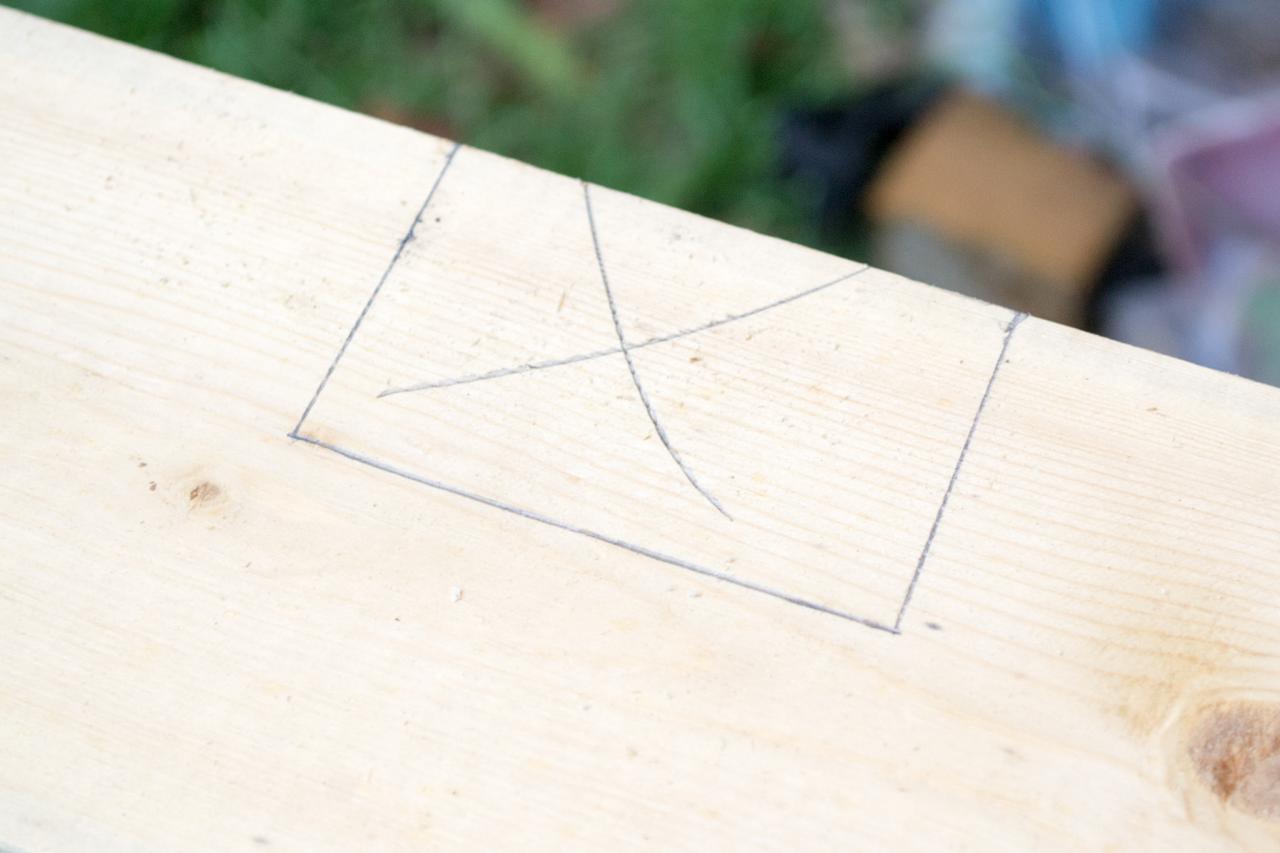
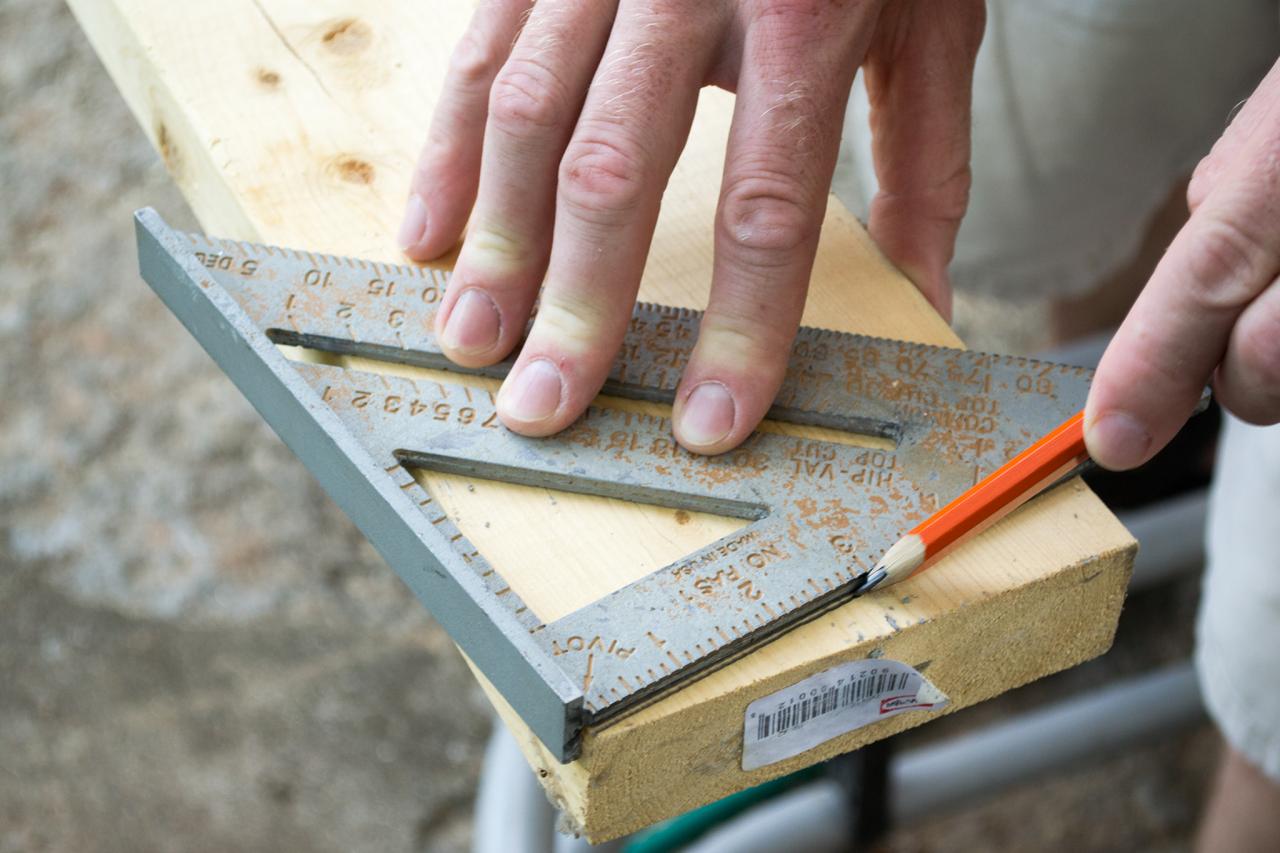
Measure 3 inches down (Image 1). Mark another 8-degree angle from the bottom edge, 2 1/2 inches long (Image 2). Connect the tops of the parallel 2 1/2 inch lines with a straigtedge. This marks the cutout for the rear roof support (Image 3).
Assemble the Rafters (Front)

Debbie Wolfe

Debbie Wolfe

Debbie Wolfe
Debbie Wolfe
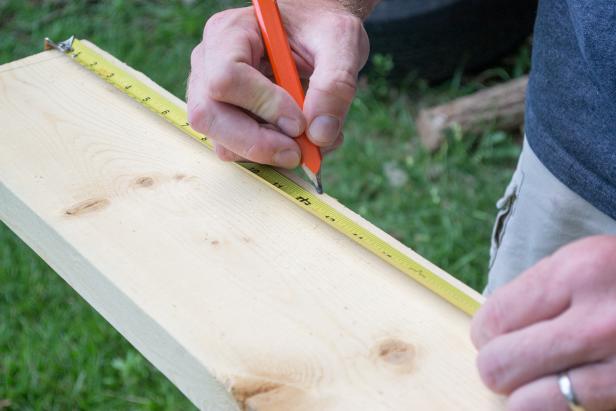
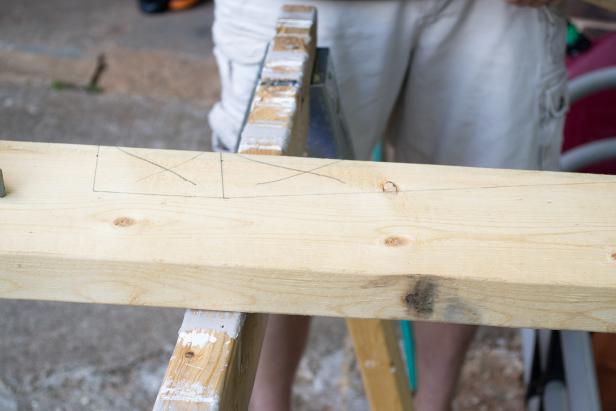
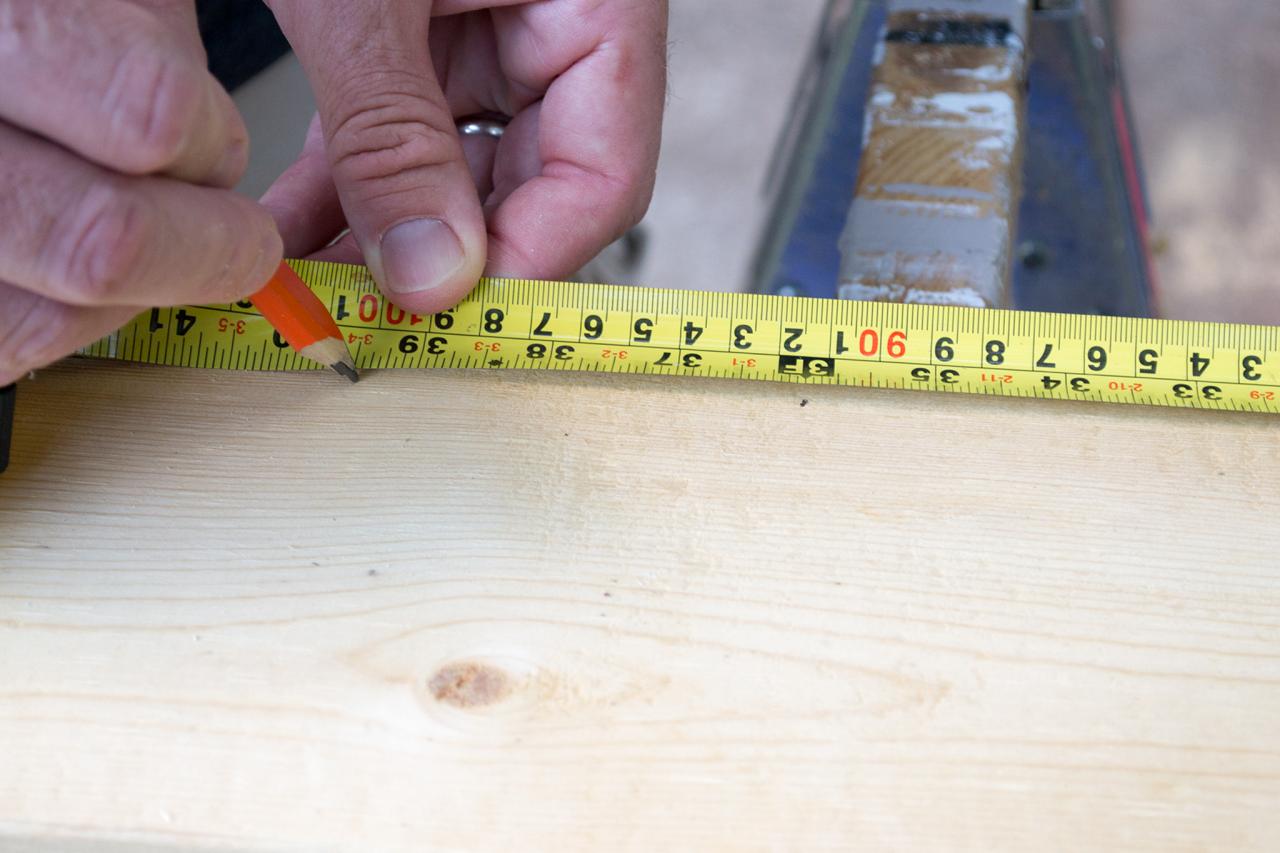
Measure 39 inches from the front end and mark an 8-degree angle from the bottom edge, 2 1/2 inches long (Image 1). Measure 3 inches to the left of the previous mark and mark an 8-degree angle from the bottom edge, 2 1/2 inches long (Image 2). Use a straightedge to connect the tops of these parallel 2 1/2 inch lines. This marks the cutout for the front roof support. Measure 24 inches from the front end to begin a line at the bottom edge connecting to the top of the front roof support cutout (Image 3). Mark an 8-degree angle at the front end from the top edge, 4 inches long.
Debbie Wolfe
Debbie Wolfe
Debbie Wolfe

Debbie Wolfe
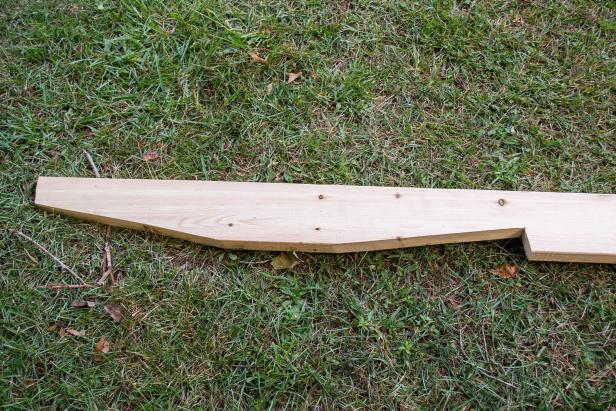
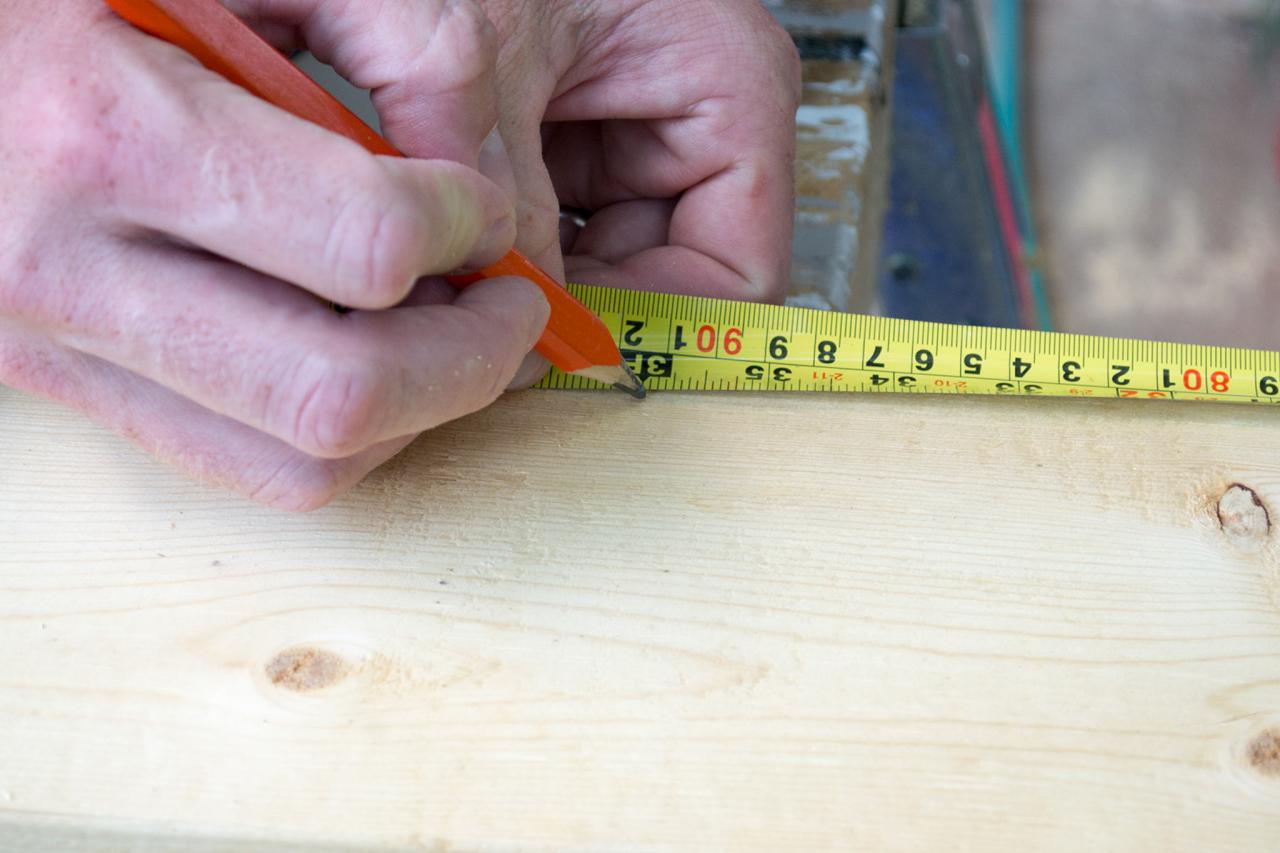
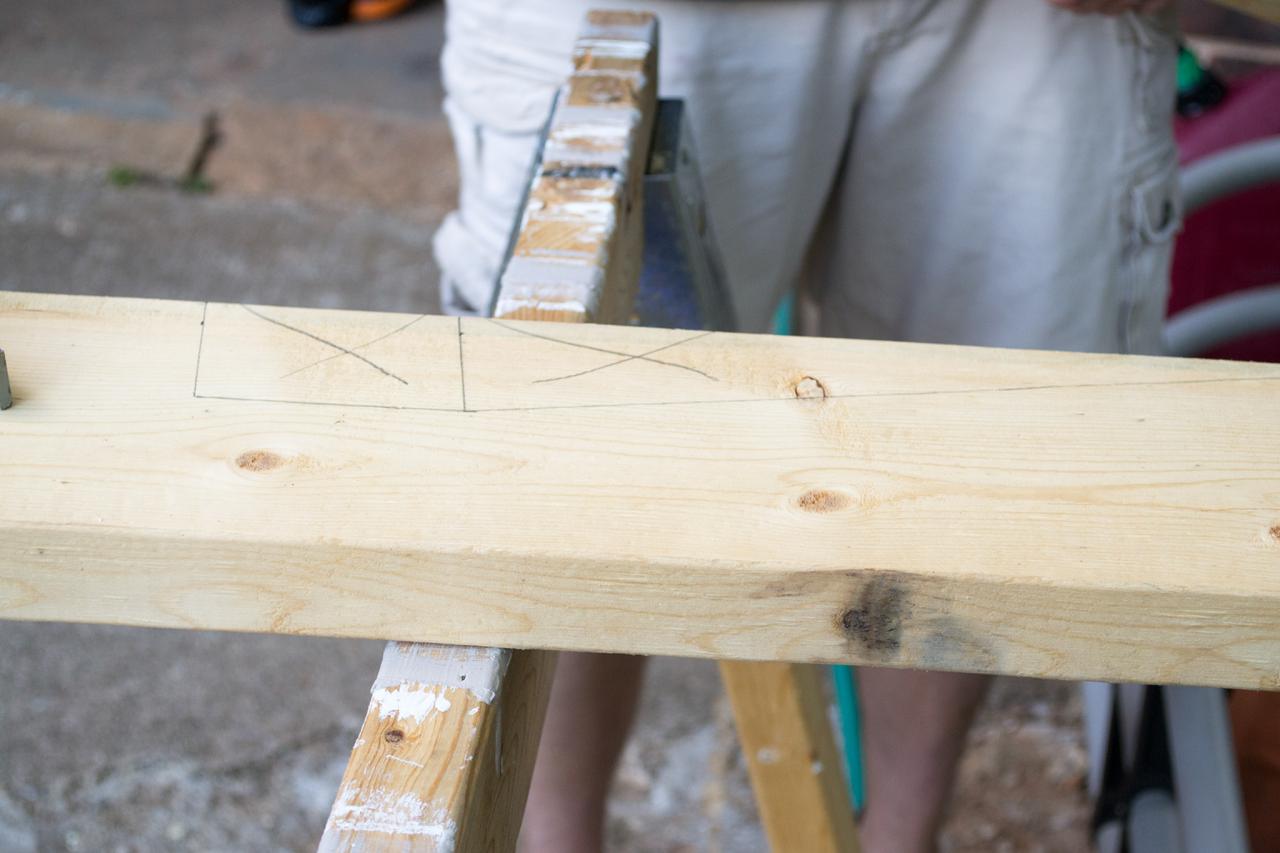
Begin a line 12 inches from the front end at the bottom edge connecting to the end of the four-inch angle on the front end (Image 1). Cut along the lines (Image 2). Use the first rafter as a template to mark each of the remaining five rafters (Image 3 and 4). To minimize variations, always lay the template on the same side to mark the others.
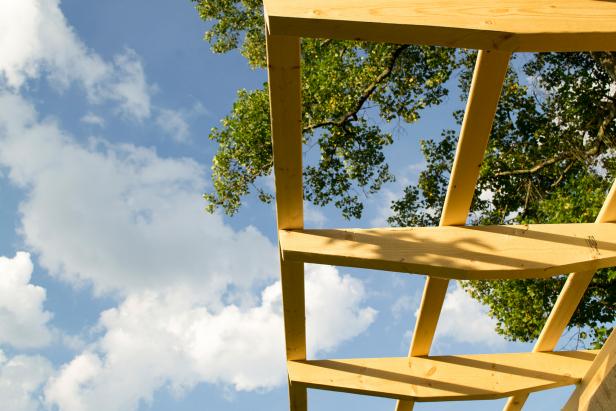
Attach the Roof
Debbie Wolfe
Debbie Wolfe

Debbie Wolfe
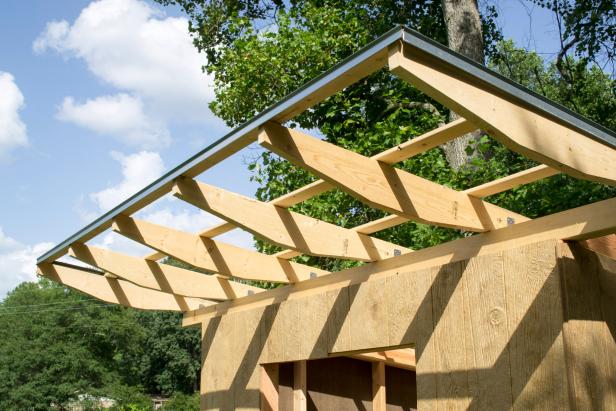
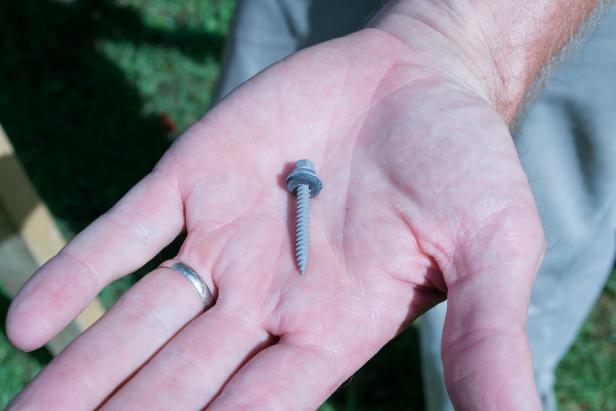
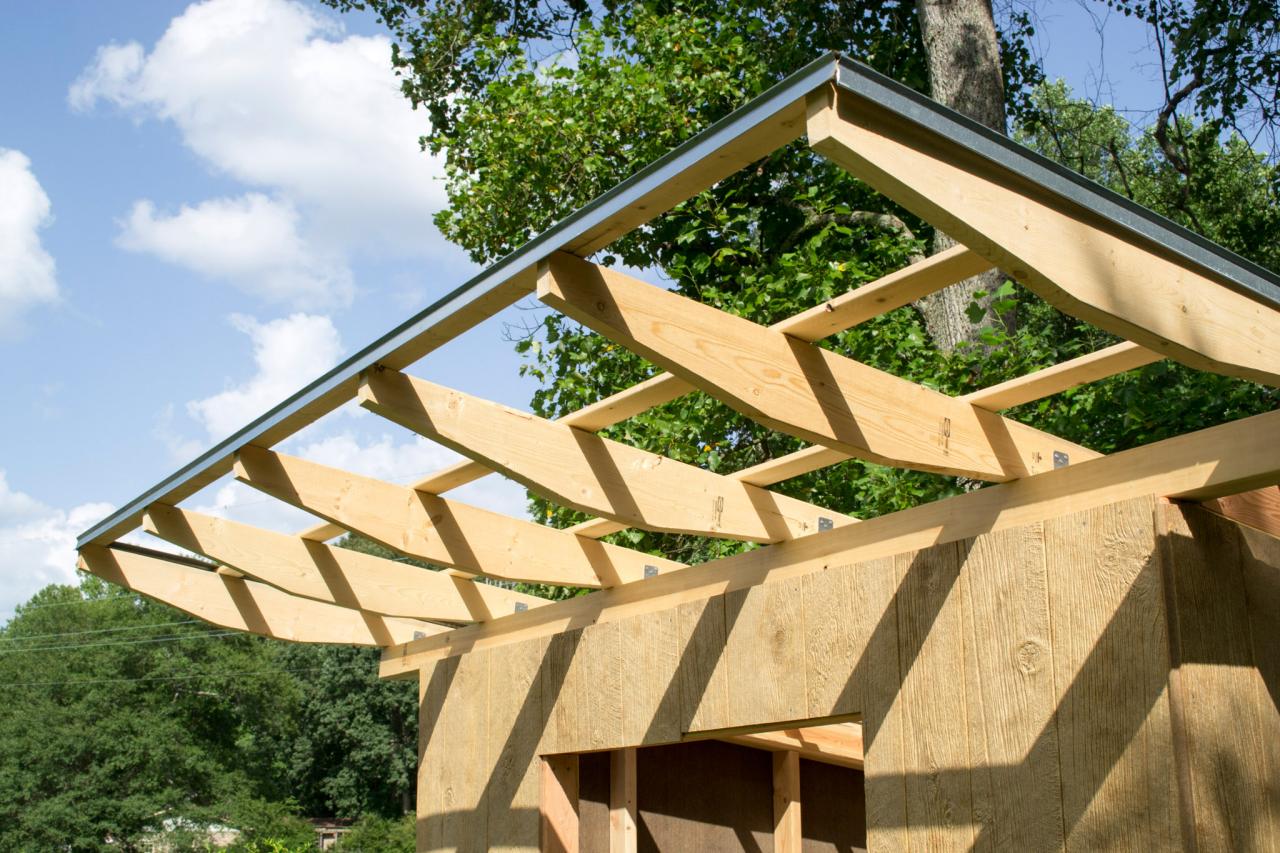
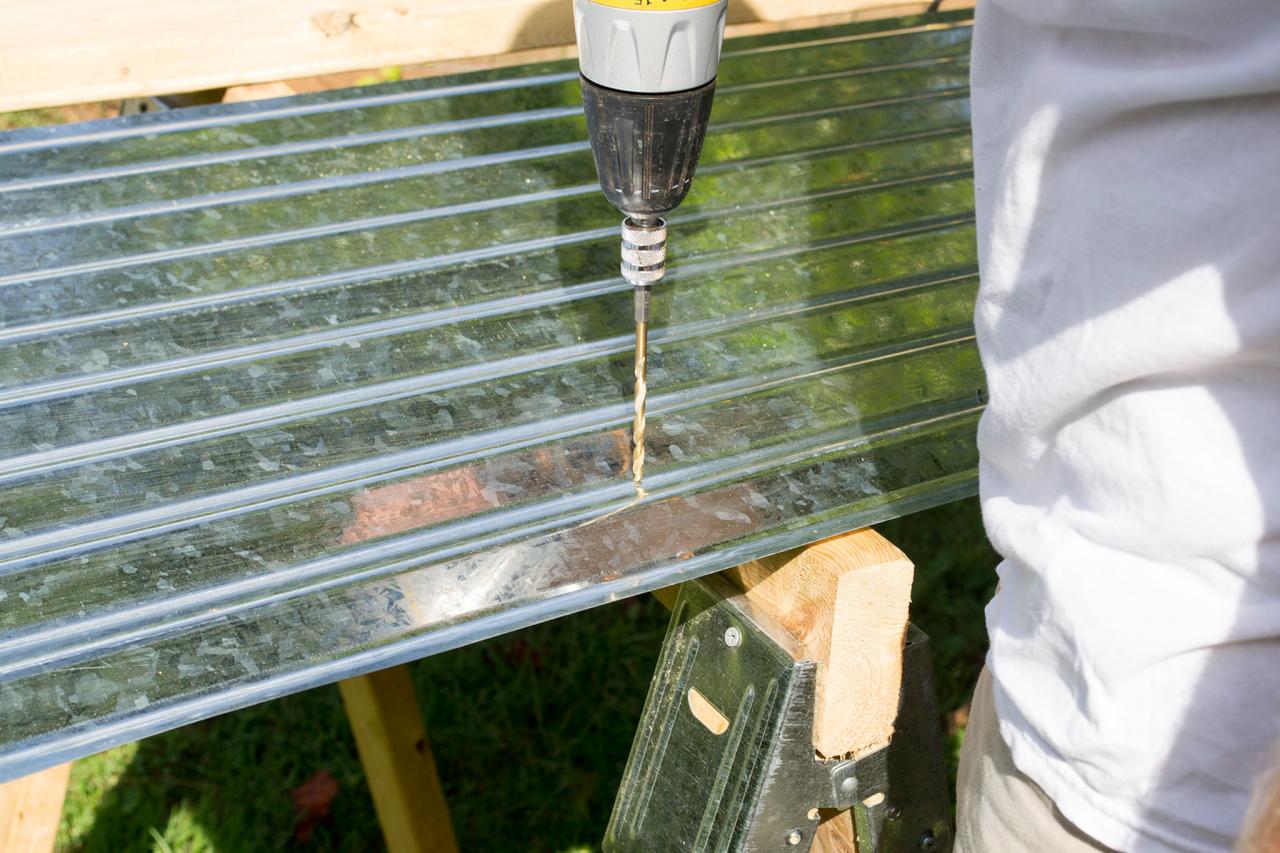
Attach the 1x4 purlins by laying them across and perpendicular to the rafters, beginning at the front edge of the roof, at 16 inches on center. Screw them in place with 2 inch exterior screws (Image 1). Attach drip edge to the rear, side and front edges of the roof using 1 1/2 inch galvanized nails. 3 inch overlaps are made at seams so that the upper piece laps over the lower piece (Image 2). Attach the corrugated roofing panels by laying them in place one at a time, pre-drilling the screw holes with a 3/16 bit (Image 3). Screw them in place (through the valleys) with 1 inch roofing screws (these screws have rubber washers to prevent leaks)(Image 4).
Finishing

Debbie Wolfe
Debbie Wolfe
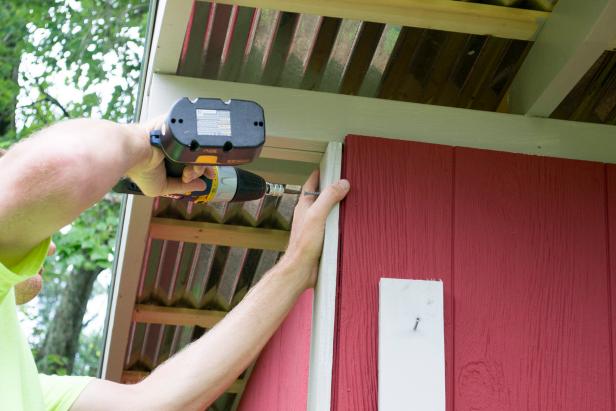
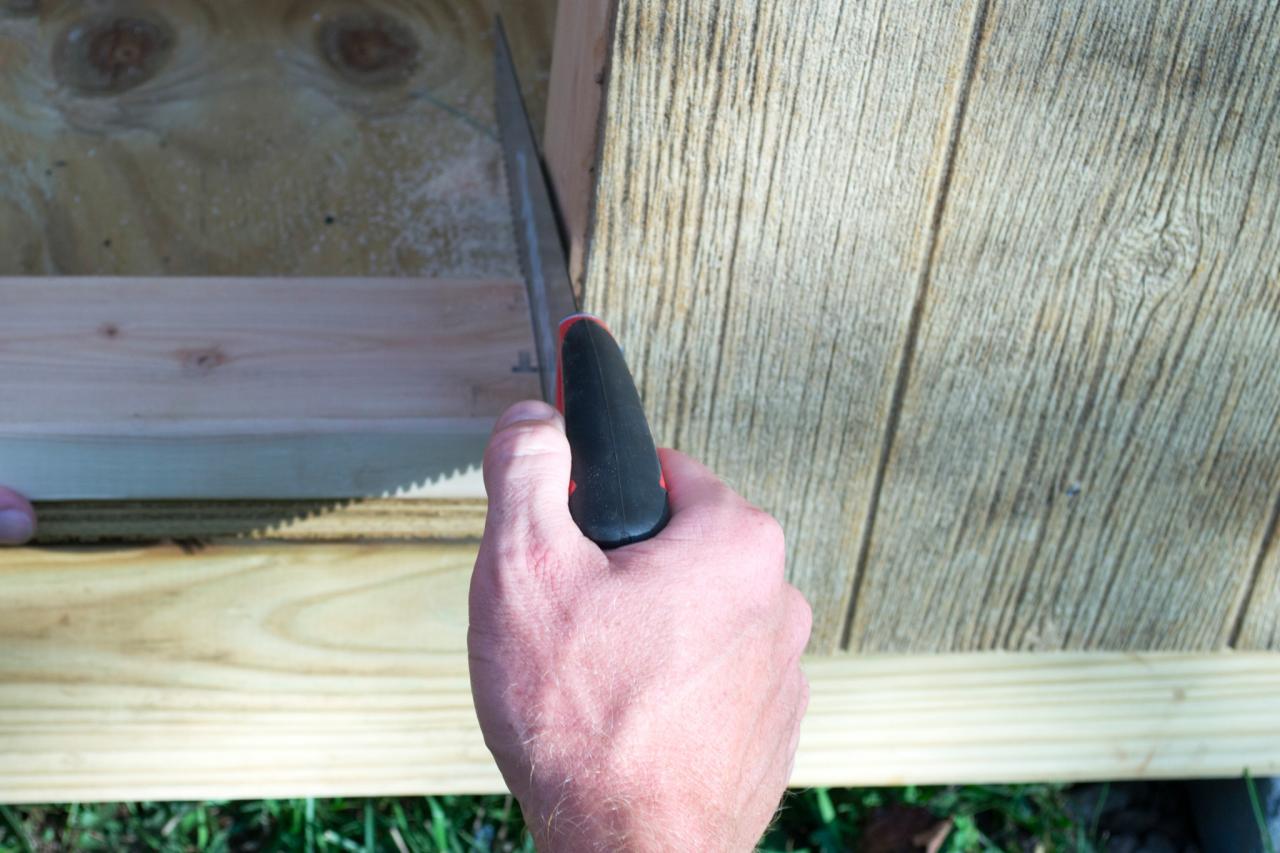
Cut out the bottom part of the door frame with a handsaw (Image 1). Paint the siding and trim separately prior to attaching trim. Install trim at corners, doorway and window using 2 inch exterior screws. Overlap the corners snugly to protect the siding. Fill in the screw holes in the trim with putty, sand and then paint (Image 2).

Debbie Wolfe
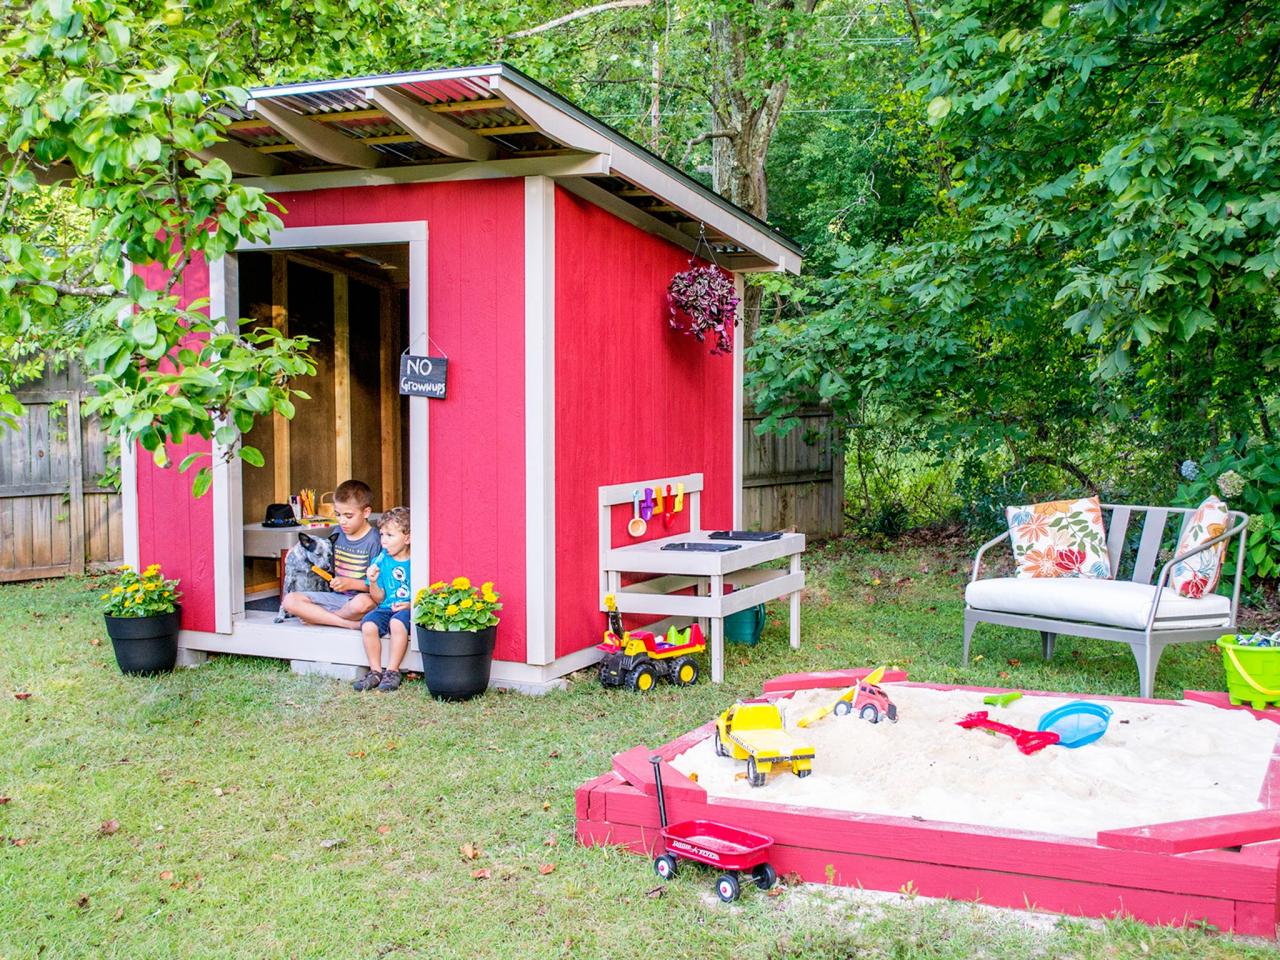
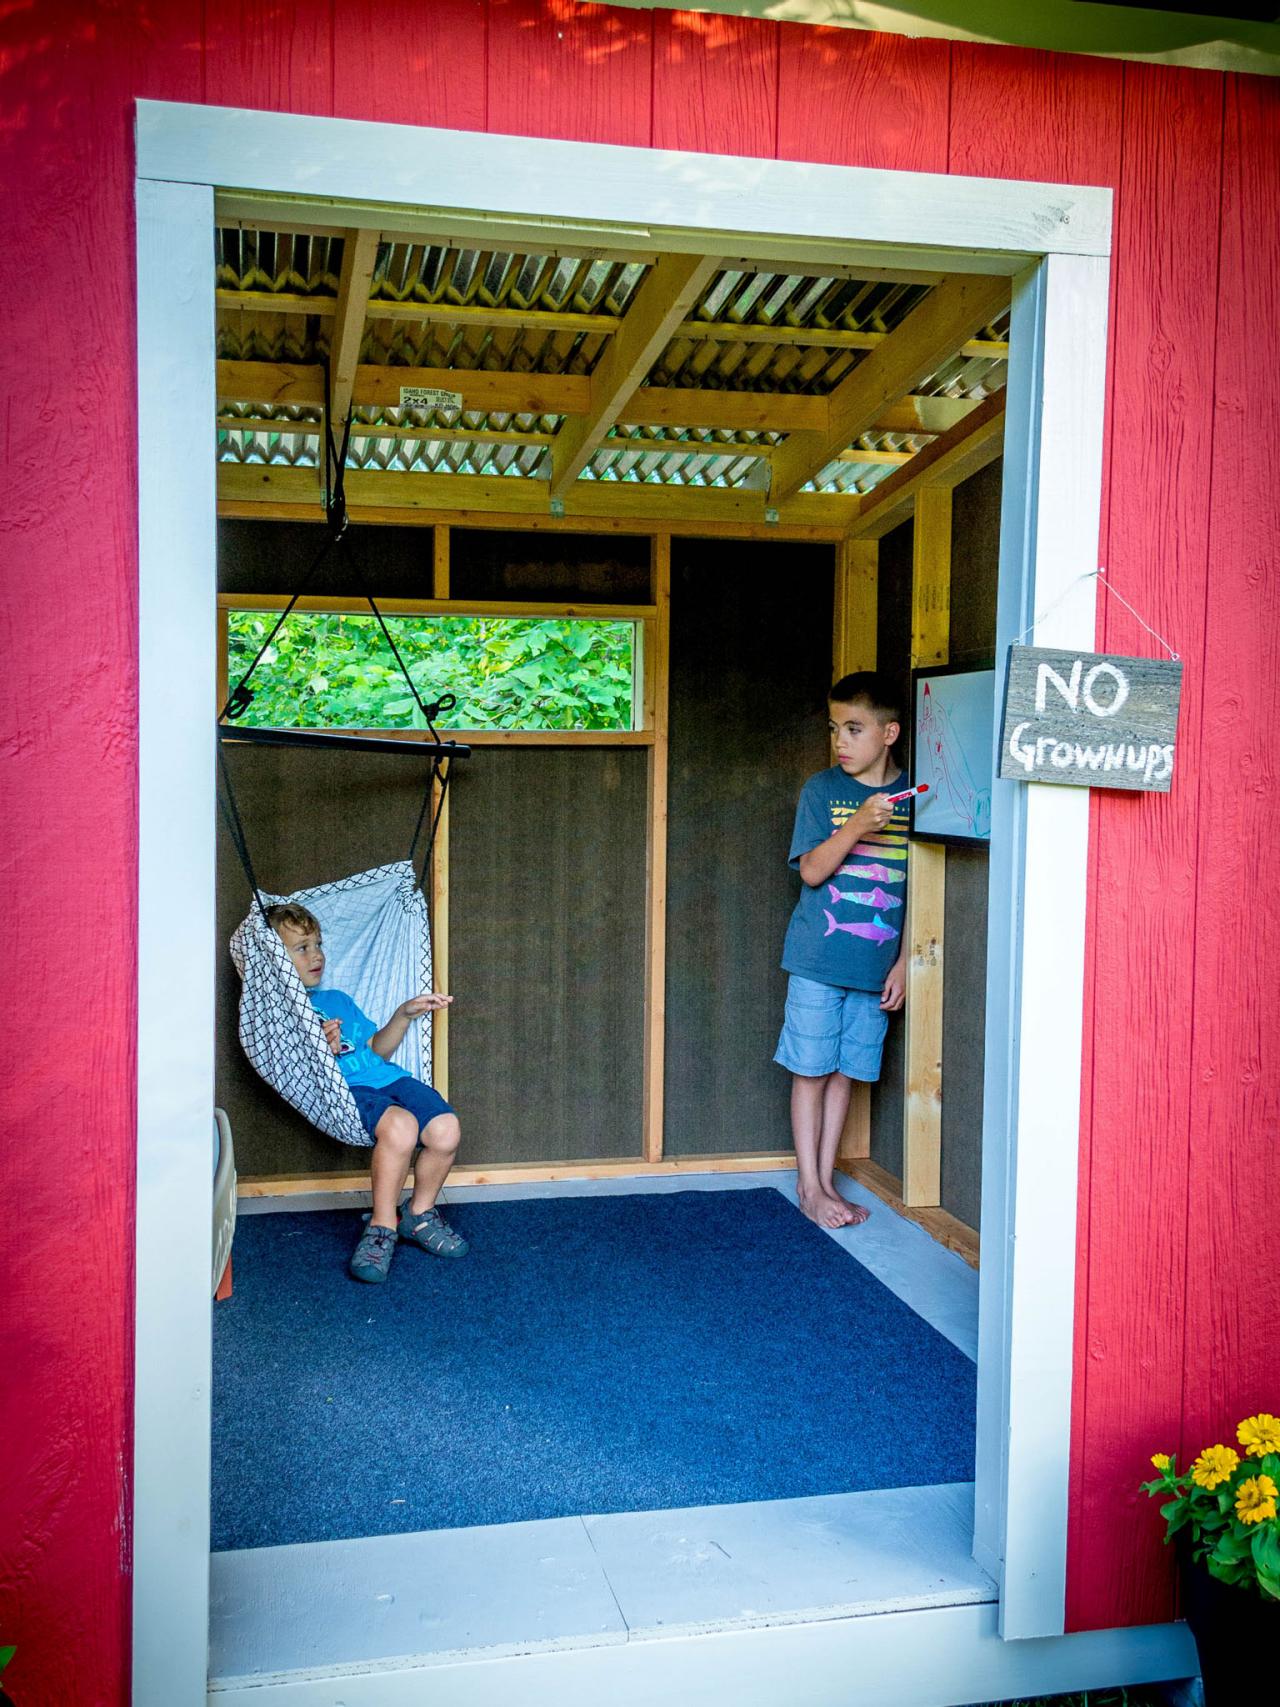
There's plenty of space on the inside to hold a small table, hammock chair and other furnishings to keep the kids entertained. Add an outdoor carpet to add a bit of interest and texture to the floor.

Debbie Wolfe
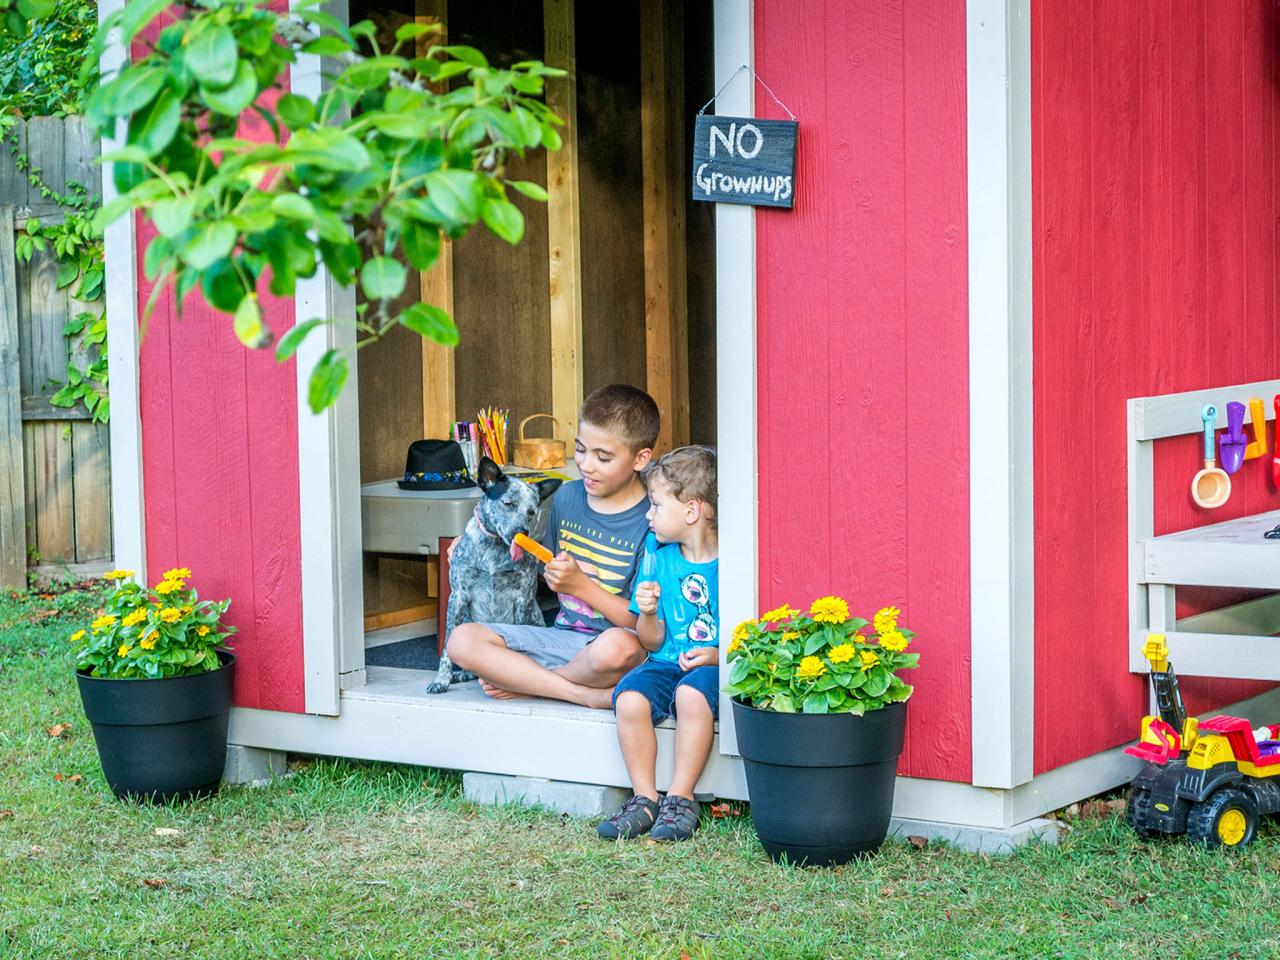
When the kids outgrow the space, turn the playhouse into a potting shed or a mini outdoor retreat for grownups.

Debbie Wolfe


