


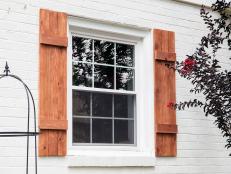
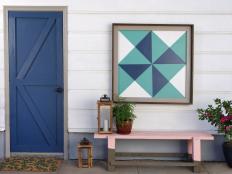
How to Make a Wall-Hanging Planter Box With House Numbers
Display your house identifier in style with this easy-to-build sign with a built-in planter box.

Jacquelyn_McGilvray
You can make a number of changes to your house, but you’ll probably never change your house number, so why not make a cool display of it. This easy, inexpensive project is made from just one 1x10 board. We used pine and then applied several coats of varnish so it could stand up to the outdoors. Cedar, teak or another exterior wood are also a good choice.

Jacquelyn_McGilvray
What You'll Need:
- (1) 1x10 x 8' premium pine
- house numbers
- exterior wood glue
- 2" galvanized finish 6d nails
- 2" exterior wood screws
- stain
- paintbrush and rags
- varnish
- French cleat
- chop saw or circular saw
- palm sander
- nail set
- tape measure
- drill gun with a 3/32" bit, a 3/16" bit and a 1/8" bit
- hammer
Step 1: Plan Your Design

Jacquelyn_McGilvray
Lay out your house numbers to determine the placement and spacing on the board. Determine the size of the planter box. The outside dimension of ours is 5-3/4" tall x 8-1/2" deep x 9-1/4" wide (the width of the 1x10). This size accommodates six-inch diameter flower pot. To give room for the plant to grown, we left five inches between the top of the box and bottom number.
Step 2: Cut Wood

Jacquelyn_McGilvray

Jacquelyn_McGilvray
Jacquelyn_McGilvray

Jacquelyn_McGilvray
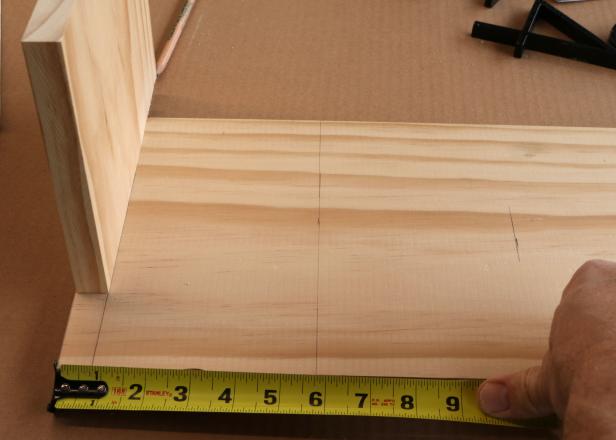
With any lumber-related project, begin by cutting a little off the end of the wood. Do this so you can start your project with clean edges and square-up the ends, plus it'll remove any splits in the wood. Watch for staples from the barcodes and labels when you make these cuts.
Cut the 1x10 as follows:
- board A (number display): cut to 37-1/2”
- board B (box front): cut to 5-3/4”
- board C (box bottom): cut 7” long then rotate wood and cut 7-3/4”
- board D (box sides): cut two pieces to 5-3/4” then rotate both pieces and cut to 7”
Step 3: Test Fit

Jacquelyn_McGilvray
Test fit each of the pieces and double check the placement of the numbers in relation to the box.
Step 4: Drill for Drainage

Jacquelyn_McGilvray
Clamp the bottom piece of the box to a worktable and use a paddle bit to drill two drainage holes.
Step 5: Sand Rough Spots + Edges

Jacquelyn_McGilvray
Sand the boards smooth.
Step 6: Glue Box Bottom to Main Board

Jacquelyn_McGilvray

Jacquelyn_McGilvray

Jacquelyn_McGilvray
Mark the placement of the bottom board to make sure it is centered on the main board. Use the two sides pieces to ensure correct placement.
Apply wood glue to the edge of the board, smear the glue along the wood for even coverage. To make it easier to screw together, hold up the other end of the main board with one of the side pieces. Then use a clamp to hold the main board to bottom board. Use a damp rag to wipe away excess glue that oozed out from the connection because dried glue will prevent stain or paint from penetrating the wood.
Step 7: Attach Box Bottom to Main Board

Jacquelyn_McGilvray

Jacquelyn_McGilvray
Predrill the screw holes with a 3/32" bit to prevent the wood from splitting. Then insert the screw to attach the pieces together. We’re using screws for the back (unseen) connections and finishing nails for the front (visible) connections.
Step 8: Fasten Box Sides

Jacquelyn_McGilvray

Jacquelyn_McGilvray

Jacquelyn_McGilvray

Jacquelyn_McGilvray
Apply glue at all wood joints. Predrill and then use screws on the back of the box and nails on the sides of the box. Repeat for the other side. Set the nails.
Step 9: Attach Box Front

Jacquelyn_McGilvray

Jacquelyn_McGilvray

Jacquelyn_McGilvray

Jacquelyn_McGilvray
Apply glue to all surfaces being connected. Lay the board in place and clamp if necessary to hold in place. Predrill for the nail holes. Insert nails, hammer in place and then set nails.
Step 10: Sand Again

Jacquelyn_McGilvray
Now that the box is fully assembled, sand all faces and edges to make it smooth. Wipe clean to prep for staining.
Step 11: Make Letter Holes

Jacquelyn_McGilvray

Jacquelyn_McGilvray

Jacquelyn_McGilvray
Our numbers came with a handy template, hopefully, yours did too. Lay out the letter templates and tape them in place. Use an awl, nail set or even a nail to mark the hole placement for the number screws. Remove the template and drill holes in all the marks you made.
Step 12: Apply Finish

Jacquelyn_McGilvray

Jacquelyn_McGilvray

Jacquelyn_McGilvray
Wipe the entire piece down to make sure it’s clean before applying stain. When the stain is completely dry, use colored putty to fill in the nail holes. Putty after stain because you can use different colored putty to match the wood grain. When the putty is dry, apply an exterior seal coat to protect the piece, we used varnish. Apply several coats of seal coat allowing each coat to dry completely before applying the next.
Step 13: Attach Numbers

Jacquelyn_McGilvray

Jacquelyn_McGilvray

Jacquelyn_McGilvray
When the seal coat has completely dried, attach the numbers. You may have to run the drill bit through the screws holes again in case the holes filled up with seal coat or stain. Our numbers are raised off the board, so to attach them, we applied a drop of silicone in each hole then inserted the numbers. The silicone helps seal the screw hole and keep the numbers slightly raised off the wood. Follow the manufacturer’s instructions on how to install your numbers.
Step 14: Add Hanging Hardware

Jacquelyn_McGilvray

Jacquelyn_McGilvray
We used a simple French cleat to hang our house number board this way the board can be easily removed if needed.
Jacquelyn_McGilvray


