


Dreidel Sugar Cookie Favors
No Hanukkah celebration would be complete without the four-sided spinning top game known as dreidel. This sugar cookie version pays homage to the tradition while looking and tasting fantastic. Treat your Hanukkah guests to a dreidel cookie at each place setting as a post-dinner treat or to take home as a festive party favor.

Dreidel Sugar Cookie Favors
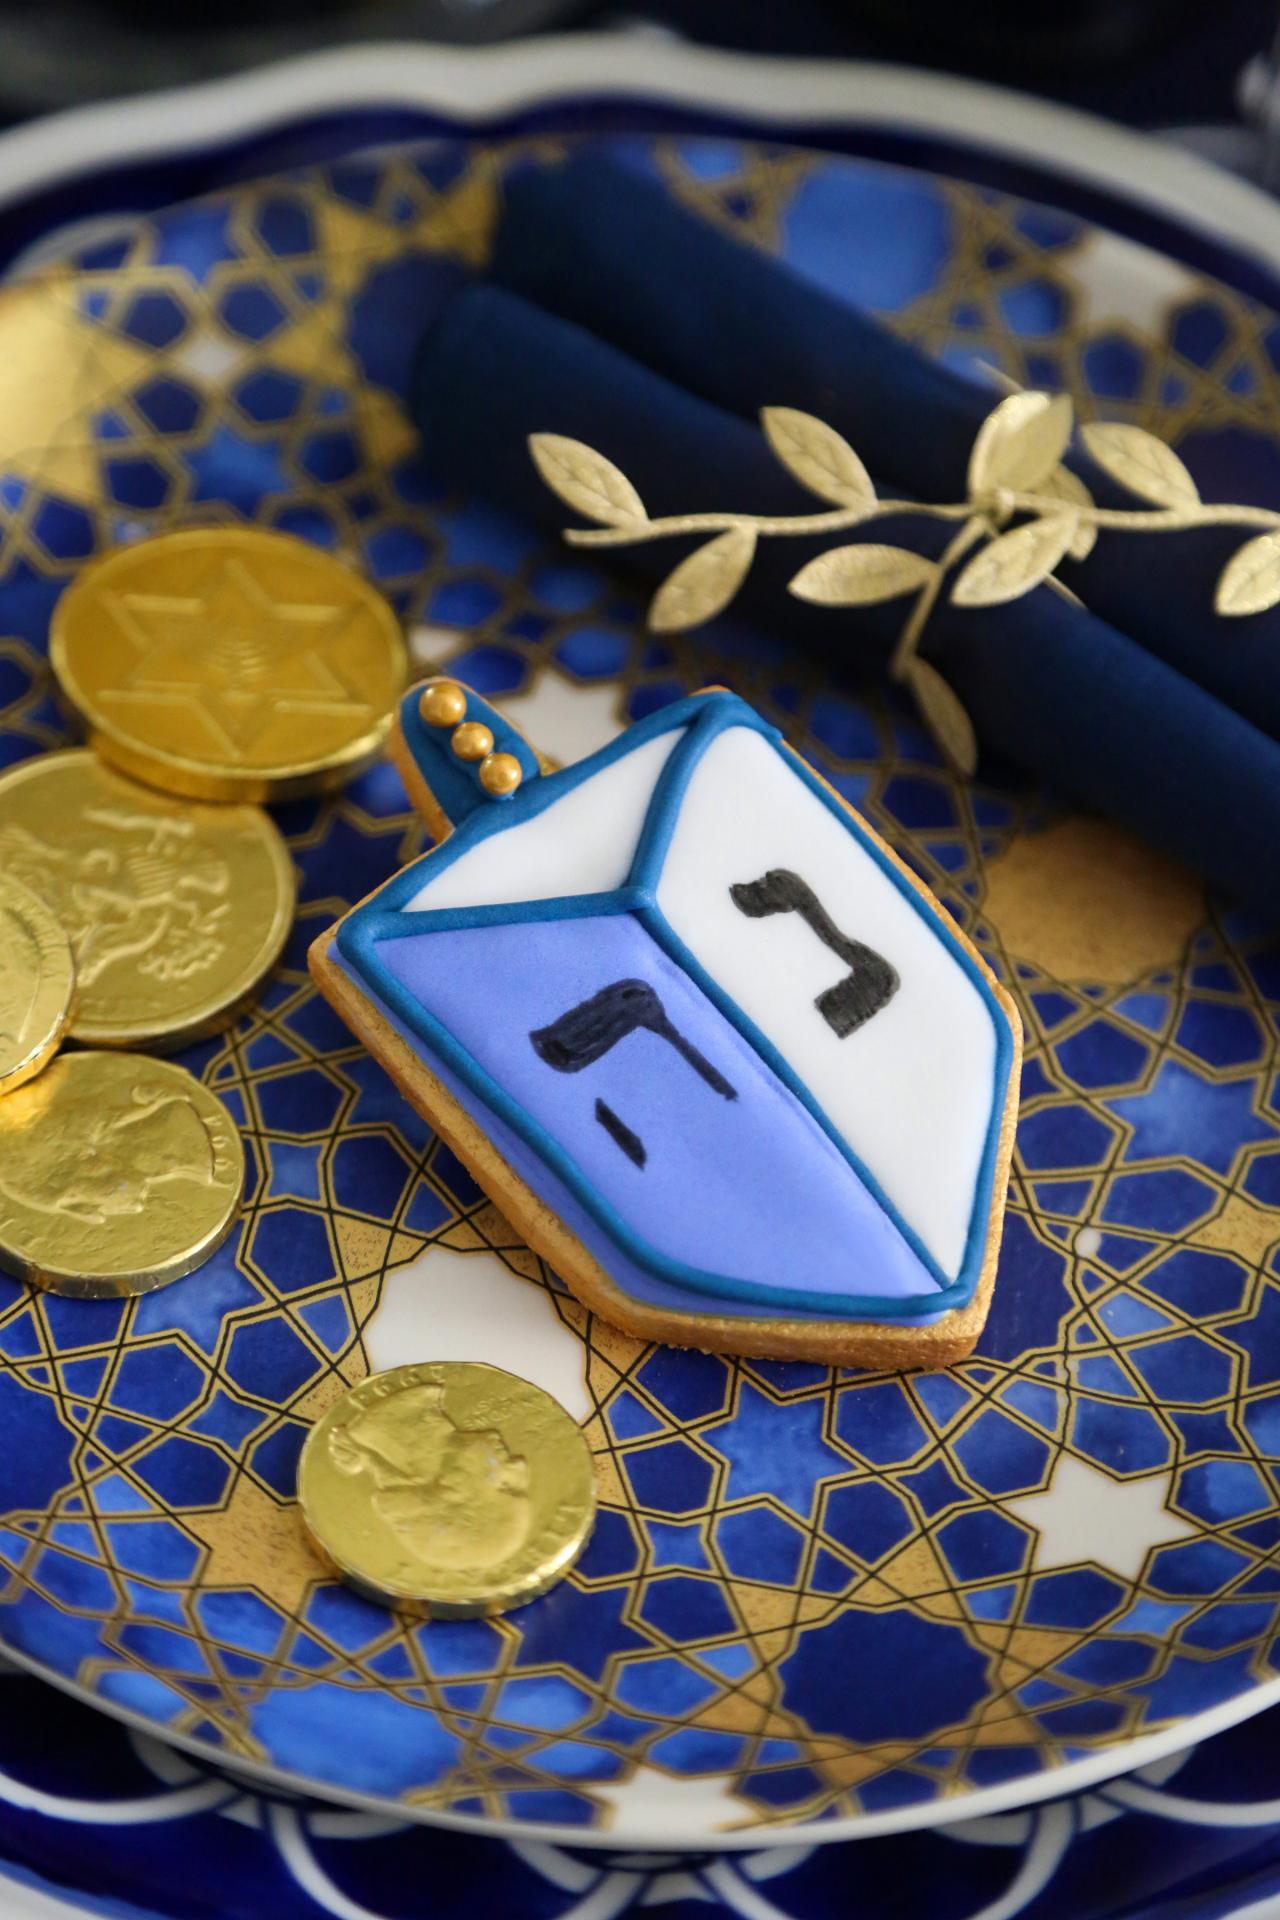
Consider purchasing some chocolate foil-wrapped coins, or gelt, to display with the cookies, as they are often used as game pieces with the dreidel.

Photo by: Heather Baird, SprinkleBakes.com
Heather Baird, SprinkleBakes.com
Consider purchasing some chocolate foil-wrapped coins, or gelt, to display with the cookies, as they are often used as game pieces with the dreidel.
This recipe requires the use of a 3-inch specialty dreidel cookie cutter which can be found online. Alternatively, you may cut a 3-inch dreidel shape from card stock to use as a template. Use a small paring knife to cut around the template and bake the cookies as directed. You’ll also need a black food color pen and a template with 1-inch Hebrew characters. If you can’t find such a template, you can freehand the characters onto the cookies.
Sugar Cookie Ingredients
- 1 cup unsalted butter, softened
- 1 cup granulated sugar
- 1 egg, lightly beaten
- 1 teaspoon vanilla bean paste or extract
- 3 cups all-purpose flour, plus more for rolling
- pinch of salt
Royal Icing Ingredients
- 4 cups confectioners’ sugar, sifted
- 3 tablespoons meringue powder
- 1/2 cup warm water
- 1/2 teaspoon clear vanilla extract
- royal blue and purple gel food color
Decorations
- gold sugar pearls
- food color pen
- gold luster dust
- clear vanilla extract
- template with 1” Hebrew characters, optional
Sugar Cookie Instructions
In a stand mixer fitted with the paddle attachment, mix the butter and sugar together until just incorporated. Do not over-mix at this stage, or the cookies may spread while baking. Next, add the egg, vanilla and vanilla bean paste or extract. Mix again on low speed, stopping to scrape down the sides of the bowl intermittently as needed.
In a medium bowl, whisk together the flour and salt. Add to the butter and egg mixture. Mix on low speed until a dough is formed and there are no longer any streaks of butter in the mixing bowl. The dough will often clump around the paddle attachment while being mixed. This is normal and a good sign that your dough is the right consistency. If your mixture does not come together and is crumbly, add ice cold water 1 tbsp. at a time until the dough clumps.

Photo by: Heather Baird, SprinkleBakes.com
Heather Baird, SprinkleBakes.com
Turn the dough out onto a sheet of parchment paper and top with a second sheet. Roll dough into an oblong disc between the paper with a rolling pin.
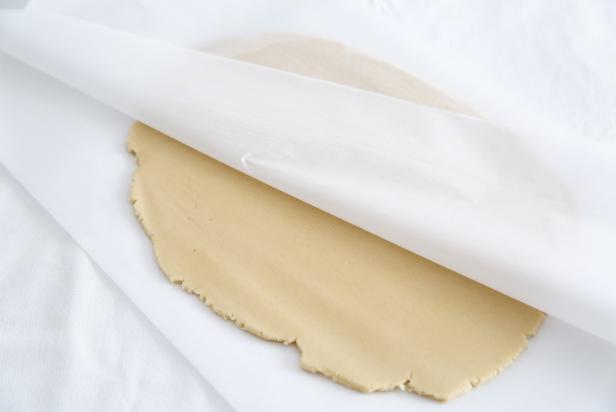
Photo by: Heather Baird, SprinkleBakes.com
Heather Baird, SprinkleBakes.com
Transfer dough — wax paper and all — to a large cookie sheet. Wrap the dough tightly onto the cookie sheet with plastic wrap and refrigerate for 1 hour. After allowing the dough to rest, remove the top sheet of wax paper and roll dough a little thinner. It should not be sticky. You may dust the surface lightly with flour if its sticky.
Roll dough to 1/2-inch thickness. Cut out 3-inch dreidel-shapes from the dough using the specialty cookie cutter. Be careful not to stretch the cutout shapes or they will be distorted after baking. Refrigerate the cutouts for 30 minutes to help the cookies maintain a crisp shape during baking.
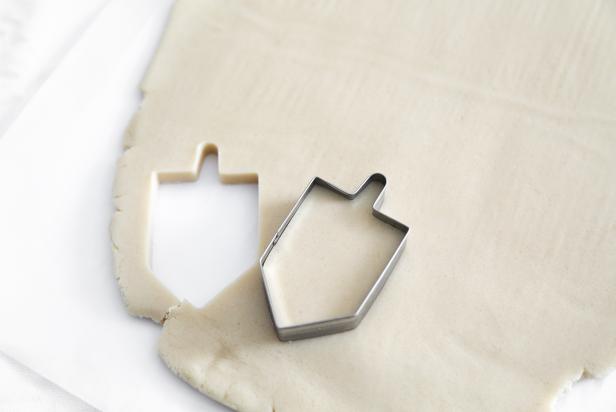
Photo by: Heather Baird, SprinkleBakes.com
Heather Baird, SprinkleBakes.com
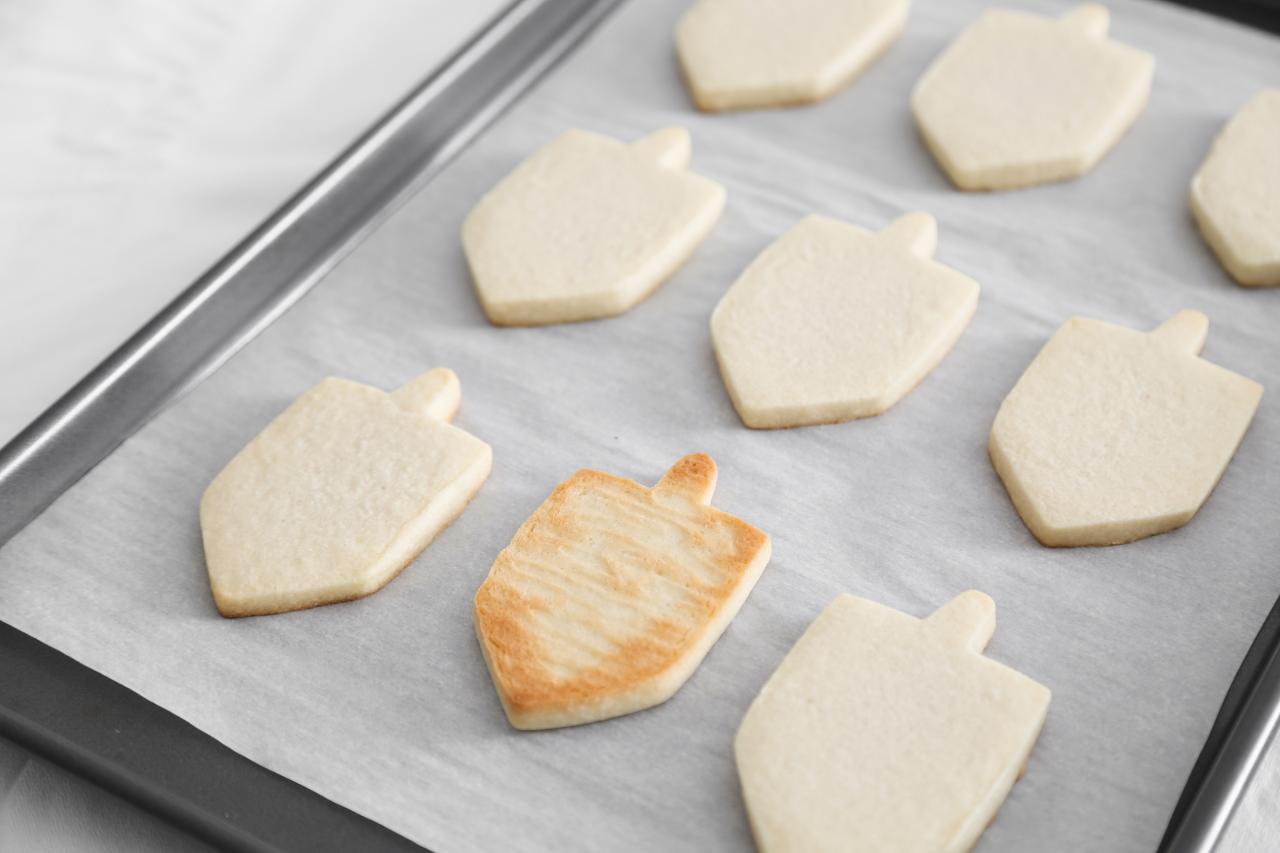
Preheat the oven to 350°F. Bake the cookies for 15 minutes till they're just barely golden around the edges and crispy on the bottoms. Let cool on the baking sheet for 5 minutes before transferring to a wire rack. Decorate the cookies when completely cooled.

Photo by: Heather Baird, SprinkleBakes.com
Heather Baird, SprinkleBakes.com
Royal Icing Instructions
In the bowl of an electric mixer fitted with the whisk attachment, stir the confectioners’ sugar and meringue powder on low speed until combined. Next, add the water and beat on medium-high speed until very stiff peaks form, about 5-7 minutes.
Add the flavoring and beat on low speed until combined; divide the icing into three bowls. Tint one bowl with the royal blue icing until a dark blue color is achieved. Tint a second bowl with a drop of blue food color and a drop of purple food color. Stir and add more color as needed (keep in mind that food colors will darken as they dry). Stir until a medium shade of periwinkle is achieved and no white streaks remain. Leave the third bowl untinted (white).
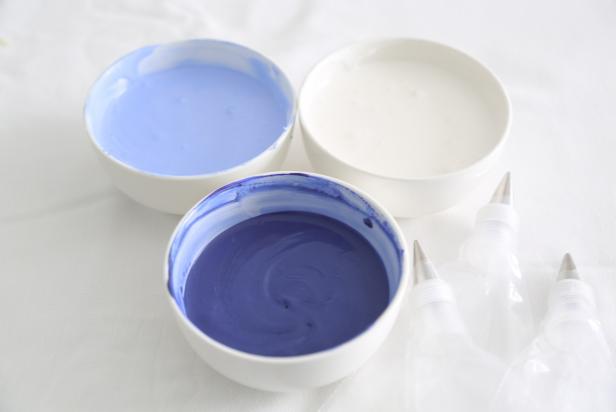
Photo by: Heather Baird, SprinkleBakes.com
Heather Baird, SprinkleBakes.com
Stir drops of water into each bowl until the icing is thinned but still has the consistency of a thick milkshake, this is called flood consistency. To make sure the consistency is correct, drag a spoon through the center of the icing in a straight line, creating an indentation. When the icing is of perfect flood consistency, the indentation should completely disappear in 10 seconds. If it disappears too quickly, then the icing is too thin and will not dry properly. The indentation should disappear as close to the 10 second mark as possible. It is much harder to thicken the icing after it has been thinned than to make thick icing thinner, so take your time and add water drops a few at a time.
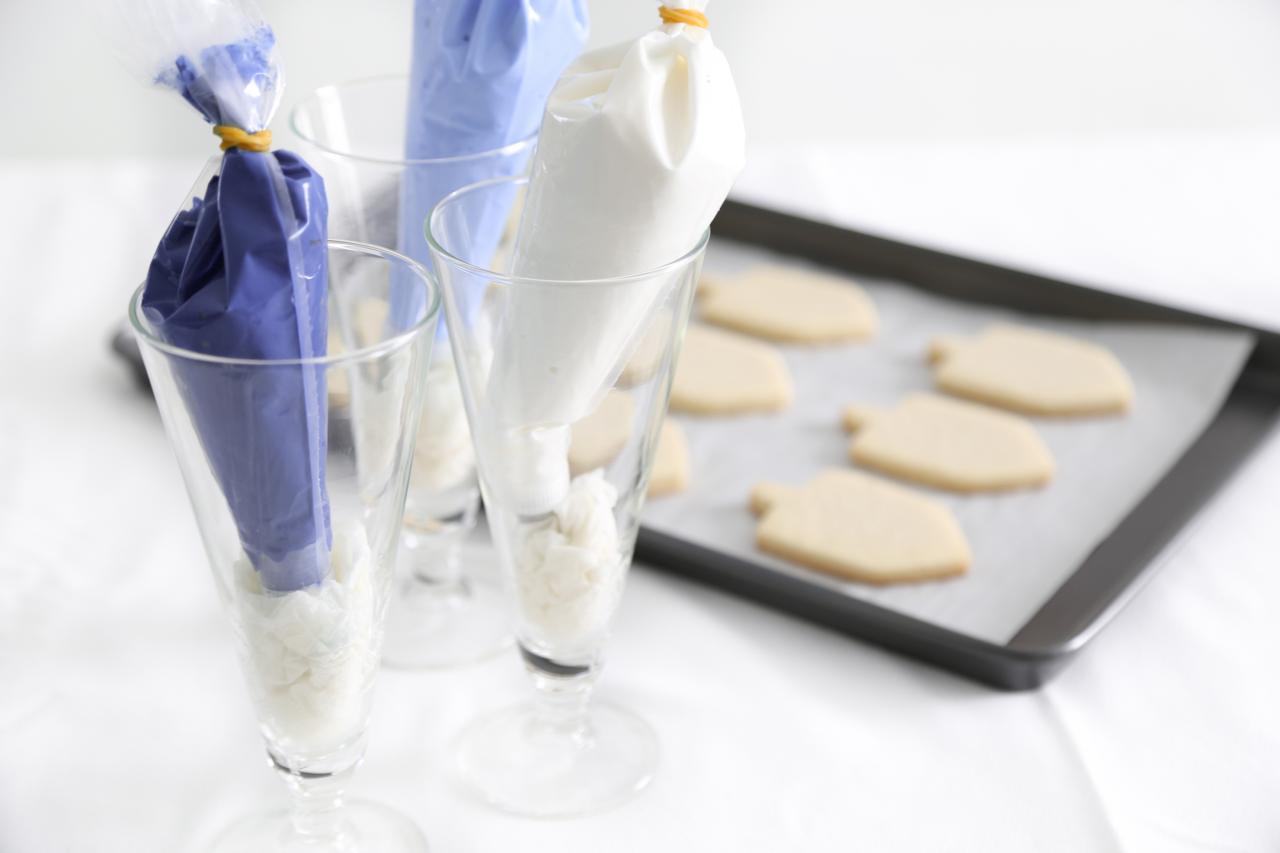
Transfer each batch of icing to a piping bag fitted with a size 3 plain piping tip. Close the end of the bags tightly with a rubber band and stand each piping bag in a tall glass with a moist paper towel in the bottom to prevent the icing from drying out and the tip from clogging.

Photo by: Heather Baird, SprinkleBakes.com
Heather Baird, SprinkleBakes.com
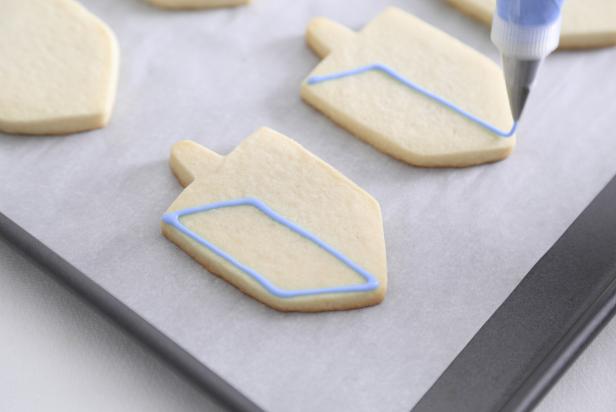
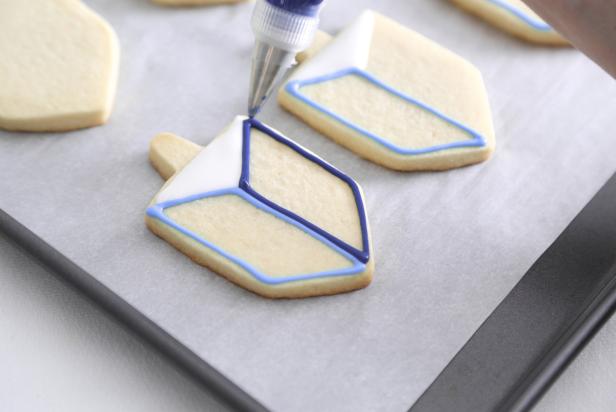
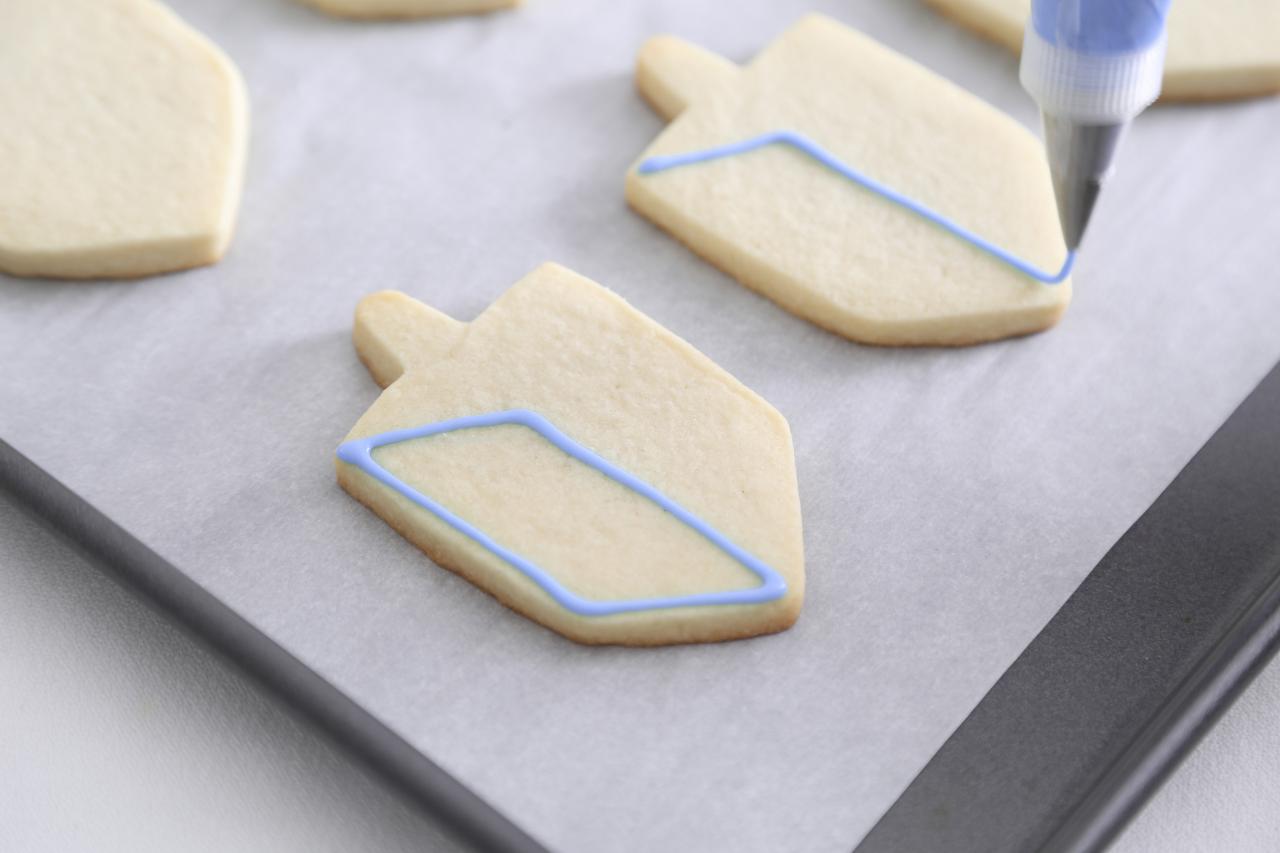
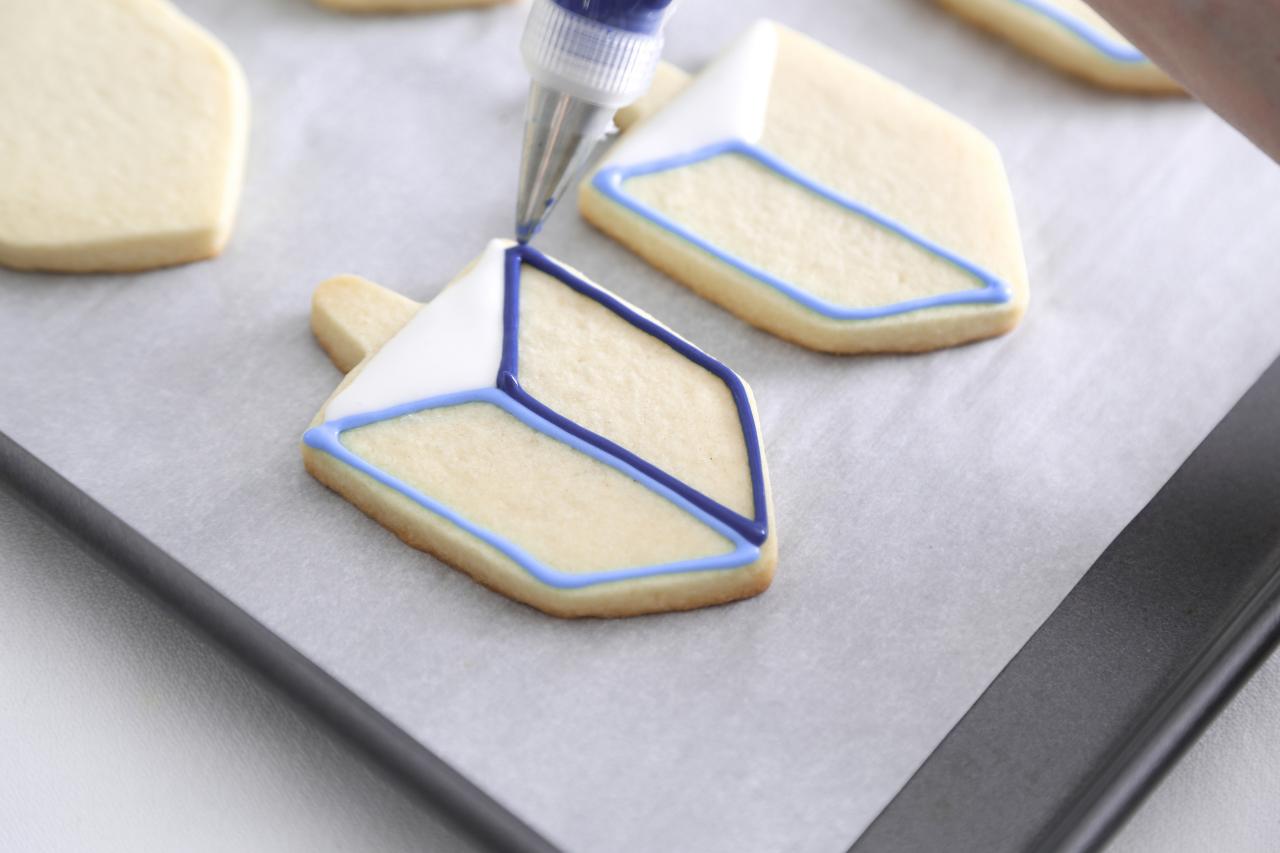
Using the periwinkle icing, draw a line downward from the top left of a cookie to the center. Hold the piping tip above the cookie and let the icing fall into place. Let the outline set for a few minutes to harden. Pipe a line down the center and continue following the outline of the left-hand side of the cookie (Image 1). (The result will be a parallelogram shape.) Repeat the process with the dark blue icing on the opposite side of the cookie (Image 2).
Heather Baird, SprinkleBakes.com
Heather Baird, SprinkleBakes.com
Photo By: Heather Baird, SprinkleBakes.com
Photo By: Heather Baird, SprinkleBakes.com
Flood the left side of the cookie with periwinkle icing, and the right side with white. Use a toothpick to help fill gaps by pushing the icing with the tip of the toothpick (Image 1). Using the white icing, fill in the top portion of the dreidel, avoiding the handle area (Image 2). Fill in the handle portion with the dark blue icing. Allow the cookies to stand 4 hours, or until completely dry and hardened. Repeat this process with the remaining cookies.

Heather Baird, SprinkleBakes.com

Heather Baird, SprinkleBakes.com
Photo By: Heather Baird, SprinkleBakes.com
Photo By: Heather Baird, SprinkleBakes.com
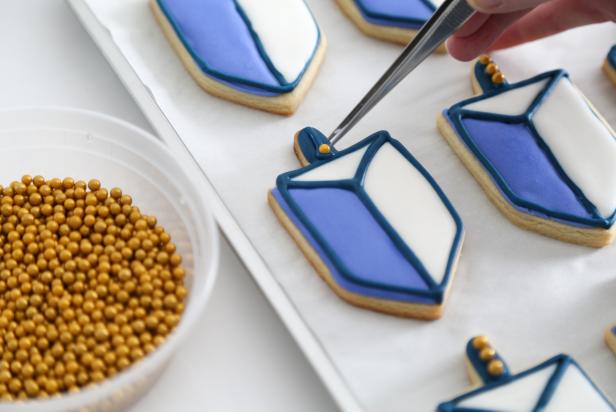
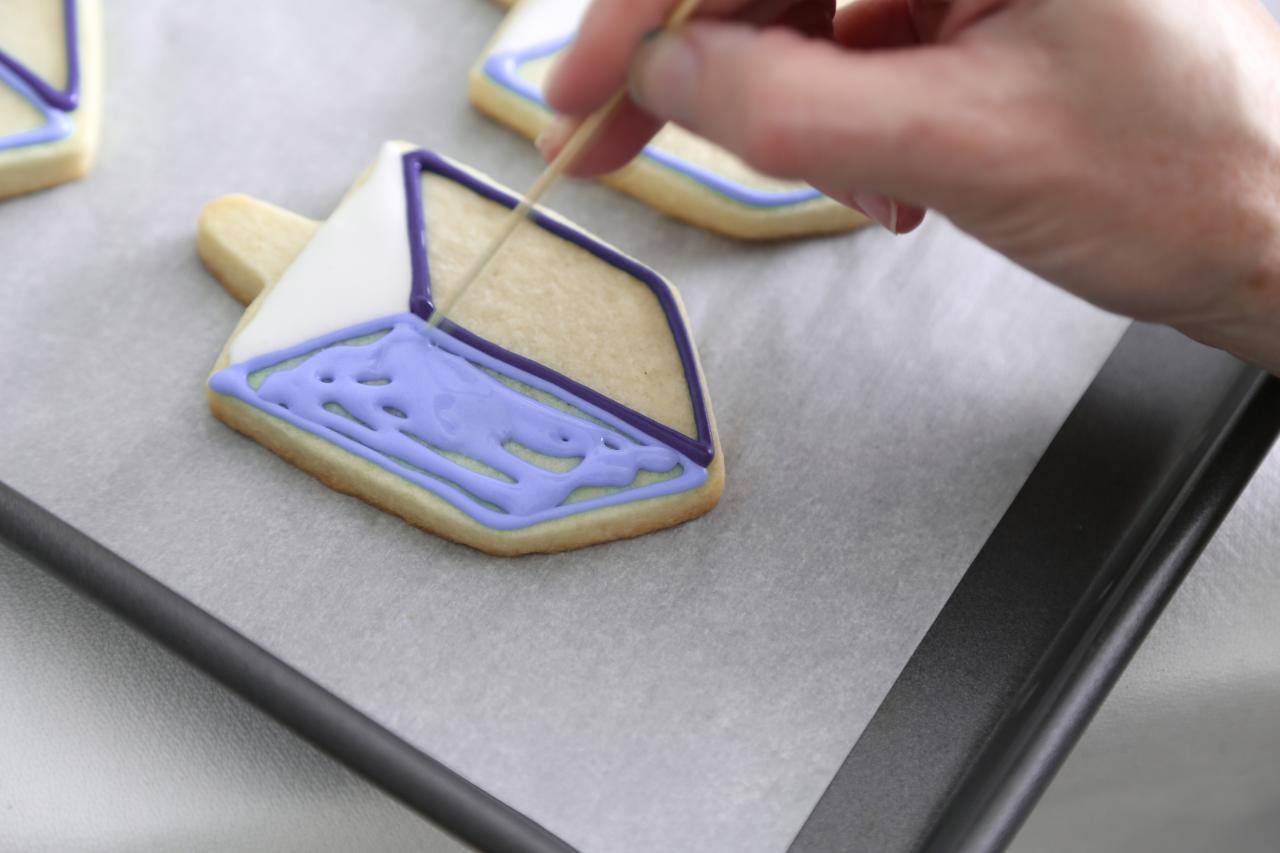
When the iced cookies are dry, re-outline the shapes on the cookies using the dark blue icing (Image 1). Pipe a line of dark blue icing from the bottom center of the handle to the top, and place three gold sugar pearls on each handle (Image 2). Allow to stand until set, about 1 hour.

Heather Baird, SprinkleBakes.com
Heather Baird, SprinkleBakes.com
Photo By: Heather Baird, SprinkleBakes.com
Photo By: Heather Baird, SprinkleBakes.com
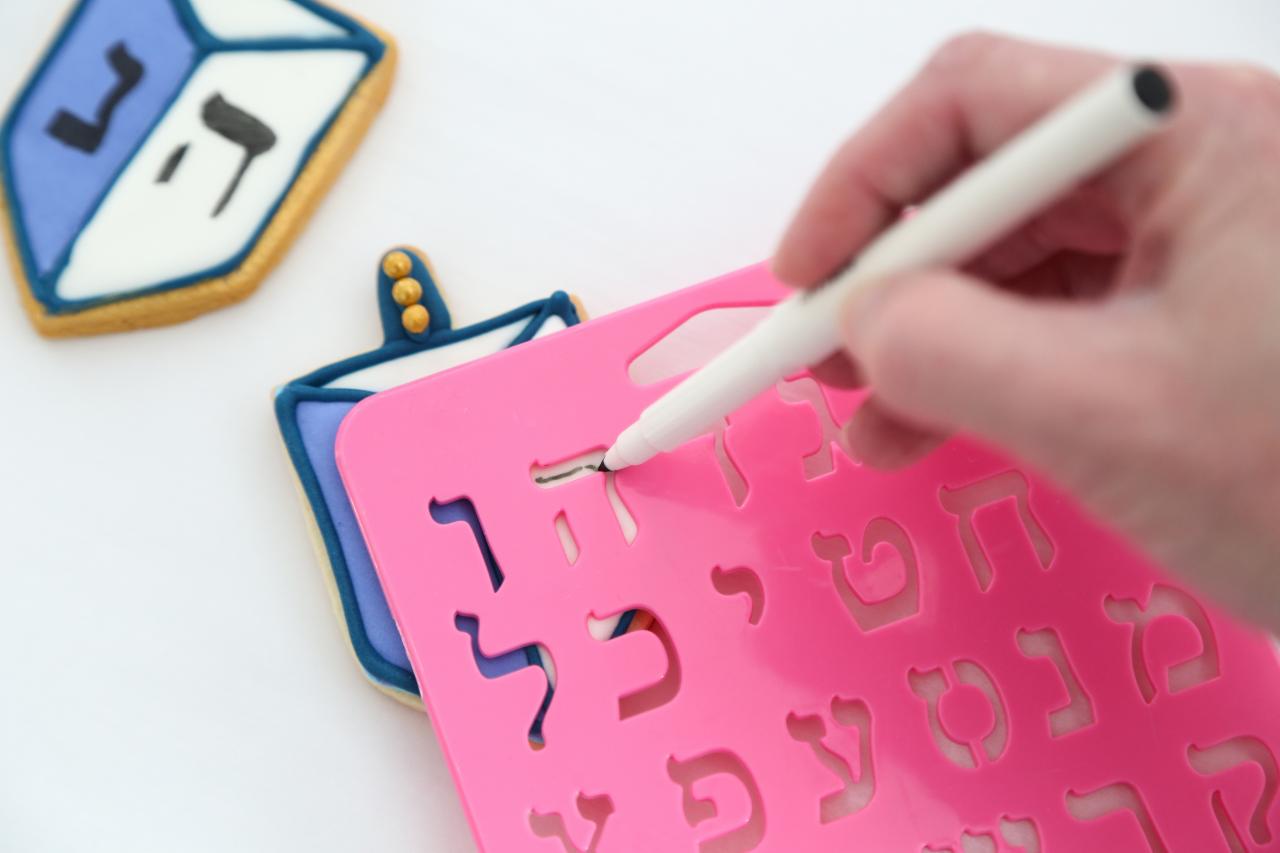
Place the Hebrew template, if using, on top of a cookie and use the food color pen to fill in the spaces. Use one of the following characters on each side of the dreidel cookie: נ (nun), ג (gimel), ה (hei) and ש (shin).

Photo by: Heather Baird, SprinkleBakes.com
Heather Baird, SprinkleBakes.com
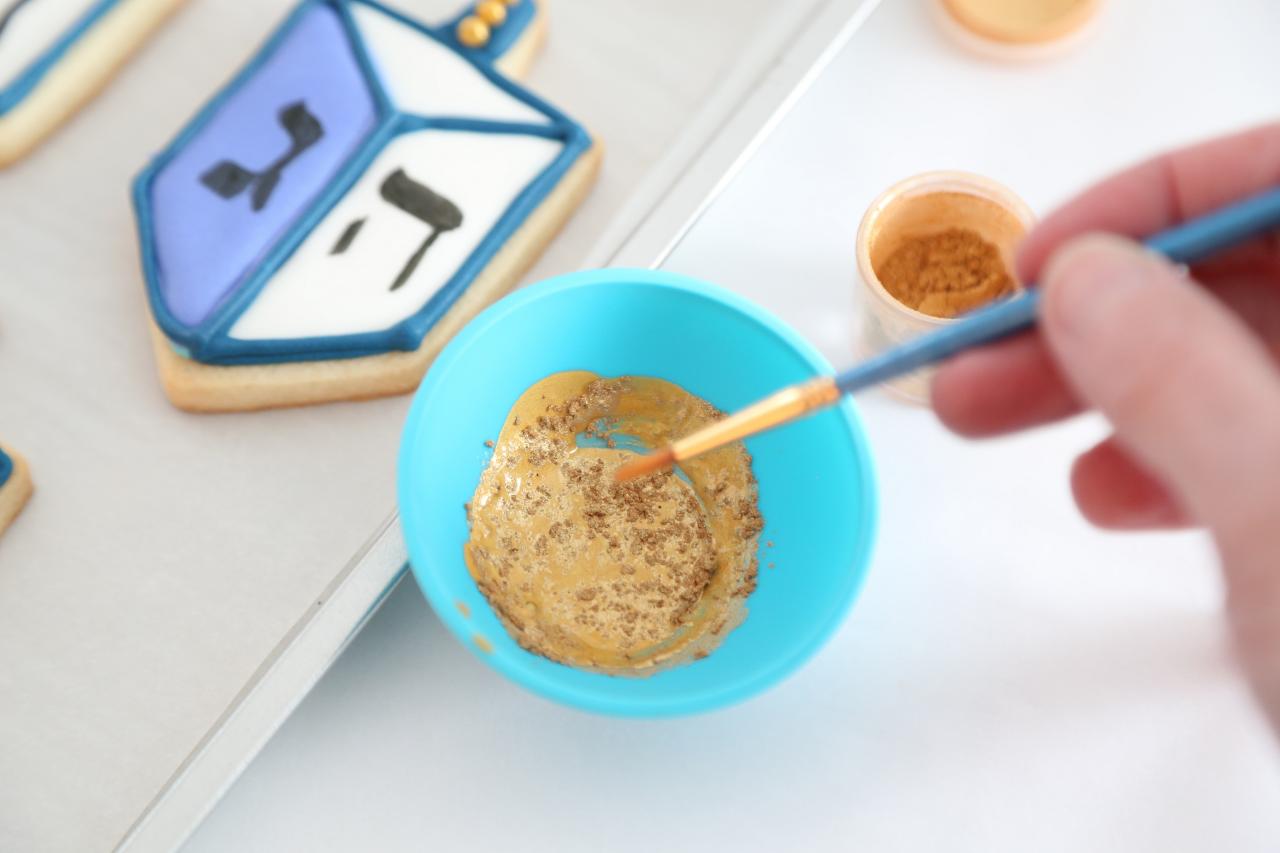
Pour 1/2 teaspoon of the gold luster dust in a small condiment cup, add drops of clear vanilla extract; stir, adding more drops as needed, until a medium-bodied paint is formed. Brush the gold paint over the exposed edges of the sugar cookies. Allow 1 hour drying time.

Photo by: Heather Baird, SprinkleBakes.com
Heather Baird, SprinkleBakes.com
Place a beautiful dreidel cookie at each place setting on your Hanukkah table. Guests can enjoy them as part of the feast or take them home as a festive favor to enjoy later.

Dreidel Sugar Cookie Favors
No Hanukkah celebration would be complete without the four-sided spinning top game known as dreidel. This sugar cookie version pays homage to the tradition while looking and tasting fantastic.
Photo by: Heather Baird, SprinkleBakes.com
Heather Baird, SprinkleBakes.com


