


Hide Your Water Heater With a DIY Storage Cabinet
Need more storage space in your garage but don’t know where to get it? Here’s the solution you’ve been looking for.

There may be nothing as frustrating as unusable space, especially in your garage where you seem to need it most. Turns out, you can DIY the solution you’ve been looking for. Creating a screen for your water heater will not only hide the unsightly appliance but also provide a usable “wall” that can be outfitted with ample storage opportunities. You’ll be one step closer to an orderly garage.
Materials Needed
- (14) 2x4 x 8’ pine boards
- (3) 4x8 sheets of 1/4” plywood
- (10) 1x4 x 8’ pine boards
- (2) 1x4 x 6’ pine boards
- 3” wood screws
- (2) white multi-tool hangers
- (10) white cup hooks
- (4) 3” rigid casters
- 1” lag bolts
- drill + bits
- 2” pocket hole screws
- nylon safety strap
- pocket hole jig
- (5) large clothespins
- 1-gallon interior paint in desired color
- 1-quart white interior paint
- paint brush
- painter’s putty
- 120-grit sanding block
- (2) 10” stainless steel cabinet pulls
Build Frame Base

Shain Rievley

Shain Rievley

Shain Rievley

Shain Rievley

Shain Rievley
Screw two 77-inch-long 2x4’s together to make a corner. Repeat once more. Attach a 36-inch 2x6 board to the end of each corner piece and lay on the floor with the 2x6 pointing up into the air. Using a pocket hole jig, attach 38-inch 2x4’s to the base of each corner. In the same fashion, fasten another 38-inch 2x4 to the top. This connects the corners and becomes the front of the cabinet. Add casters to the bottom of the 2x6 pieces using lag bolts. Rotate the entire base to now stand upright on the casters. Attach two more 38-inch pocket hole 2x4’s down the front of the cabinet evenly spaced. There should be 21 inches between each 2x4.
Pro Tip: Check the codes for your area. We needed 12 inches of clearance on all sides of the water heater to adhere to the local codes.
Complete the Sides

Shain Rievley

Shain Rievley

Shain Rievley
Add another 77-inch 2x4 to the back of the cabinet on each side. Using the pocket hole jig, connect this wood at the bottom of the front corner with a 29-inch 2x4. The sides will also connect to the 2x6 underneath. Secure the top in the exact same way. Reinforce with 34-1/4-inch 2x4s on both sides of the top and bottom. Now that the sides are built, add one more 2x6 cut to 44-3/4 inches to the top of the front to reinforce. This will make things extra sturdy when rolling.
Add the Outer Plywood Layer

Shain Rievley

Shain Rievley
Cover the 1/4-inch plywood sheets with two coats of your choice of paint. The front piece will measure 50 inches by 79 inches and the side pieces will measure 36 inches by 79 inches. Place the front piece on first, attaching with nail gun every three inches. Attach the side pieces in the same way.
Attach Trim

Shain Rievley

Shain Rievley

Shain Rievley

Shain Rievley
Paint the 1x4’s with two coats of white. Attach 81-inch vertical pieces at each corner, one on each side of the front and sides. Add a 43-inch 1x4 across the top of the front and allow the trim to peek above the plywood by 1/4” and fasten in place using the nail gun. Attach three more 43-inch 1x4 pieces evenly spaced down the front with the last piece flush at the bottom. Next, add a 29-inch 1x4 horizontally on the top and bottom of each side. Finish off with two more 29-inch pieces spaced evenly in the middle on the right side only. Attach oversized clothespins to this side for extra hanging storage.
Attach Extras

Shain Rievley

Shain Rievley

Shain Rievley

Shain Rievley
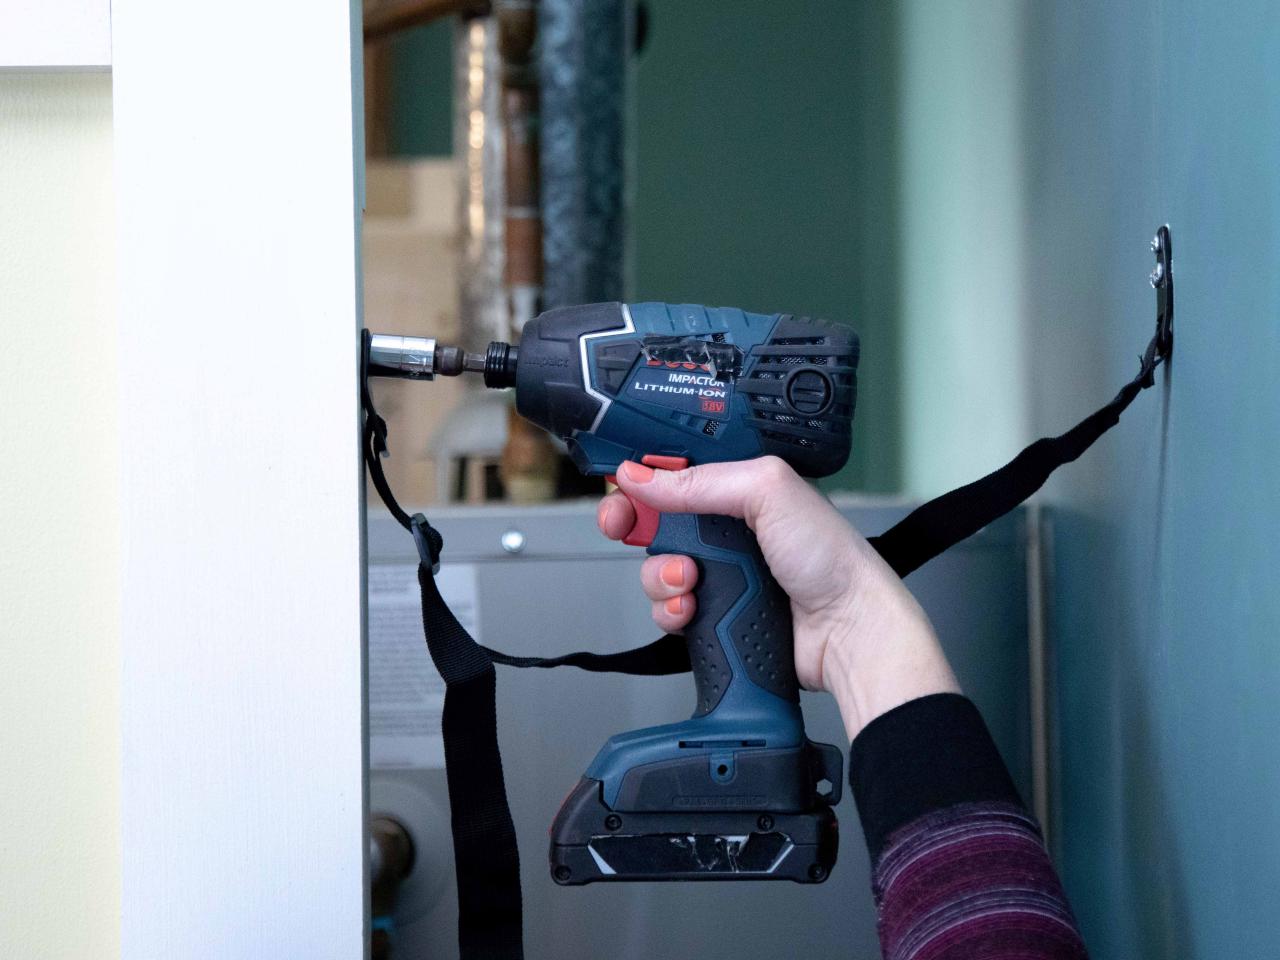
Use painter’s putty to patch all nail holes, sand and paint. Mount multi tool hangers to the front of the cabinet on one 1x4 and cup hooks on another using wood screws. Using a socket, secure the safety strap to back of cabinet with lag bolts. Roll the cabinet back and attach the other end of the safety strap to the wall. Lastly, add some 10-inch cabinet pulls to the front using the provided hardware. Voila! Just like that you have safe and effective storage that doubles as a cover for an unsightly water heater.

Shain Rievley


