


8 DIY Projects With Gold Paint
HGTV Magazine is mad for metallic! Gild everything from vases to pillows with these DIY projects using various kinds of gold paint.

Dipped Vases

Gold-Dipped Vases
Flasks: Corning Pyrex 500-milliliter long-neck shaker flask, $21; 1-liter long-neck shaker flask, $36.50; and 250-milliliter flat-bottom flask, $6.50, all amazon.com; Liquid gilding: Martha Stewart Crafts liquid gilding in gold, $7, michaels.com
Photo by: Alison Gootee/Studio D
Alison Gootee/Studio D
Step 1
Wrap electrical tape around a glass chemistry flask at an angle.
Step 2
Using a pouncer, paint everything below the tape, including the bottom, with liquid gilding. Peel off the tape while the gilding is still wet.
Step 3
Let dry upside down.
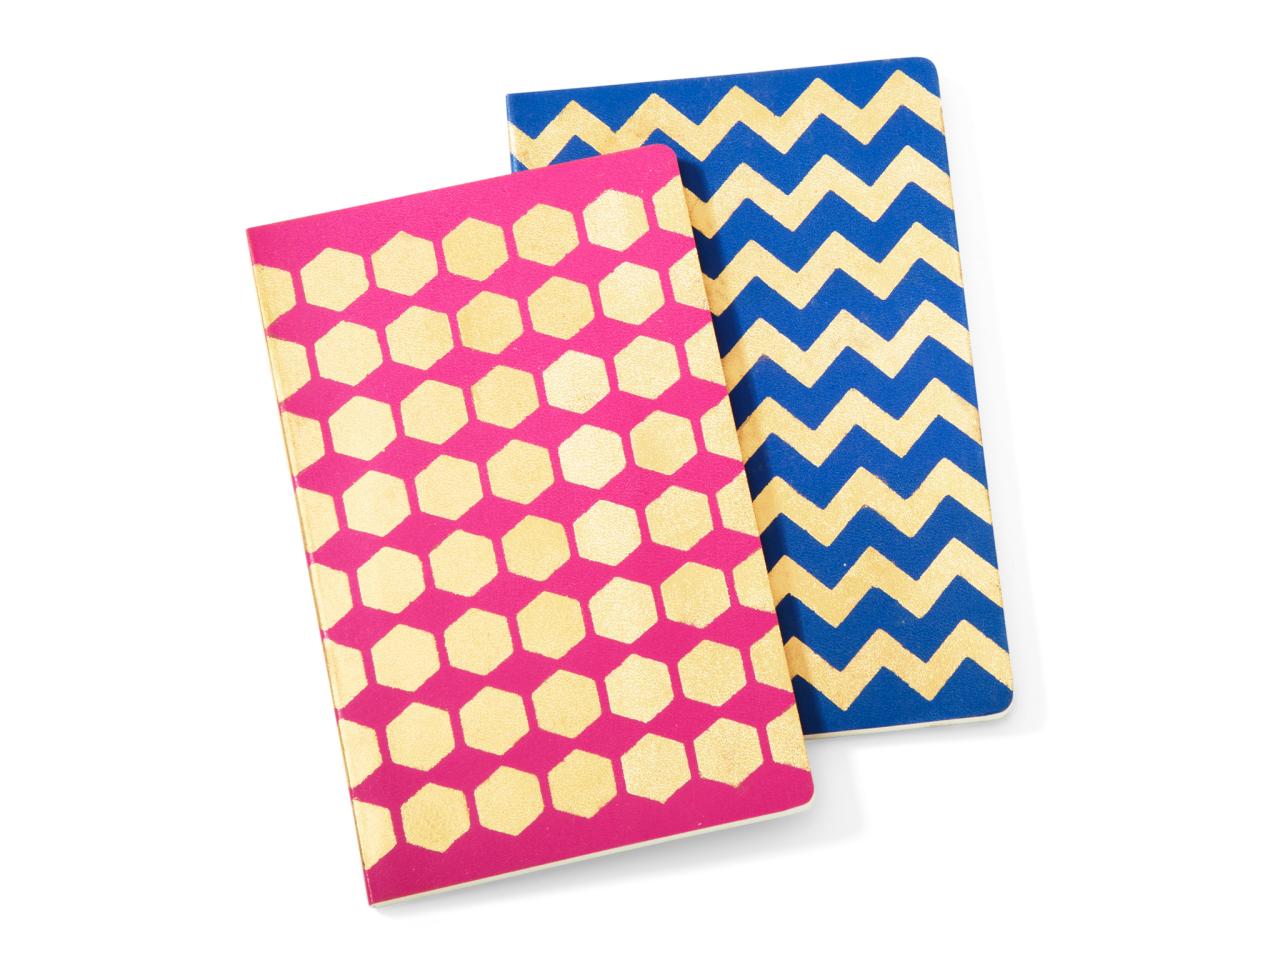
Pattern Notebooks

DIY Gold Patterned Notebooks
Notebooks: Moleskine Volant 8 1/4" x 5" notebooks, $13 for a mixed set of 2 (in pinks or blues), staples.com; Stencils: Handmade Charlotte stencils, $6 for a mixed set of 8, darbysmart.com; Liquid gilding: Martha Stewart Crafts liquid gilding in gold, $7, michaels.com
Photo by: Alison Gootee/Studio D
Alison Gootee/Studio D
Step 1
Affix a stencil to the cover of a notebook with repositionable spray mount.
Step 2
Using a pouncer, fill in the stencil with liquid gilding. Remove the stencil while the gilding is still wet. Let dry.
Striped Votive Candles

Gold Striped Candles
Votive holders with candles: Sinnlig scented candle in glass in orange, green, turquoise, and lilac, $2 each, IKEA stores; Spray paint: Bright Coat Gold by Rust-Oleum
Photo by: Alison Gootee/Studio D
Alison Gootee/Studio D
Step 1
Wrap rubber bands horizontally or vertically around a glass votive holder to create stripes (the more space between the rubber bands, the wider the stripe).
Step 2
Flip the votive holder upside down and completely coat it with spray paint. Wait a few minutes, then snip off the rubber bands with small scissors. Let dry upside down.
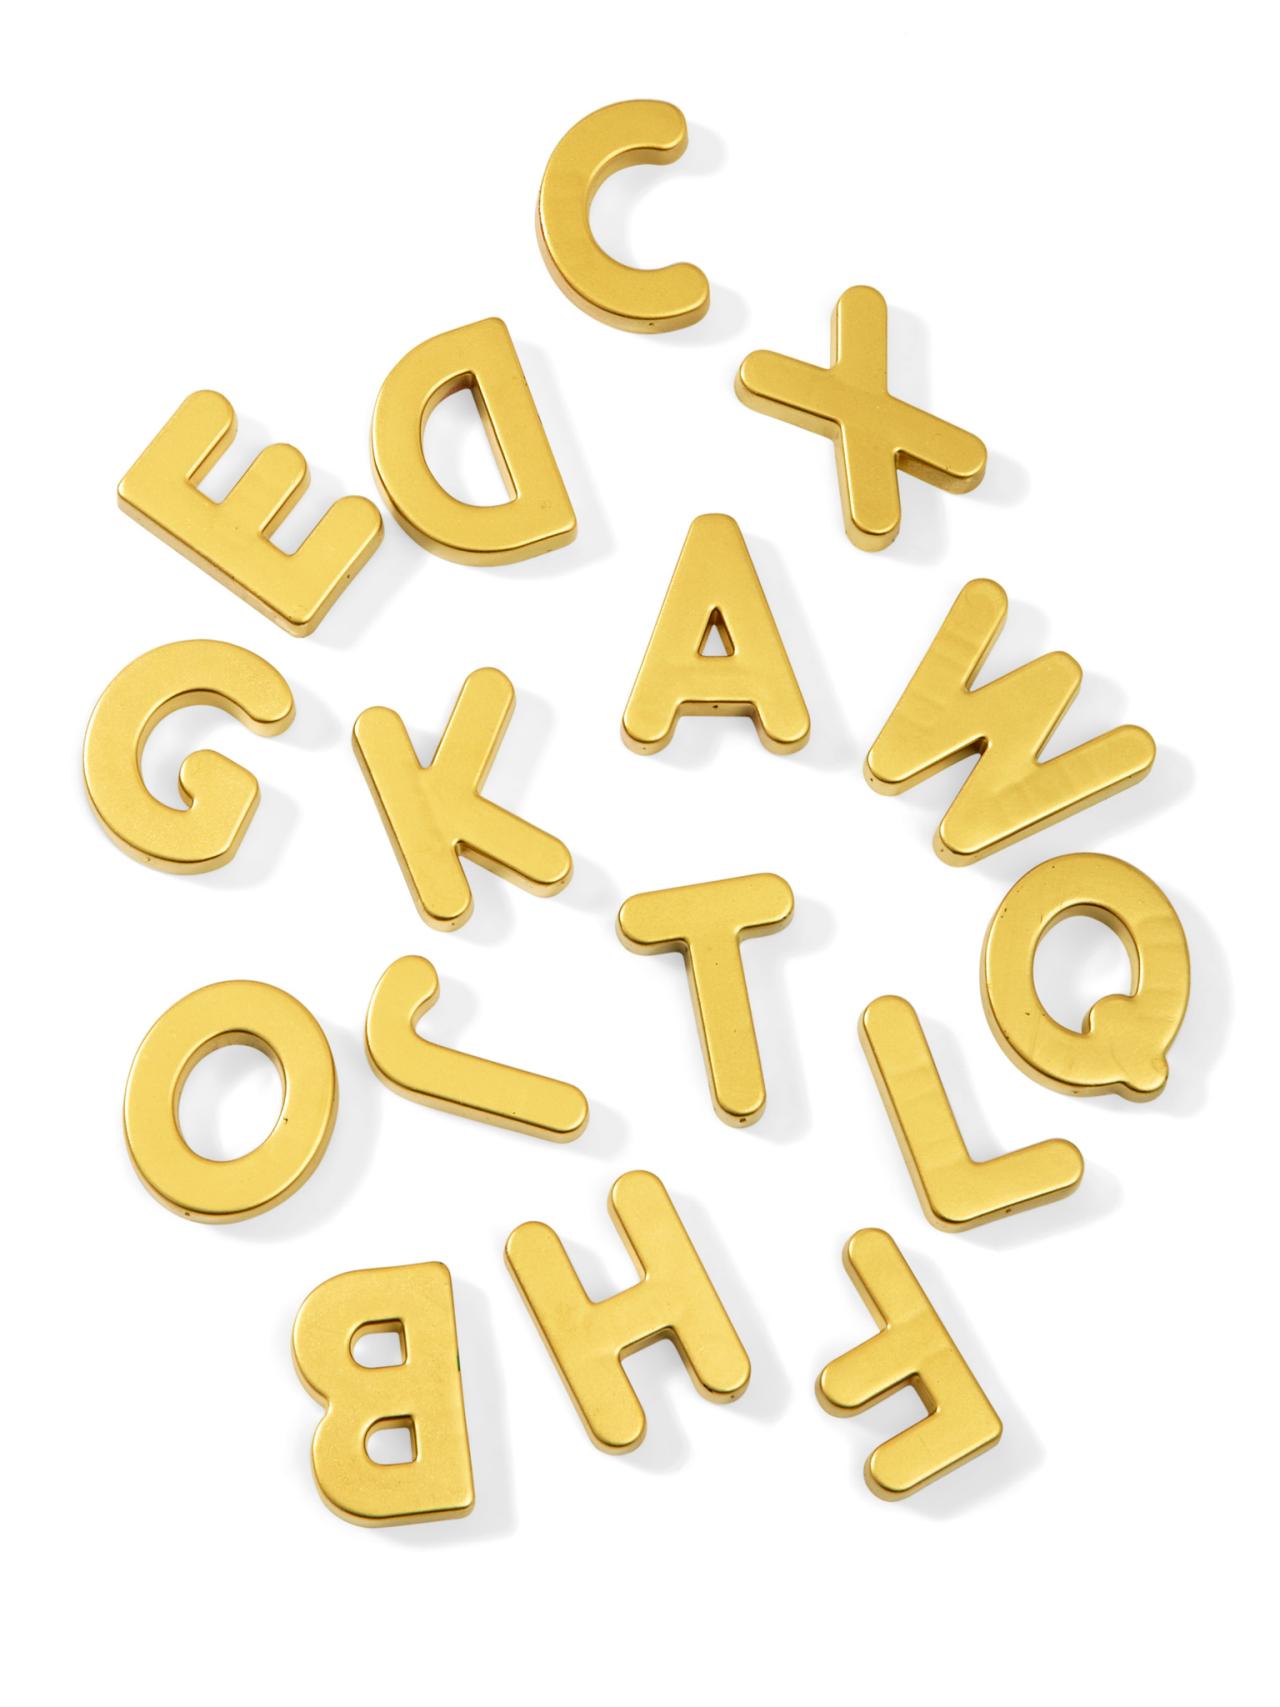
Glitzy Magnets

Gold-Painted Letter Magnets
Magnets: Alex magnetic letters, $8, amazon.com; Spray paint: Bright Coat Gold by Rust-Oleum
Photo by: Alison Gootee/Studio D
Alison Gootee/Studio D
Step 1 (and done!)
Lay the magnets faceup. Spray-paint them, directing the nozzle at an angle to get in the nooks and crannies of each letter. Let dry.
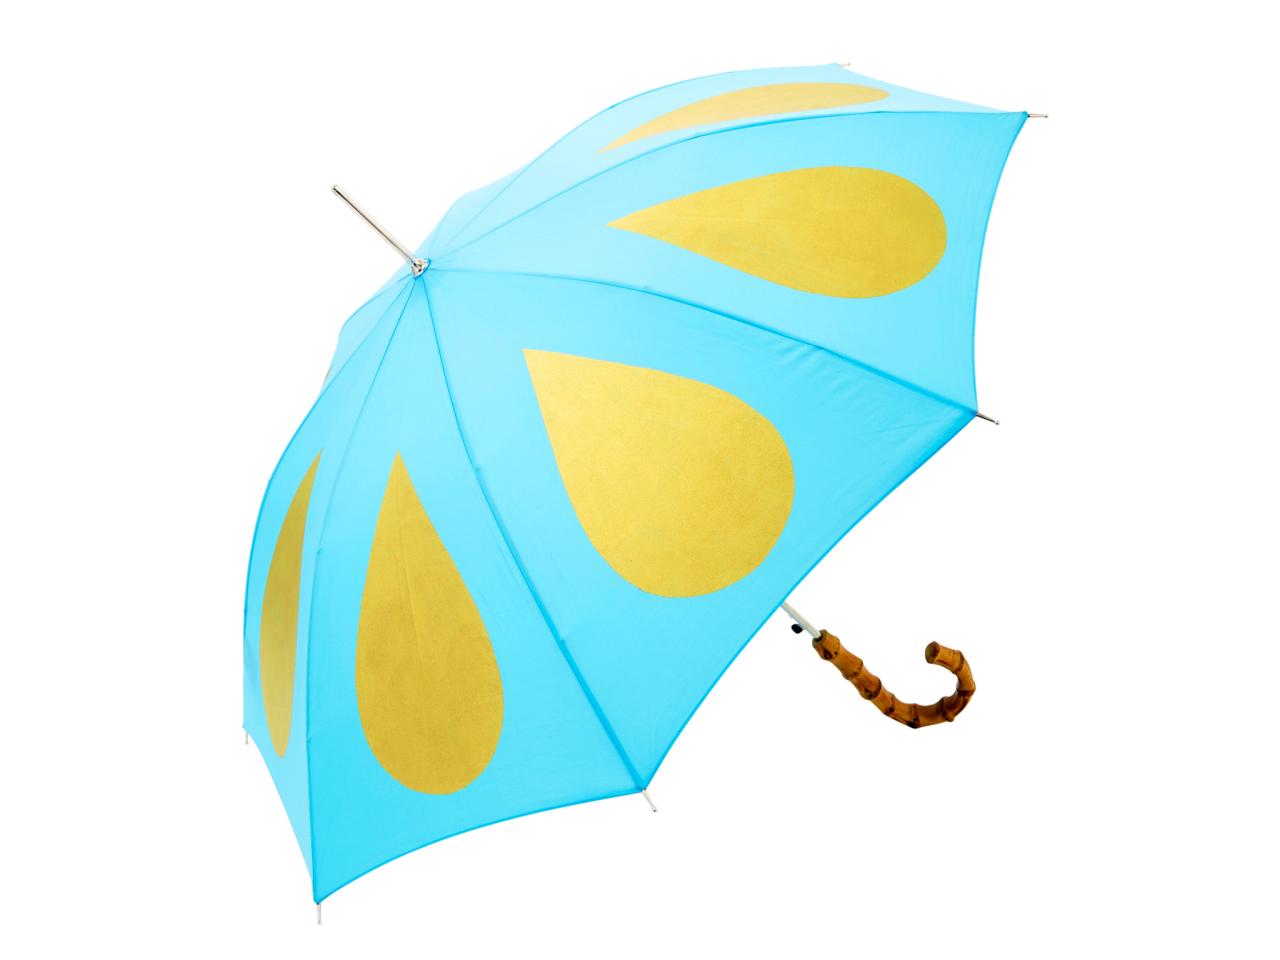
Golden Raindrop Umbrella

DIY Umbrella with Gold Raindrops
Umbrella: Classic Sky Blue stick umbrella, $45, shop.bellaumbrella.com; Crafts paint: Martha Stewart Crafts metallic acrylic paint in gold, $2.50 for 2 ounces, michaels.com
Photo by: Alison Gootee/Studio D
Alison Gootee/Studio D
Step 1
Click here to download the raindrop template, and print it onto an 8 1/2" x 11" sheet of label paper. Cut out the raindrop with a crafts knife and discard it—the remaining paper is your stencil. Repeat three or four times. (The label paper loses stickiness, so you’ll need a few stencils for one umbrella.)
Step 2
Open the umbrella and lay one section flat on an ironing board. Remove the backing from one of the stencils and adhere it to the umbrella.
Step 3
Using a pouncer, fill in the stencil with crafts paint. Remove the stencil while the paint is still wet. Repeat on each section of the umbrella. Let dry.
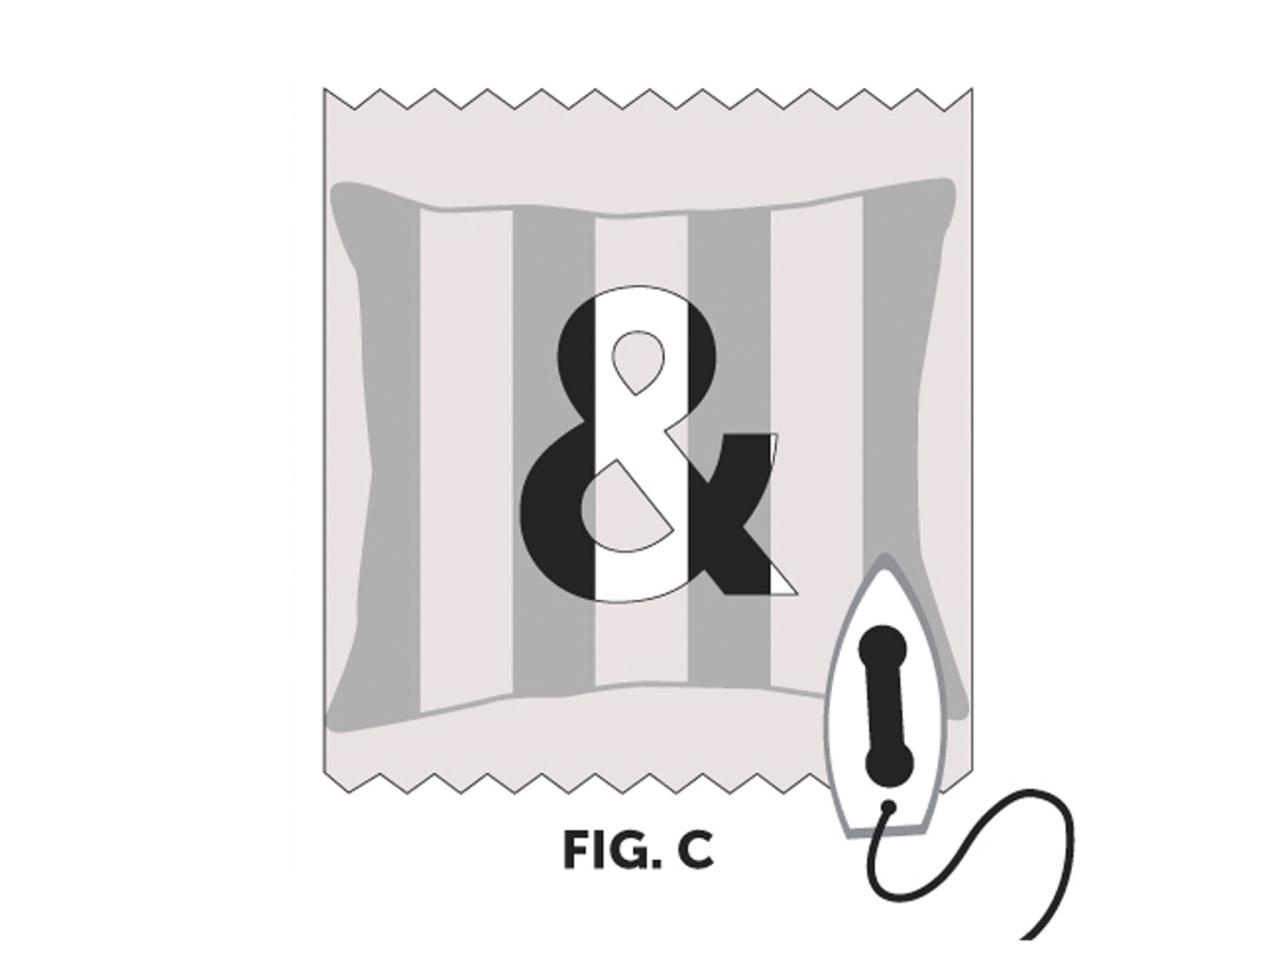
Stenciled Pillow

Gold Glitter Ampersand Pillow
Pillow cover: Vargyllen 20" x 20" cushion cover, $5, IKEA stores; Spray paint: Glitter Blast Golden Glow by Krylon
Photo by: Alison Gootee/Studio D
Alison Gootee/Studio D
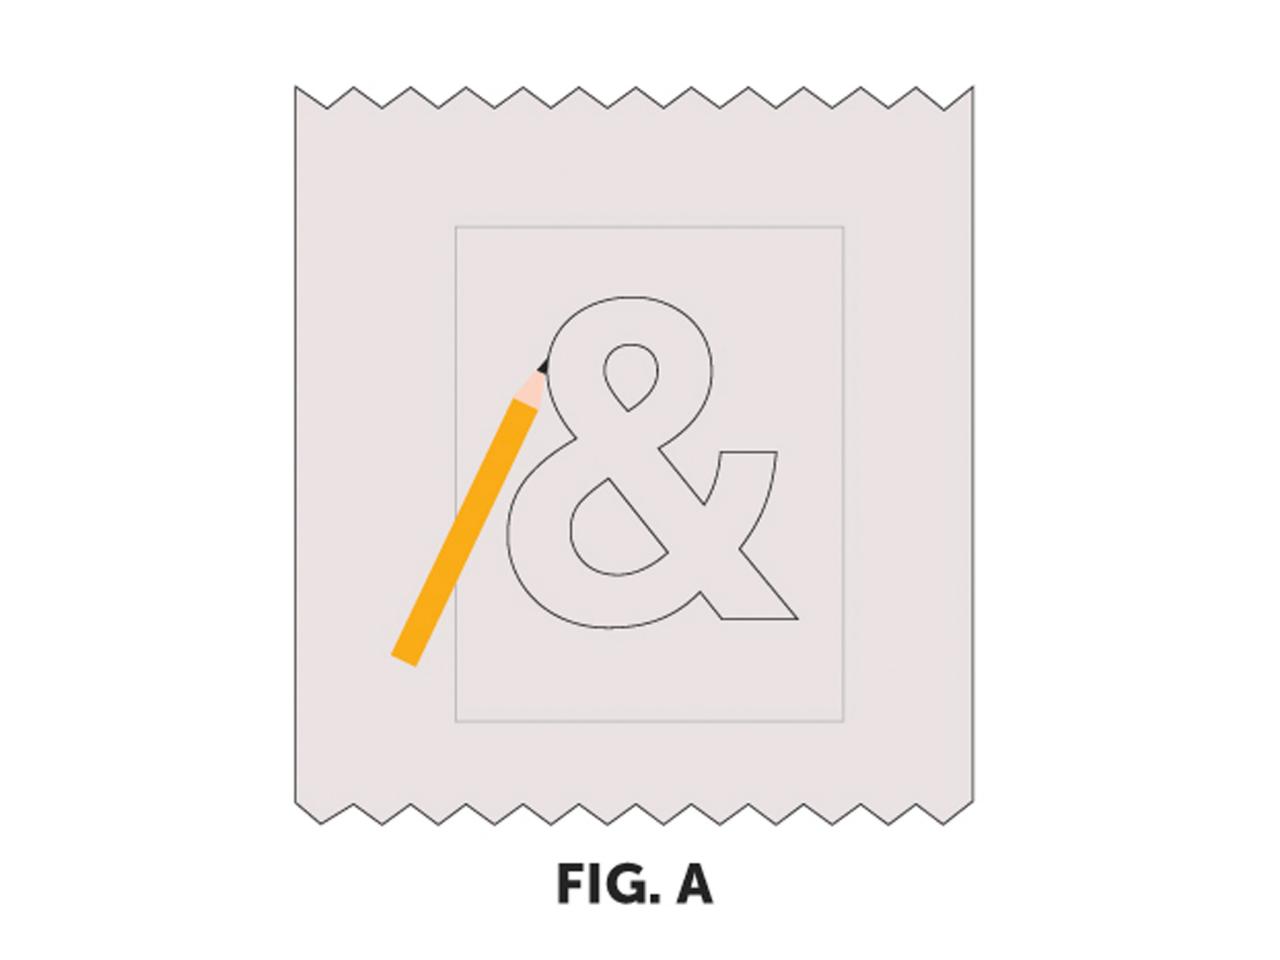
Step 1
Click here to download the ampersand template, and print it onto an 8 1/2" x 11" sheet of paper.
Step 2
Cut a piece of freezer paper to about the same size as your pillow. Lay the paper on top of the ampersand printout with the shiny side down. Trace the ampersand onto the freezer paper with a pencil (Fig. A).

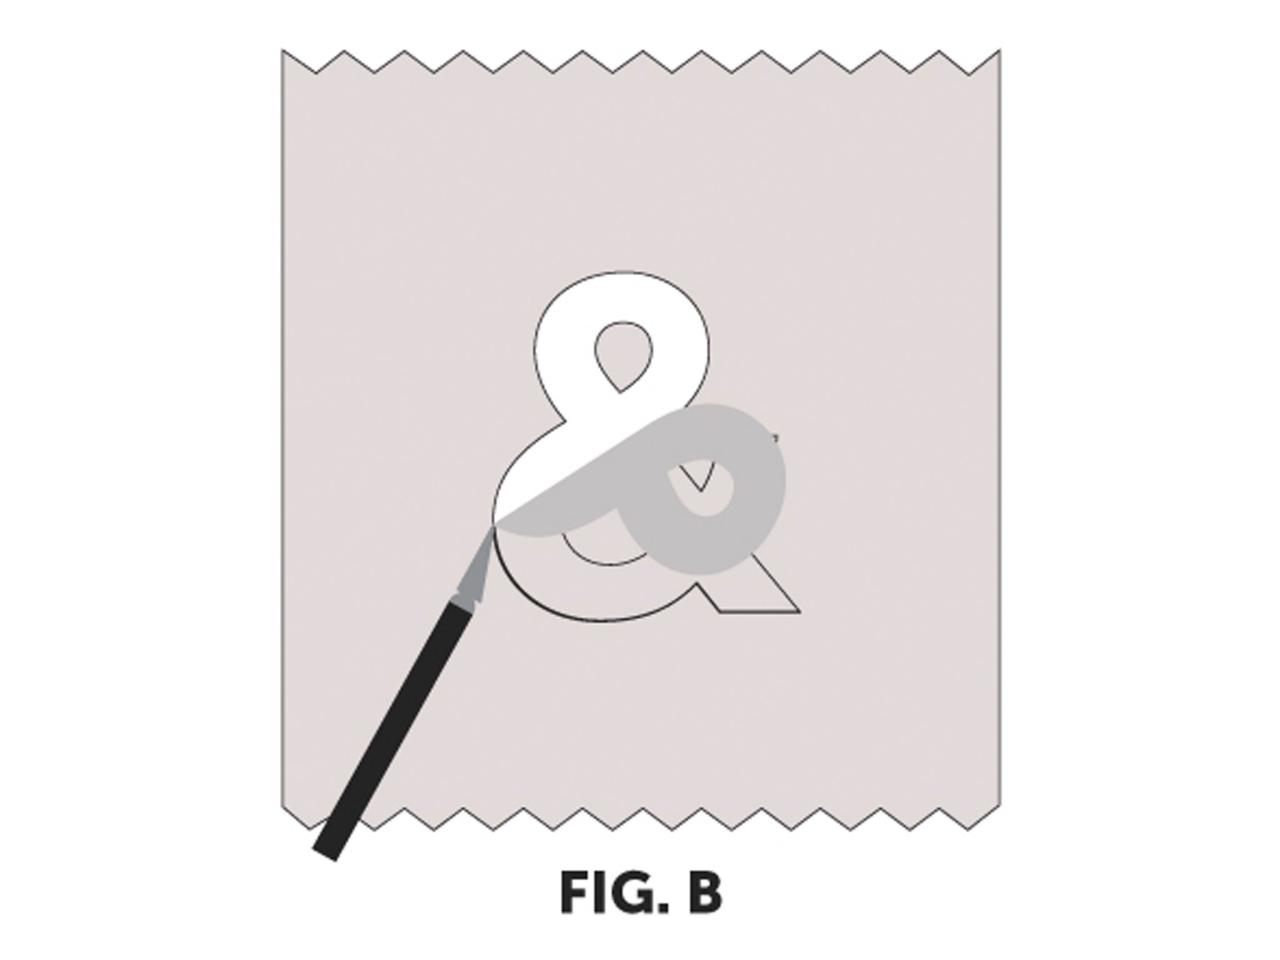
Step 3
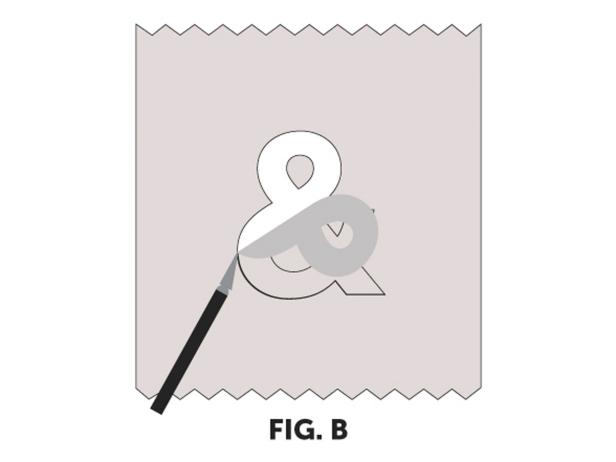
Cut out the ampersand with a crafts knife (Fig. B) and discard it, but cut out and keep the two center sections. They‘ll be your stencil, along with the remaining paper.
Step 4
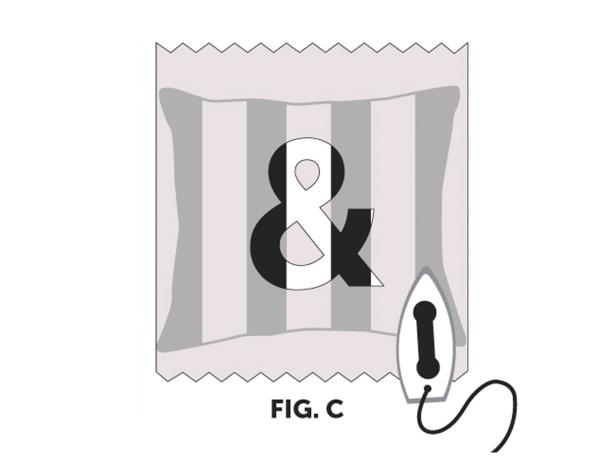
Stick a piece of cardboard inside a pillow cover to keep it flat. Using medium heat, iron the stencil, including the ampersand’s center sections, onto the pillow cover (Fig. C).
Step 5
Using glitter spray paint, fill in the stencil. Remove the stencil while the paint is still wet, using tweezers for the ampersand’s center sections. Let dry.
Extra! Extra! Continue scrolling to see two more projects we didn't show you in the magazine.
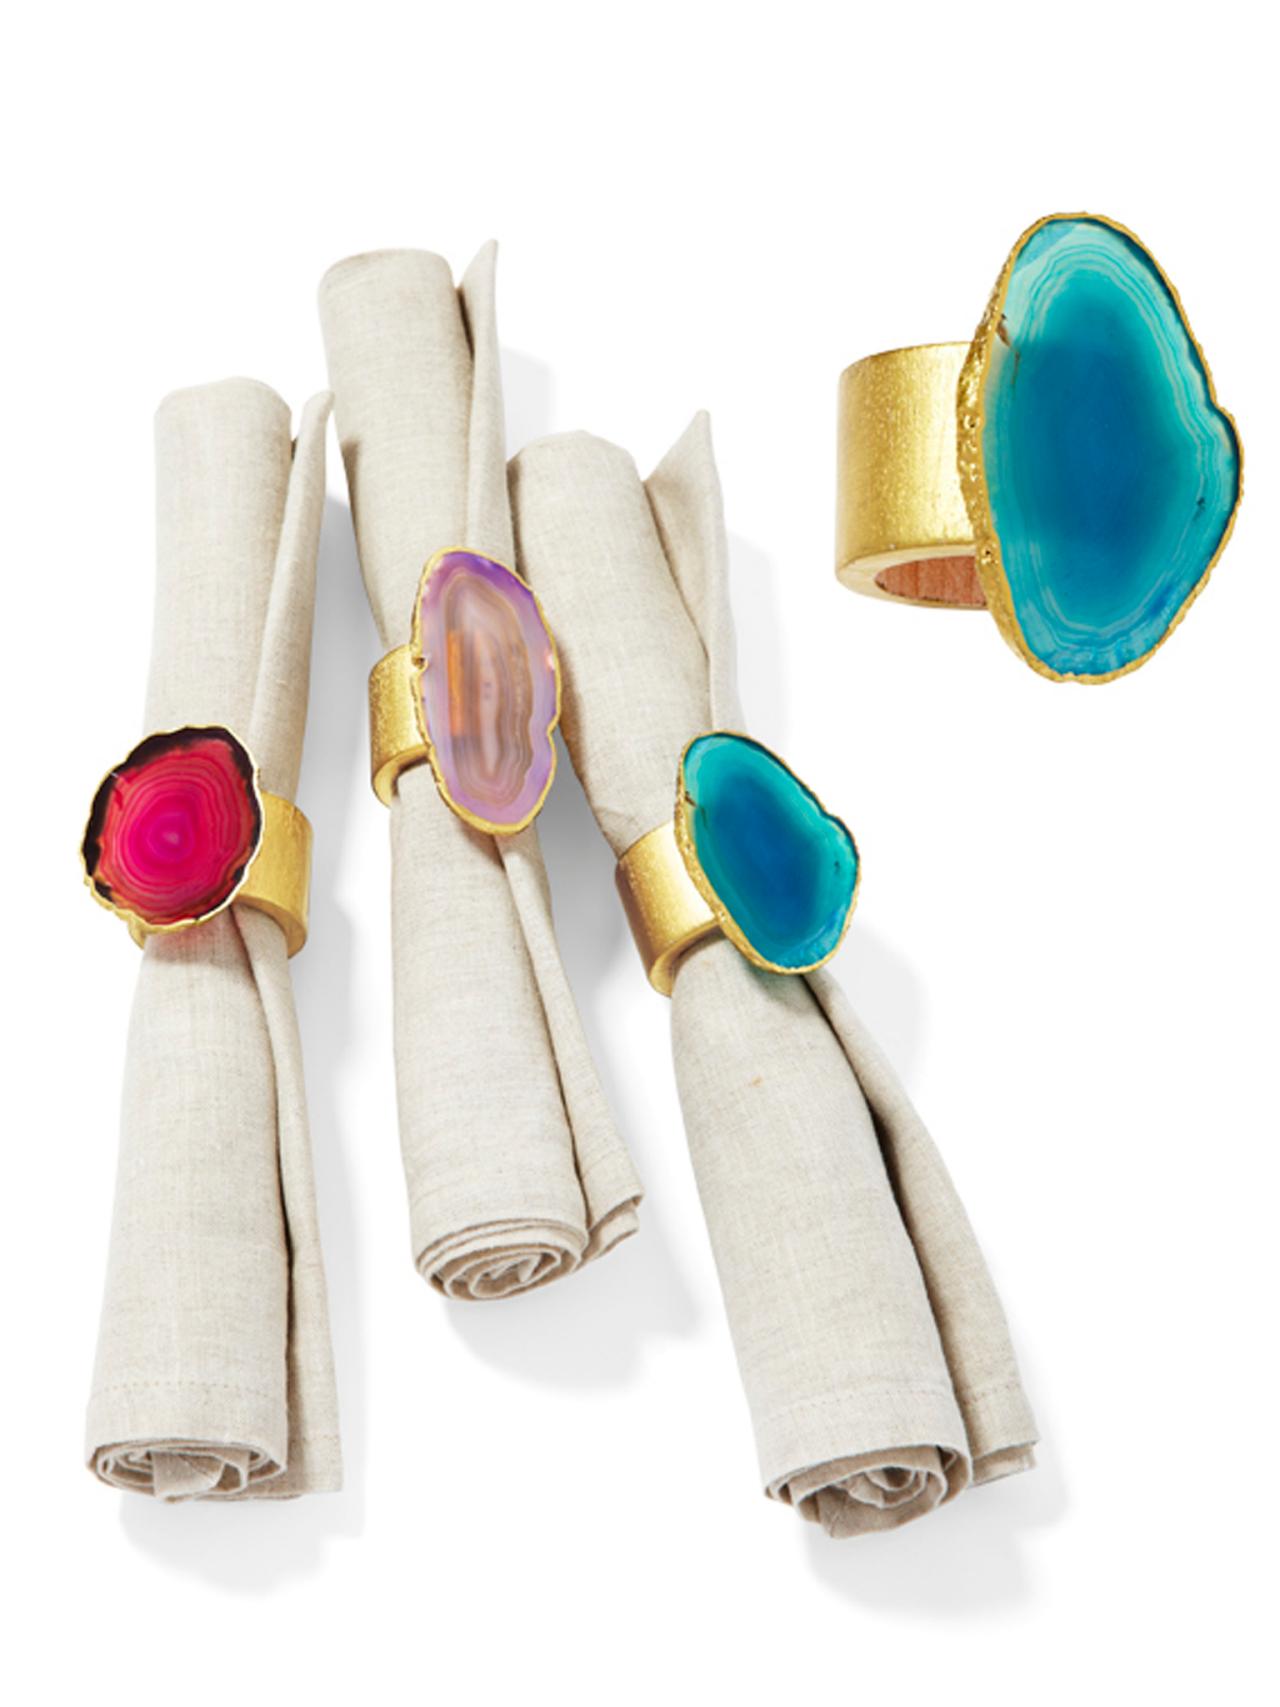
Edgy Napkin Rings

DIY Gold and Agate Napkin Rings
Geodes: Agate stones, $7 for two, darbysmart.com; Napkin rings: Wooden napkin rings, $6 for four, darbysmart.com; Paint marker: Sakura paint pen, $3, darbysmart.com
Photo by: Alison Gootee/Studio D
Alison Gootee/Studio D
Step 1
Use a gold paint marker to draw around each geode’s edge so it looks like it’s bordered in gold. Let dry.
Step 2
Color the outside and edges of wood napkin rings with the same paint marker. Let dry.
Step
3
Glue the geode to the ring with Super Glue.
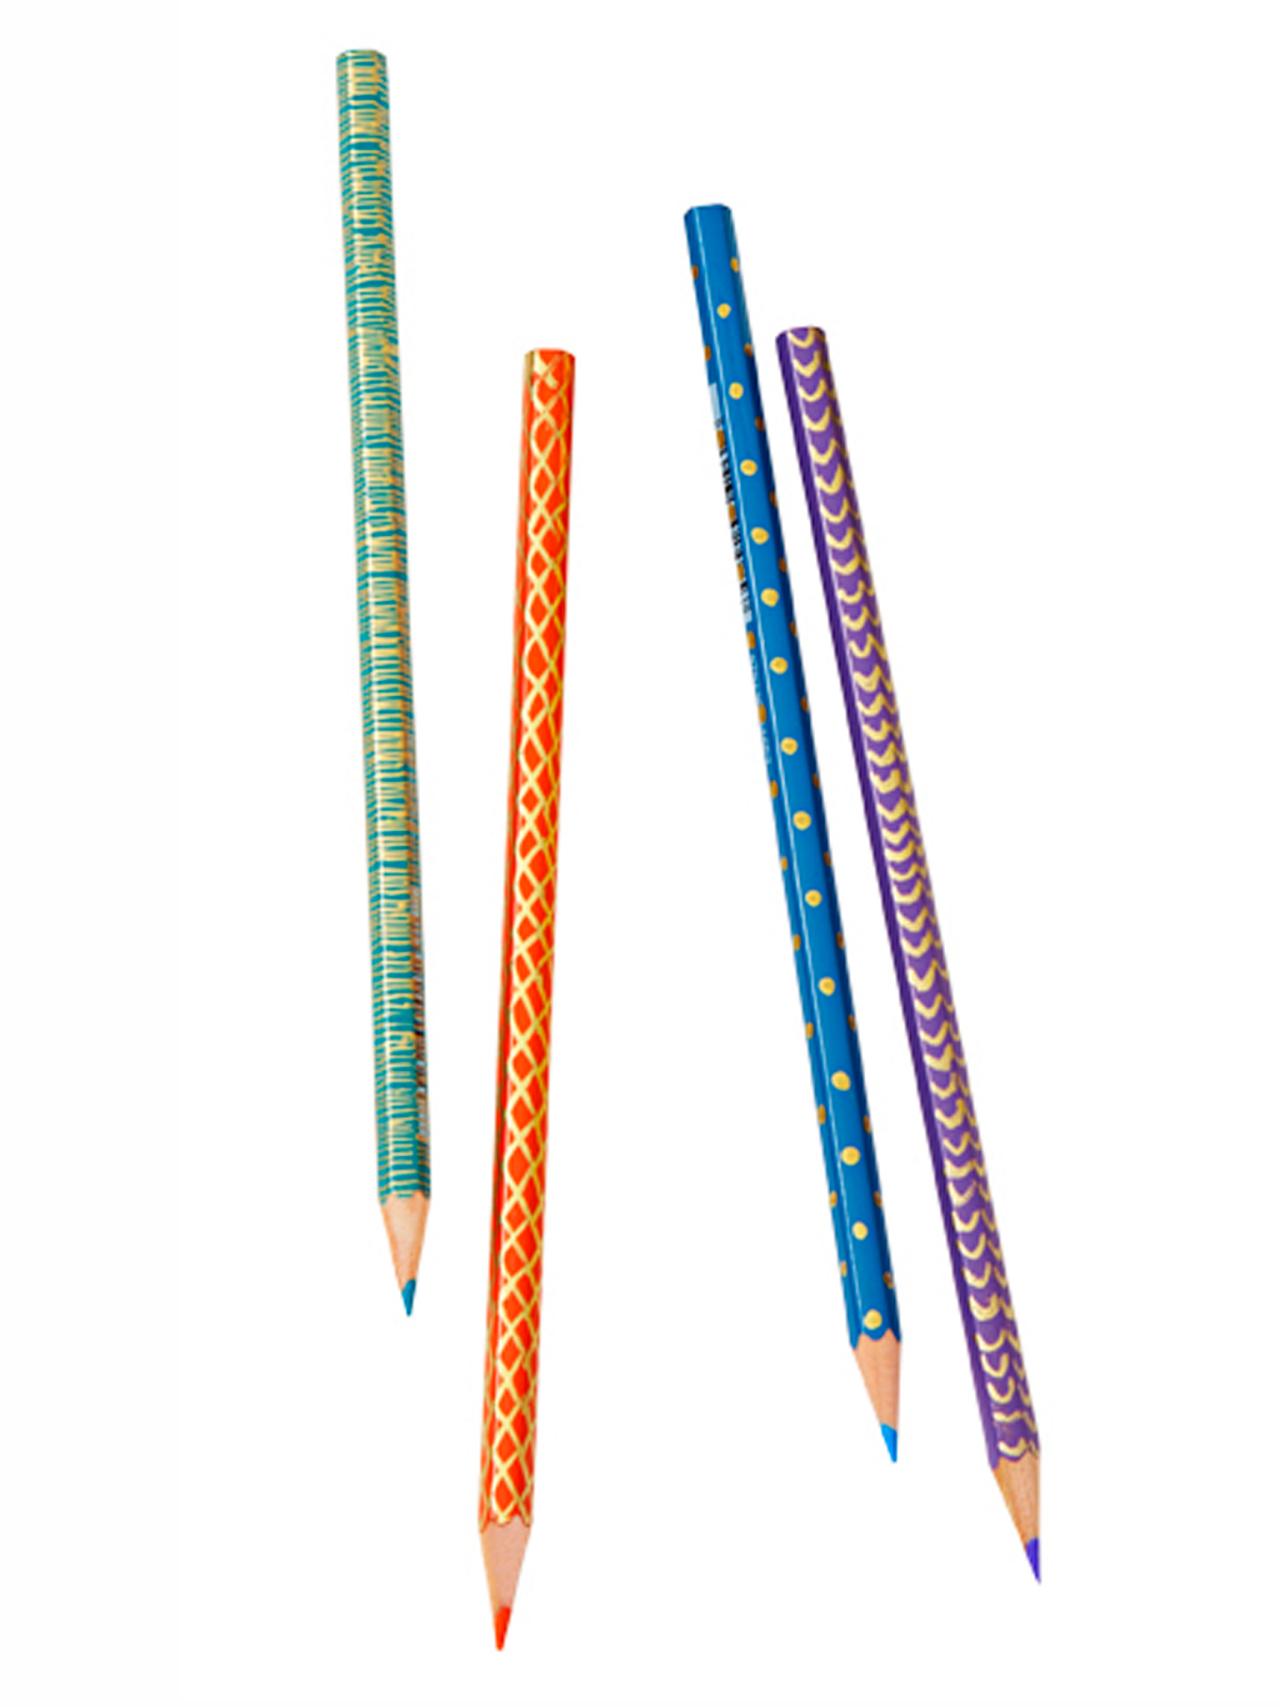
Custom Pencils

Colored Pencils Decorated with Gold Paint
This DIY using gold paint is from HGTV Magazine.
Photo by: Alison Gootee/Studio D
Alison Gootee/Studio D
Step 1 (and done!)
Using a paint marker with a fine tip, draw freehand dots, chevrons, stripes, and other patterns on solid colored pencils. Let dry.


