


How to Make Industrial-Style Rolling Shutters
Learn how to upcycle old doors into industrial-style window shutters that were inspired by the look of old warehouse doors.

Industrial decor does not have to be limited to downtown lofts. Create your own industrial appeal with these warehouse door inspired shutters. Install them on barn-door tracks for easy control.

Industrial Style Rolling Window Shutters
Create your own industrial style rolling window shutters
Photo by: Sam Henderson
Sam Henderson
Tools and Materials
- (2) hollow core doors
- pencil
- measuring tape
- table saw or circular saw
- hammer
- 1-1/4" finishing nails
- galvanized flashing, 50’ x 14" or 20" depending on the height of your shutters
- coarse sandpaper
- tin shears
- leather work gloves
- screwdriver
- construction adhesive
- awl
- mallet
- 1-1/4" metal screws
- 1" roofing nails
- drill with bit
- barn-door track
- level
Step 1: Determine Size

Industrial Style Rolling Window Shutters
Create your own industrial style rolling window shutters
Photo by: Sam Henderson
Sam Henderson
Measure the height and width of your window. Divide the width by two and use that number to determine the size of your hollow core doors. They will need to be at least big enough to cover the opening. There must also be enough room on both sides of the window to accommodate the shutters. Cut the doors at the height of the window plus two inches.
Step 2: Remove Door Cover

Sam Henderson

Sam Henderson
Industrial Style Rolling Window Shutters
Create your own industrial style rolling window shutters
Photo By: Sam Henderson
Industrial Style Rolling Window Shutters
Create your own industrial style rolling window shutters
Photo By: Sam Henderson
Next, complete the frame of the cut door by filling the hole at the bottom of the door with the framing piece from the part of the door you have cut away. You will need to peel the thin plywood away to reveal the framing piece of wood. Then scrape away any excess material and residual glue from the piece of framing wood. Insert it into the cut end of the door, tap it in place lightly, and secure it with 1-1/4" finishing nails.
Step 3: Cut Flashing

Industrial Style Rolling Window Shutters
Create your own industrial style rolling window shutters
Photo by: Sam Henderson
Sam Henderson
Use tin shears to cut four pieces of flashing for each shutter to the width of your door plus 2-1/2". Note: The cut edges of the flashing can be very sharp. Be sure to wear leather work gloves. Lightly sand the cut edges with coarse grain sandpaper.
Step 4: Fold First Side of Flashing

Industrial Style Rolling Window Shutters
Create your own industrial style rolling window shutters
Photo by: Sam Henderson
Sam Henderson
Lay the flashing on a flat surface and lay one end of a shutter on top of it. Position the shutter so that the flashing extends 1-1/4" on both sides and the end of the shutter. Use a screwdriver to score the flashing at the sides and bottom of the shutter. Make a cut on both sides of the bottom end of the flashing up to the bottom of the shutter. Carefully fold up the sides of the flashing to meet the sides of the shutter. Fold up the bottom of the flashing to meet the bottom of the shutter. Remove the flashing and repeat for three more sheets of flashing. Position a sheet of flashing under a shutter with 1-1/4" of the flashing extending on both sides. Score the flashing at each side of the shutter. Carefully fold up the flashing to meet the sides of the shutter. Remove flashing and repeat for the last three sheets of flashing.
Step 5: Add Second Side of Flashing

Industrial Style Rolling Window Shutters
Create your own industrial style rolling window shutters
Photo by: Sam Henderson
Sam Henderson
Place one of the sheets of flashing with the bottom edge folded up at the bottom of the shutter. Add two of the pieces without the bottom folded, overlapping them slightly. Add another piece with the bottom folded at the top of the shutter. Space them evenly apart. Remove the top piece and draw a line along the top of the next piece of flashing with a pencil. Remove that piece and draw a line along the top edge of the next piece. Remove that piece and draw a line along the top edge of the last piece. Remove the last piece. Add construction adhesive to the shutter and press the first piece in place. Repeat for the remaining pieces, positioning them against the drawn lines.
Step 6: Lay Out "Rivet" Marks

Industrial Style Rolling Window Shutters
Create your own industrial style rolling window shutters
Photo by: Sam Henderson
Sam Henderson
Make a small mark 1/2" in from each side and 1/2" down from the top of the top of the shutter. Repeat for the bottom. Make a mark 1/2" in from each side and 1/2" up from the bottom of the three overlapping bands of flashing. Measure the space between two of the dots and divide it so that each of the remaining marks will be between 3" to 4" apart. Use that number to distribute marks evenly and in an even line between each of the two sets of marks on the sides of the shutter. Use an awl and mallet to indent and make a small hole at each of the marks.
Step 7: Insert Screws

Industrial Style Rolling Window Shutters
Create your own industrial style rolling window shutters
Photo by: Sam Henderson
Sam Henderson
Use a drill to attach metal screws into each of the holes.
Step 8: Nail Edges

Industrial Style Rolling Window Shutters
Create your own industrial style rolling window shutters
Photo by: Sam Henderson
Sam Henderson
Stand the shutter on its side and make a mark 1/2" in from the top and bottom and centered on the edge of the shutter. Also, make marks 1/2" up from the bottom edge of each of the flashing overlaps. Use an awl and mallet to indent and make a small hole at each of the marks. Use a hammer and 1" roofing nails to secure the flashing to the side for the shutter. Repeat for the opposite side. Stand the shutter on one end and fold over the pieces of flashing from the sides. Repeat the process for adding the roofing nails, but only at the outside edges and through the flashing flap from the sides. Repeat for the opposite end.
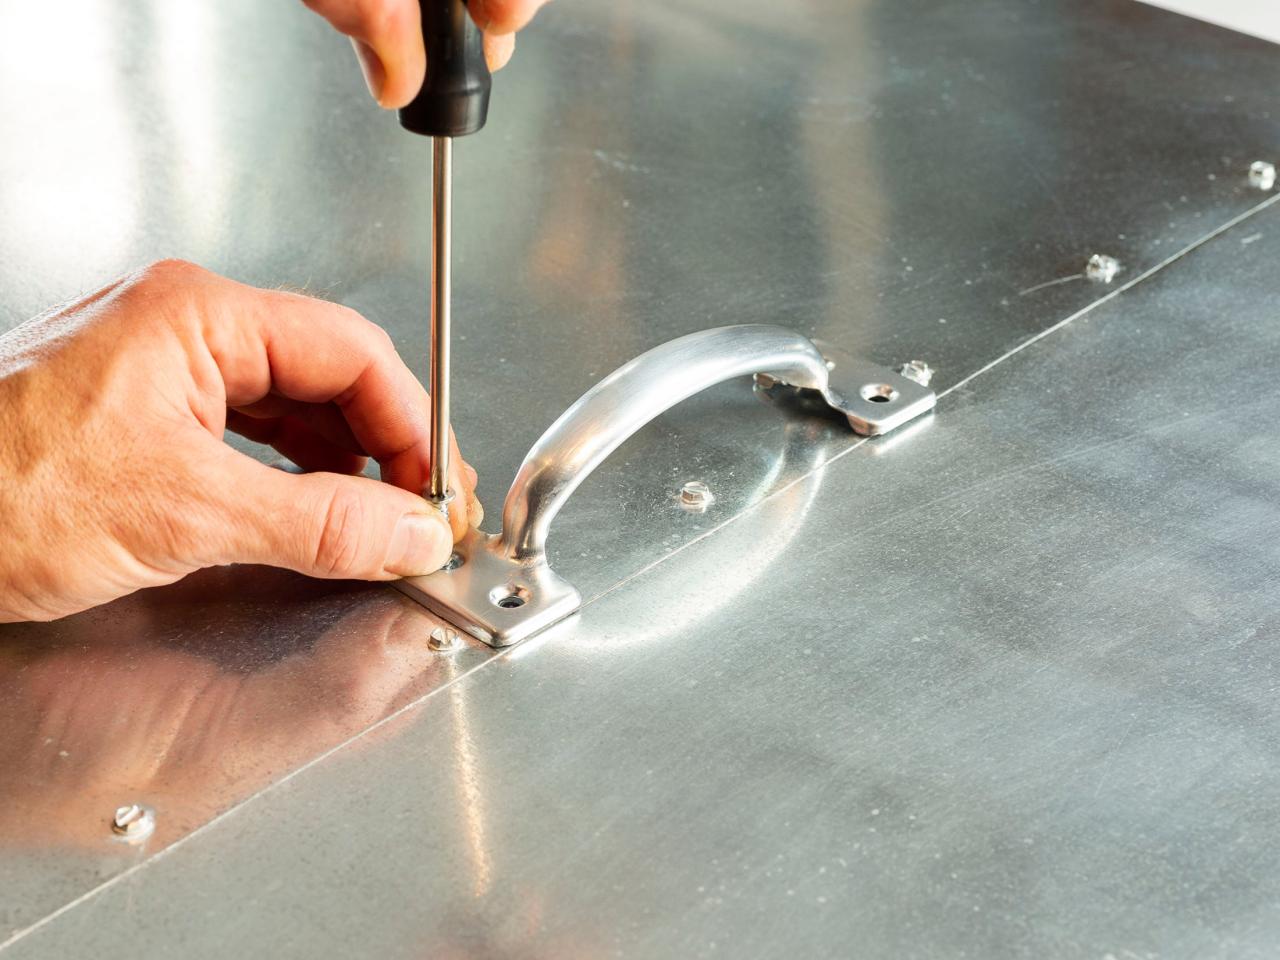
Step 9: Add Handle

Industrial Style Rolling Window Shutters
Create your own industrial style rolling window shutters
Photo by: Sam Henderson
Sam Henderson
Add the handle by putting it in the desired position and making marks through the screw holes. Use an awl and mallet to indent and make a small hole at each of the marks. Place the handle over the holes and attach with screws. Repeat the shutter construction steps for the other door.
Pro Tip: At this point, you can ‘age’ the shutters a bit by scrubbing them with a pot scrubber and some abrasive cleaner if you wish. Rub them gently in a small circular motion and then wipe them clean with a wet paper towel. This will remove some of the sheen, if desired.
Step 10: Add Hanging Hardware

Industrial Style Rolling Window Shutters
Create your own industrial style rolling window shutters
Photo by: Sam Henderson
Sam Henderson
Add the barn door wheel hangers to the top of the doors, spaced evenly, following the manufacturer's instructions. Be sure that at least one of the screws goes through the wood frame at the top of the door, within 1-1/2" from the top.
Step 11: Hang Shutters

Sam Henderson

Sam Henderson
Industrial Style Rolling Window Shutters
Create your own industrial style rolling window shutters
Photo By: Sam Henderson
Industrial Style Rolling Window Shutters
Create your own industrial style rolling window shutters
Photo By: Sam Henderson
Install the barn door track on the wall, evenly spaced over the window. The height to the top of the track should be equal to the height of the shutters, plus the distance from the top of the shutters to the bottom of the groove in the wheels, plus 1/2". NOTE: It is critical that the track hangs level. Double check for accuracy before making any holes in the wall. Add shutters to track. As desired, finish the back with stain, paint or wallpaper.

Industrial Style Rolling Window Shutters
Create your own industrial style rolling window shutters
Photo by: Sam Henderson
Sam Henderson


