


3 Ways to Make a DIY Olla Self-Watering System for Your Garden
A gardening olla is a simple, inexpensive way to make watering your garden or raised beds easier and less time-consuming. And it will help keep your plants hydrated while you're on vacation. We have three methods for making clay-pot ollas to help you find the one that’s right for your garden.

SHAIN RIEVLEY
Keep your garden watered even when you’re away from home by creating an olla self-watering system. We have three ways to make an olla system. The first uses a single terra-cotta pot and tray, the second method uses two terra-cotta pots, and the third method incorporates drip-irrigation hoses. All methods are fairly inexpensive and easy to make. You can even make a small olla for indoor houseplants.
Method 1: Single-Pot Olla With Tray Top
This method uses a single pot with a cache tray. It's perfect for small- to mid-sized container gardens.
Tools and Materials:
- metal stamping blanks
- garden trowel
1. Seal Drainage Hole
Apply waterproof sealant around the drainage hole at the bottom of the pot. Put a little sealant around the perimeter of a stamping blank. Press stamping blank over the hole, making sure the sealant is adhering to the pot. Allow the sealant to dry.

SHAIN RIEVLEY

SHAIN RIEVLEY
2. Test the Pot
Pour water into the pot to make sure the drainage hole is not leaking. If it is leaking, apply more sealant around the metal blank inside the pot. You will see the porous pot become dark with moisture. This is how the water will seep out and slowly water the roots of a plant.

SHAIN RIEVLEY
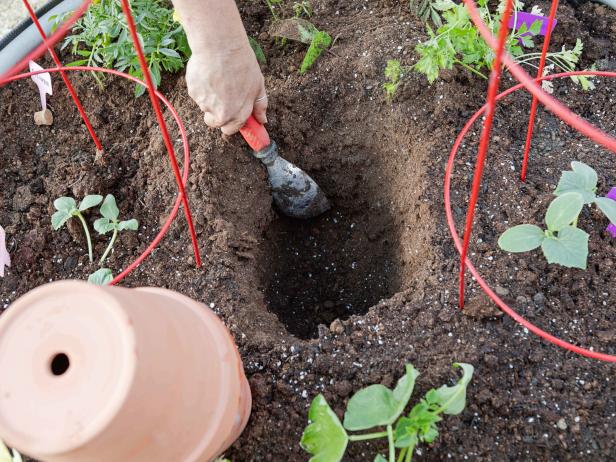
3. Bury the Pot
Dig a hole in the center of your garden or raised bed. Make it deep enough that the rim of the pot sits just above the soil line.

SHAIN RIEVLEY

SHAIN RIEVLEY

SHAIN RIEVLEY
4. Fill Pot With Water
Fill the pot to the top with water. Cover the pot with a terra-cotta saucer to serve as a lid. Check the moisture level in the soil with a meter. Roots should be getting water after one day. Refill the pot as needed.
SHAIN RIEVLEY

SHAIN RIEVLEY

SHAIN RIEVLEY
Method 2: Double-Stack Olla Pots
This method uses two pots to hold more water. Make this size for larger container gardens.
Tools and Materials:
- painter's tape
- garden trowel
- small cork to fit in pot's drainage hole
1. Seal Drainage Hole in One Pot
Apply waterproof sealant around the drainage hole at the bottom of one of the pots. Put a little sealant around the perimeter of a stamping blank. Press the stamping blank over the hole, making sure the sealant is adhering to the pot. Allow the sealant to dry.
SHAIN RIEVLEY
SHAIN RIEVLEY
2. Test the Pot
Pour water into the pot to make sure the drainage hole is not leaking. If it is leaking, apply more sealant around the metal blank inside the pot. You will see the porous pot become dark with moisture. This is how the water will seep out and slowly water the roots of a plant.
SHAIN RIEVLEY
3. Stack + Glue Pots
Place a bead of waterproof sealant along the rim of the pot with the sealed drainage hole. Place the pot without the sealed drainage hole on top — upside down so the two pot rims are meeting and will be sealed together. Use painter’s tape to hold the pots in place while the sealant dries. Let dry according to the manufacturer’s instructions.

SHAIN RIEVLEY

SHAIN RIEVLEY

SHAIN RIEVLEY

SHAIN RIEVLEY
4. Bury the Pots
Dig a hole in the center of your garden or raised bed. Make it deep enough that the rim of the top pot sits just above the soil line. Fill the pot with water.
SHAIN RIEVLEY

SHAIN RIEVLEY
5. Cork It
Use a cork to plug the top drainage hole. This will keep pests out and water in. Check the moisture level in the soil with a meter. Roots should be getting water after one day. Refill the pot as needed.

SHAIN RIEVLEY

SHAIN RIEVLEY

SHAIN RIEVLEY
Method 3: Olla Pots With Drip Irrigation
This method uses double-stack olla pots and drip-irrigation hoses. This method is perfect for gardens and raised beds.
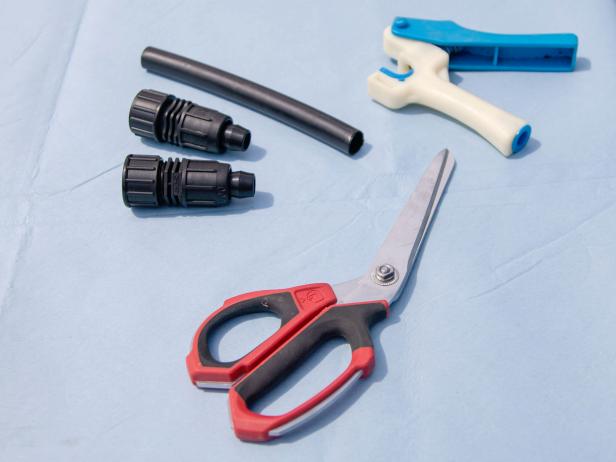
Tools and Materials:
- terra-cotta pots
- waterproof sealant
- metal stamping blanks
- painter's tape
- garden trowel
- 1/4" vinyl tubing
- 1/4" tee fitting
- female pipe adapter
- hose adapter
- punch
- 1/4" barb coupling
- package rubber washers
1. Seal Drainage Hole in One Pot
With this method, we used several double-stack pots. Build the double-stack pots the same way as explained in method 2. For each set of pots, apply waterproof sealant around the drainage hole at the bottom of one of the pots. Put a little sealant around the perimeter of a stamping blank. Press stamping blank over the hole, making sure the sealant is adhering to the pot. Allow the sealant to dry.
SHAIN RIEVLEY
SHAIN RIEVLEY
2. Test the Pot
Pour water into the pot to make sure the drainage hole is not leaking. If it is leaking, apply more sealant around the metal blank inside the pot. You will see the porous pot become dark with moisture. This is how the water will seep out and slowly water the roots of a plant.
SHAIN RIEVLEY
3. Stack + Glue Pots
Place a bead of waterproof sealant along the rim of the pot with the sealed drainage hole. Place the pot without the sealed drainage hole on top — upside down so the two pot rims are meeting and will be sealed together. Use painter’s tape to hold the pots in place while the sealant dries. Let dry according to the manufacturer’s instructions.
SHAIN RIEVLEY
SHAIN RIEVLEY
SHAIN RIEVLEY
SHAIN RIEVLEY
4. Prep Hose Attachment
Connect 1/2" plastic pipe to an end cap and a hose attachment.
SHAIN RIEVLEY

SHAIN RIEVLEY
5. Cut + Connect Irrigation Tubing
Determine how far apart you’re going to place your olla pots; you’ll want them evenly spaced. Cut the flexible black tubing so that they can connect to the top of each pot; we made ours about 18 inches long. Attach the tubing together with tee fittings.

SHAIN RIEVLEY

SHAIN RIEVLEY

SHAIN RIEVLEY

SHAIN RIEVLEY
6. Attach to Source
Punch a hole in the 1/2" pipe that is attached to the adaptors. Connect the 1/4" flexible tubing into the hole using barb coupling.

SHAIN RIEVLEY

SHAIN RIEVLEY

SHAIN RIEVLEY
7. Cover Drainage Holes With Washers
Use the waterproof sealant to glue a rubber washer over the top drainage hole on your double-stack pots. This will hold the 1/4" flexible tubing snug and prevent it from slipping out of the pot.

SHAIN RIEVLEY

SHAIN RIEVLEY

SHAIN RIEVLEY
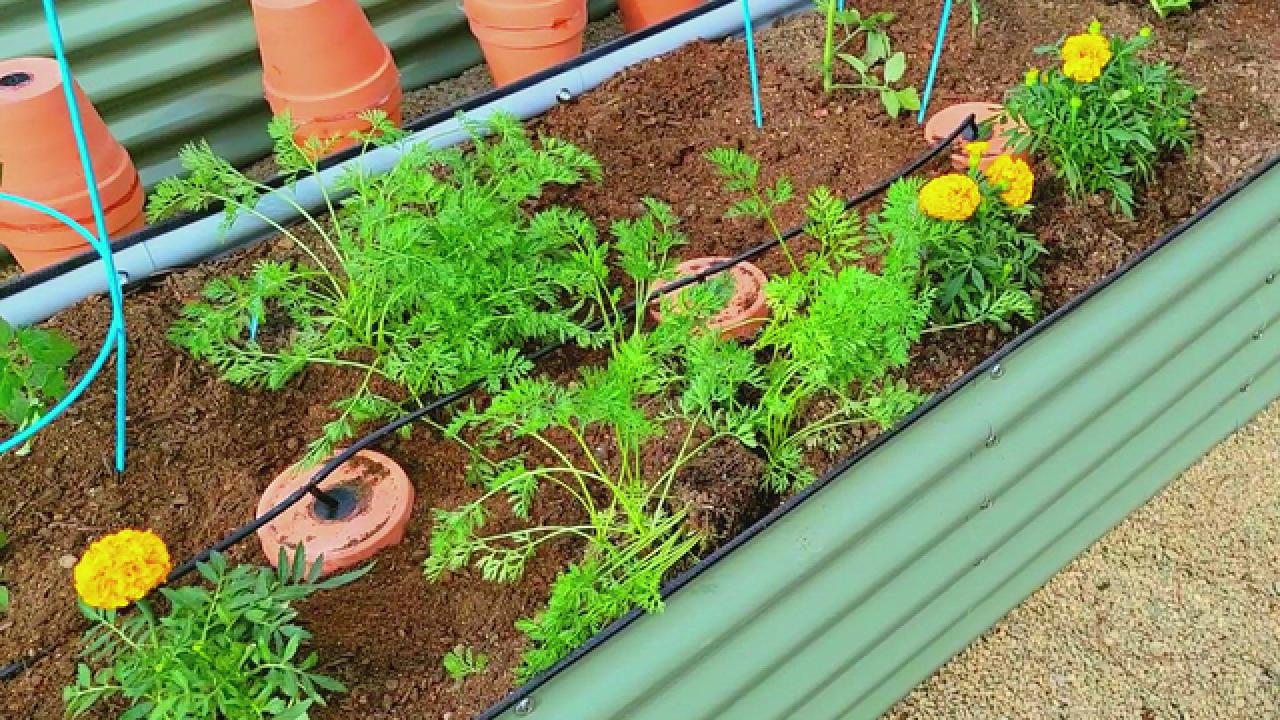
8. Bury the Pots
Dig a hole to bury each double-stack pot. Fill in with dirt around the pot. Leave the top accessible just above the soil line.

SHAIN RIEVLEY

SHAIN RIEVLEY
9. Connect Water Lines
Carefully insert vertical drip lines into the top hole of each pot. Connect the adaptor to the water hose and allow the drip to fill up all pots. To make it easier, set a daily timer to ensure your pots stay full all season long.

SHAIN RIEVLEY

SHAIN RIEVLEY

SHAIN RIEVLEY

SHAIN RIEVLEY

SHAIN RIEVLEY

7 DIY Raised Garden Bed Ideas 15 Photos
All you need to build a stylish raised bed for your garden this year are some basic skills and tools. Check out these DIY raised garden bed projects with step-by-step instructions.


