


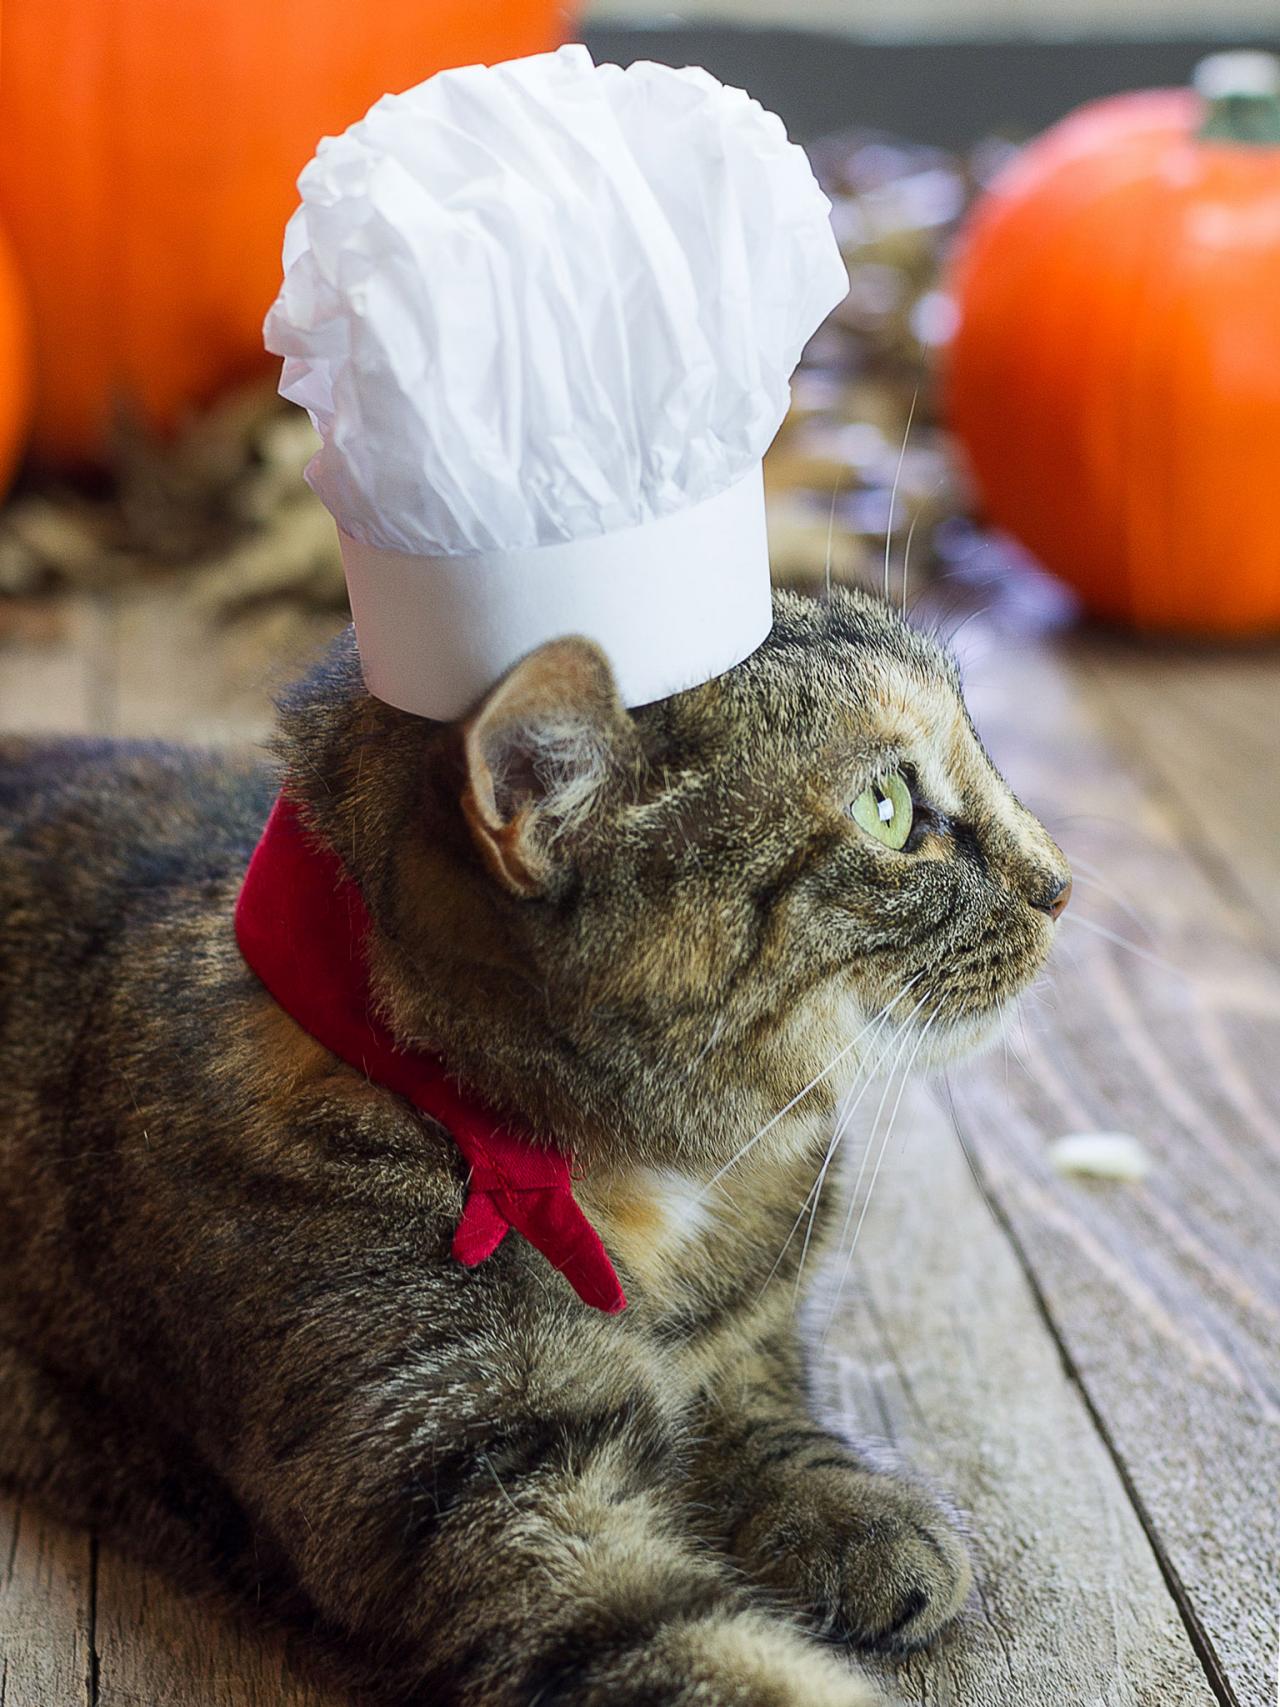
Halloween Pet Costume: French Chef

French Chef Costume for Pets
Ooh-la-la, your dog or cat will be the cutest chef on four legs in this crafty Halloween costume. Use tissue paper and card stock to create a mini version of a chef's toque blanche and a bit of red fabric to stitch up a jaunty neckerchief.

Materials Needed
clear tape
white tissue paper
white card stock
red cotton fabric square at least 18" long and 6" wide
iron
matching thread
scissors
ruler
white elastic cording
hook-and-loop tape
Create Pleats for Hat
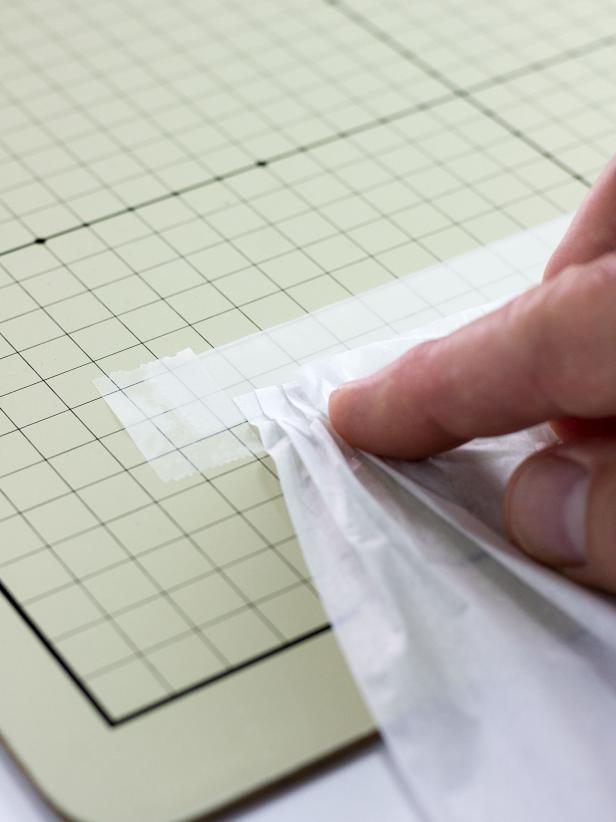
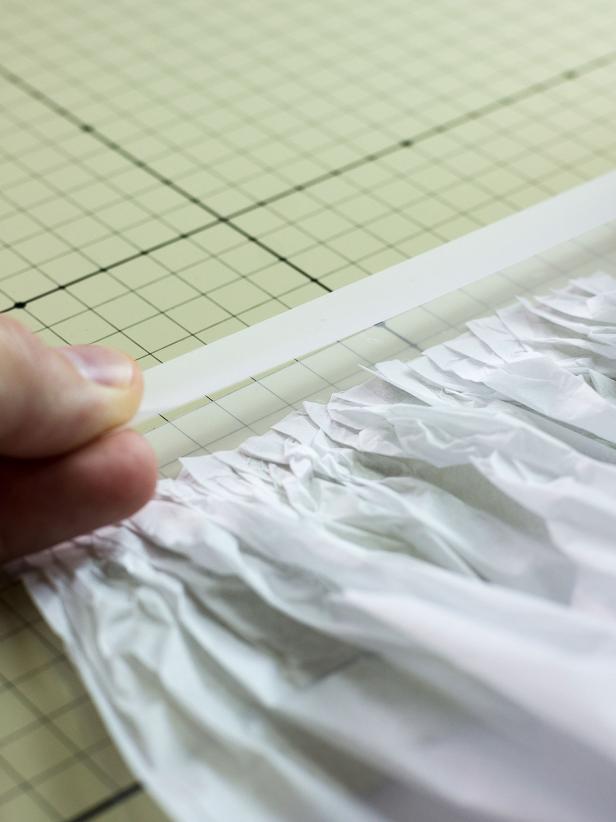
Lay a 9" piece of clear tape adhesive-side-up on a flat work surface. Tear off smaller pieces of tape and tape the upside-down piece to the work surface on both ends (Image 1). Cut a 7" x 20" piece of tissue paper. Attach the 20" side of the tissue paper to the upside-down tape strip by pressing 1/4" folds onto the adhesive, overlapping the folds as you go (Image 2). Note: Attach the folded tissue paper to the bottom half of the tape, leaving the upper half exposed. When you've finished with one side of the paper, place another piece of tape on top of the pleated paper sandwiching it between the two pieces of tape (Image 3). Carefully remove the tape from the work surface and cut off any excess. Repeat this pleating process on the other end of the paper.

Create Pleats for Hat - French Chef Costume for Pets
Lay a 9 inch piece of clear tape adhesive-side-up on a flat work surface. Tear off smaller pieces of tape and tape the upside-down piece to the work surface on both ends.
Create Pleats for Hat - French Chef Costume for Pets
Cut a 7" x 20" piece of tissue paper. Attach the 20" side of the tissue paper to the upside-down tape strip by pressing 1/4" folds onto the adhesive, overlapping the folds as you go.
Create Pleats for Hat - French Chef Costume for Pets
Attach the folded tissue paper to the bottom half of the tape, leaving the upper half exposed. When you've finished with one side of the paper, place another piece of tape on top of the pleated paper sandwiching it between the two pieces of tape. Carefully remove the tape from the work surface and cut off any excess. Repeat this pleating process on the other end of the paper.
Attach Pleated Paper to Hat Band
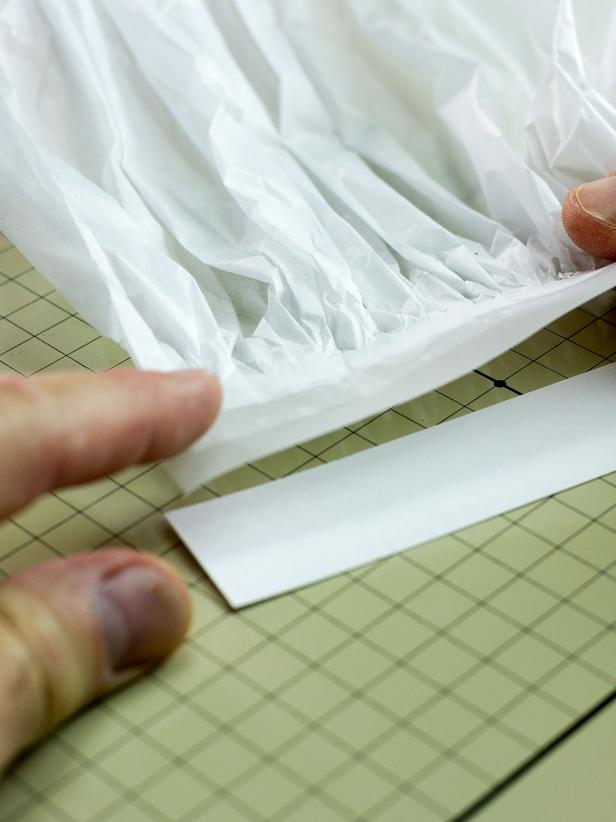
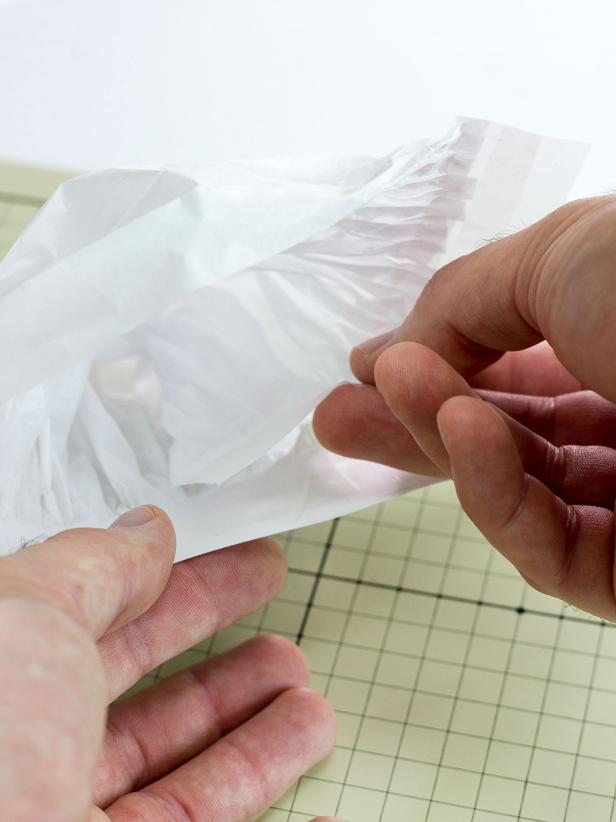
Cut an 8-1/2" by 1-1/8" piece of card stock. Use another long piece of tape to attach one side of the pleated paper to the card stock (Image 1). It should be positioned so the tape securing the pleated paper is completely attached to the card stock strip. Loop the other end of the pleated paper over and attach with tape so the outside edge is lined up with the edge of the card stock. The inside edge will overlap the other side of the pleated paper in the middle of the card stock (Image 2). Bring the card stock around to form a circle and secure it with another piece of tape (Image 3).
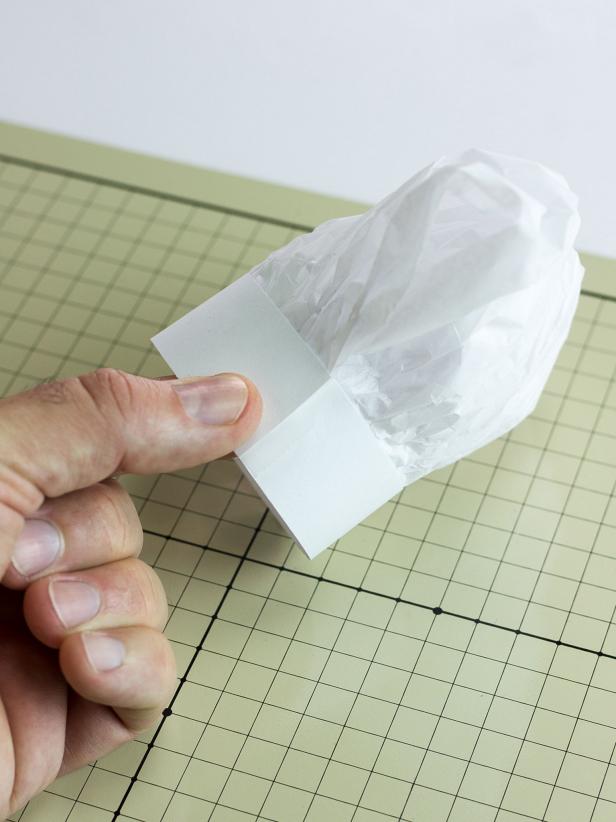
Attach Pleated Paper to Hat Band - French Chef Costume for Pets
Cut an 8-1/2" by 1-1/8" piece of card stock. Use another long piece of tape to attach one side of the pleated paper to the card stock. It should be positioned so the tape securing the pleated paper is completely attached to the card stock strip.
Attach Pleated Paper to Hat Band - French Chef Costume for Pets
Loop the other end of the pleated paper over and attach with tape so the outside edge is lined up with the edge of the card stock. The inside edge will overlap the other side of the pleated paper in the middle of the card stock.
Attach Pleated Paper to Hat Band - French Chef Costume for Pets
Bring the card stock around to form a circle and secure it with another piece of tape.
Shape Hat and Add Elastic Band
Use your fingertips to pinch the inside top of the hat and pull any excess paper into the inside of the hat so it more accurately resembles the rounded shape of a chef's hat. Tie a knot in one end of a 5" to 6" piece of elastic cording (depending on the size of your pet's head) and secure it to the inside of the hat with tape. Make another knot on the opposite end and tape it to the opposite side of the hat.
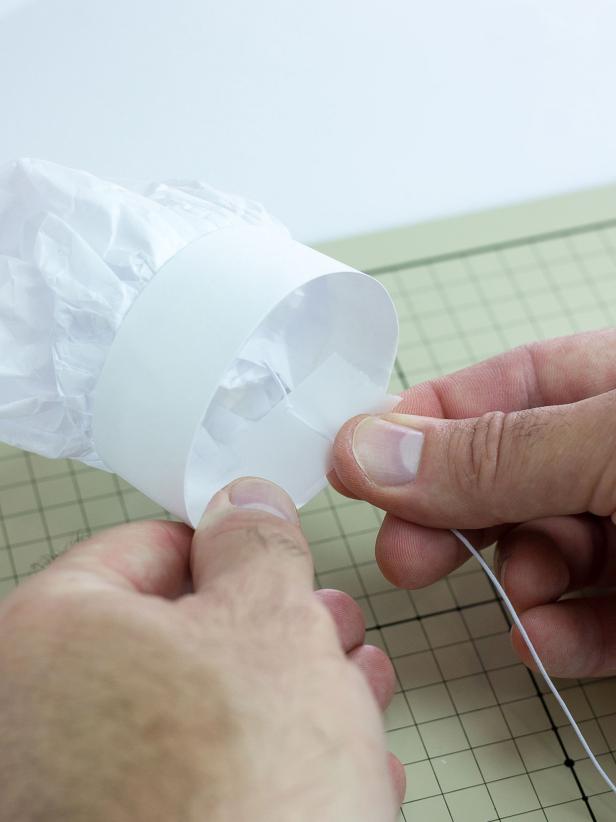
Shape Hat and Add Elastic Band - French Chef Costume for Pets
Use your fingertips to pinch the inside top of the hat and pull any excess paper into the inside of the hat so it more accurately resembles the rounded shape of a chef's hat. Tie a knot in one end of a 5" to 6" piece of elastic cording (depending on the size of your pet's head) and secure it to the inside of the hat with tape. Make another knot on the opposite end and tape it to the opposite side of the hat.
Create Triangle for Neckerchief
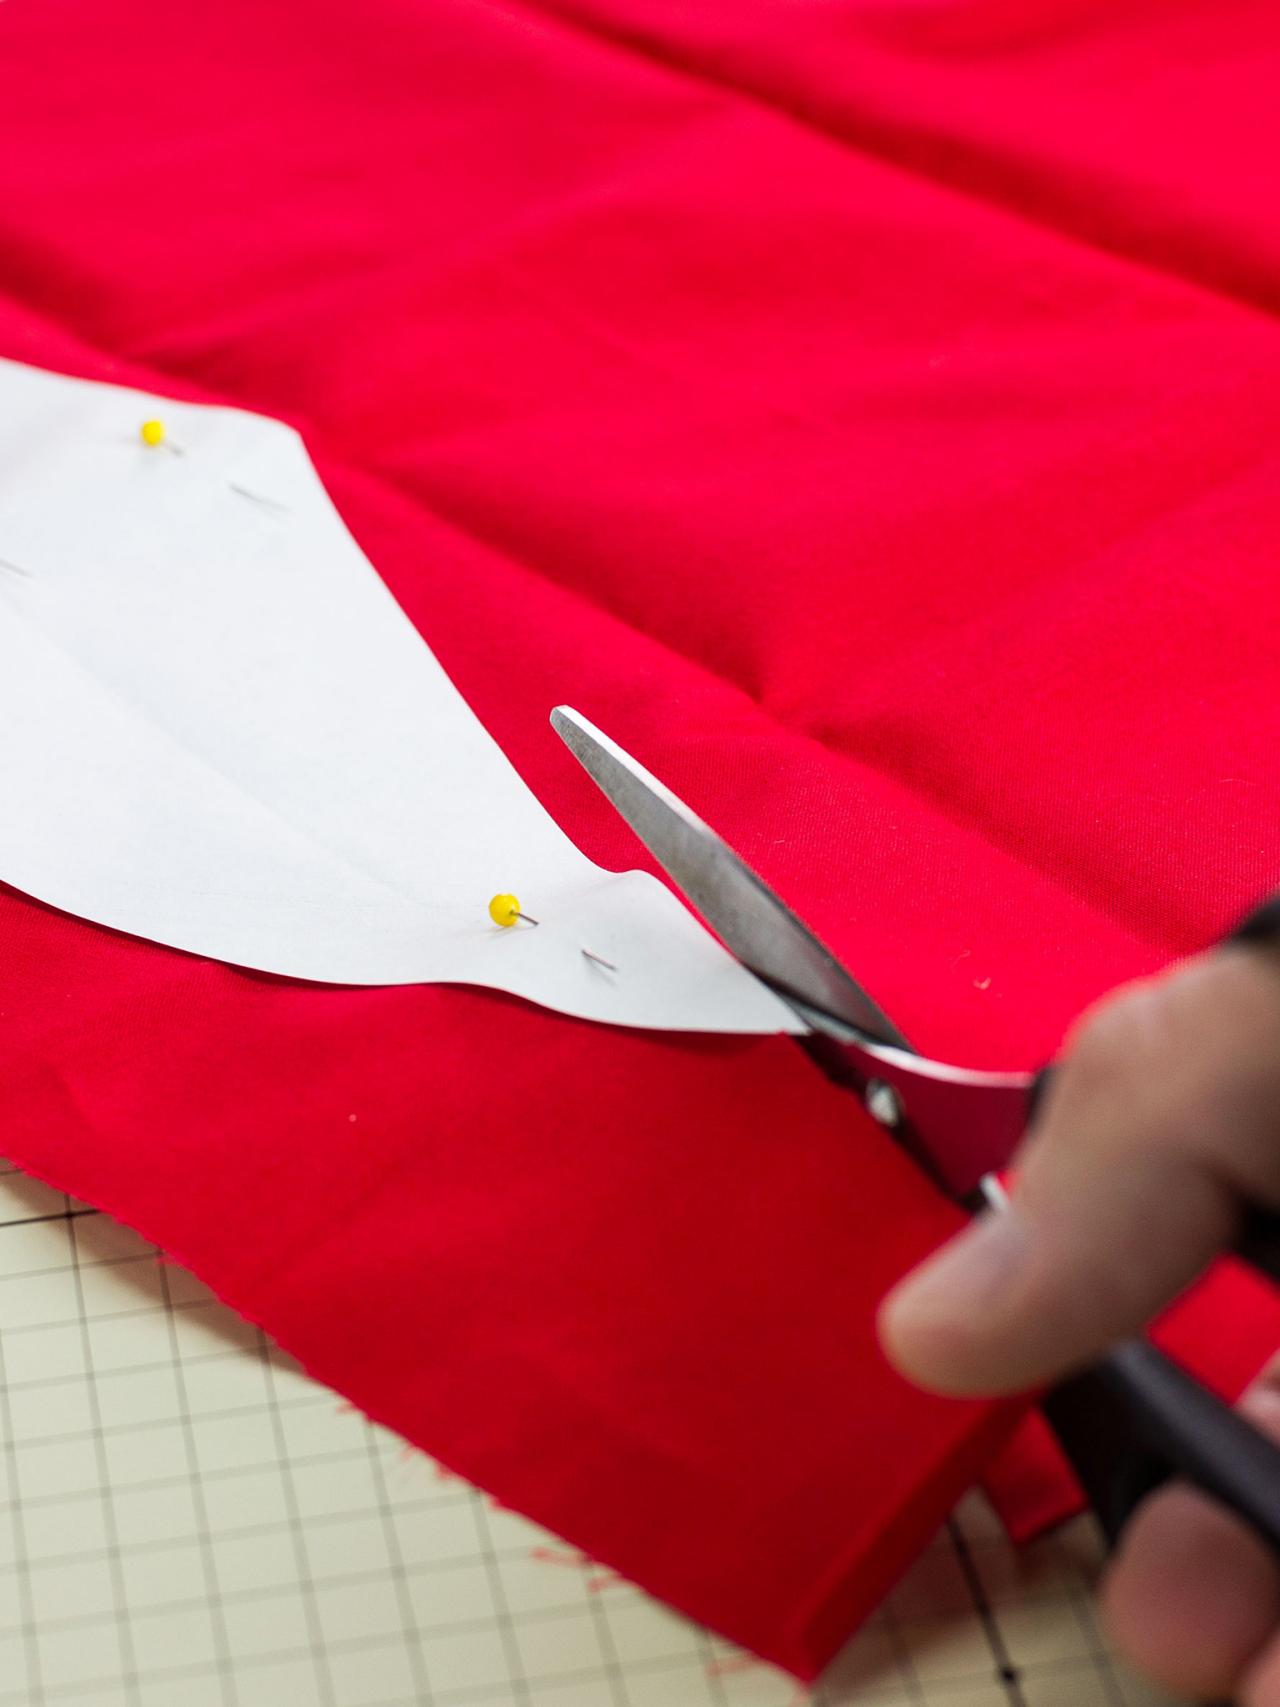
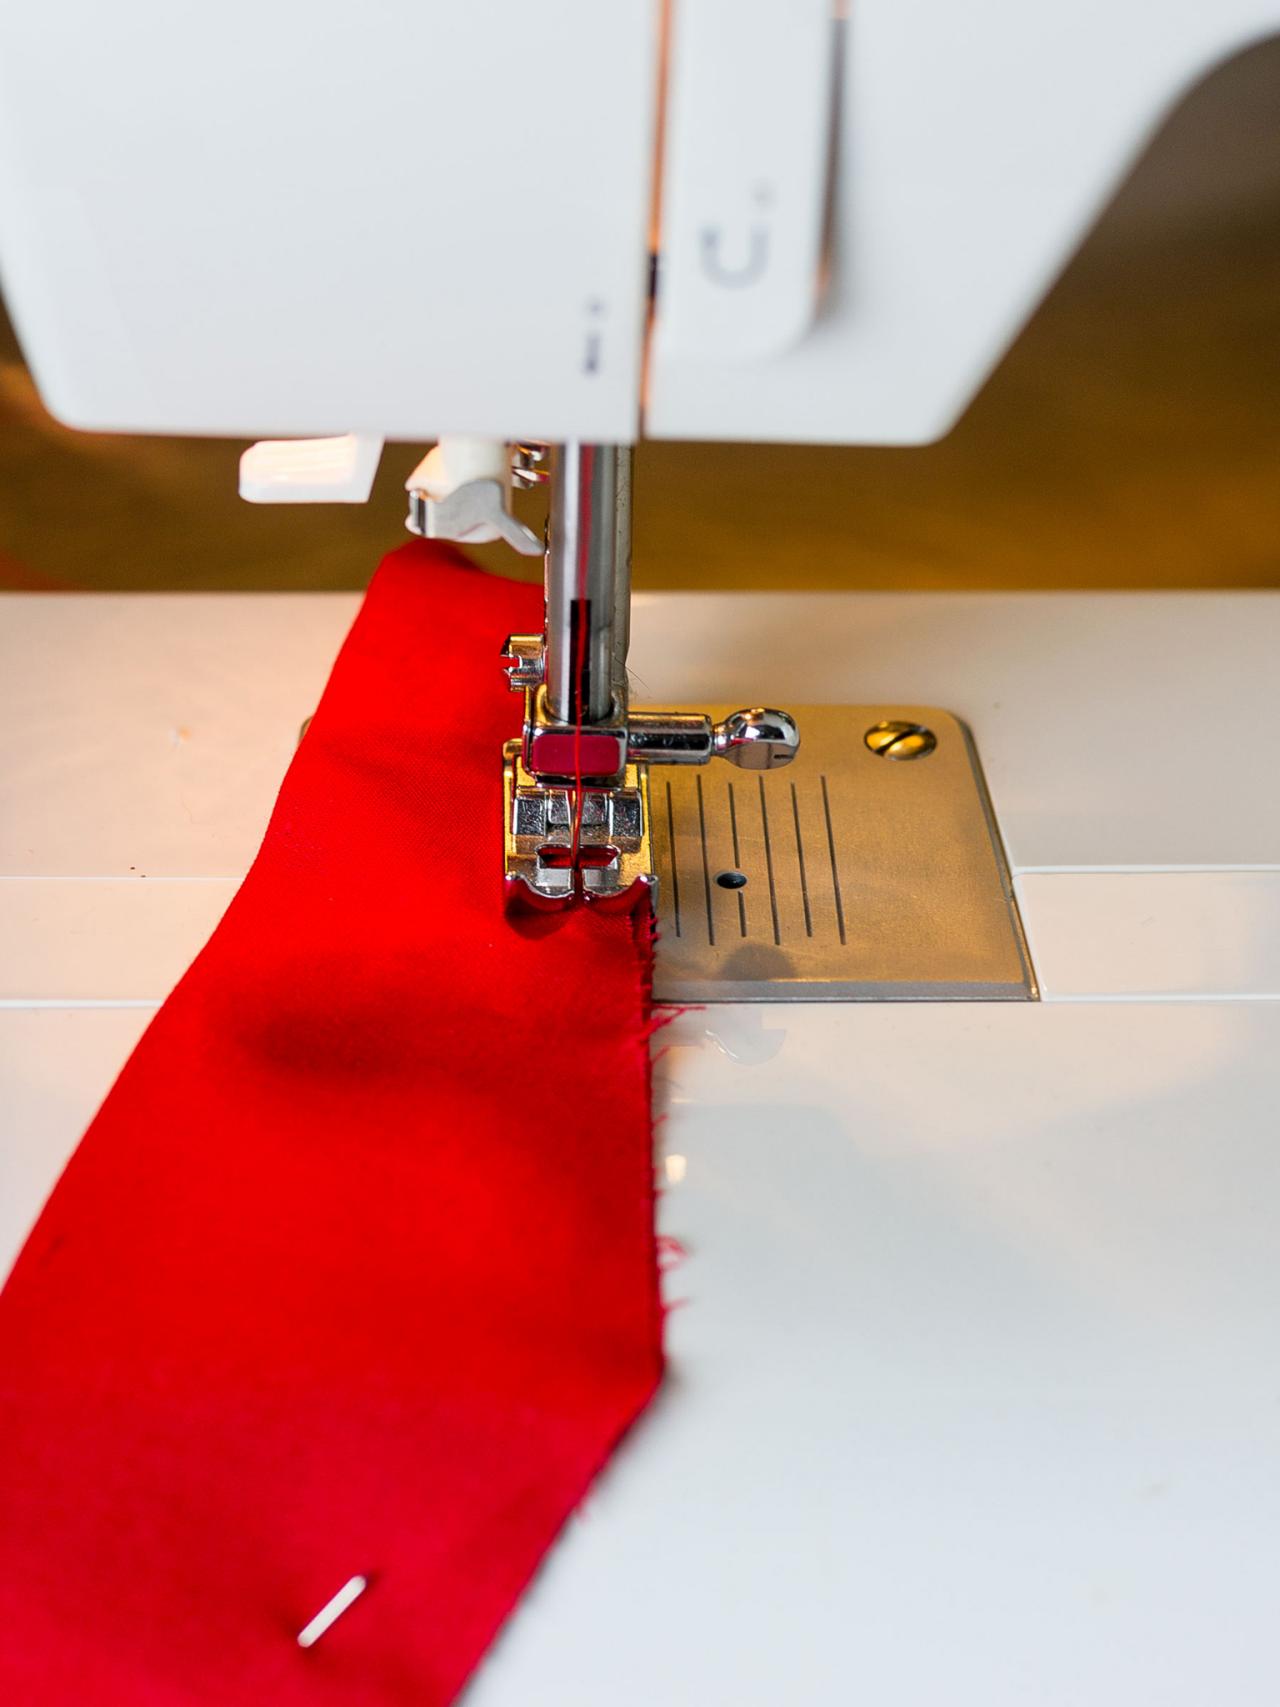
Make a template by drawing a line 16" long on large paper or newsprint. Mark the center and measure out 2-1/4" in each direction of the center mark. Draw lines connecting each mark to create a diamond shape that's 16" wide by 4-1/2" wide. Cut out template then pin to red cotton cloth and cut fabric (Image 1). Fold the diamond shape in half lengthwise (to create a triangle) and iron flat. Sew a hem around the open edge of the triangle with a 1/4" seam allowance, leaving an inch open along the edge about 2" from one of the points (Image 2). Turn the triangle inside-out through the gap. Fold in the rough edges at the gap and sew it shut on the outside.

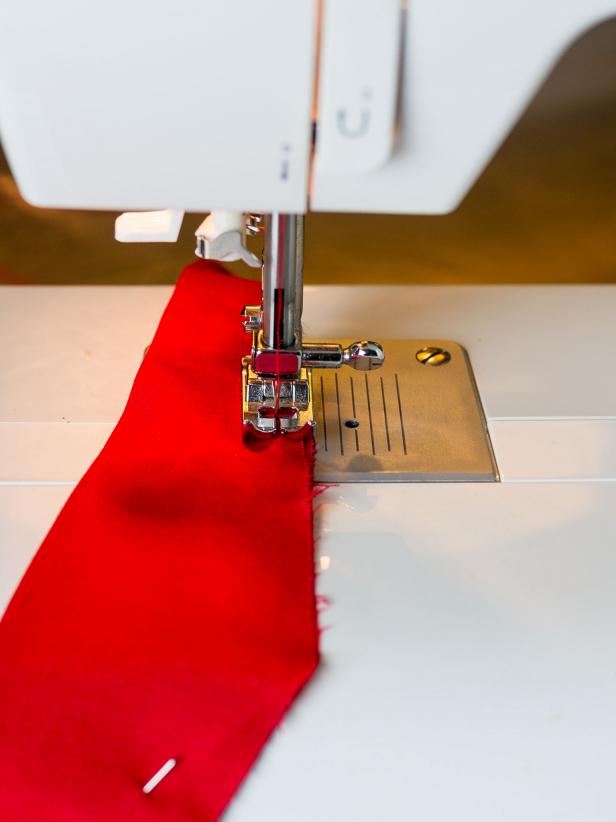
Create Triangle for Neckerchief - French Chef Costume for Pets
Make a template by drawing a line 16" long on large paper or newsprint. Mark the center and measure out 2-1/4" in each direction of the center mark. Draw lines connecting each mark to create a diamond shape that's 16" wide by 4-1/2" wide. Cut out template then pin to red cotton cloth and cut fabric.
Create Triangle for Neckerchief - French Chef Costume for Pets
Fold the diamond shape in half lengthwise (to create a triangle) and iron flat. Sew a hem around the open edge of the triangle with a 1/4" seam allowance, leaving an inch open along the edge about 2" from one of the points. Turn the triangle inside-out through the gap. Fold in the rough edges at the gap and sew it shut on the outside.
Create Points and Finish Neckerchief
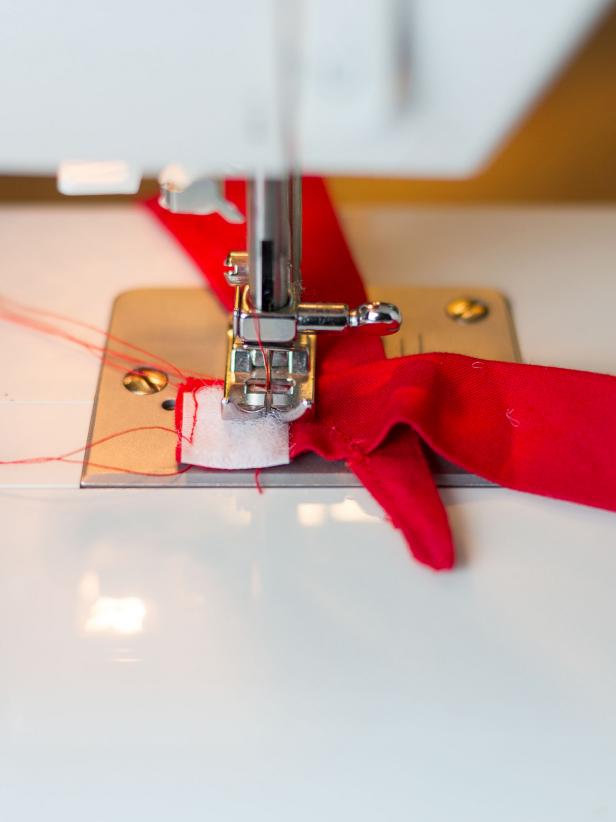
Cut a piece of red fabric that's 2-1/4" square. Fold it in thirds creating a strip of fabric 2-1/4" long and about 7/8" high. Iron the folds (Image 1). Lay the rectangular strip down with the unfinished edge facing up and place the triangle on top of it with the point of the triangle away from the strip. The tip of the triangle should extend about an inch beyond the bottom of the strip. Place the triangle diagonally with the bottom of the triangle about an inch from the edge of the strip and the top of the triangle about 1/2" from the edge of the strip. Pin and sew in place (Image 2). Flip the strip and triangle over and sew a piece of hook-and-loop tape to the edge (Image 3). Loop the triangle around to cross the tips so it resembles a tied scarf. Fold in the end of the strip with the hook-and-loop tape. Fold over the opposite end to create a 'knot' around the two tips. Mark the place where the hook-and-loop tapes should meet and attach the other side of the hook-and-loop tape to the opposite end of the strip.

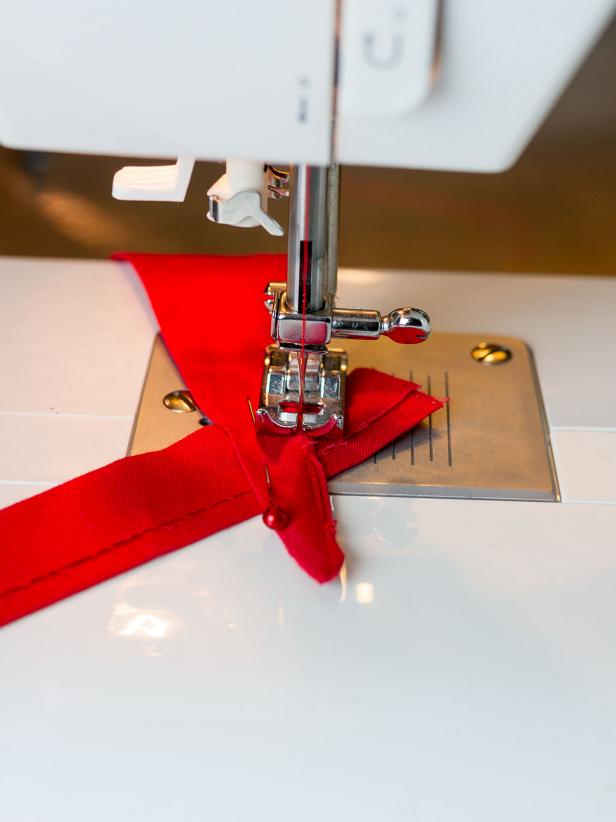
Create Points and Finish Neckerchief - French Chef Costume for Pets
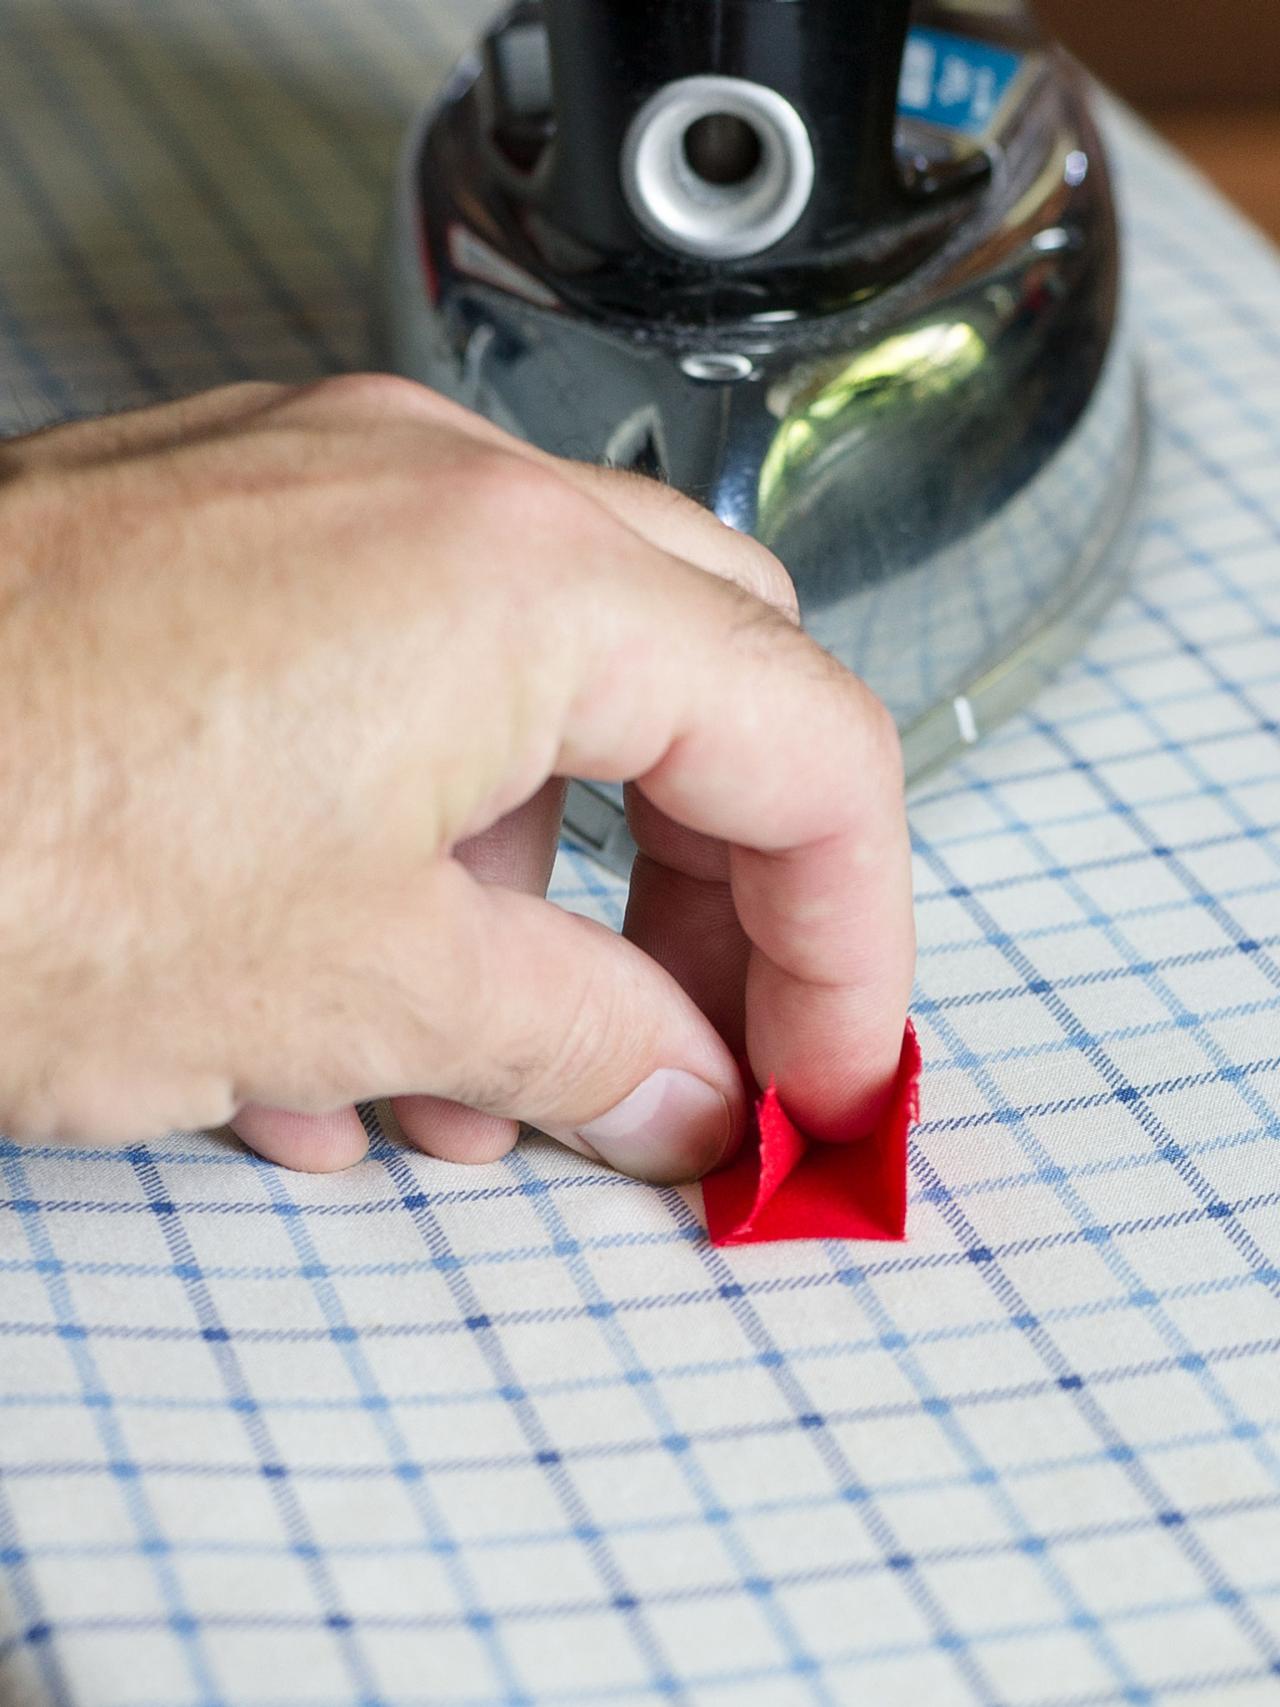
Cut a piece of red fabric that's 2-1/4" square. Fold it in thirds creating a strip of fabric 2-1/4" long and about 7/8" high. Iron the folds.
Create Points and Finish Neckerchief - French Chef Costume for Pets
Lay the rectangular strip down with the unfinished edge facing up and place the triangle on top of it with the point of the triangle away from the strip. The tip of the triangle should extend about an inch beyond the bottom of the strip. Place the triangle diagonally with the bottom of the triangle about an inch from the edge of the strip and the top of the triangle about 1/2" from the edge of the strip. Pin and sew in place.
Create Points and Finish Neckerchief - French Chef Costume for Pets
Flip the strip and triangle over and sew a piece of hook-and-loop tape to the edge. Loop the triangle around to cross the tips so it resembles a tied scarf. Fold in the end of the strip with the hook-and-loop tape. Fold over the opposite end to create a 'knot' around the two tips. Mark the place where the hook-and-loop tapes should meet and attach the other side of the hook-and-loop tape to the opposite end of the strip.
Dress Your Pet
Slide the hat's elastic band over your pet's muzzle, being careful not to hurt their ears. Check that the chin strap isn't too tight; if it is, make adjustments. Place neckerchief around their neck, fastening the ends.

Dress Your Pet - French Chef Costume for Pets
Slide the hat's elastic band over your pet's muzzle, being careful not to hurt their ears. Check that the chin strap isn't too tight; if it is, make adjustments. Place neckerchief around their neck, fastening the ends.


