


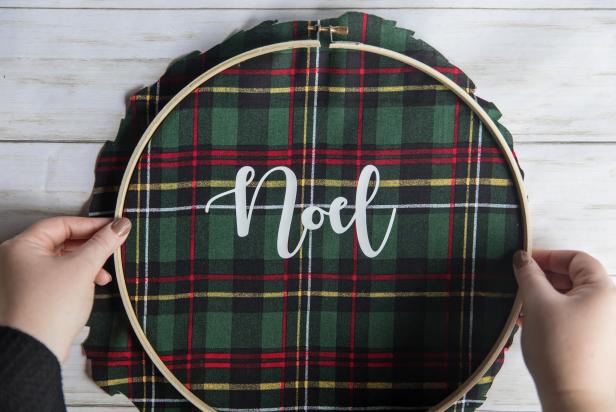
Easily Craft This Plaid Embroidery Hoop Wreath for Christmas
The weather outside may be frightful but this farmhouse-chic wreath is quite delightful. Classic holiday colors and decorative add-ins combine for a Christmas craft that is brimming with style.

Farmhouse-Chic Embroidery Hoop Christmas Wreath
The weather outside may be frightful but this farmhouse-chic wreath is quite delightful. Classic holiday colors and decorative add-ins combine for a Christmas craft that is brimming with style.

Photo by: Cassidy Garcia
Cassidy Garcia
Materials Needed
- wooden embroidery hoop
- 1 yard of plaid fabric
- hot glue gun + sticks
- scissors
- wire cutters
- floral wire
- iron-on transfer
- iron
- pressing cloth
- faux greenery
- faux red berries
- gold pinecones
- 4" emerald green ribbon
- 2 1/2" red ribbon
- 5/8" gold ribbon
- small utility hook
- cutting machine (optional)
- heat transfer vinyl (optional)
Keep in mind: Price and stock may change and we may make money off any links.
Prep Fabric
Begin by placing the embroidery hoop on top of the fabric. Using the hoop as a guide, cut out the fabric, about an inch away from the outer edge, to achieve a circular shape (Image 1). Next, place the fabric on a hard surface, peel the backing off the iron-on transfer and place it in the center of the circle, double-checking that it’s straight (Image 2). Ours measures out to 8” wide and was printed and cut out on heat transfer vinyl using a cutting machine. If you do not have access to a cutting machine, there are many precut, ready-to-iron transfers available online.
Set your iron to the highest setting but do not use steam. Place the pressing cloth, or a thin tea towel, over the design to avoid scorching or staining the transfer. Press the iron on top of the design for 60 seconds, holding it in one place without moving the iron back and forth (Image 3). Repeat in different sections if necessary. Then, let cool completely. Peel back the plastic to reveal the transfer (Image 4).

Brittney Gazaway

Brittney Gazaway

Brittney Gazaway

Brittney Gazaway
Assemble Wreath
Place the fabric on top of the inside hoop, adding the outer hoop on top of the fabric (Image 1). Tighten the hoop screw until the fabric is taut, making sure the lines of the plaid are straight and the design is centered. Flip the wreath over and place a line of hot glue on a small section of the inside hoop (Image 2). Fold the fabric over the hoop and press into the glue to secure (Image 3). Repeat this process around the entire hoop so all the excess fabric is glued in place (Image 4).
Brittney Gazaway

Brittney Gazaway

Brittney Gazaway

Brittney Gazaway
Add Accents
Using wire cutters, snip sections of faux evergreen and red berries off their stems and place in ready-to-grab piles. Next, hot glue a base of greenery on the top of the hoop in opposite directions, with the ends of the stems crossing over the screw (Image 1). Repeat this process for the berries (Image 2).
To create a layered bow, place the gold ribbon in the middle of the red ribbon. Starting about 6 inches from the end, fold the ribbons over to create a loop. Next, twist the ribbons 180° so the front of the ribbon is facing up again. Create another loop (Image 3). Repeat this process again on both sides, leaving about 6 inches of the ribbons as a tail. Secure the ribbons together in the center with floral wire. Glue the bow to the top of the wreath, covering the ends of the greenery stems. For the emerald green loops, create the illusion of a bow by making a small loop and twisting the ends with floral wire (Image 4). Then, glue those loops behind the bow. For a festive touch, glue on gilded pinecones in the center of the bow (Image 5).

Brittney Gazaway

Brittney Gazaway

Brittney Gazaway

Brittney Gazaway

Brittney Gazaway
Hang & Display
Hang your festive creation on an over-the-door wreath hanger or place a small utility hook on your door for easy removal after the holidays are over (Image 1). Pair the wreath with a fresh greenery garland, an assortment of Christmas trees and cozy accents (Image 2).

Farmhouse-Chic Embroidery Hoop Christmas Wreath
The weather outside may be frightful but this farmhouse-chic wreath is quite delightful. Classic holiday colors and decorative add-ins combine for a Christmas craft that is brimming with style.
Photo by: Cassidy Garcia
Cassidy Garcia
Use this template to create a wreath that is personalized to you. You can switch out the fabric, stain the hoop a darker hue or add your house numbers in the center instead of a design. The options are endless!


