


Learn How to Clean Silver With This Easy (and Cheap!) Trick
Put a little science and two kitchen staples (aluminum foil and baking soda) to work to easily vanquish years' worth of tarnish from your silver or silverplated flatware.

Easily Remove Tarnish From Old Silver
Put a little science and two kitchen staples (aluminum foil and baking soda) to work to easily vanquish years' worth of silver tarnish.

Photo by: H. Camille Smith
H. Camille Smith
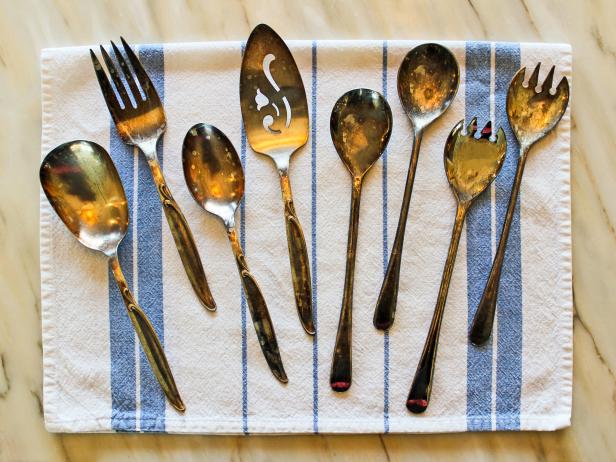
I stumbled across these silverplated serving pieces on a recent antique hunt. Honestly, I wasn’t even in the market for serveware, but at the bargain price of just $2 for all 8 pieces, I couldn’t pass them up.
H. Camille Smith
Like most of my estate-sale silver finds, these were tarnished after years of non-use. I’ve tried a variety of cleaning cloths and chemicals: Some perform better than others, but all of these products work by removing the tarnished layer of silver, not just the tarnish itself. But there's a better way! This method uses an electrochemical reaction (yay, science!) to remove just the tarnish, leaving the silver intact. Here's how to do it.
Materials Needed
- tarnished silver or silverplate pieces
- large pot
- aluminum foil
- box of baking soda
- glass or plastic container deep and long enough to contain the tarnished silver pieces
- soft cotton cloth
- tongs
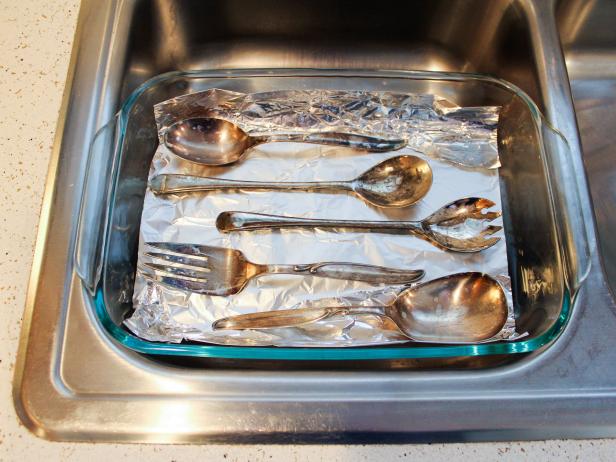
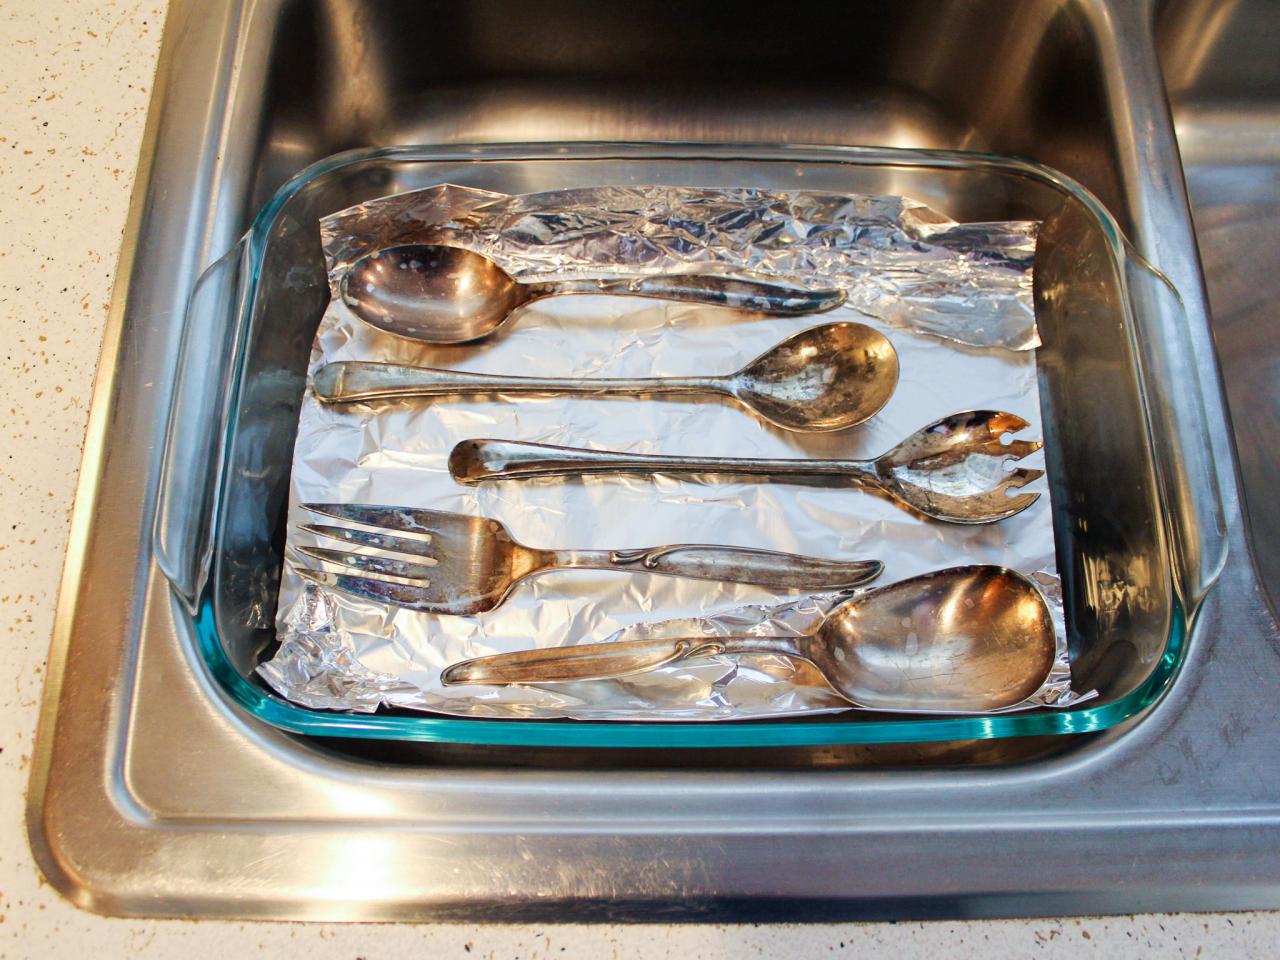
Start With a Foil-Lined Pan
Fill a large pot with water, place it on the stove and bring to a boil. While the water heats up, place the glass or plastic container in the sink. Line the bottom with a sheet of aluminum foil and top with pieces of silver to be cleaned.
Add the Baking Soda
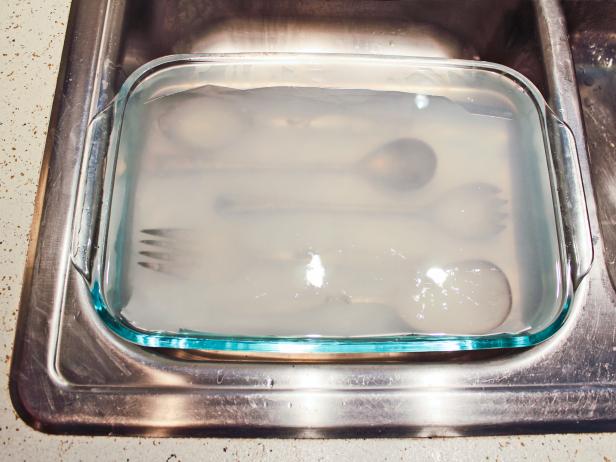
Once water has reached a boil, turn off the heat and add 1/2 cup of baking soda. The water will foam up a bit; this is normal.

Start the Reaction
Carefully pour the hot water and baking soda mixture over the tarnished silver, ensuring that the water completely covers the silver and that the metal remains in contact with the aluminum foil. This is key: warm water + baking soda + aluminum foil = a chemical reaction that causes the silver sulfide (tarnish) to change back into silver, freeing the sulfur atoms to migrate and attach instead to the aluminum foil.
H. Camille Smith
Let Science Do Its Thing
Leave the silver to soak for 5 to 10 minutes. The chemical reaction will cause the water to bubble a bit and you may catch a few whiffs of sulfur as the silver sulfide loosens from the silver’s surface before attaching itself to the aluminum foil.
If Necessary, Repeat the Process
Using tongs, remove the silver pieces every few minutes to check on their progress; the more tarnished the piece, the longer it will take to remove the oxidation. If the tarnish is still stubbornly hanging on, pop the pieces back into the baking soda bath to give the tarnish more time to release. Badly tarnished pieces may require a second (and maybe even a third) treatment; just swap out the aluminum foil and heat up a fresh pot of water and baking soda.
Give the Pieces a Final Polish
I found that some pieces came out of the bath completely gleaming while others needed a final polish. Just mix a bit of baking soda with water to create a paste and rub it onto any areas that still have a bit of discoloration, like around the tines on a fork or in any embossed or chased details. The chemical reaction in the baking soda bath will have softened the tarnish making it easy to polish off any stubborn discoloration.

H. Camille Smith
Rinse and Dry
Finally, rinse with warm water, then thoroughly dry each piece with a clean cotton cloth. To avoid a water-spotted finish, never allow silver to air-dry, always remove all moisture with a soft towel, gently buffing the piece as you dry it. Here's a before-and-after shot to demonstrate the difference this easy cleaning process can make:

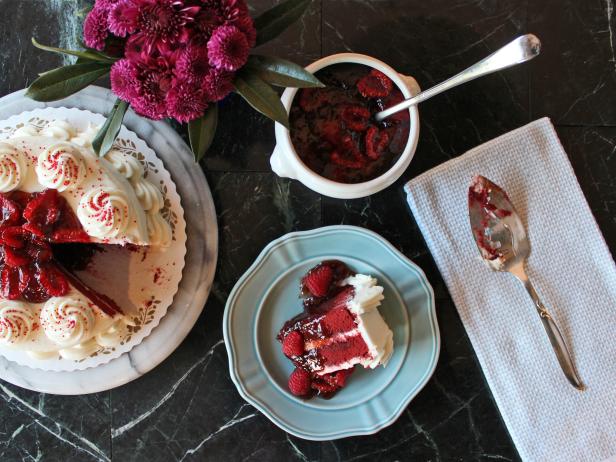
Let's Party!
Don't just hide your sparkly silver away, use it! Regular use and cleaning with mild dish soap and water is the best way to keep silver looking its best.
H. Camille Smith
Impressed by the power of baking soda? Watch more natural cleaning hacks here:


