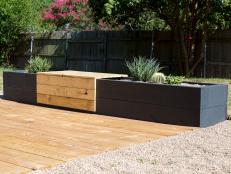
Make a Bench With Built-In Side Tables

Tools and Materials:
3/4” plywood and 1/8” plywood
3/4” solid poplar for trim
1/8” cork sheets
18” full-extension drawer glides
nail gun with 2” Brad nails and 1-3/8” pin nails
wood glue
spray adhesive
power drill with 1” and 1-1/2” wood screws
sander and sandpaper
stain and polyurethane
12” speed square, tape measure and a 12” level
table saw and a miter saw
Steps:
1. Build the center support box out of 3/4" plywood. Miter cut all side pieces for the adjoining corners.
- top piece at 18” square
- four sides at 18” x 17-1/4”
- bottom piece at 17-1/4” square
2. Attach the mitered sides with wood glue and 1-3/8” pin nails. Set the bottom piece flush inside the box then secure with glue and pin nails. Set the top piece on top of the sides and secure in the same way.
3. Build the side tables using 3/4" plywood. Miter cut all the side pieces.
- four top and bottom pieces at 16-1/2” x 22-1/2”
- four front and back sides at 18” x 17-1/4"
- four sides at 24” square
4. Attach the mitered sides with wood glue and secure with 1-3/8” pin nails. Set the bottom piece flush inside the box and secure with glue and pin nails. Do the same with the top.
5. Miter cut the 1 x 2 solid poplar trim to wrap around the two side boxes. The trim will sit on top of the box over hanging the sides and creating a recess on top (where the cork liner will sit).

6. Use wood glue and 1-3/4” pin nails to adhere the trim around the top of each table. The mitered edges should meet snuggly. Use a speed square to ensure proper right angles.
7. Measure the inside of the recessed area on the top each table. Cut squares of 1/8” plywood to that size - ours are 22” x 16”. This plywood will be adhered to the cork to form a large “drink coaster” to fit inside the poplar trim.
8. Use spray adhesive on both the underside of the cork and on the 1/8” plywood to adhere the two together. Use a rubber roller to smooth out the cork and help adhesion. After drying, use a new razorblade to cut the excess cork from the underside.
9. Apply wood glue to the underside of the plywood/cork tops and insert them into place on top of the tables. Secure with 1-3/8” pin nails.
10. Use a table saw to cut the plywood for the bench. Ours measures 72” x 22-1/2”. This piece will span the two larger side boxes with the smaller box attached in the center for added support.
11. Cut two solid poplar trim pieces for each side of the bench. Ours measures 72” x 1” x 2”.

12. Stain and varnish all pieces and let dry completely.
13. Use wood glue and 1-3/4” pin nails to secure the poplar trim to the long sides of the bench piece.
14. Assemble the bench. The small box will be centered below the span of the bench. Adhere it to the underside of the bench piece with wood glue and 1-3/4” pin nails. Cut two pieces of scrap poplar to make ledgers to attach the bench to the two end tables. Ours measure 22-1/2” x 3/4” x 1/2”. Measure and mark a level line on each end of the tables for the ledgers. Use wood glue and 1-1/4” screws to secure the ledgers to the tables. Dry fit the bench with the attached center box to the ledgers. Secure with wood glue and 1-1/4” screws from the underside of the ledgers into the bottom of the bench piece.


