


How to Build a Basic Platform Bed
This sleek, lightweight bed frame is designed for easy assembly and reassembly, so if you frequently move or like to rearrange the furniture often, this woodworking project is for you.

Derek Trimble
This project is for the slightly advanced woodworker with experience in using a router to make mortise cuts.
Tools and Materials
- (2) sheets 3/4” prefinished birch plywood
- (5) 2x8 x 8’ boards (we used poplar)
- bed rail fastener plates (typically comes in a set of four)
- stain for color and a clear coat for top seal
- rags and paintbrushes
- (2) 6” x 9” (approximate) 1/4” plywood for the templates
- (12) 3/4” screws and (12) 2” screws for bed rail fasteners (Use #6 pan-head screws so the heads sit flush in the hardware.)
- (40) 1-1/2” screws (for installing cleats and brackets)
- router (with 1/8” round-over bit and mortise bit)
- table saw
- pad sander (with 80- and 120-grit sandpaper)
- jigsaw (to cut templates)
- chisel (to clean up mortises)
- screw gun (to attach templates and bed rail fasteners)
- tape measure and pencil
Shopping Notes:
Cut List:
These are the final dimensions for a queen-size bed.
- (2) @ 1-1/8” x 6-3/4” x 81” (bed rail sides)
- (2) @ 1-1/8” x 6-3/4” x 64-3/8” (bed rail ends)
- (1) @ 1-1/8” x 2-3/4” x 81” (center support beam)
- (2) @ 3/4” x 3/4” x 81” (side rail cleats)
- (4) @ 3/4” x 3/4” x 27-3/4” (end rail cleats)
- (2) @ 3/4” x 30-1/2” x 80-7/8” plywood
- When picking out the 2x8s for the bed rails, make sure to look down the sides of the boards and pick the straightest ones you can find, especially if you do not have access to a jointer. For this project, we started with 1-1/2” thick poplar boards and used a jointer to flatten and straighten the boards. Four of the boards will need one good side, the visible sides. The inner sides will be hidden, so you may want to take that into consideration when choosing your materials, and again if you don’t have a jointer.
- Prefinished birch plywood is common in the cabinet-building industry, so you’ll be more likely to find it at a lumber yard than a big-box hardware store. If you cannot find prefinished birch plywood, just apply polyurethane on the one side of the plywood to seal it.

Step 1: Plane the Boards
If your boards are fairly straight you can go ahead and plane them down to the desired thickness, we went with 1-1/8". If you need to straighten them, run one face and on edge on the jointer first, then plane and cut to width. You can leave the boards 1-1/2” thick, but you will have to change the dimensions listed above on the four cleats and the plywood. Either way, it’s best to finish all the rails, mortise in the bed rail fastener plates and assemble before you move onto getting the proper measurements for the cleats that will support the plywood.
Step 2: Cut Rails to Size
Cut three of the 2x8s to 81” and the other two to 64-3/8”. Save the drop pieces (leftovers), you will use those to make the brackets for the center rail and for test pieces. Rip the width on all five pieces; the third (2-3/4" wide) board is for the center support beam.
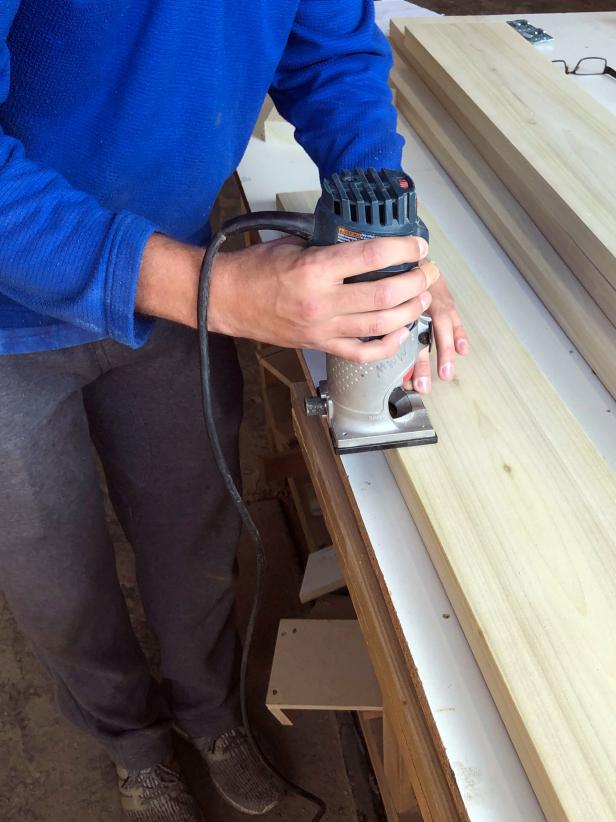
Step 3: Ease the Edges
In order not to have sharp edges on the rails, use a router to round over the edge 1/8”.


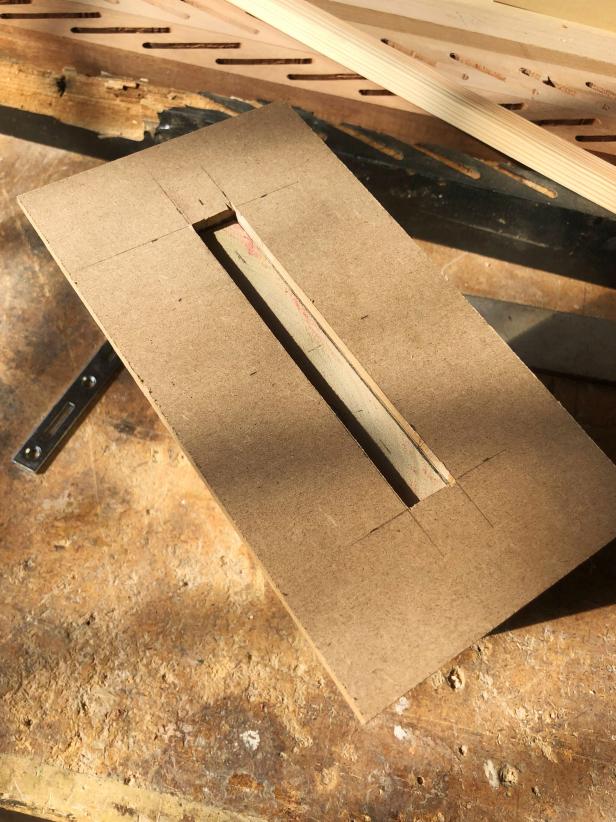
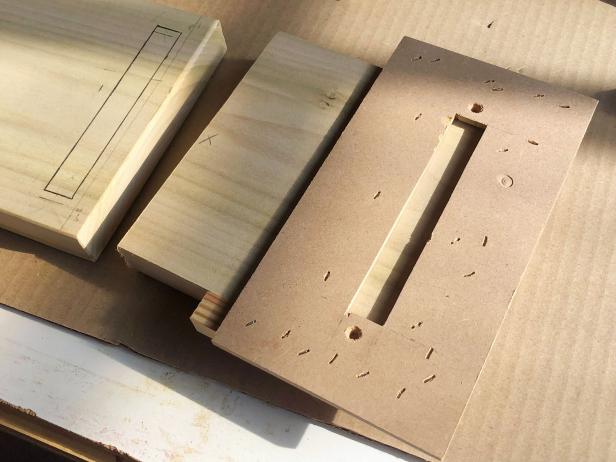
Step 4: Make Template for Hook Plates
Use 1/4” plywood or MDF to make the templates. You’ll need three templates, one for the hooks and two for the eyes. This part can be a little tricky, so take your time to make the templates correct but know that you will probably need to make some adjustments along the way, we had to adjust the depth of the router a couple of times. Your mortise bit will determine the width and length of the template cut out. The bit in our router is 1/16” from the outside edge. The bed rail hook is 5/8” x wide x 5” long, so 1/8” (1/16” doubled) was added to the length and width. So, the cut on the template is 3/4” wide x 5-1/8” long. Make the long cuts with a sliding miter saw and finish the cutout with a jigsaw.
Step 5: Make Templates for Inset Plates
You will need two templates for the inset plates: one the same size as the hook plate and one for the two small holes where the hooks will be inserted. You can use the same template for the hook and big inset plates, but you’ll have to change out the stoppers. We choose to make separate templates for the hook and inset plates.


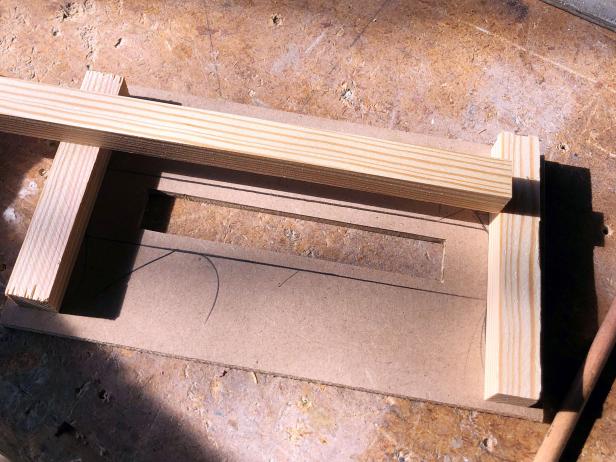

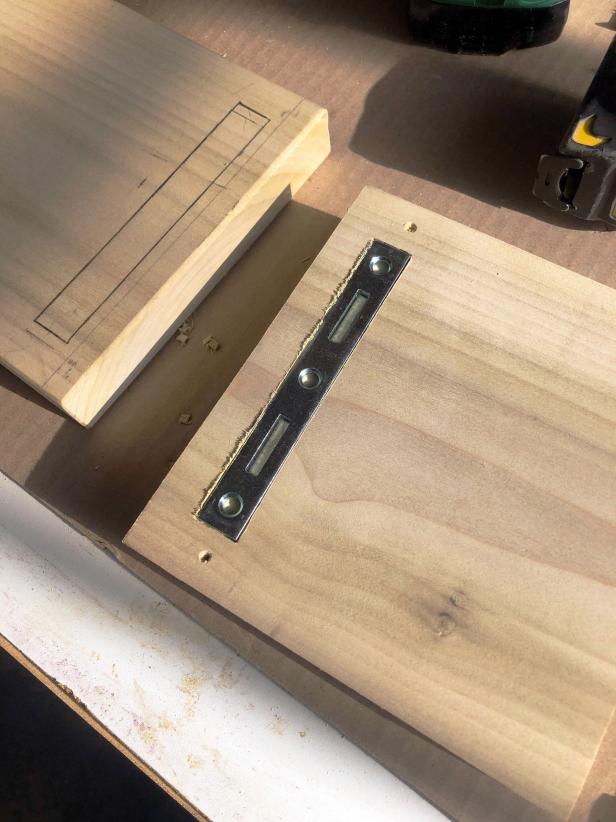
Step 6: Attach Stops to Templates
To help hold the templates in place while you’re mortising, add a stop at each end of the template so it will fit snuggly onto the board. To do this, stand one of the 2x8s on edge (use a drop piece if you have one), lay the template on the top edge so that the hardware hole is centered then trace the 2x8 onto the template from underneath. Use drop pieces from the cleats for the stoppers, cut them to size and lay them on the lines and then nail them to the template.

Step 7: Test Hook Template
Before you mortise into the rails, it’s best to do a test cut on a drop piece of wood to see if the hole needs to be widened or lengthened.

Step 8: Mortise for Hook Plates
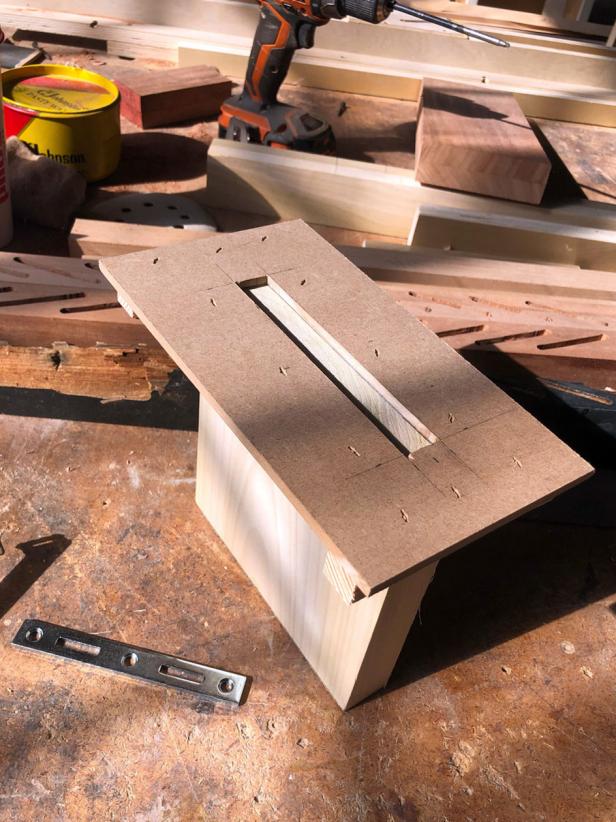
Cut the hook mortises on the four edges of the two side pieces (the 81” pieces). Clamp the first 2x8 to a work surface. Face screw the template onto the edge of the board. Use a router to cut the shape out of the template. If necessary, use a chisel to clean up the rough edges of the cut.

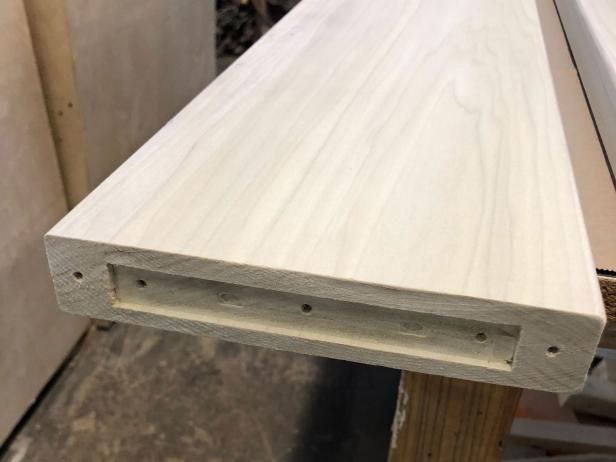
Step 9: Remove Template and Attach Hook Plates
Unscrew the template and remove it. If necessary, use sandpaper to smooth out any rough edges. Insert hook plate and predrill the holes for the screws to prevent the wood from splitting and then attach the plate. You’ll want to assemble the bed to test fit it before staining/painting, so you can remove the plate at that point. Repeat the process for mortising the other three edge pieces.

Step 10: Determine Placement of Inset Plates
The inset mortises will be on the face of the end pieces (64-3/8” pieces). We placed them one inch from the edge. This causes the ends to extend out approximately 1/2” from the sides so you don’t have to worry about a perfect joint and it adds a nice detail. You can use the same template as the hook pieces, just move the blocks for the stoppers, again, we made a separate template for each.

Step 11: Test the Inset Template
Before you mortise into the rails, it’s best to do a test cut on a drop piece of wood to see if the hole needs to be widened or lengthened.


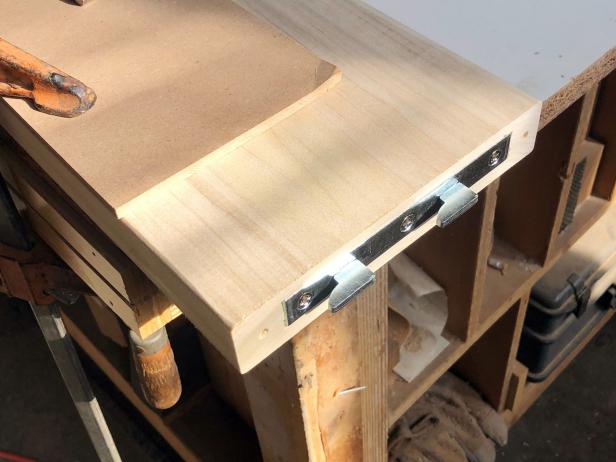
Step 12: Mortise for Inset Plates
When you’re satisfied with the test piece, move onto mortise cut the bedrails. Face screw the template onto the bedrail (making sure to use screws that will not protrude through the other side) and secure the board to your work surface. When you’re done with the router, if the cut is a little off, use a chisel to clean up the edges.


Step 13: Mortise Inner Holes for Inset Plates
Trace the template for the inner holes into the mortised section. Use a pencil to mark the holes. Face screw the template to the bedrail then use a router to mortise out the holes. Then elongate each hole on top side deep enough for the prongs to lock in but not too deep that it gets into the screw area. With the inset plate in place, predrill the holes for the screws and then attach the inset plate so you can assemble the bed. If you’re going to paint or stain the bed, you can remove the plate before that. Repeat for the other three sides.


Step 14: Make Legs
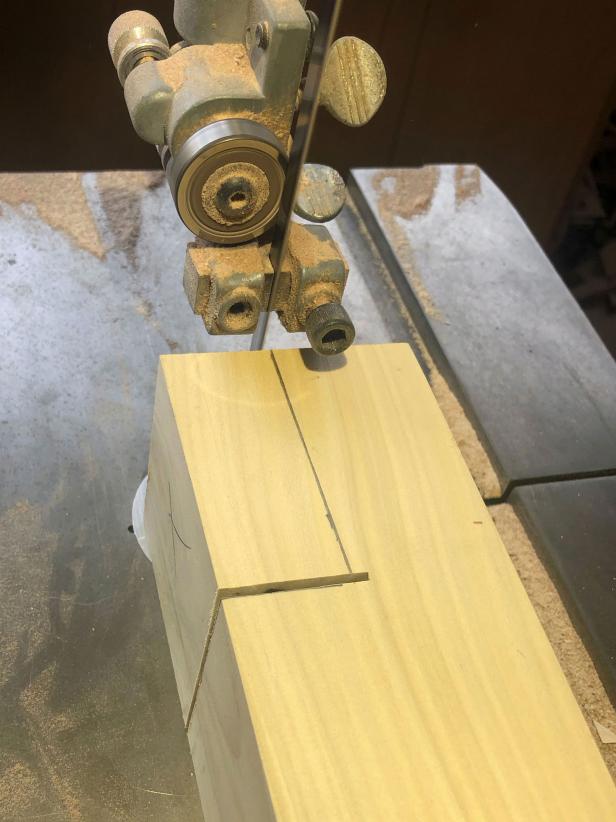
The 4x4 will come from the store with radius edges and will measure approximately 3-1/2” x 3-1/2” (even though it is called a 4x4). We planed ours down to 3” x 3”. You can plane it down to sharpen the corners or just leave it the same size and sand it. Cut the 4x4 into four 11” pieces. Measure 3” down from top and strike a straight line around three sides. Measure 1-1/4” back from one face on two sides and square from the top. Use a miter saw and a band saw or jigsaw to cut off this 3” x 1-1/4” area of material, this will create a notch to fit around the bottom of the bedrails.
Step 15: Test Assembly
With all the hardware installed, do a test assembly to see if all four sides fit together. We found that we had to mortise a couple of the holes deeper to create a tight fit. With the bed frame assembled, mark the inside vertical corners so you know how far to extend the cleats. When you're satisfied with the assembly take the bed apart and remove the plates. On the mortise holes, use a pencil to draw an arrow to indicate which side goes up.

Step 16: Sand
Use a pad sander with 120-grit sandpaper to smooth any rough edges on the bedrails and legs.
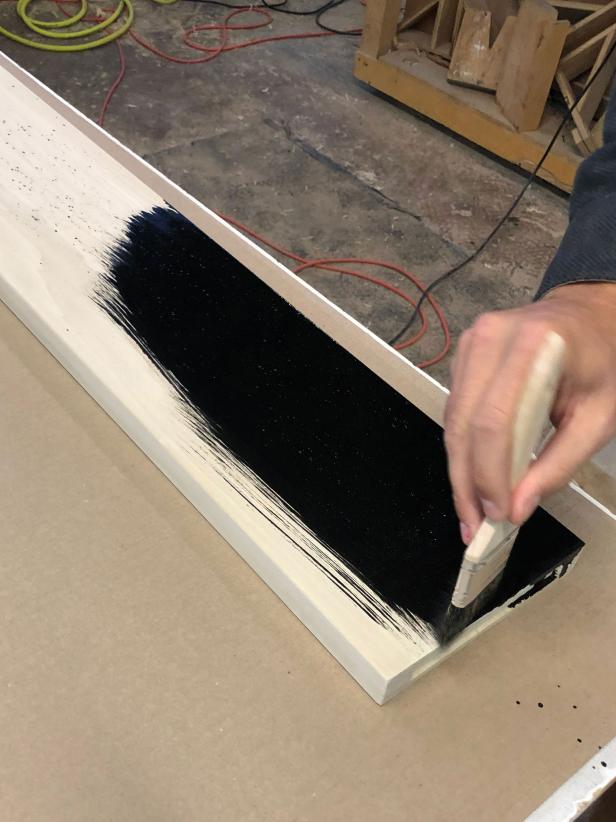
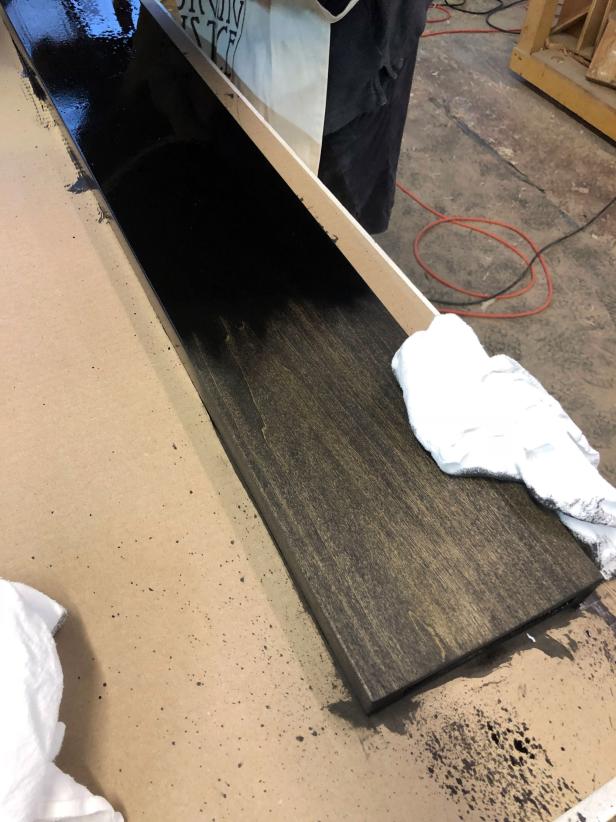
Step 17: Stain
Paint or stain the bedrails and legs as desired.
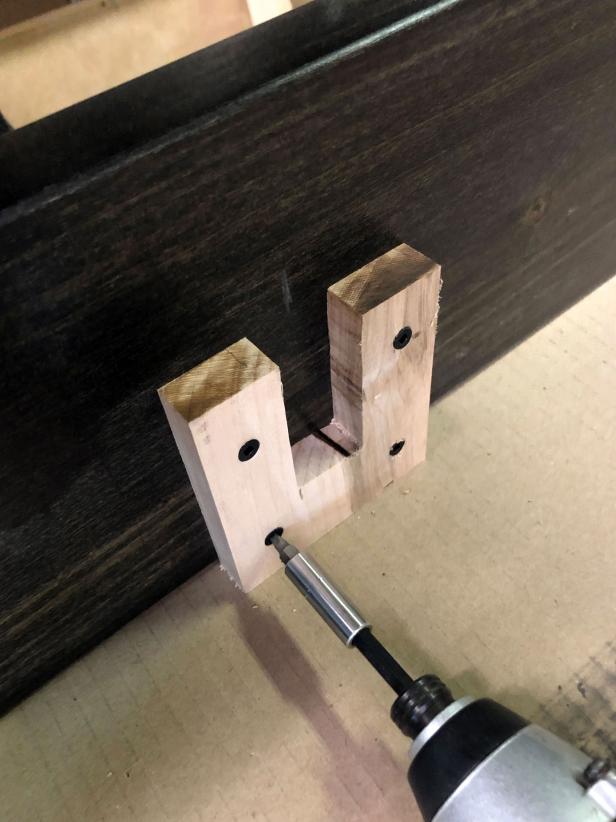
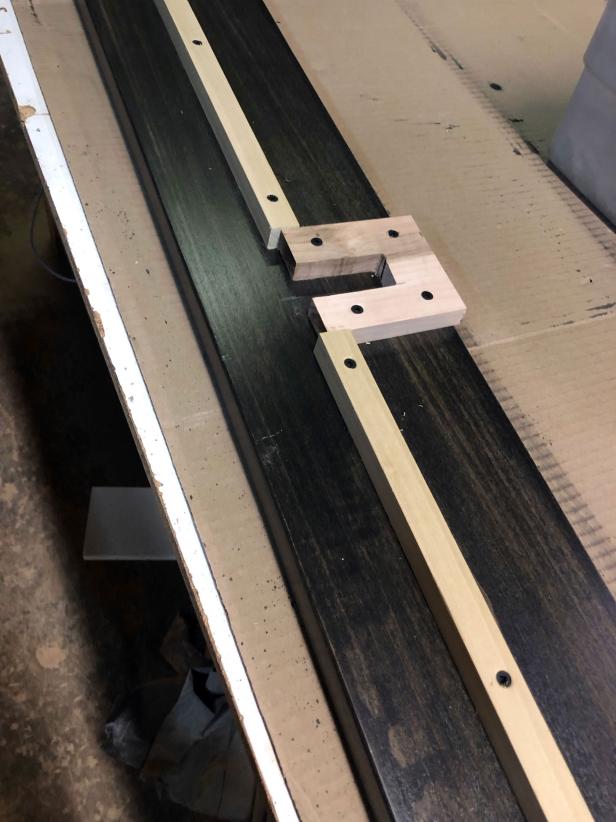
Step 18: Make Support Brackets
The two support brackets will be attached to the inside of the short bedrail pieces, centered in the middle. If you have leftover material from the bedrails you can use that; we used a scrap piece of 3/4” plywood. The outside dimensions of the bracket are 4” x 4” with a notch cut in the center that measures 1-3/16” wide x 2-1/2” deep. Use a jigsaw to cut the notch. Test fit the center support beam (the 1-1/8” x 2-3/4” x 81” piece) to see if it slides easily into the notch; the beam should sit slightly above the notch. Attach the brackets flush to the bottom of the short bedrail piece, centered in the middle. It's easiest to lay both short rails together to make sure that your bracket placement is lined up properly.


Step 19: Cut and Install Cleats
Lay the bed rails good side down. Make marks 2-3/8” down from the top of the rails. Lay the 1x1 x 81” long cleats on the side rails. Pre-drill 1/8” holes for the screws. Start a few inches in from the ends and insert a screw about 8” to 9” apart. Repeat for the second side. Attach the center support brackets in the center of each of the end rails. When positioning the brackets, make sure the top of the center support rail (the 1-1/8” x 2-3/4” x 81” piece) will sit flush with the top of the cleat or 2-3/8” down from the top of the bedrail. Make sure to pre-drill and fasten the support brackets with 1-1/2” screws. Install the 27-3/4” cleat pieces on both sides of the center support rail brackets. They should sit about 2-1/2” in from the ends of the bed rail so they do not interfere with the cleats on the side rails.
Step 20: Attach Legs
The legs are attached to each end of the short bedrails. Pre-drill holes for screws, and screw onto the rails from inside.

Step 21: Assemble

At this point you should be able to assemble the bed, locking the bed rail fasteners into place, install the center support rail and lay the two pieces of plywood onto the frame. This should give you about a 1-5/8” lip around the whole bed to hold the mattress in place.


