


10 Tips I Learned Hanging Removable Wallpaper in My Apartment
A newbie (me!) tried out peel-and-stick wallpaper for the first time. It transformed my space, but there were some things I wish I had known beforehand.
My love affair with wallpaper started awhile back. I saw its transformative powers everywhere: design shows, Instagram and magazines. The kicker was I’d never actually tried it out myself. Of course, I’d heard the horror stories. It’s expensive and once you’re tired of the pattern, impossible to remove.
Enter peel-and-stick (removable) wallpaper. It’s touted as a simple and supercute answer to all the woes of traditional wallpaper. Same look, but more affordable, easier to install and — thanks to self-adhesive backing — a breeze to remove. Some have even compared it to a giant sticker.
But I was curious: is it really as great as they say?
The Transformation
In search of some answers, I decided to decorate the small wall in the entryway of my apartment with peel-and-stick wallpaper — despite the fact that I'd never before attempted a DIY project of this magnitude. In the end, the metamorphosis was pretty striking, but the journey there took some patience.
BEFORE

Caroline Alkire
AFTER

Caroline Alkire
What I Learned
1. Take Your Time Deciding on a Pattern
Once you officially commit to your wallpaper project, the real fun begins: picking out a pattern. Admittedly, wallpaper has a rep for being granny-ish, but I will debunk that myth right now. The plethora of patterns out there — sleek, minimal, girly, moody, glam, chic — can make it overwhelming to commit to just one.
My roommate and I knew we wanted panels that would brighten our dark entryway. Lots of research and a carefully curated Pinterest board helped us narrow it down. We finally landed on a light and natural pattern: Wallshoppe’s Sweet Caroline removable panels in gray, available at Anthropologie.

Some other brands I’d recommend checking out: Chasing Paper, Flat Vernacular, Muse Wall Studio, Sweet Pea Wall Design, Kate Zaremba Company, Urban Outfitters.
Shop Similar Patterns


2. Figure Out How Much to Buy
While more affordable than traditional wallpaper, your peel-and-stick panels will be an investment. The cost of one panel won't break the bank, but you’ll likely need several panels to cover your square footage.
Figuring out how much wallpaper to order was confusing (to say the least). In the end, I used the FAQs section on Wallshoppe’s website as a guide. I’d also recommend using an online wallpaper calculator, or — if you’re only doing one small wall like I was — try calculating your total manually, based on the dimensions of the panels you’re buying. Pro tip: Add 15 percent more to your order than you calculated — you don’t want to run out mid-installation. FYI, dimensions differ per brand.

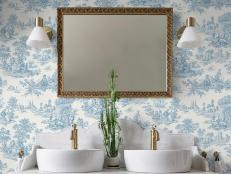
21 Beautiful Removable Wallpaper Designs Renters Should Know About
Don't let renting (or commitment fatigue) keep you from tackling that room refresh you've been wanting. Make your removable wallpaper dreams a reality with one of these peel-and-stick beauties.
3. Get Your Bestie to Help You
This isn’t a project I would recommend going in on alone. I chose my most reliable friend to help me, and he didn’t let me down. It probably took us about three hours, which included planning out exactly where each mural would go on the wall. Our pro tip: Once you start installing, have one person line the panel up and hold it in place while the other slowly pulls the backing away and lightly sticks the panel to the wall. That’s how we did it, and we were able to get into a rhythm. I won’t pretend it wasn’t a tedious process, but with patience, stamina and teamwork, we made it happen.
4. Get All Your Materials Ready Beforehand
I didn’t realize how necessary a ladder was until I took a close look at my entryway the night before we began and realized how high my ceilings actually were. Luckily, my neighbor had one we could borrow. Basically, get all your materials ready beforehand, and do not plan on using a chair or a stool while installing because you’ll need to get right up to where your wall meets the ceiling. Pro tips: Use a craft knife to trim your panels. I recommend laying a thick piece of cardboard down on the ground to protect your floors. Then use a metal yardstick to keep your edges as straight as possible. And, if you find yourself without a level (ahem, me), the level app on your phone is free and gets the job done.
What You'll Need


5. Figure Out How Your Panels Line Up
One thing that really threw me was the repeat pattern. After sifting through what felt like hundreds of wallpaper options, dissecting panel dimensions and trying to make sense of the mysterious "repeat pattern" I kept hearing about, I was ready to give up before starting. However, I quickly realized it’s not as complicated as it seems. "Repeat pattern" is just a fancy term for how the design on each panel lines up. There’s "half-drop repeat," where panels align perfectly at the halfway point of the neighboring panel. And there’s "straight repeat," where panels line up evenly from top to bottom. My Sweet Caroline panels lined up on a straight repeat, as outlined in the instructions. Once we confirmed the repeat pattern, we laid out the panels on the floor of my living room to see exactly how they would fit on the wall. If you're only covering a small surface area and have the floor space, I would highly recommend doing this. It saved us a lot of confusion in the end.

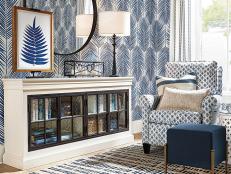
Our Favorite Peel-and-Stick Paper to Beautify Your Home
Get the home of your design dreams (on a budget!) with these beautiful peel-and-stick tiles and contact paper buys.
6. Label the Top Left Corner of Each Panel
This was the biggest help once we started the installation process. We marked the upper left corner of each panel (with a "TL" for "top left") after laying them out on my living room floor. Once we actually started adhering the wallpaper, things got a little crazy, but — thanks to the labels — it was easy to figure out how the panels fit together.
7. Start With One Panel in the Center of Your Wall
In other words, don’t start in the corner of your wall and use it as a guide for making the paper level. Always start in the middle. Before beginning, I measured and marked (with a pencil) the center of my wall as well as the center of the first (middle) panel. We lined the marks up at the very top of the wall (right under the molding) and carefully stuck on panel number one. Once it was securely in place, we measured the second panel, which we ended up having to trim vertically with a craft knife. (My entry wall was narrow, so we only needed two other panels on either side of the middle one.) Pro tip: If you need to trim your panels vertically, trim them before applying to the wall. Just make sure your measurements are exact. As for the leftover material at the bottom of your panel, it's okay to trim that off once your paper is mounted on the wall.
8. Your Shower Squeegee Is Your Best Friend

Caroline Alkire
Once your panel is in place, you’ll need to smooth it out with … something. I highly recommend a shower squeegee. I’d read about wallpaper smoothers available on Amazon or that a credit card could do the trick, but our squeegee worked amazingly. It’s bigger and easier to hold than a credit card, and we didn’t have to spend any extra money because we had one sitting in our shower. There were zero air bubbles on the finished wall. Big accomplishment. Pro tip: Smooth from the center out only after ensuring the panel is stuck on exactly how you want it.
9. Make It Cute
Decorating will forever be the best part of any DIY project. Once the installation was done, I styled our preexisting bench with layered pillows: an oversized 24” x 24” denim pillow from HomeGoods and the 15” x 20” Henley lumbar pillow from one of my favorite designer shops, Pure Salt Shoppe (of Pure Salt Interiors). On the wall, we mounted a 24-inch diameter rattan sunburst mirror from Target. To further brighten the space, we hung sheer white curtains from Amazon above a window to the left of the entry.
Shop the Look


10. Don’t Wear Nail Polish and Other Random Tips
PSA: Do not wear red nail polish (or any nail polish) while installing — especially if your wallpaper is light-colored. My red nail polish left random scratches all over the panels. Luckily, they’re not noticeable now, but it definitely added some stress. Also, clean your walls beforehand. You don’t want dust and debris trapped beneath your wallpaper. Finally, have fun with it. Nothing is perfect and decorating is supposed to be fun. In the end, be proud you created a new and happy spot in your home.


