


How to Safely Remove Vinyl Siding
We answer your burning questions — Why? How? What tools? — so you can take your exterior remodel into your own hands.

One of my family's big outdoor projects this summer was redesigning our outdoor living space. Our previously screened-in porch has been stripped of its blinds, screen panels, the ragged indoor/outdoor carpet, and we also got rid of the vinyl siding to expose the home’s original cedar shingles.
Our decision to remove the siding raised questions amongst our family and friends. Most people would say that once you’ve invested in vinyl, there’s little desire to remove it unless it needs to be repaired. However, the texture of the cedar shingles was more in line with our vision. While you might not encounter what we did beneath your vinyl, this Q&A will help give you the courage to look a little deeper and determine how you may take your home back to its roots with a refreshed facade.

How to Safely Remove Vinyl Siding
Learn how to remove vinyl siding for your exterior home remodel.
Photo by: Emily Fazio
Emily Fazio
Q: How do you know what’s under your siding? Can I take a peek under my own siding without damaging it?
A: These are the questions we get asked the most. If you weren’t living in your home when it was built, how do you go about exploring beneath the siding? You might have some intel from previous owners or neighbors, and don’t count on there being anything beyond sheathing and plastic house wrap if it's newer construction. My house was built in 1950, and I found a spot to peek up beneath the lowest level of vinyl that hangs right above the block foundation. I could see the lower edge of what appeared to be shingles, and they were splattered both red and yellow — the previous house colors.
If you can’t get a peek from the underside, locate the end of a piece of vinyl where it overlaps another piece on a wall. The overlap should only be a couple of inches if the installers were efficient. Peel it back to reveal what’s beneath — you may see insulation.

How to Safely Remove Vinyl Siding
Learn how to remove vinyl siding for your exterior home remodel.
Photo by: Emily Fazio
Emily Fazio
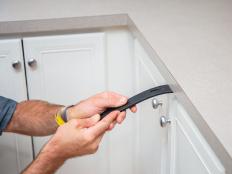
Use a utility knife to score the insulation, and peel back a small section to reveal the underlying surface.

How to Safely Remove Vinyl Siding
Learn how to remove vinyl siding for your exterior home remodel.
Photo by: Emily Fazio
Emily Fazio
Don’t like what you see? You can always flap it back into position.
Q: Is it easy to remove vinyl siding?
A: Surprisingly, yes. You can remove it with little effort and in a way where you can easily reuse the pieces. Vinyl siding is installed from bottom to top, so start at the top and work your way down when removing it. The perimeter of every wall has trim pieces (J-channel, sill/utility trim, etc). The trim secures the edges of vinyl in position and hides any nail heads. The channels around windows and the bottom of the wall secure the edges and bottom row into position.
Start by lifting an overlapped piece of vinyl on the top row. You should be able to slide it horizontally and remove it from the channel to expose the nails from the second row down. Remove the nails one at a time to disconnect the entire length of vinyl. Repeat until you’re at the ground, and then remove the surrounding trim. Note: If there’s insulation, it will come off easily with a little pull.

How to Safely Remove Vinyl Siding
Learn how to remove vinyl siding for your exterior home remodel.
Photo by: Emily Fazio
Emily Fazio

How to Safely Remove Vinyl Siding
Learn how to remove vinyl siding for your exterior home remodel.
Photo by: Emily Fazio
Emily Fazio
Q: Do you need special tools to remove vinyl siding?
A: Nope. Here’s what I used:
- various pry bars
- wooden block to protect the underlying surface
- electrical screwdrivers (if necessary)

How to Safely Remove Vinyl Siding
Learn how to remove vinyl siding for your exterior home remodel.
Photo by: Emily Fazio
Emily Fazio
Electrical screwdrivers? Why?
You'll need to reset any outlets if they’ve been raised to sit flush with the extra layer of vinyl. Always turn off the power to the outlets before you attempt to move the hardware back deeper into the box. The raised vinyl cover is installed with nails, and the screwdriver is useful for loosening and replacing the outlet itself.

How to Safely Remove Vinyl Siding
Learn how to remove vinyl siding for your exterior home remodel.
Photo by: Emily Fazio
Emily Fazio
Q: Will there be holes in the underlying material?
A: Absolutely. We had between 5-10 holes per square foot on our walls. This is because the insulation was also nailed on. To remove the nails with minimal damage, use a wood block to press your pry bar against it for extra leverage and to prevent the bar from causing damage on the surface.

How to Safely Remove Vinyl Siding
Learn how to remove vinyl siding for your exterior home remodel.
Photo by: Emily Fazio
Emily Fazio
Q: Can you patch the nail holes in the cedar shingles?
A: Yes, since our goal was to repaint the existing cedar, we patched the nail holes with wood putty. To match the vertical grooves of the wood, pull an old toothbrush vertically through the grooves over the putty to mimic the texture on the surface.

How to Safely Remove Vinyl Siding
Learn how to remove vinyl siding for your exterior home remodel.
Photo by: Emily Fazio
Emily Fazio
Q: What’s around the windows and doors?
A: The flashing installed around windows and door frames is likely a heavy metal that you’ll have to deal with after the vinyl is removed. Odds are, there’s wood trim beneath that’s intact if you have an older house. Flashing is installed over existing trim because vinyl itself is fairly leaky. The flashing redirects any water away from the window and helps prevent rot. It also looks more finished once the flashing is built out around the window to match the height added by the vinyl.
Ours was installed with nails and was easily removable. Fortunately, the window and door trim was flawless underneath — it only needed a fresh coat of paint.
The flashing won’t be salvageable. It bends and folds pretty easily. You may find some uses for the material, but you can also recycle it.

How to Safely Remove Vinyl Siding
Learn how to remove vinyl siding for your exterior home remodel.
Photo by: Emily Fazio
Emily Fazio
Q: What do you do once you’ve removed your vinyl siding? Can you reuse it in the future?
A: The best part of removing the vinyl is you can easily reuse or save it. It cleans easily with soap and water and can be stored flat without taking up much space.
If you don’t need it yourself, hand it down to a contractor, homeowner, or local organization who may be able to reinstall it as part of a project. Measure the square footage of the walls to provide the amount of surface they can cover.

How to Safely Remove Vinyl Siding
Learn how to remove vinyl siding for your exterior home remodel.
Photo by: Emily Fazio
Emily Fazio


