


DIY This: Floor-To-Ceiling Rope Shelf
Give your cowgirl boots (or whatever else!) a snazzy place to rest with this simple DIY for custom floor-to-ceiling shelving.

Floating shelves, wooden shelves and built-ins all have one thing in common. They are ridged and stiff. But a room can be softened up and styled before the shelves are even filled with the simple addition of a floor-to-ceiling rope shelf. The sleek wood and warmness of rope do all the styling for you.

Kimberly Davis
Materials Needed
- (1) 1x10 x 10’ pine board
- chop saw
- tape measure
- speed square
- pencil
- saw
- drill + 1” paddle bit
- (4) 9’ segments of 1” 3-strand cotton rope (or jute)
- scissors
- (4) eye bolts with 1” eye diameter
- sandpaper
- wood stain (we used Minwax Simply White)
- small paint brush
- clean white cotton rag
- level
Cut Lumber

Kimberly Davis
Using a chop saw or hand saw, cut the lumber into three 36-inch shelf segments.
Measure and Drill Holes

Kimberly Davis

Kimberly Davis
Use your speed square to measure one and a half inches in from the corners on each shelf, and mark with a pencil. These marks will be the center for your holes. Use a 7/8-inch paddle bit to drill the holes in each corner.
Sand

Kimberly Davis
Use a fine grit sandpaper, and sand with the grain along all sides of your shelf. Remove any dust with a clean cloth.
Stain

Kimberly Davis

Kimberly Davis
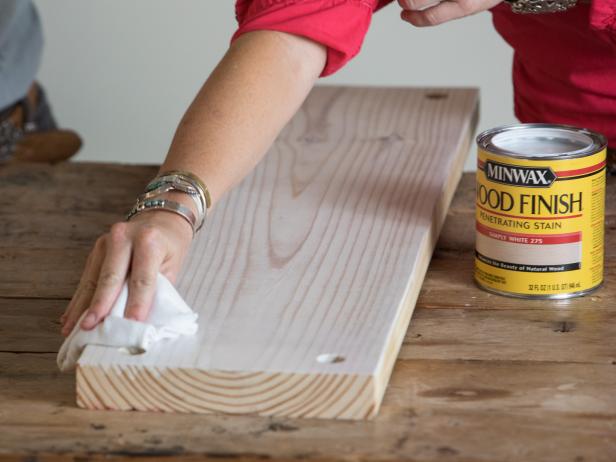
Kimberly Davis
Stain the wood following package directions, and allow it to dry completely. For this project, we used Minwax Simply White. Leave your stain on for about five minutes before using a clean white cotton cloth to remove any excess stain. For more coverage, apply multiple coats.
Tie, Try, and Tie Again

Kimberly Davis

Kimberly Davis
Tie a knot 10 inches from the end of each rope. Place your boards on their side either on the floor or a large work surface. Line up the holes of each board and space them about 18 inches apart. Take one rope and thread the longer end through the corner hole. This will be your bottom shelf. Repeat with the other three corner holes, and tighten so the shelf rests on the knots.
Pull the rope taught, and measure 18 inches from where the rope meets your first shelf. Mark with a pencil, and tie a knot. Repeat this with all corners. Next, pull the ropes taut and repeat for the next shelf.
Attach Eyebolts and Hang

Kimberly Davis
Measure and place your eyebolts in the ceiling where you wish to hang your shelf. For straight lines, one set of eyebolts should be installed two inches from the wall, and the other set should be installed eight inches from the wall. Each row should be 32 inches apart. This shelf is very heavy, so be sure to find studs or use proper anchors.
Pro tip: Use a level to find any crooked shelves and adjust your knots once it's hanging.
Finishing Touches

Kimberly Davis
Cut off any excess rope, and unravel the ends for an effortless boho look.


