


Indoor Fountain Basics

There are hundreds of "recipes" for tabletop fountains, and usually they involve recommendations for specific items. If you don't have — or can't find — one of the items in the list, or if, say, something else is amiss — your bowl is unusually big or deep (or shallow or long), or if your rocks don't match those used in the recommendations, or you don't have a pump cover — you'll have to make things up as you go along. Here, we offer a list of tips and strategies that will help guide you as you forge ahead, creating your own perfect tabletop fountain, in your own way.
The concept of a tabletop fountain is pretty simple: A pump circulates water in a container, and a spout — either hidden or visible — delivers the water into a pleasing "scene." The usual ingredients are a small, submersible pump (available at garden centers or aquarium shops); a large bowl or other water-tight container; a device to hide the pump while allowing water to recirculate (one example: an upside-down plastic container with a hole cut in its bottom to allow the tubing to pass through and a hole cut in its side to allow water to return); rocks or marbles; flexible tubing that fits the pump; a small copper elbow to direct the water downward. And water, of course.

Steps:
1. The bowl is as important as what you put in it. Try to match the bowl to the fountain it will hold as well as to the room's decor. Take into consideration whether the fountain will more likely be viewed from above or from the side.
2. Make sure the bowl holds enough water to fully cover the pump. The larger the bowl, the more water it can hold and the less frequently you'll have to add water. Also make sure the bowl has a flat bottom. The inside bottom should be wide enough to accommodate the pump and the first curve of its cord.
3. The pump needs to be camouflaged, and in a large fountain, it needs to be protected from the weight of the rocks above it. If you don't use a device like an upside-down clay pot or plastic container (either having a hole in the bottom), you might be able to get away with constructing a little den for it with rocks. Thin wide rocks such as slate are useful in creating a shelf over the pump by resting it on a pile of rocks (or a large rock) placed on either side of the pump.
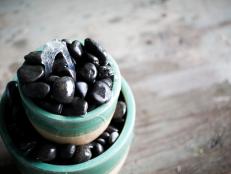
4. You'll need to use rocks (or some other inert material) to build your container water feature. Use large ones at the bottom — when it comes time to clean the water feature — they're quickly and easily removed and washed. Flat rocks are very useful to have on hand; you'll want to be able to create level surfaces.
5. Use a submersible pump; a pump that has two speed settings is a plus. Follow the instructions carefully and always use a grounded electrical outlet.
6. Assemble the bowl outside (in a dry, covered area) before you bring it indoors. You'll need to move rocks around to adjust the spray — best to do that where spattering won't matter.
7. Algae grows where it wants to, so be prepared for some to start appearing in your water feature. To slow down its growth, periodically add a teaspoon of liquid bleach to the water.


