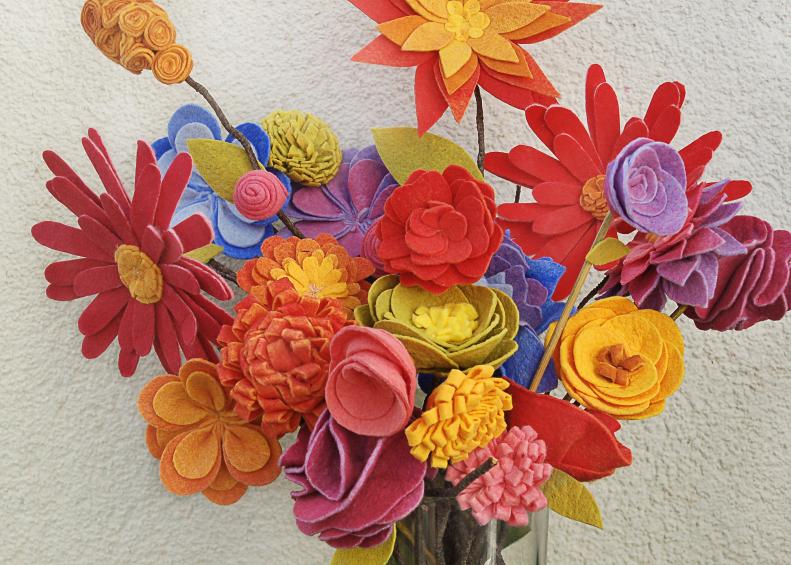
Felt Flowers How-To
Follow these easy DIY directions to create a bouquet of colorful felt flowers.

By:
Ruth Meharg
Related To:
Felt Flowers
These beautiful felt flowers add color to your home no matter what the season. They make stunning arrangements, wreaths and decorations and they can be made in any color you like so you can match the decor or your mood perfectly!
Assemble your Supplies
To make your felt flowers you will need a variety of colored felt. You can buy a wide range of colors, or dye your own using wool dye. You'll also need a pair of scissors and a hot glue gun, fabric glue or needle and thread. Using glue will be faster and easier, but using a needle and thread will make your flowers a little more sturdy in the long run.
Basic Flower Shapes
The simplest felt flowers are made by arranging petal shapes in a circle. You can make daisies, poinsettias, dandelions and many more this way. Simply choose a petal shape, rounded or pointy, narrow or wide, and cut it out in a variety of sizes. You want some of your petals to be long and some to be short.
Daisy Petals
To arrange your daisies, simply pile the petals in a circle with the longest on the bottom and the shortest on the top. Glue or stitch together and finish with a bright center.
Layers of Petals
You can get a little more complicated with your flowers by cutting out more unusual shapes or folding your petals to give them more dimension. Try cutting out shapes that aren't traditionally floral, like hearts or flowing organic shapes. Or cut out perfect circles and cut a slit on one side.
Circular Petals
To create the petals from your circles make a cut in the felt from the edge to the center of the circle. Overlap the circle at the cut to form a shallow cone and glue or stitch in place. Arrange your petals in overlapping circles to form sweet little flowers.
Organic Petal Shapes
Arrange your organic shaped petals by starting with the smallest shapes in the center. Gently fold them for a bit more dimension and glue or stitch them together at the center of the flower.
Dahlia Prep
To create a felt dahlia you will need a series of small petal shapes. They should be pointed on both ends and fat in the middle. You can use the same color for all your petals or use a gradation of color, from purple to pink or green to yellow for example. The number of petals you'll need will depend on how many layers and how large you want your flower to be, but a good rule of thumb is 6 petals for the smallest ring. Add 3 petals each time you want to make a ring larger.
Arranging Your Dahlia
To create your dahlia, pinch one end of each petal and glue or stitch to secure. Arrange the petals in concentric circles, gluing or stitching as you go. You want to attach each petal to the one next to it as well as the ones above and below. Finish with the center of your choice.
Plumeria Prep
Create felt plumerias by cutting teardrop shaped petals. You will need an equal number of large petals in one color, and small petals in another color. You will need between 5 and 8 petals in each color.
Finished Plumeria
To assemble your petals layer the small petals on top of the larger ones and pinch the points together. Glue or stitch all the pointed ends together, overlapping the larger ends of the petals as necessary.
Ruffled Petals
This felt flower is simple to make, but the layers of ruffled petals can be absolutely beautiful. You can use circles, rounded triangles, rounded squares or flower shapes for your petals. They should all be the same size.
Putting Petals Together
Fold each shape into quarters. Glue or stitch the corners together in the center of the flower. The more petals you add the rounder your flower will be. Eight petals will give you a half dome, while 16 will create a spherical flower.
Rose Prep
These roses are simple to make and quite sweet. All you need is a piece of felt cut in a spiral shape. You can begin with a circle of felt and cut a smooth spiral into it, or begin with a flower shape and cut a loopy spiral to create petals.
Large Rose
Wrap your spiral of felt tightly, beginning at the center. Glue or stitch as you go. Once the glue is dry, gently pull the petals outward to keep your rose from looking too flat.
Spiral Rose
Using a circle instead of the petal pattern creates a tight spiral rose. Just like the petal rose, begin winding your spiral at the center and glue as you go. Try creating a series of small spiral roses and gluing them together to create little bunches of blossoms.
Spiral Rose
You can also create a simple spiral rose with one long strip of felt. Cut one end into a point and fold in half lengthwise. Begin winding at the flat end and finish by tucking the pointed end under the spiral. Glue or stitch as you wind to keep the spiral tight.
Chrysanthemum Prep
To create felt chrysanthemums you need a long, narrow strip of felt. It should be twice as wide as you want your petals to be, and the longer it is the larger your final flower will be. Fold the felt strip in half lengthwise and cut slits along the folded edge. Don't cut all the way through. It should be one piece of felt with cuts all along the middle when you are done.
Chrysanthemum Final
With the felt folded in half and the folded/cut side facing up, hold one end and begin rolling the strip. Glue or stitch as you go, keeping the bottom tight but letting the petals fan out. When the flower is finished you can leave the petals in little loops, like you see in the pink and yellow examples, or cut all of the loops in half like the green example.
Floral Centers
Some flowers need a little center to finish them up. There are a multitude of options when it comes to creating your centers, including using beads and buttons, but you can also make them with left-over felt scraps. Try rolling a long, narrow piece into a tight spiral for a small center, or create loose loops for a larger center. You can attach lots of little circles, or a bunch of thin strips. Or just try a little stitching with contrasting thread for a subtle center.
Attaching Stems
If you are going to make a bouquet out of your flowers, you will need to hot glue them to some sort of stem. You can use skewers, floral wire or twigs and branches to attach to your flowers. Branches add a lovely natural touch, but floral wire can make arranging and flower placement easier.
Arrange your Bouquet
Once your flowers are attached to stems all that's left to do is arrange your bouquet. Wrap the stems in a beautiful ribbon to finish, or arrange them in your favorite vase for the perfect display.
Create a Wreath
If you aren't sure about a bouquet, felt flowers make beautiful wreaths. Begin with a ready made grapevine or foam wreath and hot glue the felt flowers onto it until the wreath is completely covered. Hang on your door for a bright "welcome home!"