


How to Construct DIY Acrylic Shelving
Learning to build a beautiful set of shelves has never been clearer.


Take your desk to the next level with clear and chic shelving. This piece is easily DIY’d and makes the statement you’re wanting without costing you a fortune on glass — a total win all-around.
Materials Needed
- (11) 1x2 x 8’ pine boards
- (6) 10”-x- 20” 6 mm acrylic pieces
- 10”-x- 80” 6 mm acrylic piece
- clear vinyl bumpers
- super glue
- 2” brad nails
- brad nailer
- gloss-finish water-based polyurethane
- tapered synthetic brush
- metallic spray paint
- tack cloth
- wood glue
- wood filler
- drill
- 120-grit sandpaper
- orbital sander
- clamps
- square
- small putty knife
- miter saw
- 1-1/4” self-tapping wood screws
Cut List
- (8) 1x2 x 64” pine boards
- 1x2 x 46” pine board
- (24) 1x2 x 10-1/2” pine boards
- (4) 1x2 x 12” pine boards
- 2) 1x2 x 6” pine boards
Prep Acrylic Pieces
Order your acrylic shelf pieces from a local plastic wholesaler and pay for them to be pre-cut. If you want rounded edges, it could take up to a week longer, so plan accordingly. Once you have your acrylic pieces, sand the corners and edges with 120-grit sandpaper to get rid of the saw marks from the shop.

RTR Media
Cut and Seal Wood
Pre-cut and sand all the 1x2s with an orbital sander. Seal all the boards with a coat of gloss polyurethane according to the manufacturer’s instructions. Pre-sealing helps to create a metallic shine on the boards.
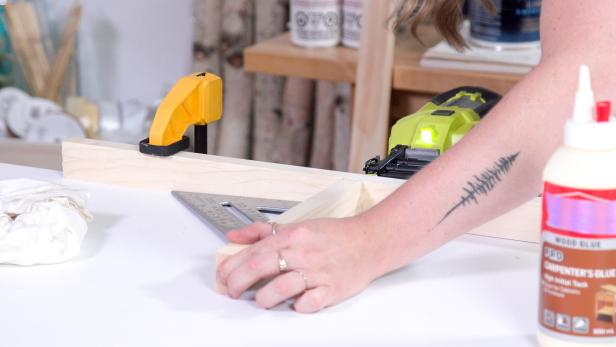
Mark for Crosspieces
Make even marks on the ends of each upright piece. Next, mark four evenly spaced lines between the two marks for the above shelving. You can space them however you like as long as each of the eight upright pieces are identical.

RTR Media
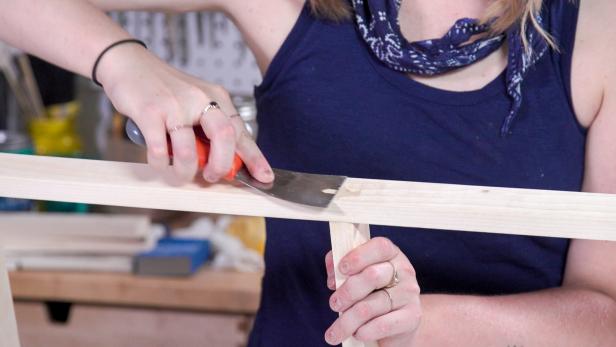
Attach Crosspieces
Clamp your long piece to the edge of the work bench and start to glue and brad nail each 10-1/2-inch crosspiece at your pencil marks (Images 1 and 2). Use a right angle against each pencil mark to line up your boards exactly, and be sure to always work above your pencil marks so each side matches (Image 3). Wipe excess glue away immediately using a wet cloth. Turn the finished half around and clamp your second long piece to the workbench. Glue the other ends and line up the other upright piece so that it matches the same marks. Brad nail the base and then work upwards toward the top. Apply wood filler to cover the holes from the brad nails and to smooth out any rough joints (Image 4). This will make everything look clean and professional. Once the wood filler is dry, sand over the excess filler to give it a smooth finish. Wipe away dust with a tack cloth.

RTR Media

RTR Media
RTR Media
RTR Media
Paint Towers
Using your metallic spray paint, cover both frames. To ensure an even coating, apply the spray paint in light coats. Be sure to spray from a consistent distance on each coat. Repeat this process on the 46-inch crossbar and the two 6-inch braces. Always remember to spray paint in a well-ventilated area with proper safety equipment.

RTR Media
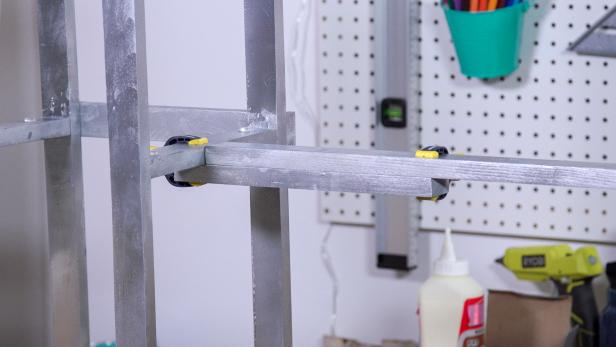
Connect Ladder Pieces
At this point, you should have four metallic ladder-shaped brackets. Add a 12-inch cross brace board to the top and bottom of each ladder piece to tie the two ladders together on the back side. Further secure with a 1-1/4-inch wood screw.
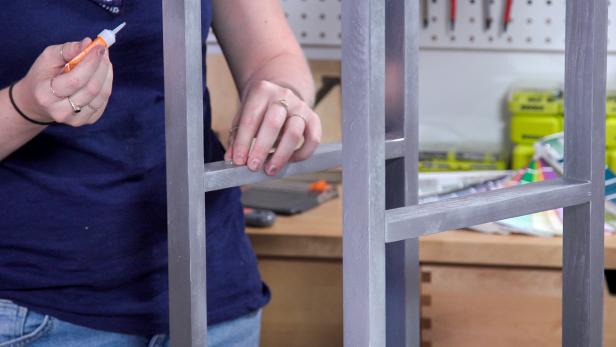
Add Center Crossbar
Take your two 6-inch braces and attach each to the bottom center of your inside 10-1/2-inch top shelves. Attach with a 1-1/4-inch self-tapping wood screw through the bottom. Rest the 46-inch crossbar on top of the 6-inch braces making sure it is flush on both sides. Add wood glue to the end and align with the center point of the inner top shelf crosspieces. Secure with four 1-1/4-inch wood screws on each side.
Pro tip: This is a thin connector between the two towers, so try not to move the piece too much after this point, especially while the glue is drying.
RTR Media
Add Acrylic Shelving
To finish, apply the vinyl bumpers to the wood crosspieces so the acrylic pieces stay in place. Use a dab of super glue to secure the bumpers in place (Image 1). Position the bumpers to meet the inside of the crosspieces so they remain concealed as much as possible. Remove the protective plastic sheeting from the acrylic pieces and place them on the crosspieces (Image 2).
RTR Media

RTR Media

RTR Media


