






How to Make DIY Yarn Tassels
Tassels can transform so many items in your home: baskets, pillows, throws. Make your own DIY tassels with these easy instructions and start embellishing your decor.

DIY Yarn Tassels
Tassels can transform so many things in your home: baskets, pillows, throws. Make your own using yarn and start embellishing your decor.

Photo by: Bethany Nauert; Styled By: Paige Geffen
Bethany Nauert; Styled By: Paige Geffen

Materials Needed:
- yarn
- scissors
- stiff piece of cardboard

DIY Yarn Tassels: Materials
For this project, you'll need yarn, scissors, a stiff piece of cardboard and tacky craft glue.
Photo by: Bethany Nauert; Styled By: Paige Geffen
Bethany Nauert; Styled By: Paige Geffen
Choose the Right Yarn
When choosing your yarn, think about the type of tassels you would like. Thicker yarn will produce fluffier tassels, while thinner yarns will produce smaller, sleeker tassels. Don’t be afraid to mix yarns, if you would like to make a tassel with a bit more texture.
Wrap Yarn Around Cardboard
Use a piece of cardboard that’s the size of the tassel you’d like to make. Leave a tail of yarn on top, and begin wrapping the yarn around your cardboard.

DIY Yarn Tassels: Wrap Yarn Around Cardboard
Use a piece of cardboard that’s the size of the tassel you’d like to make. Leave a tail of yarn on top, and begin wrapping the yarn around your cardboard.
Photo by: Bethany Nauert; Styled By: Paige Geffen
Bethany Nauert; Styled By: Paige Geffen
Continue Wrapping
Wrap yarn until you have created the level of thickness you would like to achieve with your tassel. This will vary depending on the type of yarn you are using.
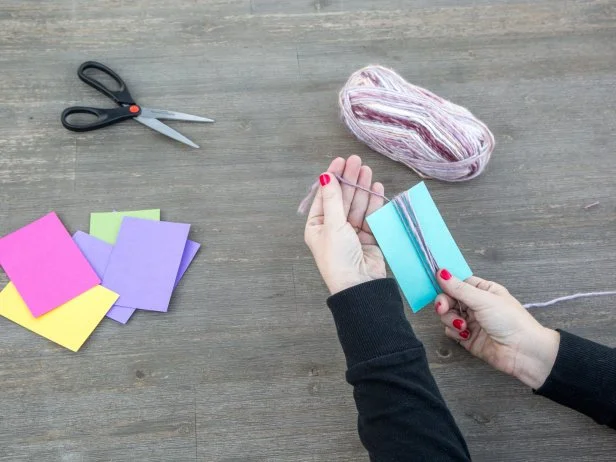
DIY Yarn Tassels: Wrap Yarn Around Cardboard
Use a piece of cardboard that’s the size of the tassel you’d like to make. Leave a tail of yarn on top, and begin wrapping the yarn around your cardboard.
Photo by: Bethany Nauert; Styled By: Paige Geffen
Bethany Nauert; Styled By: Paige Geffen
When you’ve finished wrapping, cut the yarn evenly with the bottom of your cardboard.

DIY Yarn Tassels: Finish Wrapping Yarn
Wrap yarn until you have created the level of thickness you would like to achieve with your tassel. This will vary depending on the type of yarn you are using. When you’ve finished wrapping, cut the yarn evenly with the bottom of your cardboard.
Photo by: Bethany Nauert; Styled By: Paige Geffen
Bethany Nauert; Styled By: Paige Geffen
Finish Tassel
Cut an additional piece of yarn that is approximately 12” to 18” long. Slip this piece of between the wrapped yarn and the cardboard and tie a tight knot.

DIY Yarn Tassels: Tie Additional Piece of Yarn
Cut an additional piece of yarn that is approximately 12” to 18” long. Slip this piece of between the wrapped yarn and the cardboard and tie a tight knot.
Photo by: Bethany Nauert; Styled By: Paige Geffen
Bethany Nauert; Styled By: Paige Geffen
Then slip the yarn off the cardboard, and cut through the bottom loop to create the tassel.

DIY Yarn Tassels: Remove Tassel From Cardboard
Slip the yarn off the cardboard, and cut through the bottom loop to create the tassel.
Photo by: Bethany Nauert; Styled By: Paige Geffen
Bethany Nauert; Styled By: Paige Geffen

DIY Yarn Tassels: Cut Through Bottom Loop
Slip the yarn off the cardboard, and cut through the bottom loop to create the tassel.
Photo by: Bethany Nauert; Styled By: Paige Geffen
Bethany Nauert; Styled By: Paige Geffen
Add Finishing Touches
Cut an additional piece of yarn 6” to 8” long and tie it around the top of the tassel.

DIY Yarn Tassels: Add Finishing Touches
Cut an additional piece of yarn 6” to 8” long and tie it around the top of the tassel.
Photo by: Bethany Nauert; Styled By: Paige Geffen
Bethany Nauert; Styled By: Paige Geffen
Trim the tassel to make sure all the ends on the bottom are even.

DIY Yarn Tassels: Trim Bottom of Tassel
Trim the tassel to make sure all the ends on the bottom are even.
Photo by: Bethany Nauert; Styled By: Paige Geffen
Bethany Nauert; Styled By: Paige Geffen
Dress Up Your Decor
Using the longer tail pieces on top, we tied our tassel onto a basket for a simple, stylish update. You can also sew them onto a pillow or blanket.

DIY Yarn Tassels: Dress Up Your Decor
Using the longer tail pieces on top, we tied our tassel onto a basket for a simple, stylish update. You can also sew them onto a pillow or blanket.
Photo by: Bethany Nauert; Styled By: Paige Geffen
Bethany Nauert; Styled By: Paige Geffen





.jpg.rend.hgtvcom.231.174.85.suffix/1738869872256.webp)





