



How to Cover Walls With Fabric
No, that's not wallpaper. It's fabric! Turn a textile into a chic (and removable) wallcovering with this easy tutorial from HGTV's DIY experts.

It’s no secret that wallpaper instantly adds character and style to any space, but sometimes it's just not a practical choice. Wallpaper can be tricky to install and even harder to take down. (Even removable papers can damage walls.)
Enter fabric. Your favorite textile can be used as a wallcovering that's just as chic — while adding more texture and warmth than traditional wallpaper. Plus, it's easy to remove and won't cause damage. Fabric is also the more eco-friendly choice. If you remove it from your wall in the future, it can be reused, minimizing waste. Today’s wallcovering could be tomorrow’s pillows or curtains!
How to Cover a Wall With Fabric

Jennie Andrews
Tools and Materials
- fabric
- liquid starch
- iron
- basting tape
- wallpaper bucket
- push pins
- utility knife
- paint roller and nap
- dropcloth
- metal yardstick
1. Select a Fabric
Not every fabric will work as a wallcovering. Look for textiles that are cotton or a cotton blend in a light to medium weight, which will soak up the adhesive, helping it stick to the wall. (Thicker fabrics may be too heavy to stay put.) Fabric can be installed on any painted wall, but keep in mind that darker paint colors may show through and dull or alter the look of the fabric pattern.
2. Take Measurements
Determine the measurements of the wall (or walls) you want to cover as well as the width of your chosen fabric. The most common width sold by the yard (in one long continuous piece) is 54 inches. Each piece placed on the wall will have a seam and will overlap the adjacent pieces by 1-2 inches. To allow for this seam and overlap, divide the width of your wall by 50 inches. This will be the number of vertical pieces you will need. If you end up with a partial measurement, round up to include one extra fabric panel. Multiply this number by the height of your room (allowing for a few extra inches at the top and bottom to line up the pattern) to determine the yardage you need. Cut the fabric into the height (plus allowance) of the room.
3. Prep the Fabric

Jennie Andrews

Jennie Andrews

Jennie Andrews
Iron each piece of fabric until all the wrinkles are removed. If the long edges of your fabric have a raw or selvedge edge, fold that edge in about one inch and iron a sharp crease. Place basting tape into the crease and iron again to secure the hem in place. Repeat on each piece of fabric.
4. Prep Your Space and Adhesive

Jennie Andrews

Jennie Andrews

Jennie Andrews
Lay down a drop cloth where you will be working to protect your floors. Remove any outlet covers on the wall, and tape over the outlets with waterproof tape. In a large bucket made to fit paint rollers, combine one part liquid starch to one part water. Mix well.
5. Hang the First Piece of Fabric

Jennie Andrews

Jennie Andrews

Jennie Andrews

Jennie Andrews

Jennie Andrews
Hang the first piece of fabric in the center of the wall. With help from a friend, place a pin through one corner of the fabric at the spot where the ceiling meets the wall. Pull the other side of the fabric taught, ensuring that it is straight and plumb, then pin a few additional places along the border of the ceiling. Once you are confident in the placement, dip a paint roller into the starch mixture and roll it directly onto the fabric. Start in the center and roll towards the outside edges, smoothing bubbles as you go. The roller needs to have enough moisture to completely soak through the fabric and onto the wall, where it acts as a paste to hold the fabric in place. Saturating the fabric will also help discourage bubbles from forming. When the entire sheet has been rolled, run your hands across the fabric, feeling for any bubbles. If you have any that can't be rolled away, pull the fabric off the wall and try again.
6. Continue Hanging

Jennie Andrews

Jennie Andrews

Jennie Andrews

Jennie Andrews
Hang the additional pieces of fabric. Start at the ceiling again and pin the fabric into place, paying attention to the pattern. Adjust the edges so that one seam overlaps the other where pattern lines up. (This is easier with a smaller pattern. Large-scale patterns may require additional length to ensure the pieces align properly.) Pin the fabric in place and then apply the paste, using the same method as before. Take extra care to thoroughly saturate the edges, so they don’t lift when dry. Repeat this process until the wall is covered. Let it dry fully.
7. Trim the Excess

Jennie Andrews

Jennie Andrews
Jennie Andrews

Jennie Andrews
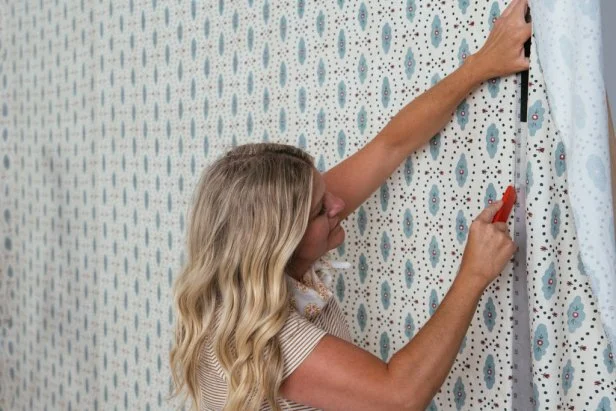
Remove the pins from the top of the wall. To trim the excess fabric, use a utility knife with a sharp, new blade and a metal straight edge. Press the straight edge flush against the ceiling and use it as a guide to cut along the corner. (This should keep the material from pulling as you cut.) Repeat this step along the floor (or baseboard) and each side of the wall. Cut around any outlets and replace the covers. (There should be some fabric left underneath each cover.)
8. Admire Your Work

Jennie Andrews
You did it! Enjoy your newly-patterned space and bask in the compliments you'll be getting from guests about your stunning accent wall. If have extra material, consider using it to pattern drench your space.
How to Remove a Fabric Wallcovering

Jennie Andrews
Fabric walls are the perfect low-commitment way to infuse style and texture into a space, but if you want to switch up your design in the future, taking down the panels is a breeze. To remove them, gently tug each piece away from the wall, then wipe down the wall with a damp sponge.