Hang Floral Fabric on Your Ceiling
Do you need a fun project in the bedroom? Get inspired with step-by-step instructions for adding a vibrant focal point.
By:
Jen Jafarzadeh L'Italien
Related To:
Bright and Cheerful
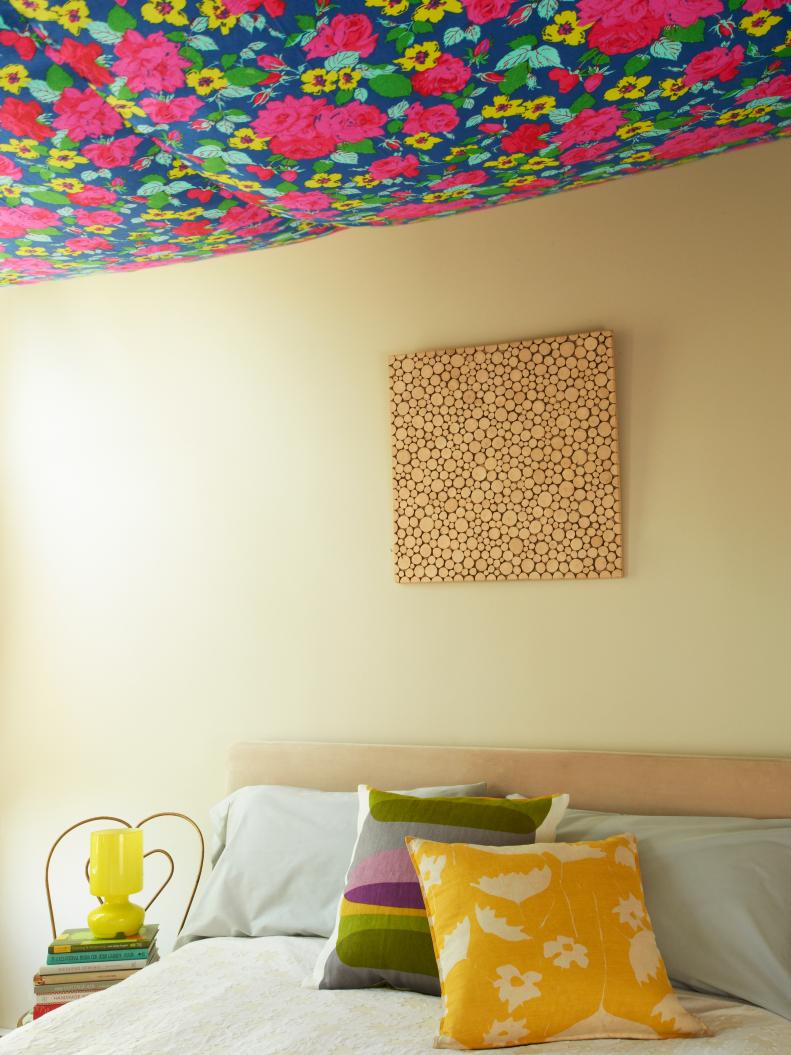
Don't be afraid to go big and choose a spectacular fabric with scale and drama, like this floral fabric we found at DryGoods Design Online. A bright, bold pattern makes an excellent foil for a bedroom with lots of whites and neutrals. Your fabric canopy is sure to be the exclamation point in the room.
Materials List
For this project you'll need fabric; measuring tape; a sewing machine; grommets; a grommet tool; scissors; a pencil; ceiling hooks; rope or twine; an iron; and fabric scissors.
Measure the Fabric
First, choose your fabric. The floral fabric here is a lightweight cotton fabric. Measure and cut how much you’ll need to create your fabric canopy. Consider the size of your bed and how much you want the canopy to drape when deciding the measurements for the canopy. Home decor fabrics are typically a wider width (54 to 56 inches wide) so you wouldn’t need to fuse two panels together. You would need about 3-4 yards of wide-width fabric. The fabric shown here is a lightweight fabric we found at DryGoods Design Online. It's 45 inches wide, so we worked with 7 yards, fusing two panels of fabric together. A lightweight fabric will have a pretty drape, and you won’t have to worry about reinforcing the canopy to the ceiling, as you would with a home decor fabric, due to the weight.
Sew the Edges
To create your canopy, you'll need to finish the raw edges of your fabric and fuse two panels of fabric together to create one canopy that matches the width of your bed. It's true that there’s no-sew stitch witchery you can use if you don’t have a sewing machine. But the canopy is a lot of fabric, so the no-sew solution would not look polished — and the seam down the middle of your canopy will ripple if it's not properly sewed. If you don't have access to a sewing machine, try taking your fabric to a local tailor to have it hemmed.
Add Grommets at the Corners
Try adding the grommets to a scrap piece of fabric first to test out using your grommet tool and grommets. “Once you’ve decided where you’re going to install the grommets, take the front grommet piece and make a mark by outlining the interior circle with a fabric marker or lightweight pencil," says Keli Faw, owner of DryGoods Design Online. Use fabric scissors to cut the circle out. “Insert the front grommet piece through the hole and then flip over, placing the washer on top, on the wrong side of the fabric." says Faw. Follow the instructions with your grommet tool to install the grommet. Repeat on each corner of the canopy.
Hang It
Measure and mark on the ceiling where you want your canopy to hang. Consider the drape and the canopy’s placement over the bed. We used simple metal C-shaped ceiling hooks to hang the canopy. A sturdy nautical rope works well to hang the fabric. Be sure the rope is thin enough to fit through the grommets. We used a sink-stopper knot to prevent the thin rope from slipping through the grommet hole.