


Knitting Socks 101: Heel, Cuff and Toe Tips
Begin to knit your own socks with these basics for standard top-down socks on five double-pointed needles (dpns).
Stitches
Most socks have the same number of stitches around the cuff and the foot. One way to determine the number of stitches to cast on is to measure around the widest part of the foot (usually the ball of the foot) and then multiply that number (in inches) by your stitch gauge (how many per inch).
If your foot is 9 inches around and your yarn is knitting up at 7 stitches to 1 inch, your number is 9x7, or 63. Now subtract 10-15 percent from that number, because you want your socks to have what is called "negative ease." They need to be snug, and in their relaxed state they should be smaller in circumference than your feet and stretch to fit. It makes things easier if your final number is divisible by 4, so that you can have the same number of stitches on each needle.
Many people prefer to cast on all the stitches onto a single needle and then divide them between the four needles. You may also divide your stitches while casting on.
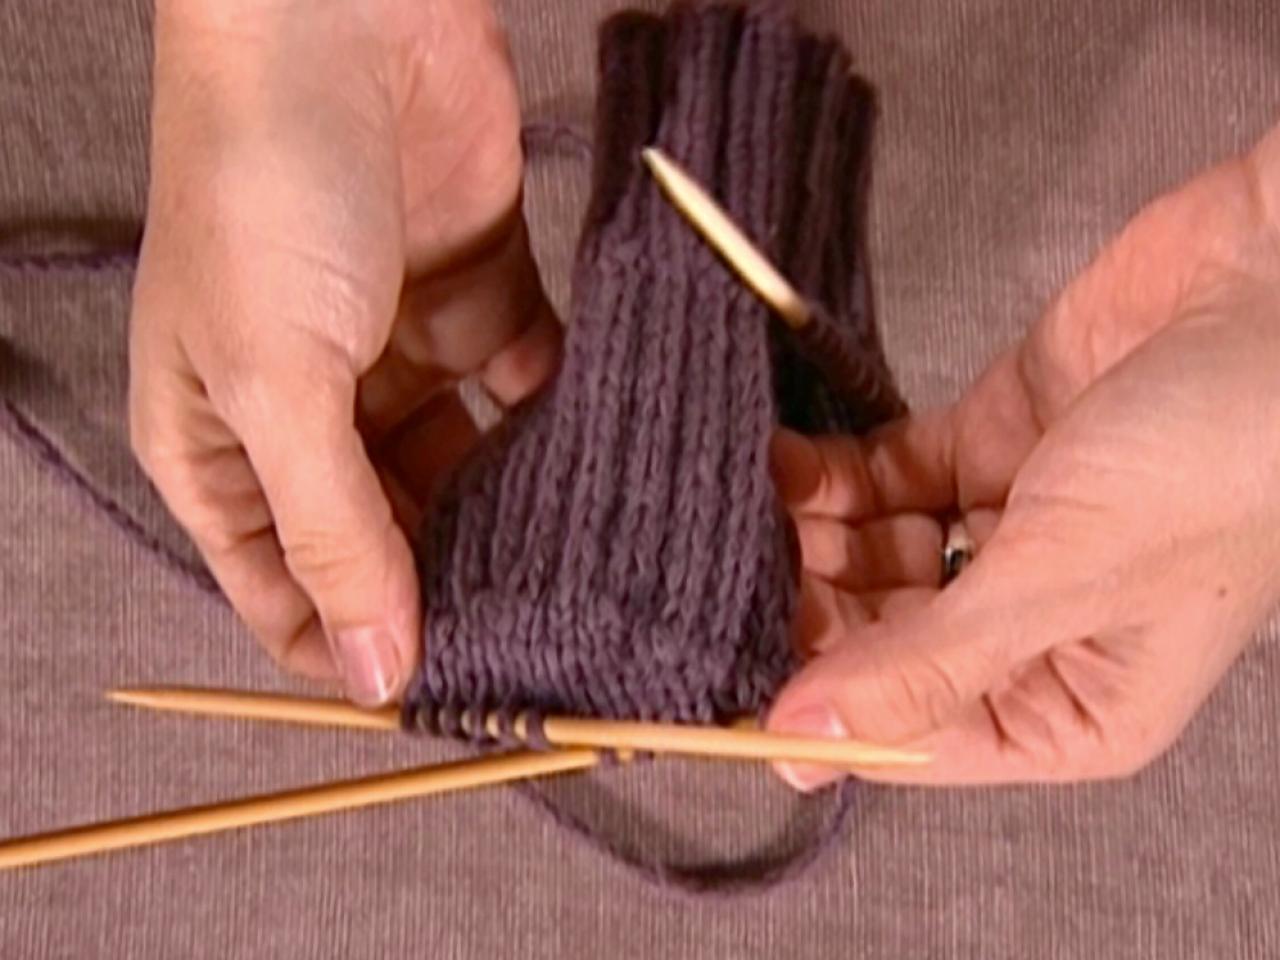
Cuff
Once you have the correct number of stitches cast on and have joined the knitting into a round, you can begin knitting your cuff. This is the easiest part of the sock, and the place where you can be creative. There's almost no limit to what you can do on the cuff: lace, texture, cables. Once you get the hang of sock construction, you will find it easy to branch out.
Most cuffs will at least start out with some sort of ribbing to help them stay up. You can do the entire cuff in rib (1x1 and 2x2 rib are common, but some unusual ribs such as 4x2 or 5x1 will work too; just be sure that the rib pattern works out evenly over the total number of stitches in your cuff).
Yarn that knits up into a jacquard pattern doesn't look as good over ribbing, so many knitters who use those yarns to do about 1 inch of rib at the very top of the cuff and then switch to stockinette stitch, which shows off the pattern.
Knit the cuff to your desired length (1 to 2 inches for anklets, 6 to 8 inches for standard socks). Keep in mind that if you make very long cuffs, it may be necessary to start out with more stitches, because your leg gets wider toward the top.

Heel Flap
A heel flap is the part of the sock that goes down the back of your ankle. It's worked back and forth over half of your total stitches while the remaining stitches rest on their needles. In the above example of a sock with 56 stitches, your heel flap would be 28 stitches across. Two popular ways to work the heel flap are as follows:
Plain Flap
Row 1 (right side): slip 1 stitch, knit to end.
Row 2: slip 1 stitch, purl to end.
Repeat rows 1 and 2.
Slip Stitch Flap (produces a sturdier, more snug flap)
Row 1 (right side): slip 1, knit 1 across.
Row 2: slip 1 stitch, purl to end.
Repeat rows 1 and 2.
Note that in both versions, the first stitch of every row is a slipped stitch. This is important because later you will be picking up stitches along the sides of the heel flap, and the slipped stitch edge will look cleaner.
Continue working the heel flap in your preferred manner until it is about 2-1/2" to 3" long, depending on the wearer's foot size. End with a right side row.
Turning the Heel
This part involves making the heel "turn the corner" to conform to the bottom of your foot. Turned heels use a technique called short rowing, where you knit back and forth but don't go to the end of the row each time.
Note: SSK = slip one stitch knitwise, slip next stitch knitwise, insert left needle tip into the two slipped stitches and knit them together
Row 1 (wrong side): Purl across half the steps of your heel flap plus 1, purl 2 together, purl 1. Now TURN the work.
Row 2 (right side): Slip 1, knit 3, SSK, knit 1, TURN.
Row 3: Slip 1, purl 4, purl 2 together, purl 1, TURN.
Row 4: Slip 1, knit 5, SSK, knit 1, TURN.
Row 5: Slip 1, purl 6, purl 2 together, purl 1, TURN.
Row 6: Slip 1, knit 7, SSK, knit 1, TURN.
Proceed in this fashion, adding one worked stitch before the decrease in each row, until all of the stitches have been worked, finishing with a right side row. You should now have a number of stitches equal to one quarter of your original total for the round, plus one if it was an odd number or plus two if it was an even number. In our example, the new number would be 16.

Gusset
1. Pick up stitches along the sides of the heel flap to make everything back into a tube. At first your tube will be bigger than it was to start with and you will gradually decrease it at the sides to get it back down to its earlier size. This technique is what gives the sock its shaping around the ankle area, which is larger than the rest of the sock.
2. Divide your heel stitches in half, leaving half on the current needle and putting the other half on an empty needle. With the right side of the work facing you, take the needle holding the leftmost heel stitches and use it to pick up stitches along the slipped stitched edge of the heel flap, moving upward toward the cuff, one stitch per slipped stitch. On a typical sock this will be somewhere between 16 and 21 stitches.
3. Take an empty needle and continue knitting across the first needle full of stitches that have been "resting" all this time.
4. With a new needle continue across the remaining resting stitches (i.e., work across all the resting stitches as you normally would with your double-pointed needles).
5. You should now be at the other side of the heel flap, with an empty needle in your hand. Proceed down the heel flap by picking up stitches just as you did for the other side, except now working from the cuff downward and starting with an empty needle.
6. Pick up the same number of stitches that you did on the other side, then continue across the live stitches that are waiting on the last needle (the ones remaining from the section where you turned the heel).
7. You should now have a tube again: two needles will have the same number of stitches as they did for the cuff, and two needles will have more stitches because you've picked up all those stitches from the sides of the heel flaps.

Gusset Decreases
Now that you have a tube again, start working a stockinette stitch in rounds. The needle that starts at the center bottom of the heel as you work around is needle one, and so on, with the needle that ends at the center bottom of the heel being needle four.
Round 1: Knit all around, knitting through back loop on the picked-up stitches along both sides of the heel flap only; otherwise knit normally.
Round 2: Knit until 3 stitches remain on Needle 1, knit 2 together, knit 1; knit across Needle 2 and Needle 3; on Needle 4, knit 1, SSK, knit to end.
Round 3: Knit.
Repeat rounds 2 and 3 only until all four needles have the same number of stitches on them again (i.e., the original number of stitches that you had for the cuff, evenly divided among your four needles).
Foot
Continue working the stockinette stitch in rounds until the foot of the sock is about 2 inches shorter than your desired finished length.
Toe Decreases
Round 1: Needle 1, knit to last 3 stitches, knit 2 together, knit 1; Needle 2, knit 1, SSK, knit to end; Needle 3, knit to last 3 stitches, knit 2 together, knit 1; Needle 4, knit 1, SSK, knit to end.
Round 2: Knit.
Repeat these two rounds until you are down to a little less than a quarter of your original stitch count. (If you want a blunter toe, you can decrease on every row for the last three or four rounds — see tips below.)
Adjust the remaining stitches onto two needles, so that the foot’s top and bottom rows of stitches are parallel and the yarn is hanging at the end of the needle holding the sole stitches. Knit across a few stitches if you need to. Cut yarn, leaving about a 10 inch to 12 inch tail. Graft the toe together using Kitchener stitch:
1. Hold the two needles one in front of the other, with the tail of the yarn attached to the back needle (it should be hanging from the right end of the line of stitches from your current point of view).
2. With a tapestry needle, feed the tail purlwise through the rightmost stitch on the front needle. Pull yarn through and leave the stitch on the needle.
3. Insert needle knitwise through the rightmost stitch on the back needle. Pull yarn through and leave the stitch on the needle.
4. Insert needle knitwise through the rightmost stitch on the front needle and then slip that stitch off the needle. Insert needle purlwise through the next stitch on the front needle. Pull yarn through and leave stitch on needle.
5. Insert needle purlwise through rightmost stitch on back needle and slip off the needle. Insert needle knitwise through the next stitch on back needle. Pull yarn through and leave on needle.
6. Repeat rows 3 and 4 only until all stitches on both needles have been grafted together. The yarn should always stay below the needles as you work (i.e., not going over the tops of the needles and forming extra loops). Feed yarn through the last loop, then through to the inside of the sock and weave in the end.
Your toe should look completely seamless, but don't despair if it doesn't. Most people need some practice before "getting" Kitchener stitch. Weave in any remaining ends.
Sock Knitting Tips
- The rule of thumb for sock yarns is that you need one skein per average sock. Some are put up in double skeins, though, so pay attention to your label. (If it's 100g, it's probably a double skein.)
- Books such as the Vogue Knitting guide and the Vogue on the Go sock books have excellent illustrations of Kitchener stitch.
- Search online for standard sizing charts for shoes and socks – useful when you're knitting socks as a surprise for someone and don't want to secretly measure feet or ask.
- If you are using yarn that is not specifically for socks, you should go down one or two needle sizes from what is recommended on the yarn label. Socks hold up much better when they're knit at a tight gauge (the yarn label assumes you are making a sweater or similar garment, not socks).
- Some like to start off toe decreases on every other round but switch to decreasing in every round for the last 3 or 4 decreases. This makes for a shorter, rounder toe. If you want to try this, wait a little longer before starting your decreases (perhaps until you are 1 1/2" short of your total desired length), because the toe won't be as long.
- If you prefer to work with just four double-pointed needles, you can still follow these guidelines; just treat Needle 2 and Needle 3 as a single needle (i.e., one of your needles will have twice as many stitches as the other two).
Q&A
Q: How do I choose needle size?
A: If you find yourself with a ball of yarn and you aren't sure what needle size to knit with, grab your needle gauge, double the yarn and thread it through the closest size hole on the gauge. Whichever hole it fits through most efficiently (neither too tight nor with gaping spaces around the yarn) is the best needle size to use for your first swatch.
Q: Is there a way to tailor a pattern so it fits your shoe size?
A: Measure your foot around the widest part (usually the ball of the foot), then multiply that number by your stitch gauge to get the approximate number of stitches you'll need to start with.
Q: When you slip a stitch on a purl row, do you slip it purlwise or knitwise?
A: You can do it either way. Slipping it purlwise (with the yarn in front) will result in a somewhat different look from slipping it knitwise (with the yarn in back).


