


How to Make the Patchwork Wall Art of Your Dreams
Liven up a boring, plain wall with handmade wall art. Decor this to-die-for never seemed so easy.

Say goodbye to big box store artwork and hello to DIY design. Opt for this one-of-a-kind decorative wall art piece handmade by ... that’s right, you! Some reclaimed wood, plywood and a lovely stain are just about all it takes to make this must-have masterpiece.
Materials Needed
- (1) 1x3 x 10’ pine board
- tape measure
- pencil
- miter saw
- nail gun + 1-1/4” nails
- wood glue
- (1) 1x2 x 11’ reclaimed or distressed lumber (for four 30” pieces)
- (1) 30” x 30” piece of plywood
- sandpaper
- wood stain (we used Minwax Simply White, Minwax True Black and Minwax Dark Walnut)
- paint brush
- clean white cotton rags
- mounting hardware
- safety gloves and glasses
Cut Triangles and Frame

Kimberly Davis
Begin by setting the miter saw to a 45-degree angle. Trim off the square end of the board and proceed to cut equal-sized triangles by sliding the board and flipping it over with each cut. Continue cutting until you have 16 uniform triangles. Use the 45-degree angled miter saw to cut the reclaimed lumber into four 30-inch sections for the frame. Coat with a layer of polyurethane.
Pro tip: Don't forget to always check old wood for lead paint and use proper safety gear when sanding and cutting.
Sand

Kimberly Davis
Use a fine grit sandpaper to sand all triangles and the plywood base. Always sand with the grain and wipe with a clean rag to remove any dust.
Stain

Kimberly Davis

Kimberly Davis
To add visual depth and interest, we chose to use three different stains on the triangles, but you could use as many or as few as you prefer. We stained eight triangles in Minwax Simply White, six triangles in Minwax True Black and two triangles plus the plywood base in Minwax Dark Walnut.
Allow the stain to penetrate the wood for five to seven minutes before wiping away excess with a cloth.
Find Center

Kimberly Davis
Use a tape measure and pencil to find and mark the center of the plywood backdrop.
Place Your Pieces

Kimberly Davis

Kimberly Davis

Kimberly Davis
Beginning at the center and working out, place each triangle in its correct location. Use a liberal amount of wood glue on the back of each piece, and tack it down with the nail gun before moving on to the next triangle. Once all the triangles are in place, attach the frame using the same glue-and-tack method.
Display

Kimberly Davis
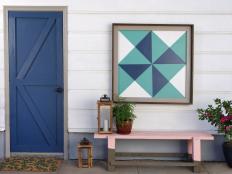
Once the glue is dry, the artwork is ready for display. This is a heavy piece, so be sure to hang with weight-appropriate hardware. Now, simply enjoy your new piece of art, and wait for the compliments to roll in.

Kimberly Davis


