Photo: Rachel Whyte.
From:
Fixer Upper
1 / 55
Great Things in Small Packages
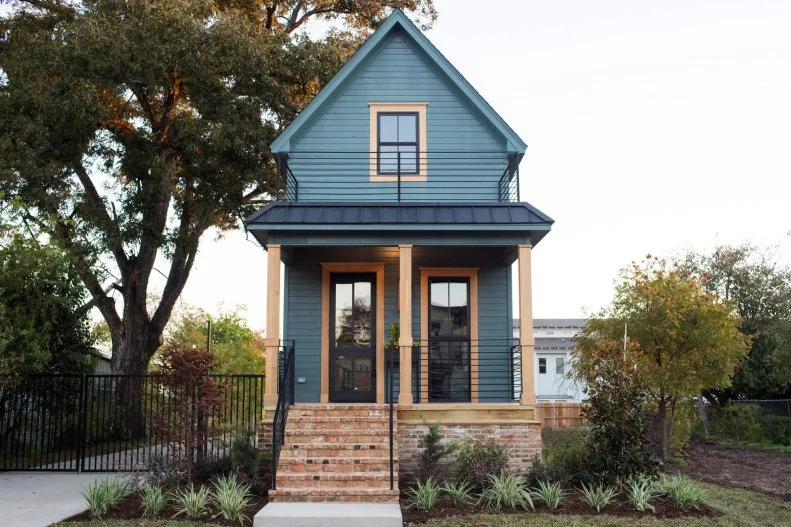
"What's fun about smaller spaces is that it really challenges your creativity and makes you maximize the space that you've got," says Joanna. "From the beginning, the tiny shotgun house had lot of big challenges, but in the end, the reward was huge. Every design element that we got to incorporate really stood out. We love this house."
More photos after this Ad
Photo: Rachel Whyte.
From:
Fixer Upper
2 / 55
Lofty Views
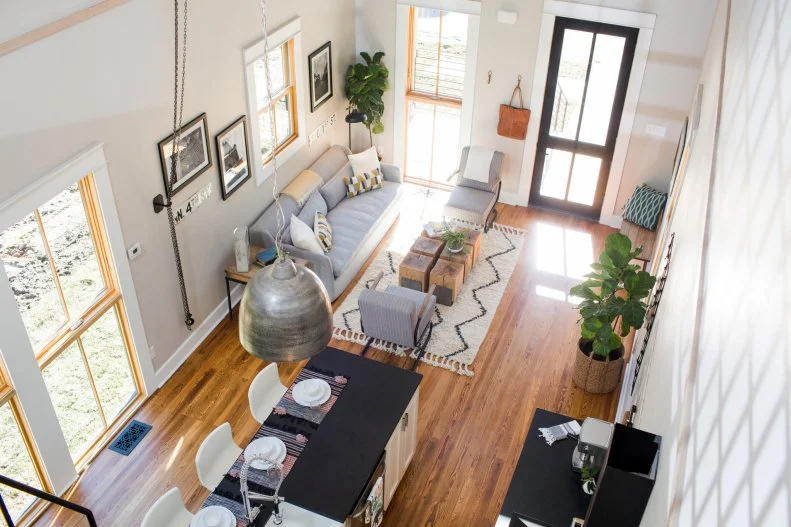
The renovation included an addition above the original roofline, enabling the "tiny house" to have a main living area with dramatic 20-foot ceilings as well as a new multipurpose loft offering this view onto the living room and kitchen below.
More photos after this Ad
Photo: Rachel Whyte.
From:
Fixer Upper
3 / 55
Playing With Perceptions
The footprint the new kitchen was tight, but carefully thought-out design helps create the impression of a much larger space. Oversized windows that start at the floor, vaulted ceilings, an oversized ceiling fan in a modern design and lots of natural light are all factors that contribute to an open and roomy feel.
More photos after this Ad
Photo: Rachel Whyte.
From:
Fixer Upper
4 / 55
Creative Solutions
A challenge with adding the loft was where to locate stair access. Chip came to the rescue with specialized retractable stairs that can be raised and lowered drawbridge style. When the loft is not being used, the stairs can be raised to a storage position where they hang suspended about 10 feet above the kitchen.
More photos after this Ad
Photo: Rachel Whyte.
From:
Fixer Upper
5 / 55
Gathering Place
Since space constraints prohibited a full-fledged dining room, Joanna's design plan took that into account and included a generous sized kitchen island with bar seating where meals can both be prepped and served.
More photos after this Ad
Photo: Rachel Whyte.
From:
Fixer Upper
6 / 55
Coordinating Details
The original pine floors in the main living area were restored and beautifully refinished. All of the new windows in the house are wood. Joanna opted to leave the window frames in an unpainted finish, creating a visual tie with the wood floors.
More photos after this Ad
Photo: Rachel Whyte.
From:
Fixer Upper
7 / 55
Room Bonus
Once the ceilings were raised, it was Chip's suggestion to make use of the space above the kitchen and bedroom for a functional loft rather than simply for attic storage.
More photos after this Ad
Photo: Rachel Whyte.
From:
Fixer Upper
8 / 55
New Master
The master suite is at the rear of the house in the space that was previously the kitchen. The master bath and a small laundry area are located just behind.
More photos after this Ad
Photo: Rachel Whyte.
From:
Fixer Upper
9 / 55
Meet the Bells
Homeowners Jessie and Cameron Bell check out the kitchen and living area in their newly renovated home. The Bells had been married for three years but were purchasing their first home together. They liked small, cozy spaces and both were interested in an older home with character in an appealing neighborhood. Their total budget, including renovations, was $131,000. Jessie and Cameron were adventurous and not afraid to take on a project that was challenging or unusual. On that last point, they got their wish.
More photos after this Ad
Photo: Rachel Whyte.
From:
Fixer Upper
10 / 55
BEFORE
Despite its rough appearance, the Bells were intrigued by this authentic shotgun style house built in 1920 – one of only two such houses still standing in Waco. Cameron had spent time in southern Louisiana where shotgun houses were once fairly common, so he was familiar with their history and a fan of the style. This house was listed at only $28,000, but it was clearly in distressed condition both inside and out and would require extensive repairs and upgrades.
More photos after this Ad
Photo: Rachel Whyte.
From:
Fixer Upper
11 / 55
AFTER
The total reimagining of this shotgun house – serendipitously paralleling in some ways the current 'tiny house' movement in home building – encompassed major modifications to both the interior and exterior. The exterior features new steps and wraparound brick skirt constructed using antique bricks, new wood columns and trim in unpainted finish, iron railing, a metal roof and bold dark-green exterior paint. The most substantial modification, though, was raising the roofline, facilitating the upstairs loft and dramatic 20-foot ceilings.
More photos after this Ad
Photo: Rachel Whyte.
From:
Fixer Upper
12 / 55
Demolition + Relocation
The shotgun house project was an even more monumental undertaking than even Chip and Joanna first imagined. Before the purchase could be finalized, a real estate developer bought the entire block where the house was standing – with the intent on demolishing all of the existing houses to make way for new construction.
More photos after this Ad
Photo: Rachel Whyte.
From:
Fixer Upper
13 / 55
Demolition + Relocation
Chip was able to negotiate a deal with the developer who was willing to turn over the house at no cost – provided that it could be relocated to another site. The Bells agreed to the relocation plan and ultimately were able purchase a lot in an up-and-coming neighborhood near downtown Waco for around $31,000. Here, Joanna pitches in on demo day after the structure was moved to it's new site.
More photos after this Ad
Photo: Rachel Whyte.
From:
Fixer Upper
14 / 55
Demolition + Relocation
Chip accepted the formidable challenge of moving the house, something he had never done before. For the relocation, the house had to be lifted from its foundation, the roof removed in order to clear power lines while the structure was in transit, and the gas lines, electricity and plumbing disconnected. The entire structure was then trailered to the new location and secured on a newly poured concrete slab. Once on its new pier-and-beam foundation, the house was essentially gutted and reframed, including addition of a new upper floor and a raised roof. So, in the end, the house itself was free, but moving the structure cost $5,000, and the cost of the new lot was $31,000 – leaving the Bells with a budget of around $95,000 for renovations. That amount can go a long way in 700 square feet.
More photos after this Ad
Photo: Rachel Whyte.
From:
Fixer Upper
15 / 55
Kitchen, BEFORE
This room in the center section of the existing structure was formerly used as the bedroom but, in the revised floor plan, would become part of the kitchen.
More photos after this Ad
Photo: Rachel Whyte.
From:
Fixer Upper
16 / 55
Kitchen and Living Room, AFTER
The front portion of the house was opened up by removing the wall that separated the living room from the former bedroom, making way for a new combination kitchen/living area.
More photos after this Ad
Photo: Rachel Whyte.
From:
Fixer Upper
17 / 55
Kitchen, AFTER
The new kitchen has a clean, straightforward design and features white oak cabinets, black countertops and open shelving.
More photos after this Ad
Photo: Rachel Whyte.
From:
Fixer Upper
18 / 55
Kitchen, AFTER
Other key elements in the kitchen include a custom vent hood and industrial style pendant light in galavanized metal finish.
More photos after this Ad
Photo: Rachel Whyte.
From:
Fixer Upper
19 / 55
Kitchen, Detail
Visually the kitchen design was kept simple, with the clean lines and neutral palette highlighting the Bells' vintage style refrigerator in ice blue finish.
More photos after this Ad
Photo: Rachel Whyte.
From:
Fixer Upper
20 / 55
Kitchen, Detail
More photos after this Ad
Photo: Rachel Whyte.
From:
Fixer Upper
21 / 55
Kitchen, Detail
More photos after this Ad
Photo: Rachel Whyte.
From:
Fixer Upper
22 / 55
Kitchen, Detail
More photos after this Ad
Photo: Rachel Whyte.
From:
Fixer Upper
23 / 55
Kitchen, Detail
More photos after this Ad
Photo: Rachel Whyte.
From:
Fixer Upper
24 / 55
Laundry Room, AFTER
The new laundry room is located just behind the master bedroom and adjacent to the master bath.
More photos after this Ad
Photo: Rachel Whyte.
From:
Fixer Upper
25 / 55
Living Room, BEFORE
Aside from removing the back wall to open up the space, Joanna's recommendations for the living room included removing the carpet and restoring the hardwood floors, removing the paneling to expose shiplap, adding fresh paint and new light fixtures.
More photos after this Ad
Photo: Rachel Whyte.
From:
Fixer Upper
26 / 55
Living Room, AFTER
The living room design, as in other areas, is kept simple and uncluttered to make the most efficient use of the small area. Large windows in unpainted wood finish help make the space feel more open and provide dramatic views.
More photos after this Ad
Photo: Rachel Whyte.
From:
Fixer Upper
27 / 55
Living Room, BEFORE
More photos after this Ad
Photo: Rachel Whyte.
From:
Fixer Upper
28 / 55
Living Room, AFTER
More photos after this Ad
Photo: Rachel Whyte.
From:
Fixer Upper
29 / 55
Living Room, Detail
More photos after this Ad
Photo: Rachel Whyte.
From:
Fixer Upper
30 / 55
Living Room, Detail
More photos after this Ad
Photo: Rachel Whyte.
From:
Fixer Upper
31 / 55
Front Foyer, AFTER
More photos after this Ad
Photo: Rachel Whyte.
From:
Fixer Upper
32 / 55
Upstairs Loft, AFTER
Creating the multifunctional loft space above the new kitchen and bedroom adds around 400 square feet to the home's total interior area.
More photos after this Ad
Photo: Rachel Whyte.
From:
Fixer Upper
33 / 55
Upstairs Loft, AFTER
Depending on how it's furnished, the loft can function as a den, office or extra bedroom.
More photos after this Ad
Photo: Rachel Whyte.
From:
Fixer Upper
34 / 55
Upstairs Loft, AFTER
The upstairs loft offers an impressive view into the living space below as well as onto the backyard from this large window. Joanna lit the space with an industrial style pendant and highlighted the window with decorative sconces.
More photos after this Ad
Photo: Rachel Whyte.
From:
Fixer Upper
35 / 55
Loft, Detail
In the loft, Joanna kept the design simple to allow the home's structural features, like the iron railing and wood floors, to take the spotlight.
More photos after this Ad
Photo: Rachel Whyte.
From:
Fixer Upper
36 / 55
Loft, Detail
More photos after this Ad
Photo: Rachel Whyte.
From:
Fixer Upper
37 / 55
Loft, Detail
More photos after this Ad
Photo: Rachel Whyte.
From:
Fixer Upper
38 / 55
Loft, Detail
Wall mounted vintage suitcases make for a unique take on open shelving.
More photos after this Ad
Photo: Rachel Whyte.
From:
Fixer Upper
39 / 55
Master Bedroom, BEFORE
This space, formerly the kitchen, would become the new master bedroom. The wood flooring in this section of the house was rotted and beyond saving, so Chip replaced it with wood salvaged from vacant homes nearby that were slated for demolition.
More photos after this Ad
Photo: Rachel Whyte.
From:
Fixer Upper
40 / 55
Master Bedroom, AFTER
The new bedroom is located at the rear of the house and features rich blue wall paint and all-wood doors custom made by a local cabinet maker.
More photos after this Ad
Photo: Rachel Whyte.
From:
Fixer Upper
41 / 55
Master Bedroom, AFTER
A low bed frame and oversized mirror both help to make the small bedroom feel bigger.
More photos after this Ad
Photo: Rachel Whyte.
From:
Fixer Upper
42 / 55
Master Bedroom, Detail
More photos after this Ad
Photo: Rachel Whyte.
From:
Fixer Upper
43 / 55
Master Bedroom, Detail
More photos after this Ad
Photo: Rachel Whyte.
From:
Fixer Upper
44 / 55
Master Bedroom, Detail
More photos after this Ad
Photo: Rachel Whyte.
From:
Fixer Upper
45 / 55
Bathroom, BEFORE
More photos after this Ad
Photo: Rachel Whyte.
From:
Fixer Upper
46 / 55
Master Bathroom, AFTER
More photos after this Ad
Photo: Rachel Whyte.
From:
Fixer Upper
47 / 55
Master Bath, AFTER
The new master bath features a twin vanity with concrete top and lower cabinets made from reclaimed wood.
More photos after this Ad
Photo: Rachel Whyte.
From:
Fixer Upper
48 / 55
Master Bath, AFTER
The house may be tiny, but the walk-in shower with gray concrete tile is roomy and spa-worthy.
More photos after this Ad
Photo: Rachel Whyte.
From:
Fixer Upper
49 / 55
Master Bath, Detail
More photos after this Ad
Photo: Rachel Whyte.
From:
Fixer Upper
50 / 55
Master Bath, Detail
More photos after this Ad
From:
Fixer Upper
51 / 55
Behind the Scenes - The Reveal
More photos after this Ad
From:
Fixer Upper
52 / 55
Behind the Scenes - The Reveal
The Bells prepare to see their newly renovated (and newly relocated) tiny house for the first time.
More photos after this Ad
Photo: Rachel Whyte.
From:
Fixer Upper
53 / 55
Group Pic
Chip and Joanna with homeowners Cameron and Jessie Bell in the kitcen of their newly restored historic shotgun house.
More photos after this Ad
From:
Fixer Upper
54 / 55
Behind the Scenes - A Shout Out to the Crew
More photos after this Ad
Photo: Rachel Whyte.
From:
Fixer Upper
55 / 55
Finis
If you enjoyed this unconventional Fixer Upper project, be sure to check out "The Barndominium" – an amazing barn conversion.
And if you'd like to know more about historic shotgun houses, check out this renovation project from HGTV's Small House, Big Easy.