10 Tips for Repurposing a Vanity
Before turning a dresser, console or chest into a one-of-a-kind bathroom vanity, be sure to pay close attention to these 10 designer tips.
Related To:
Give Your Bathroom Salvaged Style
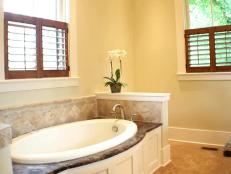
In order to give this remodeled Atlanta bathroom one-of-a-kind designer flair, a dining room console table was repurposed as a dual sink vanity. Although many designers suggest repurposed case goods into custom vanities, there are important factors to keep in mind before doing so.
Get Proper Dimensions
It's important to know the height of the dresser, console or chest before considering repurposing it. If the piece is too low, it will be impractical to use with a sink due to having to bend down to reach water. However, if the top surface of a dresser, console or chest is too high, it will be difficult to reach once a vessel sink is added. Two common dimensions which work well are standard vanity height which is 30", and standard counter height which is 36". Vanity height is ideal for homeowners under 6' in stature while counter height is ideal for those over 6'.
Seal It Right
One of the most important steps in ensuring longevity of a repurposed bathroom vanity is the proper sealing of a dresser, console or chest's top. All that's needed is a quart of polyurethane and a 3 to 6 inch paint brush. With the surface properly wiped and dry, add two coats of polyurethane evenly, allowing at least one hour drying time between each coat. Polyurethane is odorous and sometimes takes up to 5 days for proper deodorization. Excellent, non-odorous or less odorous options include shellac and a polyurethane/acrylic blend.
Fit Plumbing Fixtures
In order for a dresser, console or chest to work properly, its interior must be properly adjusted to fit plumbing fixtures such as P-traps, hoses and valves. First, if the back panel of the piece of furniture is made from a light, decorative material such as cardboard, luan or particle board, consider removing it completely. Next, if the back is solid wood or metal, be sure to take proper measurements for placement, then cut a square or rectangle large enough to fit all plumbing elements using a jigsaw. It’s also important to remove any drawers which may impede space needed for P-traps, but transfixing the drawer front to the body of the dresser with wood screws for a more finished look. On the average, P-traps for bathroom sinks require at least 12 inches of depth for proper installation. Before deciding on the proper piece of furniture for repurposing, make sure its interior dimensions are deeper than 12 inches.
Check Sink Measurements
Before choosing a vessel sink, it's important to know its dimensions. In order for a vessel sink to fit for functional and aesthetic reasons, it's best to ensure between 3 to 6 inches of top surface both in front and in back of the vessel sink. This will keep it in check proportionately with the dresser, console or chest while offering enough space for toothbrushes, combs, etc. To seal the space along the bottom of the vessel sink add a bead of silicone or caulk in a slow, controlled manner.
Ensure Correct Faucet Placement
Two of the most important factors when choosing the proper faucet are identifying how many holes are needed for its plumbing, and ensuring the proper placement for attaching the P-trap and drain. If the dimensions are not confirmed before drilling holes with a paddle bit, the top of the furniture piece could be damaged by additional holes added to re-situate the plumbing and faucet.
Install Extra Outlets
Many of today's bathroom accessories are re-chargeable, and it's wise to keep them hidden from view until ready for use. What better place to store them than inside of the vanity? Consider relocating or adding an outlet box along the wall directly behind the repurposed dresser, console or chest. Furniture without back panels involves the outlet box being installed directly to the wall. Those with back panels will require a jigsaw to cut through the wood or metal so that the face plate can be screwed inside of the cabinet and also attached firmly to the outlet box.
Add a Toilet Paper Holder
As wall-mounted bathroom tissue dispensers continue to be replaced by free-standing, roll-concealing towers, finding alternative places to mount them out of sight remains an issue for many homeowners. To keep the dispenser within arm's reach but out of view, consider mounting it to the side of the vanity closest to the commode using screws and a drill.
Change Out Hardware
Never underestimate the power of hardware. If an existing dresser, console or chest is equipped with pulls, knobs or hinges which don't fit the style of your bathroom, simply change them out for something more aesthetically correct. Many designers suggest choosing classic finishes which defy trend such as antique brass, aged bronze or polished pewter.
Layer Finishes
When changing hardware on a repurposed dresser, console or chest, be sure to keep in mind how its finish will coordinate with other elements within the bathroom. Designers often recommend sticking within the same color or material family, yet letting the finishes vary slightly for a layered look. This vanity was outfitted with brown-toned hardware in a variety of finishes: aged bronze knobs, a raw steel mirror frame, and oil rubbed bronze accessories.
Incorporate Your Personal Style
Many times a homeowner may find a dresser, console or chest perfect in scale and proportion, yet lacking in style or ornamentation. An excellent way to update doors is with mirrors and trim. In order to do this, you'll need to determine if the door fronts are in check with standard size mirrors, then take into consideration how any trim will fit: directly on top of the mirror or around it. In order to attach mirror correctly, liquid bonding adhesive must be added directly to its back, then placed onto the door front and held in place with painter's tape for several hours. Keep in mind that a custom-cut mirror will run approximately $35-$45 per door front whereas standard sizes will usually cost less than $20 each.