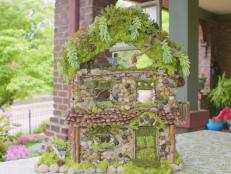
Make a Magical Forest Fairy House
Add a little clay to a hollow gourd to craft a beautiful fairy house perfect for garden display.

By:
Ruth Meharg
Related To:
Garden Fairy House
Little fairy houses add the perfect touch of whimsy to any garden. This project can be done by older kids without much supervision, but it's also a great project for parents and children to enjoy together.
Supplies
To build your fairy house you will need a dried, hollow gourd and some polymer clay. You can hollow, bleach and dry your own gourd if you'd like, but it's quick and easy to buy a pre-dried one at your local gardening store. (They are often sold as bird houses) You'll also need a strong, waterproof super glue and some aluminum foil.
Mixing Colors
Polymer clay comes in many colors, but you don't need to buy them all to get the colors you need. It is easy to mix colors by kneading bits of them together between your fingers. We mixed all of these colors using only six colors of clay, pink, orange, green, blue, brown and white. Of course you can use any color scheme you'd like and most colors can be mixed by just using red, yellow, blue and white.
Making a Door
Every fairy house needs a beautiful door to welcome little fairies inside. To create this door you'll need to flatten out a sheet of clay about a quarter inch thick. You can roll out the clay or just flatten it with your fingers. Cut out your basic door shape from that sheet. We created a curved door from light green clay. Roll out a series of different colored clay ropes to add details and a door frame. We used thin orange and dark green ropes to add detail to the door, and thicker brown ropes to create the door frame. A little orange ball makes a perfect door knob.
Shuttered Window
Since fairies love the outdoors, they usually like their homes to have windows. To create our window and shutters we started out with a thin square of blue to look like reflected sky. Cross two thin ropes of darker blue at the center of your square to create panes and line the perimeter of your square with the same. Add thicker ropes of brown, using the same colors you used for your door frame, around your window. Create shutters with rectangle sheets and thin ropes, using the same colors you used for the doors.
Shingles
This organic looking shingles are very easy to make. Simply take a pea sized piece of clay and start flattening it between your fingers, stretching it out lengthwise. Make the pieces as thin as possible and let the edges take on an organic shape. Layer them together in sections for baking.
Roses
Now that you have the basics of your fairy house put together you can begin to add embellishments. Climbing roses are beautiful and easy to make. Pinch out a long and thin sheet of clay and roll it up lengthwise to create a spiraled rose. Create leaves by gently shaping bits of green clay between your fingers.
Lantern
You can add one more welcoming touch to your home with a tiny lantern. Create the main body of the lantern by stacking a yellow, an orange and a white ball together. Use your fingers to blend the colors gently into one solid shape but don't let the colors mix completely. Add a little brown cone on the top and bottom with some thin brown ropes to connect them. A little bit of orange trim on the top is the perfect finishing touch.
Baking Prep
To ensure your fairy house has a long life you'll need to bake your clay before permanently attaching it to the gourd. To do this cover the section of the gourd where your accessories will go with aluminum foil. Place the clay item on top of the foil and press it down so that it takes the shape of the gourd. Gently lift the clay piece and the foil off of the gourd, being careful to keep the shape of the gourd underneath.
Baking the Clay
Wad up some foil to imitate the shape of the gourd under your pieces of clay. You want the clay to keep the shape of the gourd even while it bakes, so place the foil under it to support it. Follow the directions on your polymer clay to bake it. Be sure to let the clay cool before handling.
Gluing Together
Once all of your pieces are baked and cooled you can glue them onto your gourd. Choose a heavy duty glue that won't get washed away if your gourd gets rained on. If you want add extra longevity to your fairy house seal it with a clear coat of polyurethane once the glue is dry.
Enjoy!
Your fairy house is now complete! All that's left is to find the perfect place for it in the garden. You can build little pebble paths to your fairy house, or hide it in a secret corner of the garden for adventures to stumble upon.