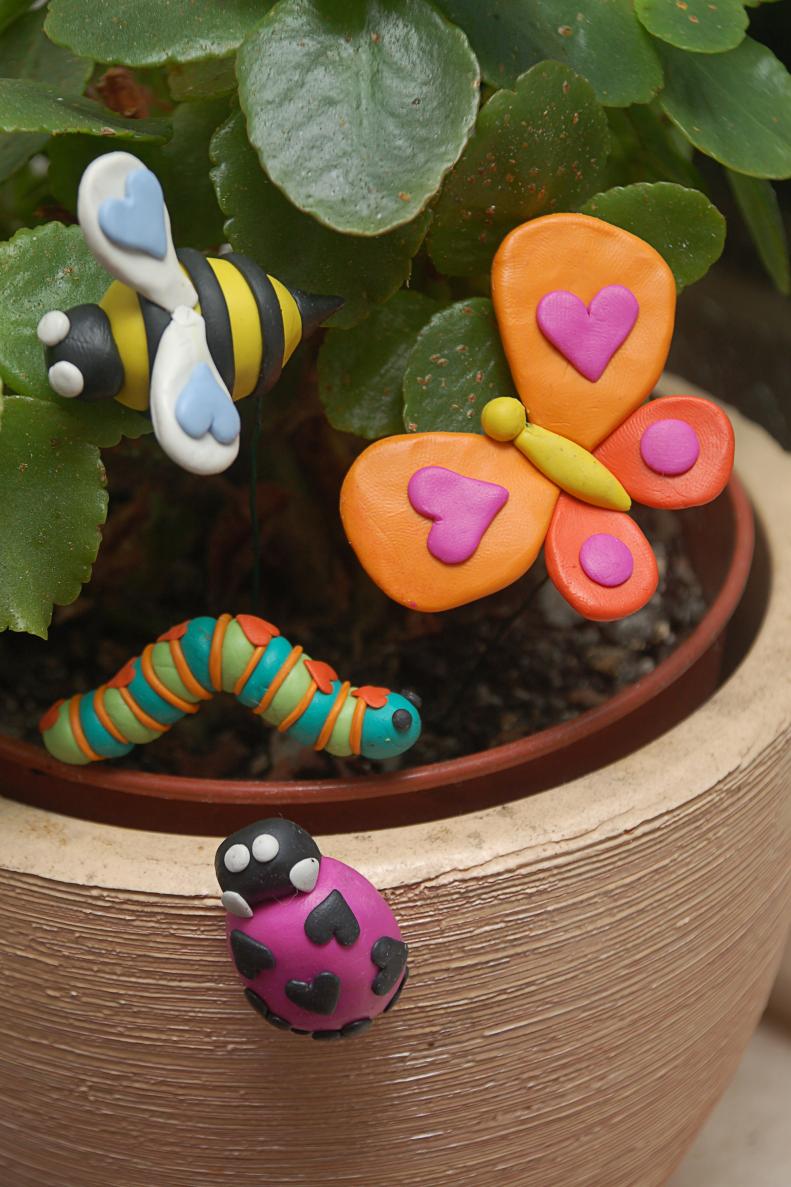
DIY Garden Love Bugs
These cute Love Bugs are easy to make with this simple tutorial and are sure to brighten your garden.
Garden Love Bugs
This friendly little love bugs are sure to brighten up your potted plants or garden. These easy instructions make them simple and fun to create. They are a wonderful treasure to find hidden among the plants for children and adults alike.
Clay
To create your love bugs you will need a variety of colors of polymer clay. It can be found in a bright range of colors in many different brands and hardens after being baked in the oven. Be sure to follow the instructions for baking that come with your clay.
Butterfly Shapes
To create your butterfly you will need a few simple shapes. First a log or hot dog shape for the body, and a sphere for the head. You will need two large teardrop shapes for the top wings, and two smaller teardrops for the bottom wings. Then you will need decorations for your wings. We used two hearts and two dots, but feel free to try other shapes.
Making Pieces Stick
When putting together your different pieces of clay, you want to be sure that they stick together well. To make this happen you need to rough up the surfaces that will stick together. Scratch the object you will place and the area where it will be placed with a toothpick or other pointed object before placing them together. Press firmly with your fingers to strengthen the bond. This is especially important with larger pieces.
Create Your Butterfly
To put your butterfly together, gently press the wing shapes together at the back of the body shape. Place the head on one end, pressing it onto the body between the wings to keep it secure. Then place your decorations on your wings and press firmly.
Bee Shapes
To create your bee you will need a fat yellow teardrop shape for the body. A black half-sphere will make a great head, and a black cone is a perfect stinger. You will need three thin logs of black clay for your bee's stripes. two white spheres will be perfect eyes and two flattened white teardrop shapes will create the wings. Create two light blue hearts for the wings to turn your bee into a love bug.
Mixing Colors
Sometimes you won't be able to buy the perfect color of clay, and you'll need to mix your own. To create a light blue mix white clay with a little bit of blue clay. Knead it with your hands until the color is fully integrated.
Create Your Bee
Begin your bee by attaching the head to the flattened end of the body. Press the stinger onto the pointed end and gently smooth it down with your finger. Wrap the black stripes around the body and gently press to flatten. Attach the hearts to the wings and then press the tips of the wings to the bee's body. Finish by placing the eyes at the top of the head.
Ladybug Shapes
To make your ladybug you need a pink half sphere for your ladybug's body and a smaller black half-sphere for your ladybug's head. You will also need little black heart shapes for your ladybug's spots, and two small white triangles for the spots on her head. Two small white spheres for eyes will complete your ladybug!
Create Your Ladybug
Press the ladybug's head firmly onto one end of its body. Arrange your ladybug's heart spots and press down to secure. Place the white triangles on either side of the head, near the body and then add the eyes to the front.
Caterpillar Shapes
To create your caterpillar you will need two different colors for the body, for example a light and dark green. Shape them into thick, round disks. About 6 of each color will create a good sized caterpillar, but you can add more if you want a longer one. Create thin logs of orange clay for stripes and small hearts for spots. Roll two small black spheres for eyes and you have all the parts you need for a lovely caterpillar!
Create Your Caterpillar
To create your caterpillar stick the rounded disks together in a row, alternating color as you go. Bend the body gently upwards in the middle to make it look like your caterpillar is inching along. Place the thin orange strips between each alternating color and place your hearts along the back of your insect. Add the little black eyes to his front end for the finishing touch.
Baking Your Bugs
When you have finished sculpting your bugs gently push a piece of wire into the thickest part of the clay. Create a bend at the end of the wire that will go into your bug to be sure that it stays securely in place. Bake your clay with the wire inside according to the instructions that come with the clay. Be sure to let the clay cool completely after baking before handling. The clay and the wire will be hot at first.
Bend the Wire
Gently bend the exposed end of the wire inwards to insure that it doesn't accidentally poke someone. We created a little heart at the end of ours, but a simple loop will work just as well.
Place your Love Bugs
All that's left is to arrange your love bugs in the perfect spot! Try using the bugs to decorate your pots by bending the wire around the edge to suspend your bug in the perfect place.
Planted Love Bugs
Stick your love bugs anywhere that needs a little extra brightness. Add some color to your indoor plants during the winter, and move your bugs outside to the garden in the summer. Use them to help you mark plants or to line your walkway.