The Best Vegetables for Your Garden
You can grow healthy and delicious tomatoes, sweet corn, crunchy carrots and more in your own backyard. Discover the best veggies for home gardens, plus learn how to grow them.

Related To:

Photo By: Shutterstock/Phil Darby
Photo By: Nancy Ondra
Photo By: Johnny’s Selected Seeds at JohnnySeeds.com
Photo By: Nancy Ondra
Photo By: ReneesGarden.com
Photo By: Derek R. Trimble
Photo By: Burpee
Photo By: Gardener’s Supply Company at Gardeners.com
Photo By: Julie Martens Forney
Photo By: National Garden Bureau
Photo By: Mick Telkamp
Photo By: Shutterstock/wasanajai
Photo By: W. Atlee Burpee and Co.
Photo By: Shutterstock/Hans-Engbers
Photo By: Image courtesy of Rinne Allen
Photo By: Shutterstock/Jesus Kelly
Photo By: John Black
Photo By: Shutterstock/Yuris
Photo By: All-America Selections
Photo By: Leesa Morales
Photo By: Mary Beth Shaddix
Photo By: Julie Martens Forney
Photo By: National Garden Bureau
Photo By: ReneesGarden.com
Photo By: Shutterstock/HVPMdev
Grow Your Own Veggies for Fresh Taste and Great Flavor
Homegrown tomatoes are juicy and just-picked corn, boiled in water with a little salt, is sweet and tender. Many veggies are delicious and easy to grow, but the best vegetables for your garden are the ones you and your family will actually eat, so choose your favorites.
First, check out the USDA Gardening Zone Map. Whether you plant seeds or young plants, they need time to mature before your first frost — although crops like collards don't mind some cold, and others, like cabbage, can survive the winter.
Before you plant, do a soil test or have your soil tested by your extension service so you'll know if it needs amendments. Then click through our list of the best vegetables for your garden and learn how to grow a bountiful harvest.
Sweet Potatoes
Sweet potatoes are started from slips (shoots from mature plants), not seeds. Order them by mail or make them from store-bought potatoes, although the varieties won't necessarily be labeled.
To make your own slips, wash the sweet potatoes and cut them into big pieces. Put each piece in a jar of water; use toothpicks to hold half of it above the water. Keep the slips in a warm spot and leafy sprouts will appear in a few weeks. Next, twist each sprout off the sweet potato and submerge the bottom half in a bowl of water until the roots are an inch long.
Plant slips in loose, fast-draining soil, spaced 12 to 18 inches apart. Cover the bottom half with soil and leave the top half uncovered. Thoroughly water the slips and water again daily for the first week. Water every other day in the second week. Harvest when indicated on the packing sheet that came with the slips. Most varieties take 90 to 120 days to mature. Keep reading to learn how to dig, store and cure your delicious sweet potatoes.
Learn More: How to Plant and Grow Sweet Potatoes
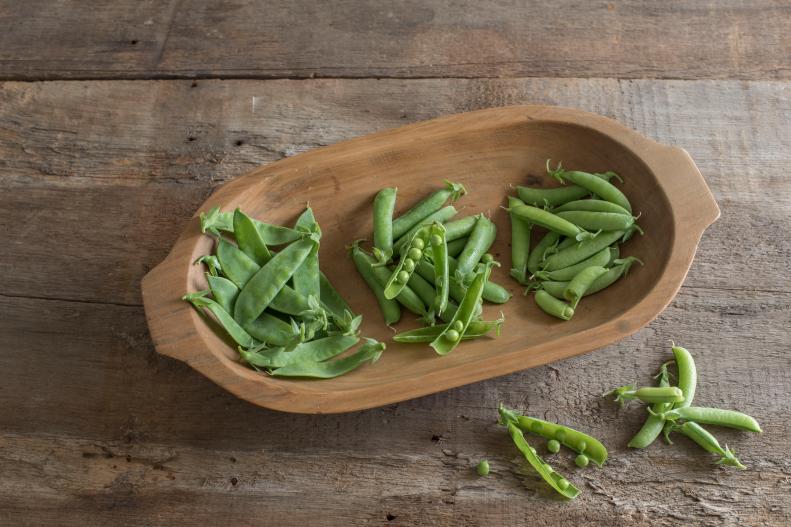
Spring Peas
Snow peas, garden peas and sugar snap peas (left to right) are called spring peas. Remove the strings, and you can eat the whole pods of snow and sugar snap peas. Garden peas, also called sweet peas, shelling peas or English peas, are harvested when the pods feel full and firm, and they're shelled before eating.
Plant peas four to six weeks before your last spring frost and sow again six to eight weeks before your first fall frost. Peas need well-draining soil mixed with organic matter in a site that gets full sun in cool climates and some afternoon shade in warmer climates. Plant 1 to 1-1/2 inches deep and 1 inch apart in rows spaced 18 to 24 inches apart. Keep the soil evenly moist once the peas are up. Most varieties are ready to pick 60 to 70 days from sowing. Want to know about trellising your plants and different varieties of peas? Read our growing guide.
Learn More: How to Grow Sugar Snap Peas
Potatoes
Potatoes are the most popular vegetable in the US and some of the best vegetables for your garden. Start them from seed potatoes (small pieces of mature tubers) with one or two buds per piece. Plant in early spring, a few weeks before your last frost date but after all the danger of a hard freeze has passed. If you garden in a freeze-free region, plant in fall or winter.
Dig a furrow and keep the extra soil beside it. Put the seed potatoes in the bottom, eyes up, 2 to 3 inches deep. Space them 12 inches apart in rows 3 to 4 feet apart. As the plants grow, they'll develop stolons (stems that curve back into the ground). Hill the potatoes (use a hoe to pull the extra soil over the stolons) so the tubers are in complete darkness. Most varieties are ready to harvest three or four months after planting.
Click below to learn more about hilling, harvesting and growing potatoes in containers.
Learn More: Planting, Growing and Harvesting Potatoes
Radishes
Radishes are some of the best vegetables for your garden in cool weather. In fall, plant radish seeds four to six weeks before the first expected frost. In spring, plant them four to six weeks before the last spring frost.
Loosen your soil at least 6 to 8 inches deep and work in compost or well-rotted manure and an all-purpose fertilizer. Sow the seeds in full sun and space them 1 inch apart in rows 1 foot apart. Cover them with about 1/2-inch of soil and water gently. Thin the seedlings to every 2 or 3 inches. Plant again every 10 days for a continuous harvest. Slugs and other pests ruining your radishes? See below to find out how to protect them.
Learn More: Planting and Growing Radishes
Garlic
Garlic is another one of the best vegetables for your garden because it's easy to grow and can be used to flavor so many dishes. In fall, plant softneck types if your winters are mild. Plant hardneck types if the winters are cold. Elephant garlic, a third type, is more closely related to leeks.
Grocery store bulbs are often treated to prevent sprouting, so buy via mail order or from a garden center and plant about the same time you'd plant spring bulbs. Garlic needs excellent drainage and full sun. Work your soil 6 to 10 inches deep and loosen it with plenty of organic matter. Rich, sandy loam is ideal. In northern climates, dig a trench 2 to 4 inches deep. In southern climates, dig 1 inch deep. Put bulb food in the bottom of the trench and space the cloves 4 to 6 inches apart, pointed tips up. Space elephant garlic bulbs 6 to 8 inches apart.
Backfill the trench so the tips are about 2 inches below the soil. Water and mulch. Garlic needs an inch of water a week when it's actively growing, but stop watering in June. Before you pull the bulbs, loosen the soil with a garden fork. Read about the kind of garlic you're growing to know when to harvest (there are early, mid-season and late varieties). Now you're ready to cure and store your garlic. Read on to find out how.
Learn More: How Grow Garlic
Bell Peppers
Sweet bell peppers come in many sizes, colors, flavors and shapes. Start the seeds indoors in moist soil eight to 10 weeks before your last expected frost and move them into 4-inch pots when they have their first set of true leaves. Don't transplant them until all danger of frost has passed and nighttime and soil temperatures stay consistently around 50 degrees.
If you plant seedlings, space them as directed for the variety you're growing. Water consistently during hot weather and apply fertilizer as indicated by a soil test.
Cut the peppers from the plants when they're green or let them change colors and become sweeter. Short on garden space? Click on the link to learn how to grow bell peppers in pots and find more growing tips.
Learn More: Planting and Growing Bell Peppers
Asparagus
One of the first spring crops, asparagus is tender and tasty but grows slowly. Started from crowns, it takes three years to get a significant harvest. Seeds take four years. The plants dislike transplanting and can produce for up to 15 years, so pick a permanent location. Plant in full sun and organically rich, easily-draining soil with a pH near 6.5.
Soak year-old crowns in water before planting. Two to four weeks before your last frost, dig furrows 12 inches wide and 5 to 12 inches deep, spacing rows 3 to 6 feet apart. Shape a shallow ridge at the bottom of each furrow and plant the crowns about 5 to 6 inches deep.
Space the crowns 12 inches apart, buds facing up. Spread the roots along the bottoms of the furrows. Cover the crowns with a couple of inches of soil and leave the rest of the excavated soil beside the furrows. When the stalks emerge, cover them with another 3 to 4 inches of soil. Keep covering them as they grow. The furrow should be completely filled by mid-summer.
You can also grow asparagus from seeds. Read our grow guide to learn how, plus get more advice for growing and harvesting asparagus.
Learn More: How to Grow Asparagus
Zucchini
Zucchini is so prolific, you might have to abandon some on a neighbor's doorstep. It's planted from seeds that mature in 45 to 55 days. Sow them as late as mid-July or August for an early fall crop or direct sow in spring when the air and soil temperatures stay consistently around 60 degrees. For a headstart, plant the seeds indoors two to four weeks before your last spring frost, but be aware that zucchinis dislike transplanting.
Zucchini needs well-draining soil amended with compost or manure and full sun. Outdoors, make hills in the soil and plant the seeds 1 inch deep with four or five seeds per hill. Thin emerging seedlings to two to three plants per hill. You can also plant in rows with two or three seeds per holes. Mulch the plants and give them 2 inches of water per week.
If your blooms fall off and you don't get any zucchinis, you may need to pollinate the plants by hand. We'll tell you how, so read our grow guide.
Learn More: Zucchini 101: Planting and Growing This Super Squash
Tomatoes
If an apple a day keeps the doctor away, maybe tomatoes do, too. These nutritious fruits (botanically speaking, tomatoes are fruits) are packed with antioxidants, vitamin C and potassium.
Start tomato seeds indoors six to eight weeks before your last frost. Transplant them or plant young tomato starts in the garden in late spring or early summer when the ground is reliably warm. They need full sun, rich, well-draining soil and 1 or 2 inches of water each week. Fertilize at planting time and just before the tomatoes develop. Mulch and stake the plants as needed.
Click below to learn about many different varieties of tomatoes, how companion plants can help protect them from garden pests and much more.
Learn More: How to Plant, Grow and Care for Tomatoes
Corn
Butter, salt and pepper. That's all you need to enjoy sweet corn on the cob, but you can also remove the kernels to saute, fry or toss into salads, soups and stews. Versatile corn is one of the best vegetables for your garden.
Soak corn seeds overnight before planting them in loose, well-draining soil with a pH of 5.8 to 6.5. Sweet corn needs a lot of nitrogen and phosphorus, so amend your soil as indicated by a soil test. In warm climates, direct-sow the seeds in mid-May for a late August or September crop. In cool climates, sow under glass from mid-April to early May and transplant from late May to early June. Our growing guide, linked below, explains how to start corn indoors and harden off the seedlings.
To direct-sow outdoors, make shallow furrows and plant the seeds 1 to 2 inches deep and 4 to 5 inches apart. Cover them with 1-1/2 inches of soil and water thoroughly. Thin the seedlings when they're 6 inches tall and mound some soil around the stems to support them. Depending on the variety and weather, corn is usually ready to pick in 80 to 95 days after planting. Harvest the ears when the husks are tightly folded and green, the tassels die and milky white sap comes out when you pierce a kernel with your thumbnail.
Learn More: How to Grow Corn
Carrots
To grow carrots successfully, loosen your soil 12 to 16 inches deep. Alternatively, you can grow short varieties or plant in raised beds. Carrots need well-drained soil with a pH of 6.0 to 6.8 and full sun. Work in amendments if indicated by a soil test.
Don't plant until the soil temperature is 70 to 80 degrees. Sow the seeds outdoors, 1/8-inch deep in rows 15 inches apart. Lightly cover them and keep them moist. Thin the seedlings to every 2 to 3 inches when they're an inch high, or as your seed packet indicates. Give them some 5-10-10 fertilizer and an inch of water per week. Some varieties mature about 58 days from planting, while others take 75 to 100 days.
Try different kinds of colorful carrots, like ''Purple Dragon' or deep orange 'Sugar Snax.' We'll tell you more at the link below.
Learn More: How to Grow Carrots
Spinach
Nutritious, fast-growing spinach is among the best vegetables for your garden. Sow the seeds as soon as you can work the ground in very early spring and again every two to three weeks. Stop sowing when the temperature hits 70 degrees (they'll stop germinating then). In the fall, sow six to eight weeks before the first frost; spinach can tolerate frost and temperatures as low as 20 degrees. Gardeners in very warm climates can grow spinach year-round.
Spinach needs full sun and soil loosened at least 1 inch deep. Plant 12 seeds per foot, 1/2 to 2 inches deep. Thin the seedlings to 3 or 4 inches apart when they are 2 inches tall. Water regularly and mulch. Most varieties are ready six to eight weeks from planting. Look for varieties that resist bolting in warm climates; read on for some recommendations.
Learn More: Planting and Growing Spinach
Eggplant
Eggplants grow best when the temperatures are 77 to 95 degrees in the daytime and 70 to 80 degrees at night. They need well-draining soil mixed with organic matter and at least six hours of direct sunlight. Add amendments if your soil test recommends them.
Start seeds indoors eight to 10 weeks before your average last frost in trays filled with a fine-textured seedling mix. Cover them 1/4 inch deep and keep them on a heating mat until the seeds sprout. When they're up, put them under a grow light or near a bright window. Move them into bigger pots when they have a second set of leaves. Harden off your plants for two weeks before transplanting them. Spacing varies by variety, so read your plant tags or seed packets to know how much room they need (usually 2 feet between plants).
Give eggplants at least an inch of water per week. Pinch the top buds to keep them bushy and stake or cage them as needed. Most eggplants mature in 100 to 120 days from seeds or 65 to 80 days from seedlings. Watch for pests like flea beetles; we'll tell you what to do if they show up. We can also suggest companion plants.
Learn More: Planting and Growing Eggplant
Okra
Okra grows fast in warm weather. Soak the seeds overnight or nick them with a file to soften the seed coats. Southerners can direct-sow the seeds, while Northern gardeners can start them indoors four to six weeks before their last average frost date.
Let the nighttime temperatures climb into the 60s before planting okra outside. Plant again in mid-summer if you have a long growing season. Okra needs well-draining soil with a pH of 6.5 to 7. Mix in organic matter and a slow-release fertilizer and plant the seeds 1/2 to 1 inch deep and 3 inches apart in rows 3 feet apart. Thin the seedlings to every 18 to 24 inches and side dress with compost. Mulch when they're 3 or 4 inches tall. Side-dress again when the pods appear and halfway through the growing season.
Okra needs an inch of water per week and matures in 50 to 60 days. Pick the pods while they're young and tender. Consult our guide for tips on freezing and pickling okra to enjoy later.
Learn More: Planting and Growing Okra
Pumpkins
Do you want pies or jack-o'-lanterns? Pick a pumpkin variety that's right for you. Most take 80 to 120 days to mature and have sprawling vines, so give them plenty of time and room to grow. Pumpkins need organically rich, well-drained soil and full sun. Don't grow them where other plants in the cucurbit family have grown to help prevent shared pests and diseases.
Direct sow the seeds or transplant young plants when the soil temperature is consistently above 60 degrees. For seeds, dig holes 1 foot deep and 1 to 3 feet wide. Backfill them with a mixture of the excavated soil and compost or manure. Shape the rest of the mixture into a mound over the hole. Plant three seeds in the middle of each mound and thin to one seedling after a few weeks. Allow 5 feet between mounds or as directed for the variety you're growing. To have pumpkins ready for Halloween, plant from mid-May to mid-June.
Keep the plants watered and apply mulch after the soil temperature reaches 75 degrees. (Pumpkins like warmth, but mulch keeps the ground cooler.)
Start seeds indoors as indicated on your seed packet. Keep the seedlings in a warm, sunny spot or under a grow light and transplant them when nighttime temperatures are consistently in the 60s or above. Read our guide for tips on when and how to harvest your pumpkins.
Learn More: How to Grow Pumpkins
Egyptian Walking Onions
Egyptian walking onions like to travel. These perennials produce clusters of bulblets instead of flowers, like other onions. The bulblets grow on top of stalks until their weight makes the stalks fall over. Then the bulblets can root and grow new plants, sometimes up to 2 feet away from the original.
These onions are planted from bulbs and do best in moist, well-draining soil with a pH close to 6.5. They can take full sun to partial shade. Plant them 2 inches deep and 6 to 12 inches apart in summer or fall, before the first frost. They'll be ready to harvest the following spring. You can also plant in spring, but you won't get flowers or bulblets until the next spring.
Egyptian walking onions are prolific, so you'll probably have plenty to share with friends. Read on for tips on harvesting, propagating and dividing these spicy vegetables.
Learn More: Egyptian Walking Onions
Celery
Celery has a bit of a bad rep, and you may wonder if it's really one of the best vegetables for your garden, but its intense, fresh flavor makes it worth growing. Celery dislikes heat, so for a spring crop, start the seeds indoors 10 to 12 weeks before your last spring frost. For a fall harvest, start the seeds so the seedlings are ready to transplant 10 to 12 weeks before the first fall frost.
Soak the seeds for one or two days before sowing and barely cover them or just pat them down to make contact with your seed starting mix. Don't transplant the seedlings until they're 2 inches tall with daytime temperatures consistently above 55 degrees and nighttime temperatures above 40 degrees.
Celery seedlings need full sun or sun with afternoon shade in hot climates. Plant them in soil amended with organic matter and add more to each hole as you plant. Space the plants 8 inches apart. Most varieties mature in 130 to 140 days.
Keep the seedlings watered, mulch them when they're 6 inches tall and side dress with compost. Apply a balanced fertilizer once during the second and third months of growth. Unless you're growing a self-blanching variety, you'll need to mound soil around the celery stalks to make them sweet and crispy. Don't know how? Read on.
Learn More: How to Grow Celery
Broccoli
Choose a broccoli variety that forms big, central heads or one that develops smaller florets. Varieties range in color from green to purple to yellow, and there are heat- and deer-resistant types.
Start broccoli seeds indoors four to six weeks before your last spring frost or direct-sow for a fall crop in most of the country. In the Deep South, broccoli can grow all winter. Broccoli does best when the temperatures are 60 to 75 degrees but can tolerate moderate freezes. Ask your local extension service when to start broccoli in the fall.
Plant young broccoli plants 2 feet apart in organically rich soil in full sun. This veggie needs 1 to 2 inches of water each week from rainfall or your hose. Don't plant where broccoli or its relatives (cole crops like cabbages) have grown in the last three years to help keep pests and diseases from building up in the soil.
Fertilize as indicated by a soil test and add mulch. Most varieties mature 12 weeks after planting. If cut properly, the central head will usually develop smaller heads on side shoots. Consult our growin guide to find out how to cut the heads and handle pests like flea beetles.
Learn More: How to Plant and Grow Broccoli
Brussels Sprouts
If you or your family balk at eating Brussels sprouts, try them freshly harvested when they're sweet, tender and nutty. Give the plants organically rich soil with a pH of 6 to 7, but don't grow them where Brussels sprouts and other members of the Brassica family have grown for the past few years; pests and diseases may still be present.
These veggies need full soil and consistent watering. They grow best when the temperatures are around 60 degrees and take about 100 days to mature from seedlings. Most gardeners start them indoors in the spring and transplant them after all danger of frost. In hot regions, they often do better if planted in the fall and grown throughout the cool winter. Your extension service can tell you when to plant in fall.
Start the seeds indoors four to six weeks before your last spring frost. When the seedlings have four or five leaves, carefully move them into 4-inch pots (or 6-inch pots if you're worried about clubroot disease). Harden them off before planting them in a sunny spot, but bring them back inside if the temperatures drop below 45 degrees. Read your seed packet or plant label for spacing information. Brussels sprouts need an inch of water per week and can be staked for support. If you harvest after the first frost, you'll find the cold makes them sweeter. Twist the heads from the stalks when they're the size of a quarter, starting at the base of the plant.
Do you know how to "top" your Brussels sprouts? Topping helps the plants develop firm heads that are all ready to harvest around the same time. Read our guide for "topping" tips.
Learn More: How to Plant and Grow Brussels Sprouts
Collards
No longer just a Southern vegetable, vitamin-rich collards have become popular around the country. (Kale, you're not the only nutritional superstar.)
Collards thrive in cool weather and the leaves should be picked before warm weather makes them bitter. These veggies are easy to grow from seeds or transplants. Direct sow the seeds in late summer for a fall harvest or start the seeds indoors six to eight weeks before your last spring frost. You can also direct-sow the seeds in early fall and let them grow through the winter. They'll survive down to about 5 degrees.
Collards like full sun, fertile soil mixed with compost and a pH of 6.5 to 6.8. If you plant in late summer, choose a site with morning sun and afternoon shade. Sow the seeds 1/2 inch deep and thin emerging seedlings to 12 to 18 inches apart. Apply 1-1/2 inches of water each week if rainfall is insufficient. Fertilize regularly with a water-soluble plant food.
Start picking the leaves when they're 10 to 18 inches long. Take the lower leaves first and spread your harvest between plants so you don't leave some plants bare. Click on the link for more tips on planting collards and cooking them.
Learn More: Growing Collards
Tomatillos
Tomatillos add a citrusy tang to salsas, salads and garnishes. These tomato relatives are bright green when they ripen under their papery husks. You'll need at least two plants for cross-pollination. Plant in well-draining, fertile soil amended with rotted manure or compost in full sun — but wait until the nights are consistently above 55 degrees and all danger of frost has passed. These are heat-loving veggies. Plant young tomatillo plants deeply, like tomatoes, burying about two-thirds of their stems to encourage more roots to form.
Give the plants 1 to 1-1/2 inches of water per week if rain is scarce and apply a continuous-release fertilizer. Keep the soil moist and stake or trellis the plants, which can sprawl. Space them 3 feet apart and add mulch. They're ready to harvest when the tomatillos feel firm and fill out the husks. Yellow or purple tomatillos are overripe and mushy and lose their tart flavor.
Read on and we'll tell you how to store tomatillos on the counter, in the fridge or in the freezer.
Learn More: How To Grow Tomatillos
Beets
Easy-to-grow beets are one of the best vegetables for your garden if you want foods that are high in minerals, vitamins and nutritional plant compounds. Beets grow best in cool spring and fall when the temperatures are below 75 degrees. Most mature in 55 to 70 days after planting. You can pick and eat the leaves even earlier and let the roots keep growing.
For best results, plant bolt-resistant varieties. Direct-sow the seeds after your last frost in early spring and plant again every 2 or 3 weeks until midsummer. If desired, plant more seeds from midsummer into early fall, starting at least six weeks before the first frost.
Plant the seeds 1/2 inch deep and 2 inches apart in loosened soil that's free of rocks and other debris that would hamper their growth. Keep the soil moist and thin the seedlings to every 3 inches when they're 4 inches tall.
Give your beets an inch of water weekly if rain is lacking, and weed carefully so you don't damage their shallow roots. Fertilize lightly. Harvest the beets when they are golf ball-sized. Don't limit yourself to red beets. Read on to learn about golden beets, magenta beets and "candy-striped" beets with concentric red and white rings.
Learn More: Planting and Growing Beets
Arugula
Arugula is peppery, green and packed with nutrients. You can eat it cooked or raw, so it's another one of the best vegetables for your garden. Direct-sow the seeds in cool spring or fall weather. Arugula is very hardy and can withstand frost, so some warm region gardeners can grow it all winter.
Choose a sunny site that gets light shade in the hottest part of the day. Plant the seeds 1/2 deep and 12 to 18 inches apart in rows spaced 4 to 8 inches apart. It's a great cut-and-come-again crop, but you can also sow more seeds every two weeks for a continuous harvest.
Arugula needs organically rich, well-draining soil; don't plant it where other members of the Brassica family, like broccoli and cabbage, have grown, to help avoid a build-up of pests and diseases in the soil.
Water consistently and keep the soil evenly moist. Feed the plants with continuous-release plant food and harvest the young, tender leaves when they're about 2 inches long. Leave the small, center rosettes alone so the plants can keep growing. Once arugula bolts, the leaves will become bitter. That's when it's time to pull the plants and compost them.
Grow companion plants to help deter arugula pests. Click below to see which ones are the best.
Learn More: Planting and Growing Arugula
Rhubarb
Pink or green rhubarb stems add a hint of tart flavor to fruit pies, jams and other dishes. The stems, also called stalks, are safe to eat but the leaves and other parts of the plants can be toxic, so don't consumer them.
Most gardeners grow rhubarb from crowns or divisions. In the South, rhubarb is an annual and tricky to grow in Zones 7 and above. It needs exposure to temperatures below 40 degrees for about 20 days during the winter so buds will form for the next growing season. It also tends to die or go dormant when temperatures rise above 90 degrees.
In northern climates, plant rhubarb on a sunny, warm slope that faces south. In the South, plant on a north-facing slope or in a site with afternoon shade. Rhubarb needs well-drained, organically enriched soil and plenty of room to grow.
There's much more to know about successfully growing, harvesting and dividing rhubarb, so read our guide for info on how to plant crowns, how to water and mulch rhubarb and more
Learn More: How to Grow Rhubarb