How to Create a Crowd-Pleasing Christmas Dessert Board
Dessert becomes your Christmas party's star with this guest-impressing holiday dessert board. From homemade cookies and cheesecake bars, to semi-homemade and store-bought sweets; our party-perfect sweet spread has something to tempt friends and family of all ages.


Photo By: Heather Baird SprinkleBakes.com
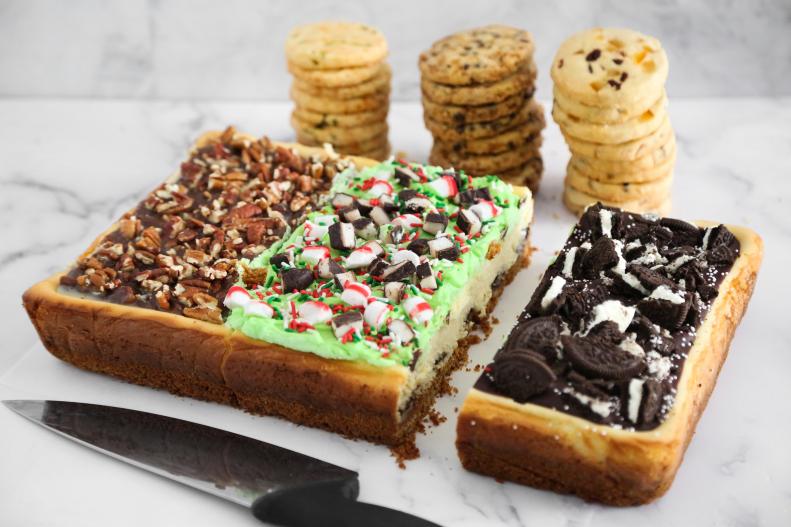
Sweetly Celebrate the Season
Nothing captures the magic of the Christmas season more than sharing holiday sweets with all the folks you're sweet on. And this bountiful dessert board is the ultimate way to share a variety of irresistible treats with a crowd. Best of all: It can be prepared in advance, which means dessert is ready when you are. With our guide, you’ll learn how to build a board around a special homemade touch, all while choosing your level of involvement. (Think semi-homemade and store-bought ingredients.) Remember, the options are endless when it comes to flavor combinations and Christmas colors, so feel free to get creative and choose your own sweet adventure.
First, Choose Your Base Surface
Just as a painter begins with a blank canvas, creating this sweet masterpiece begins with a blank surface. Large wood boards, fancy silver trays, ceramic platters and marble slabs can all be used as the foundation for your sweet spread. Wooden cutting boards and marble slabs are wonderful multitaskers that go from kitchen workhorse to dessert display. Trays and platters which are rimmed can be filled to the brim with loose candies and treats that would otherwise tumble off the sides of a board. Both large and small boards can be used depending on your guest list, but keep in mind that larger boards create an impact with more room for variety.
Select Small Dishes
Pinch bowls, little ramekins, condiment cups and petite plates are all adorable and functional on a dessert board. They’ll anchor together loose candies and other small ingredients that might easily roll around if not corralled. White ceramic dishes look best for creating a uniform look, and will allow your desserts to shine.
Whip Up These Scratchmade Sweets
Homemade treats will make your board truly special — but that doesn’t mean you have to spend days in the kitchen. Our easy cheesecake and shortbread cookie recipes have plenty of holiday appeal. Even better, each recipe yields three different flavors from a single batch. This will help fill up real estate on your board without breaking the bank. As a general rule, plan 3 oz. portions per guest. This is a generous serving that might include 2 cookies and 2-3 bite-size nibbles of candy or other treats.
get the recipe: Endlessly Customizable Layered Cheesecake Bars
A Christmas Classic (With a Twist!)
A classic recipe is the perfect springboard for adding your own creative twist. Sweet on multiple levels, these endlessly customizable cheesecake bars are layered with cookies, nuts and candies, and then finished with toppings that complement the fillings. Just one pan will have your dessert board overflowing with flavor! Get our recipe, below
get the recipe: Endlessly Customizable Layered Cheesecake Bars
One Dough, Many Cookies
Our 3-in-1 shortbread cookie recipe is high yield, which means you’ll get many cookies from just one batch. It will fill and refill your board throughout a lengthy party. Just one batch of dough accommodates three fantastic holiday flavors — both sweet and savory. Orange-Cranberry, Toffee-Chocolate-Chip and savory Smoked Cheddar-Jalapeño shortbread cookies are not to be missed! Bake up a crowd-pleasing batch with our recipe, below.
get the recipe: Gift or Enjoy: Endlessly Customizble Christmas Shortbread Cookies Recipe
Include Semi-Homemade Sweets
Busy holiday schedules can cut into your kitchen time. These easy DIY sweets don’t require any cooking or intensive baking. Easy Christmas bark requires only two ingredients; melted almond bark and candy sprinkles. Spread the melted candy over parchment paper, cover with sprinkles, and allow to harden before breaking into pieces. Make peppermint wands with ready-made wafer rolls dipped in melted candy; sprinkle with crushed peppermints and let set. Dress up plain white chocolate-covered pretzels by heating a pan full in a 350°F preheated oven for 2 minutes. When the pretzels are slightly melted and shiny, sprinkle them with holiday nonpareils. Allow them to harden before adding them to your board.
Do Some Shopping
When planning your board, buy or make as much or as little as makes sense for you. The in-store bakery at most grocery stores is a wonderful resource for busy holiday hosts. It will have a few fancy offerings to dress up your board, such as French macarons and madeleines. Then, hit the cookie aisle for prepackaged gingersnaps and other holiday cookies that are easy to arrange and will help to fill in space on your dessert board.
Add Holiday Hues With Colorful Candy
Light up your spread with bowls of candies in holiday colors. You can’t go wrong with classic red, green and gold, or go for icy hues in shades of blue, white and silver.
Start Assembling Your Dessert Board
Once you have all your ingredients made or puchased, it's time to fill 'er up! When arranging your dessert board, start by adding the homemade goodies first, which are usually the largest and take up the most space. Arrange cookies in opposite corners of your board so they mirror each other. Symmetry is pleasing to the eye, so use this trick throughout the styling of your board.
Add Visual Interest With an Angled Design
Homemade layered cheesecake bars, cut into fingers (which makes them fork-optional) will take up a lot of room on your board. So, make them the main attraction! A central diagonal line of the cheesecakes in alternating flavors will look good from every angle. If prepping your board a day ahead, fully assemble the ingredients on the board, then remove the cheesecake bars to refrigerate until ready to serve. Just before party time, put them back in their place in the center of the tray.
Simplify Self Service
Place creamy or sticky foods, like our homemade cheesecake bars, in cupcake liners for easy pickup. This helps keep fingers tidy. A stack of pretty paper napkins close by will also be appreciated by guests.
Add Eye Appeal
White bowls filled with candies in holiday hues will add a cheery pop of Christmas color. Use them to house peppermint puffs, Jordan almonds, nuts and chocolate-covered cherries. Place them on the board leaving room to pile cookies and other ingredients around them.
Fill in Nooks and Crannies
Fill in every blank space with little cookies, candies and other small nibbles. Don’t be afraid to pile gumdrops next to macarons or place thin pieces of candy bark upright in narrow spaces.
Think Outside the Board
Continue the feast outside the dessert board with more of your favorite sweets and muchables. A platter of our Smoked Cheddar-Jalapeño Shortbread Cookies will be best appreciated as a savory bite to contrast all those sweets.
Assemble Ahead to Simplify Party Set-Up
Nearly every sweet thing on this dessert board can be assembled, covered and kept at room temperature a day ahead. (But remember to refrigerate those cheesecake bars!) Festive and bold, this platter is like a metaphor for the holiday season. Too much is just enough — but a little more can't hurt either, right?
See More Photos: 35 Low-Key Christmas Party Ideas That Spread Major Holiday Cheer