Create a Personalized Floral Cake Topper
Follow these easy steps to create a stunning topper for your wedding cake and a keepsake that will last long past your wedding day.

By:
Ruth Meharg
Related To:
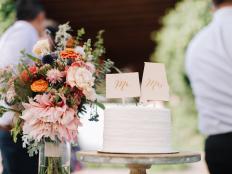
Wedding Day Keepsake
Flowers are almost certainly a huge part of your wedding day, but it is usually difficult if not impossible to keep wedding plants long term. This arrangement of paper flowers makes a beautiful cake topper and it will last for years. Use your personal mix of colors and flowers with the instructions in this gallery to create a unique cake topper for your wedding day.
Paint your Paper
To create your cake topper you'll need to begin by painting tissue paper using your chosen colors. We recommend using at least three colors for each color flower you want. If you want a blue flower, try using a bright blue, baby blue and white. Don't mix them up too well, you want to be able to see the different colors on the paper. Don't use water with your paint, it will make the tissue paper too damp and cause it to tear. Paint gently and lift the paper occasionally to make sure it isn't sticking to the surface underneath it.
Create your Centerpiece Flower
These layered flowers were inspired by roses and peonies. Begin by cutting teardrop shaped petals in your chosen color. How many and how large your petals should be will depend on how big you want your final rose to be. For a large one try 5 different sizes with about 7 petals in each size.
Begin Gluing
Begin creating your flower by gluing your smallest petals together in a half circle. Glue them just at the base so that the petals have freedom to move away from each other at the top. When your half circle is created, bend it into a cone shape and glue. Give the point of the cone a little twist to secure the petals together. This will be the center of your flower and the base all other petals will be glued on.
Folding Petals
To add more body to your petals and more fullness to your flower add some creases to your petals before gluing them on. Lay the petal right side up, then fold in half lengthwise. Fold the open edges back to the folded edge so that your petal is folded into fourths, like a basic paper airplane. Open the petal and smooth out the creases at the top edge before gluing around the cone of petals you've already created.
Add more Layers
Continue layering petals to create fullness in your flower. Alternate between folded petals and flat petals, twisting them around the base as you glue to secure them. If you're having trouble, take a break and let the glue on each layer dry before adding the next.
Finish the Back
When the flower is dry, glue a few leaf shapes to the back of the flower to cover the twisted base. This isn't absolutely necessary if you are sure the back of your flower won't show, but it creates a more polished finish.
Daisy Supplies
Create daisies by cutting a series of thin petals, pointed on both ends. Cut small circles out of yellow or orange paper and roll them tightly into balls.
Create your Daisies
Create the daisies by gluing the petals together in a circle. Add more layers of petals on top, gluing only in the center. Place the orange paper balls in the center with a hefty drop of glue. The paper will expand and loosen from the moisture of the glue.
Create Accent Roses
Cut curved paisley shapes from the paper and twist around itself beginning at the small end. Add glue as you twist to secure it in a spiral. You can create large or small flowers using this technique, whatever will fit best in your overall arrangement.
Little Flowers
Create your small flowers by cutting teardrop shapes out of your chosen color and twisting them at the narrow end. Twist it tightly about half way up while keeping the top a bit looser.
Create Branches
To create a series of small branching flowers you'll need to begin by shaping a branch base. You can use fairly soft wire, as long as it is strong enough to hold its shape when you bend it. Cut one long piece of wire and wrap smaller sections around it that branch off.
Attach your Flowers
Attach the flowers to the wire with a drop of glue and wrap strips of paper around the wire and the twisted end of the flower to secure.
Continue Adding Flowers
Continue wrapping and adding flowers until the entire wire is covered.
Create a Framework
You'll need a way to arrange all of your flowers, and one of the easiest is to attach them to a wire frame. Choose a wire soft enough to bend without too much trouble, but one that is stiff enough to hold its shape. Cut strips of paper and wrap the wire, gluing as you go, until it is completely covered. Bend the wire into a spiral shape that reaches upward as it gets narrower to create a loose cone.
Arrange and Attach
Attach the flowers to your wrapped wire base by cutting long leaf shapes from green paper. Place the wire over the back of the flower and glue the paper over the wire onto the back of the flower. Repeat with one or two more pieces of paper to be sure the flower is secure. Let dry.
Completed Arrangement
Once your flowers are securely attached and the glue has dried you can bend the wires until your flowers are arranged just the way you like. You can mix your paper arrangement with real flowers on your cake, but after the cake has been sliced and the flowers eaten, this topper will still be a beautiful reminder of a treasured day.