Before and After: Follow a Small Bathroom Remodel From Scary to Sophisticated
We're walking you through an entire small bathroom makeover to show exactly what it took to go from dark, dated and dingy to light, bright and airy.

Related To:

Photo By: Kamron Sanders
Photo By: Cassidy Garcia
Photo By: Kamron Sanders
Photo By: Cassidy Garcia
Photo By: Kamron Sanders
Photo By: Cassidy Garcia
Photo By: Kamron Sanders
Photo By: Cassidy Garcia
Photo By: Kamron Sanders
Photo By: Cassidy Garcia
Photo By: Kamron Sanders
Photo By: Cassidy Garcia
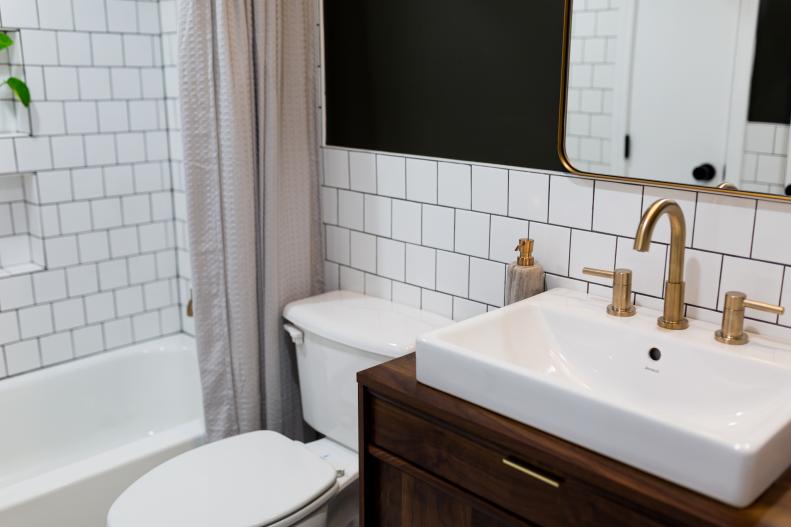
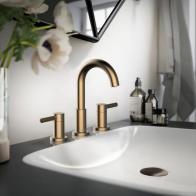
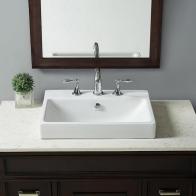
Before: Cramped and Nondescript
Before the renovation, this small, windowless bathroom was dark, dingy and overall outdated. The low ceilings and insufficient light fixtures caused the bathroom to feel even smaller than it was, while a long-broken exhaust fan resulted in excess moisture and poor air quality.
After: Pretty With Some Pain Points
When it comes to remodels, the “afters” never tell the entire story. Truth is, in any renovation job, there are a multitude of unknowns that the renovator has to be comfortable with taking on if by chance they become a problem. Though this small bathroom turned out beautiful and just as planned, the renovation journey required a lot of patience and creativity.
Total Gut Job
The owner's big-picture goals for the renovation were to add better lighting, tile the floors and walls and update the bathroom’s overall aesthetic. To check off each wish-list item, the quickest and easiest route was to fully gut the space, which also allowed for a better assessment of the room’s structural health. Once gutted, we determined that the bathroom needed to be totally reframed and structuralized before tile on the floors and walls would be possible.
Keep Moisture Out
Once the walls were framed and the floor system stabilized and leveled, a new tub was installed, and the walls were prepped for tile. In the shower area, cement backer board was installed and sealed with a waterproofing membrane. For further protection from moisture, the entire area behind the backer board was fully covered in plastic sheeting. Special attention was given to the dual shower niches, as these tend to be a prime location for water damage.
Don't Underestimate the Details
Once all coats of the waterproofing membrane were finished and the area had been thoroughly cleaned, it was time to start tiling. To create a seamless visual, the niches were framed in a way that allowed full tiles to be installed both within them and around them. The ceiling was also leveled to allow for full tiles around the top of the tub. This attention to detail may seem like minutiae, but it makes all the difference in the end result.
Bright, Built-In Beauty
The completed niches appear one with the wall when viewed from straight on, which offers the modern look we'd hoped for and is a sleeker alternative to contrasting tile that could feel visually overwhelming in such a tight space. To promote proper draining, each shelf was framed with a slight slope. This is totally invisible to the naked eye but ensures no water sits in the niches.
BUY IT NOW
Choose Brass for a Luxe Look
Bright white tile with contrasting grout makes the shower feel lighter, cleaner and almost unbelievably bigger than before. Brass fixtures were chosen to balance the stark finishes and warm up the space. Brass has a way of lending a space a vintage, luxurious feel that chrome, black and other fixtures simply can’t match.
Before: Moisture Problems
Before, the drywall above the fiberglass tub surround was prone to moisture issues and constantly needed to be wiped down, leading to a streaky, dingy appearance. A white metal shower rod and builder-grade showerhead only furthered the shower’s dreary, dated look.
After: Easy to Clean
After, the fully tiled shower is easy to clean and reflects tons of light from the bathroom’s new recessed lighting. A custom wood shower rod doubles down on the warm, luxurious look of the brass fixtures, while a light gray, waffled shower curtain brings in subtle texture and contributes to the now calm, cozy atmosphere that the space was lacking.
Before: Builder-Grade Vanity
A standard, builder-grade vanity sink served its purpose fine but didn’t give the space the wow factor it deserved. Stains and grime-collecting nicks in the sink and countertop were visually unappealing, while water damage on the bottom of the vanity ensured it was nearing the end of its lifespan.
Think Outside the Box
The goal was to find a vintage cabinet to convert into a vanity, but size and time restrictions made this an extremely difficult task. Instead, a new vintage-style cabinet was bought and transformed into a vanity. To cut a hole for the sink, the drawer was removed, and the sink’s template was attached using tape, then the hole was cut with a jigsaw.
Get the How-To: DIY Bathroom Vanity: How to Build a Vanity From a Cabinet
BUY IT NOW
After: Vintage-Style Vanity
The end result looked just as good as a vintage piece and fit the space perfectly. In addition to the bright half-tiled wall and updated lighting, the slightly smaller vanity opens up the bathroom, making it feel immensely larger, which also made it possible to go with a moody dark hue on the walls. We chose Steelyard Common by HGTV HOME by Sherwin-Williams.
Before: Searching for Storage
One of the major frustrations of this particular renovation was figuring out what to do above the sink. The goal was to find a new medicine cabinet, since the bathroom was already lacking storage space, but after hours of searching, we determined that most modern medicine cabinets were either too tiny or cost prohibitive. On top of that, most of the medicine cabinets on the market didn’t even come close to matching the aesthetic of the room.
Get Creative
To stay true to this bathroom’s form, we took the DIY route. To still get the look of a large mirror but with the function of a medicine cabinet, we built a large cabinet within the studs and covered it with a gorgeous brass mirror that acts as a swinging door thanks to the addition of a lengthy piano hinge.
Get the How-To: DIY Recessed Medicine Cabinet With Oversized Mirror
BUY IT NOW
Custom-Built Shelf Insert
For the cabinet, a tailor-made niche insert was in order, which allowed for full customization to suit the owner’s needs. Grooves were installed every 2 inches to allow the shelves to be placed at any height. Rather than a wood backing, the drywall behind the niche was painted to match the rest of the bathroom, making the entire space feel custom and cohesive.
BUY IT NOW
Strong and Secure
The piano hinge was attached to the mirror using rivets and attached directly to the wall by sinking long wood screws into a stud. This allowed the mirror to sit perfectly flush while providing maximum strength and support.
Adjustable Wooden Shelving
Thin poplar shelves are finished in a dark wood stain that matches both the vanity and the custom shower rod, and a small magnetic catch was attached to the top of the cabinet to keep the mirror from swinging open when not in use. The shelving unit itself is much deeper and larger than any of the medicine cabinets on the market, allowing for far more customizable storage space.
BUY IT NOW
After: Large and Luxurious
The final product made all the tedious labor worth it. Both the cabinet and the mirror were far larger than any medicine cabinet available, adding valuable storage space for this small bathroom. On average, the cabinet cost half as much as a standard medicine cabinet, and the visual results speak for themselves.
Get the How-To: DIY Recessed Medicine Cabinet With Oversized Mirror
BUY IT NOW
Measure and Measure Again
Much of the time working on the small bathroom was spent measuring to make sure the multiple different lines would match up. With so many different variables, checking and double-checking measurements was imperative.
Before: Lackluster Laminate Flooring
The last major installation in the bathroom was the tile floor. Before, the yellowed-laminate floor made the space feel dull and dirty. It was peeling around the baseboards and register and in desperate need of an update.
After: Bright White Mosaic
As previously mentioned, the floor system had to be structuralized and leveled before tile was even a possibility. However, even after much improvement, the floor could not be totally leveled without major work being done to the entire home. This made a small mosaic tile the perfect option. Whereas large-format tiles would’ve eventually cracked and shown obvious imperfections, these small tiles conform to the small imperfections in the floor system.
Get the How-To: How to Lay Tile Flooring
BUY IT NOW
After: Bright and Beautiful
Even without a window, the bathroom's "after" is as light, bright and airy as it gets — a major contrast to the space's previous look. Tile surrounding the space makes for a clean look that is easy to maintain and offers durability that will last for years to come.