DIY Family Portrait Tips
You don't need a professional photographer to capture your family. Just grab a tripod, a selfie stick or a willing neighbor and follow our tips for taking a great family photo you will cherish forever.


Photo By: Jules Ko Photography
Photo By: Steve Larese
Photo By: Alison Hatch Photography
Photo By: Jules Ko Photography
Photo By: Alison Hatch Photography
Photo By: Steve Larese
Photo By: Jules Ko Photography
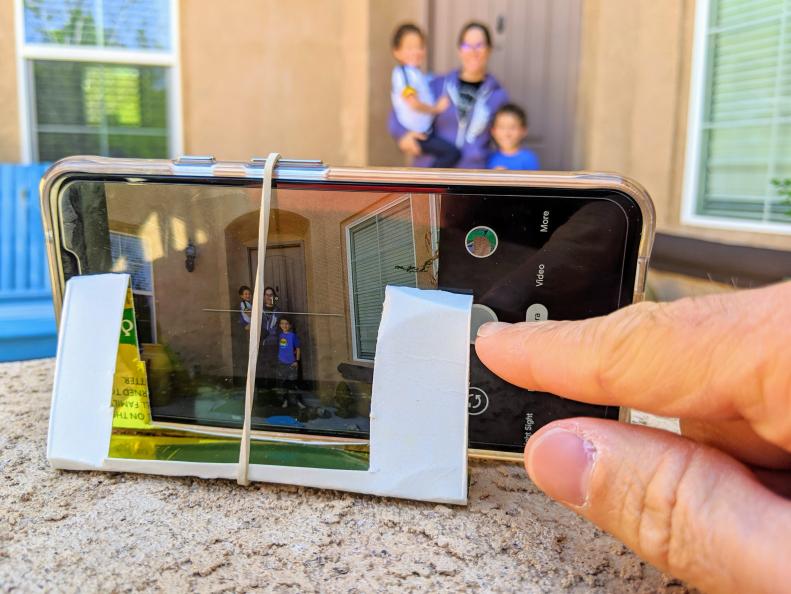
Perfect Family Portraits
Taking a family portrait at home is easy and doesn’t require a lot of expensive gear. Professional portrait photographers Jules Ko in Boston and Alison Hatch in Albuquerque, New Mexico, offer these tips for transforming your photos from snapshots into frame-worthy family photos.
Use (or Make) a Tripod
You'll need something to hold your camera or phone if you want to be in the shot. A tripod makes this easy with cameras, but what if you don't have a tripod or you're using a phone without a tripod socket? When taking selfies with phones, most of the time the subject looks at the screen and uses the forward-facing camera. But the camera on the back of the phone typically has more resolution and is higher quality, assets you may want for a family portrait. You can use objects such as binder clips, rubber bands and folded cardboard to make a stand for your phone. Use a chair or other stable object to position the phone. Commercial smartphone clamps used to hold your phone and thread into a tripod are available as well.
BUY NOW: Amazon | Smartphone Tripod, $12.59
Use the Self Timer
Using the self-timer feature of your camera or smartphone allows you to be in the photo, too. On most cameras, the self-timer is a subsetting located under the "Drive" setting, and is oftentimes just called "timer." (The Drive setting lets you choose how fast you want the camera to take photos such as single frame (one at a time) or Continuous (the camera will take photos for as long as the shutter button is held down). The self-timer setting usually looks like a clock, and it may have a number. This number represents the number of seconds you'll have until the camera takes the photo, usually 3, 5 or 10 seconds. Select the number of seconds you think you'll need to get back to the group and get positioned. Some timers allow you to take several photos after the delay, and this can be helpful to ensure that you've positioned yourself in time and that everyone has a pleasant expression and open eyes. On many smartphones when in camera mode, swiping down on the screen will allow you to access special settings such as the timer, flash and other features.
Adjust Your Camera Height
Where you place your camera or phone affects your portrait. Too low and you force people to look down which scrunches up necks. Placement too high can result in oddly large heads. As a rule, place the camera at the average of the eyes of the shortest and tallest members of your group. The edge of your screen should be parallel with your subjects and with the edges of walls or other straight objects in the background (not tilted). This will minimize distortion, especially with wider-angles lenses such as those on smartphones.
Try to Avoid Using Wide-Angle Focal Lengths
For portraits, it's best to use a focal length of at least 50mm (full-frame equivalent) or longer (telephoto). This will serve to compress facial features and make for a more natural, flattering photo. Smartphones tend to have camera lenses that are moderately wide-angle (about 28mm full-frame equivalent). Wide-angle lenses can "stretch out" faces and bodies, especially if not centered. Some smartphones have a portrait mode that digitally zooms in somewhat to minimize the wide-angle stretch. Otherwise, manually zoom in on your screen somewhat to accomplish the same thing. As a rule, the camera or smartphone should be 6' to 8' away from a person when taking a portrait, and even farther if it's a large group. Use distance to get everyone in the shot, as opposed to using wide angles, for more flattering group portraits.
Set Your Focus on the Eyes for Sharp Photos
If people's eyes aren't in focus, all of the photo is considered out of focus. This becomes more difficult when using the recommended longer focal length for portraits. Use the touchscreen focus on your smartphone or camera (if available) and tap on the middle person's face, or better yet, zoom in and focus on the eyes. If everyone's head is lined up and parallel to the camera, everyone's eyes should be reasonably in focus. If you have the option of adjusting your aperture, setting it f/5.6 should give you enough depth of field to ensure that everyone's face is in focus. On cameras where you can manually adjust the focus point, move it to the middle person's eyes, as opposed to straight ahead and focused on their body.
Use Shaded Areas to Create Even Lighting
When photographing outside, mixed light (sunlight and shadows) is not uncommon. While our brains are great at ignoring this, in photographs the contrast is extremely distracting. Direct sunlight can result in harsh facial features and squinting. Find an area in even shade to get the most flattering photos. And professionals agree that bright but overcast days are ideal for taking great photos. Everyone's face will be in the same light and require the same exposure. Notice how your desired location changes during the day to determine the best time to photograph your group.
Use Your Flash Outdoors
Flash isn't just for indoors. Many cameras have a small built-in flash, as do smartphones. Using flash outside can enhance portraits by lightening faces and adding sparkle to eyes. They can also be used to minimize harsh shadows in sunlit scenes. Flash power can often be adjusted, so if full power is too much and looks unnatural, reduce the flash power.
Consider Your Image File Size Before Photographing
Cameras and smartphones allow the user to select different file sizes for JPEG photos. Smaller sizes allow more photos to be saved to your device's memory, but larger sizes will allow you to not only make larger prints if you wish, but also to crop a photo more without losing much quality if necessary. This can be handy for cropping in tighter on your group or cropping your image square for social media. Image size can be checked and adjusted in your menu under Image Quality or Image Size.
Pay Attention to the Background
It's easy to concentrate so much on the people in your photos, the camera settings, and yourself that you don't pay critical attention to the background. Are there any branches, poles or door jams that look like antlers coming out of someone's head? Any distracting bright colors or shapes? Did someone leave a water bottle on a railing? Little details like these are easy to overlook in the moment but jump out of photographs. Good backgrounds include a plain, simple wall, bookshelves, brick walls and gardens. Watch for reflections in windows in the background, or avoid windows altogether, if possible. Once your camera or phone is set up and leveled, check the screen or viewfinder for anything distracting, and then give the scene a second look with your own eyes from the level of the camera. If you have a manual camera, adjusting the lens aperture will affect how sharp the background is. Smaller numbers (f/2.8, f/4) will render the background out of focus depending on how far away from it your subjects are standing. Larger numbers (f/11, f/16, f/22) will make your background sharp, similar to how squinting makes something far away appear sharper.
There's an App for That
After you've taken your portrait, take it to the next level with editing software such as Adobe Photoshop Express, which is free to download. Users can adjust exposure, shadows, color and even blur backgrounds. Apps such as Adobe Photoshop Fix allow you to remove distractions such as blemishes or unwanted objects in the background or sky, and AirBrush smooths skin, whitens teeth and performs other portrait-specific tasks.