


Can You Paint Over Stain?
Yes, you can paint over stained wood with the right prep and the right type of paint. Learn how to figure out the best method and type of paint for your project then get step-by-step instructions and tips from the pros.

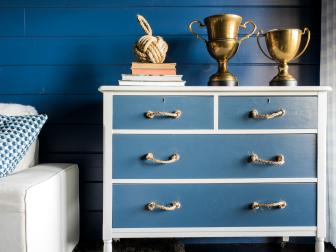
Color can totally reimagine your thrifted armoire, the cabinets in your fix-me-up kitchen and even your weather-worn porch furniture. Despite what you may have heard — or maybe your own last attempt — you absolutely can paint over stain beautifully and durably. The key to getting a professional result is recognizing the projects that will require more work, then choosing a paint that accommodates both your aesthetic and your patience.

Susan Teare, Joanne Palmisano
Paint can totally reimagine wood furniture. The key to getting a professional finish is taking the time to prep the original finish.
Types of Paint That Can be Used on Stained Wood
There are several paints you can use over wood stain, including:
- chalk paint
- milk paint (dry or premixed)
- all-in-one paint
- mineral paint
- latex paint
- acrylic paint
- alkyd paint
- enamel
- spray paints in sheens and metallics
In recent years, water-based paint has been supplanting oil-based paint for interior projects but either can be used. To ensure your paint job will withstand the rigors of use, limit your choices to paints that say they can be applied to finished wood surfaces.
Wood Types and Stains That Can be Painted
Woods high in tannins may require sealing first, but all species of stained wood can be painted, including hardwoods and softwoods, and even grasses like wicker and rattan. Previously stained furniture and home elements (doors, trim, cabinetry) will accept paint, with the latter sometimes requiring a deep clean first.
Wood finishes that can be painted fall into two general categories:
- Penetrating stains and dyes, which give a somewhat unfinished appearance and where you can feel the woodgrain.
- Film-forming finishes, which create a thin protective layer on the surface of the wood that is smooth. This category includes varnish, polyurethane, lacquer and shellac.
Traditionally, most wood treatments were oil- or solvent-based but water-based alternatives are now available in every finish category. Both types can be painted over with the right prep.
Some vintage wood pieces will have a coat (or several coats) of wax. Others were polished with products that contain silicone (e.g., Pledge). These require additional steps to be painted.
19 Creative Ways to Paint a Dresser 18 Photos
This weekend, turn an old bureau into a work of art. It's easier than you think and doesn't have to cost a lot.
How to Paint Over Stained Wood
To get a gorgeous and durable finish, you need to guarantee compatibility between the old surface and the new which will take a few prep steps before the new paint is applied.
1. Identify the Existing Wood Surface
Knowing a few qualities of your wood ensures compatibility between your desired paint and the prior surface.
- How to Identify a Wax Coating: Gently scrape the surface with a coin or your fingernail. Soft, non-wood shavings indicate a wax finish. Confirm with a little corner of sandpaper. Wax will gum it up.
- How to Identify an Oil-Based Stain: Apply a few drops of mineral oil to the wood and it should soak in. Conversely, a few drops of water on a recently applied oil stain should bead up.
- How to Identify Woods That Have Natural Staining Potential: Note if your wood has visible knots or is a species known to be high in tannins (such as oak and mahogany).
2. Clean
Every painting project requires the removal of contaminants that might prevent your new paint from sticking to the existing surface. For general pre-paint cleaning of any finish, paint companies Miss Mustard Seed and General Finishes both recommend using a scouring pad and a 50:50 mixture of denatured alcohol and water, or a TSP alternative (TSP can leave a residue).
A pre-cleaning treatment step will be required for the following:
- Waxed wood will need to have the wax layer entirely removed using mineral spirits.
- Similarly, if you suspect your furniture has silicone-based polish on it (hard to detect beyond a lemony smell), it will only accept paint after removal. General Finishes recommends products such as Spic and Span for this.
- Doors, kitchen cabinets and other home components that are subjected to constant handling or grease and smoke will need to be treated with diluted vinegar or a product like Krud Cutter.
- Outdoor furniture will have an ecosystem of mold and mildew on its surface that should be removed with similar products.
After cleaning, allow the wood to dry completely.
3. Sand or Degloss
The goal of this step is to create a smooth-but-grippy surface that your paint will adhere to.
- For wood with a penetrating stain, lightly scuff the entire surface with fine-grit sandpaper.
- For wood with film-forming finishes, scrape off any loose finish then scuff the entire surface with fine-grit sandpaper.
A dust-free alternative to sanding is liquid sandpaper, also called deglosser. Since it rubs on, it is also easier to use on ornate furniture as well as wicker and rattan.
Whichever method you use, clean up the dust or residue and allow the wood to dry completely.

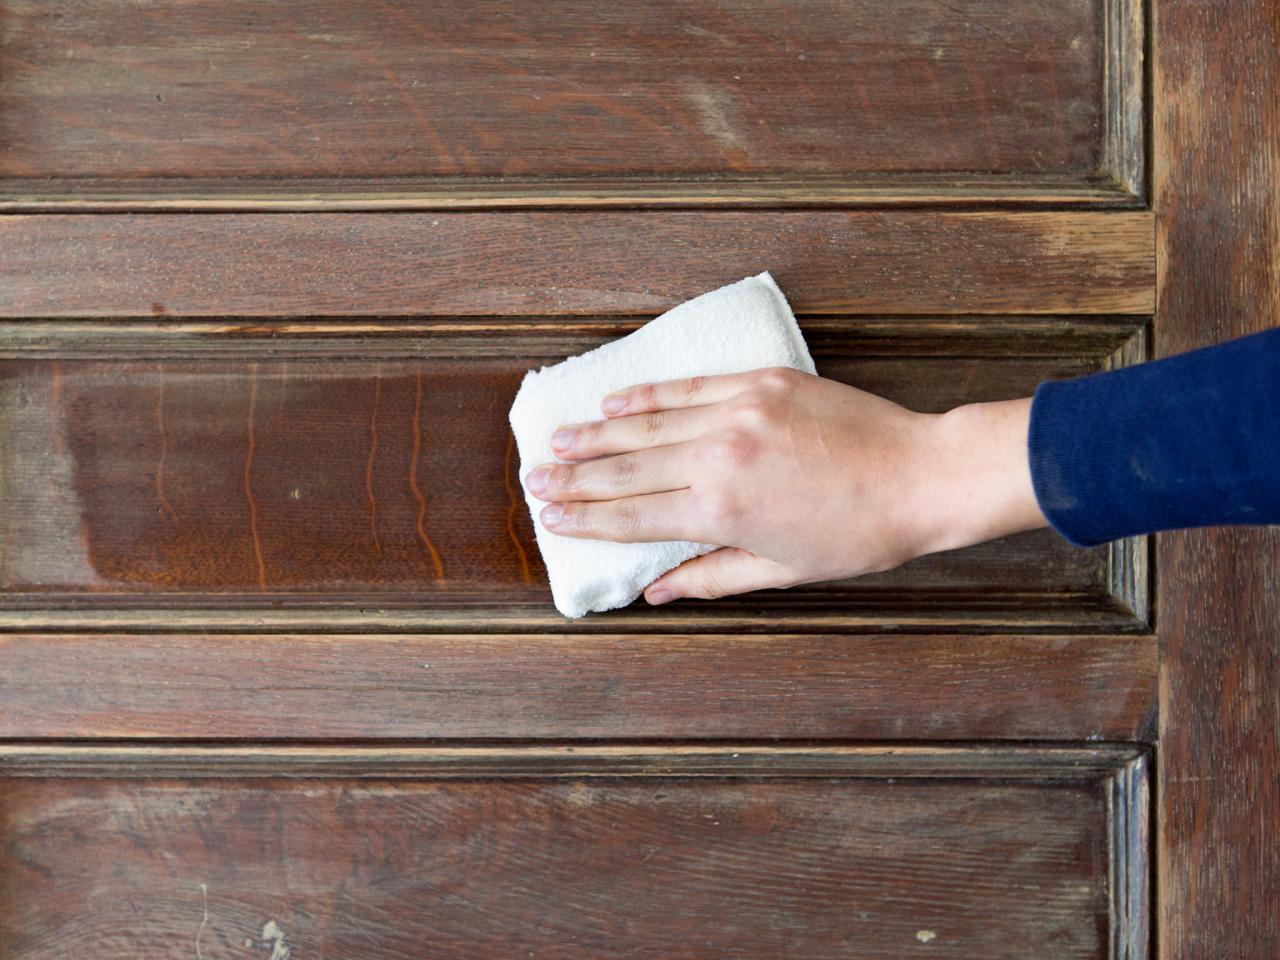
Wipe Clean
Sanding the original finish creates a smooth but grippy surface for your paint to adhere to. Remove the sanding residue with a damp cloth and allow to dry completely.

Photo by: Molly Winters
Molly Winters
Sanding the original finish creates a smooth but grippy surface for your paint to adhere to. Remove the sanding residue with a damp cloth and allow to dry completely.
4. Make Repairs
Use wood filler to correct any imperfections you don’t want in your painted surface. Sand those spots and clean again.
5. Prime the Surface
If your paint is intended to react with the underlying finish (say, certain milk paint techniques), you might skip this step. For the rest, priming will hide minor imperfections and create a smooth surface for a more professional paint application and finish longevity. Additionally:
- Primer can save paint by ensuring that the first coat isn’t absorbed into the wood.
- Primer can create a strong bonding layer between a stain of one type and a surface paint of another.
- Certain primers will seal the prior surface so that wood tannins and old stains and dyes won’t bleed through your new paint.
Many paint companies include priming as a necessary step for that second reason, but even companies of high-bond paints — chalk, mineral and all-in-one — will tell you to use shellac-based primer in that last circumstance. More on this in the Tips section below.
6. Paint Your Project
Brush- and roller-applied paints may require a few coats with complete drying and light sanding in between. Spray paints will generally specify a number of light coats applied within a certain timeframe.
7. Apply a Topcoat or Sealer (Sometimes)
This step is the only way that some textured and specialty paint choices will have finish durability, and the label will be specific about what to use (and what not to). You can also include this step for aesthetics — to add a high-gloss or wax sheen to your paint finish.

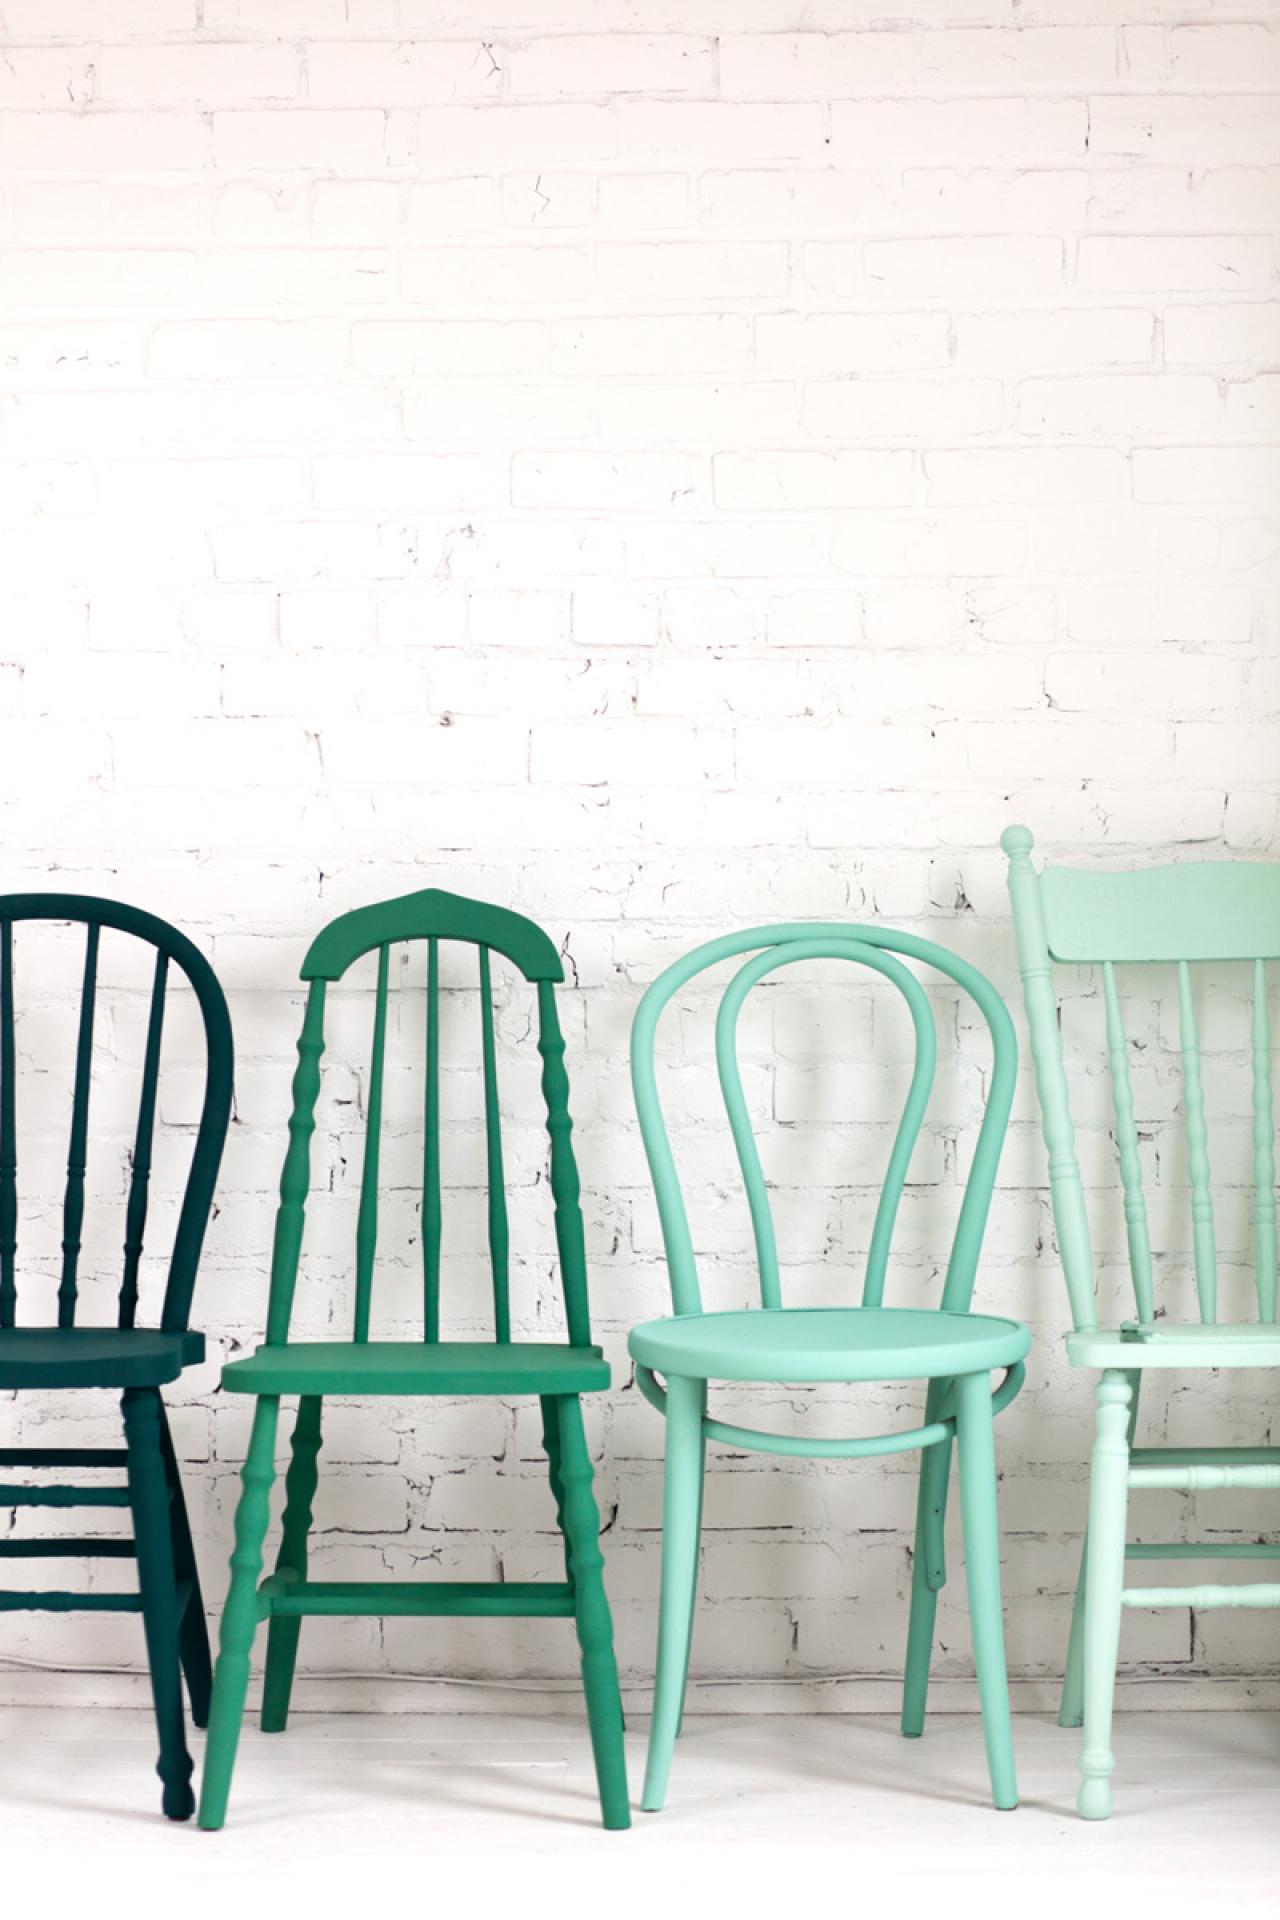
Duckworth Interiors
Wooden chairs take on new life when painted in different hues of green and blue.
Tips for Getting Professional Results
Spend Time on Sanding
Even when the paint directions say it’s optional, professional painters rarely skip the sanding step on their own projects.
Pick a Primo Primer
There are latex, oil and shellac-based primers on the market but there’s really only one choice for consistent results on finished interior wood: shellac. This is for two reasons.
- Shellac-based primer is the best choice for bleed-through prevention from tannins and stains.
- Identifying wood finishes can be tricky, and it can really matter for paint adhesion. You can cover water- or oil-based finish with a shellac-based primer and you can then cover the shellac primer with water- or oil-based paint.
Prep-Adverse? Pick the Right Project and Paint
If you don’t have the time or the inclination to sand or prime but you still want to be happy with the job, then skip any finished wood that is waxed or has furniture polish and limit your paint choices to:
- Use flatter sheens and darker colors that will hide imperfections and stains from prior finishes and the wood itself.
- Choose paints with super bonding qualities like all-in-one, mineral and chalk paint.
- Use paints intended to interact with your existing finish, like milk paint.
Allow Adequate Drying Time
Once you’ve applied that last coat of paint, don’t let your enthusiasm ruin your finish. Dry to touch absolutely does not mean go ahead and sit on. The difference between dry to touch and full cure in the paint world can be 30 long days. Set your expectations accordingly.
Check for Lead
Regardless of the age of your wood furniture or home feature, there is a chance the existing finish has lead in it. Lead is highly toxic to humans and animals when inhaled or ingested and will be released into the environment by sanding. Certain wood preparation products and paints have their own chemical exposure risks. Protect yourself and others by following the safety guidelines for the products you’re using and the EPA’s advice on its Lead-Safe Renovations for DIYers page.

Should You Be Concerned About Lead in Antiques?
Lead house paint and plumbing components may already be on your radar, but this toxic substance could also be hanging out in your cabinets and credenza.
Look for New Water-Based Alternatives
A few veteran paint pros may still swear by the superiority of oil-based products for particular uses, but most will admit that in recent years paint manufacturers have made huge advances in high-performing water-based paints and finishes for wood. In fact, even as we speak there is a new generation water-based primer that claims to be able to stain-block as well as shellac.
Read the Paint Can
If your paint is intended for wood, the manufacturer should offer clear instructions for how to handle existing wood finishes. Follow those directions, use the recommended products and don’t hesitate to reach out to the company’s customer service to get instructions for your specific project.
Below are some links to several popular paint companies to help answer any specific questions you may have.
- Annie Sloan Chalk Paint
- General Finishes Milk Paint
- Miss Mustard Seed offers tips on preventing bleed-through with milk paint.
- Fusion Mineral Paint
- Heirloom Traditions All-in-One Paint
- Rust-Oleum Spray Paints
Also, we mentioned that it’s difficult (read: multi-step process) to identify some wood finishes, but Waterlox made an amazing and comprehensive finish identification guide if you want to throw on the lab coat.

You Can Chalk Paint That! 29 Photos
If you think chalk paint is only reserved for farmhouse vibes, think again. Chalk paint creator Annie Sloan shares 12 tips for working with chalk paint that’ll inspire your next weekend DIY.


