Install Paper-Faced Drywall Corners
The method most of us use to finish rooms with drywall has been around since World War II. Back then, it was a big improvement over plaster, especially in cost and efficiency of installation. But finishing drywall usually takes three times longer than hanging it, and if it's not finished right, it's likely to cause all kinds of problems, such as nail pops that result in warped or cracked walls.
- Measure the length of the corner of the wall.
- With the corner bead in its prefabricated shape, run it through the mud hopper from one end to the other, making sure it is evenly coated.
- Now align the bead with the drywall corner and use the mini-roller to press it into place.
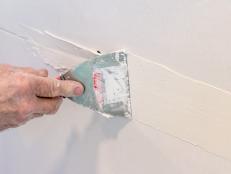
- Use your taping knife to remove excess mud and apply a thin layer of joint compound over the bead.
- Let the mud dry, and then sand it until the corners are smooth.
- Apply a second coat that's wider than the first and feather it out at the corners.
- Shine a light parallel to the wall to check for any bumps or irregularities.
- The paper-faced corner bead offers many advantages over the traditional method of finishing corners. It's faster and allows a more flexible corner. And since there are no nails or screw, there is no chance of nail or screw pops.