


Make a Headless Horseman Figure for Halloween

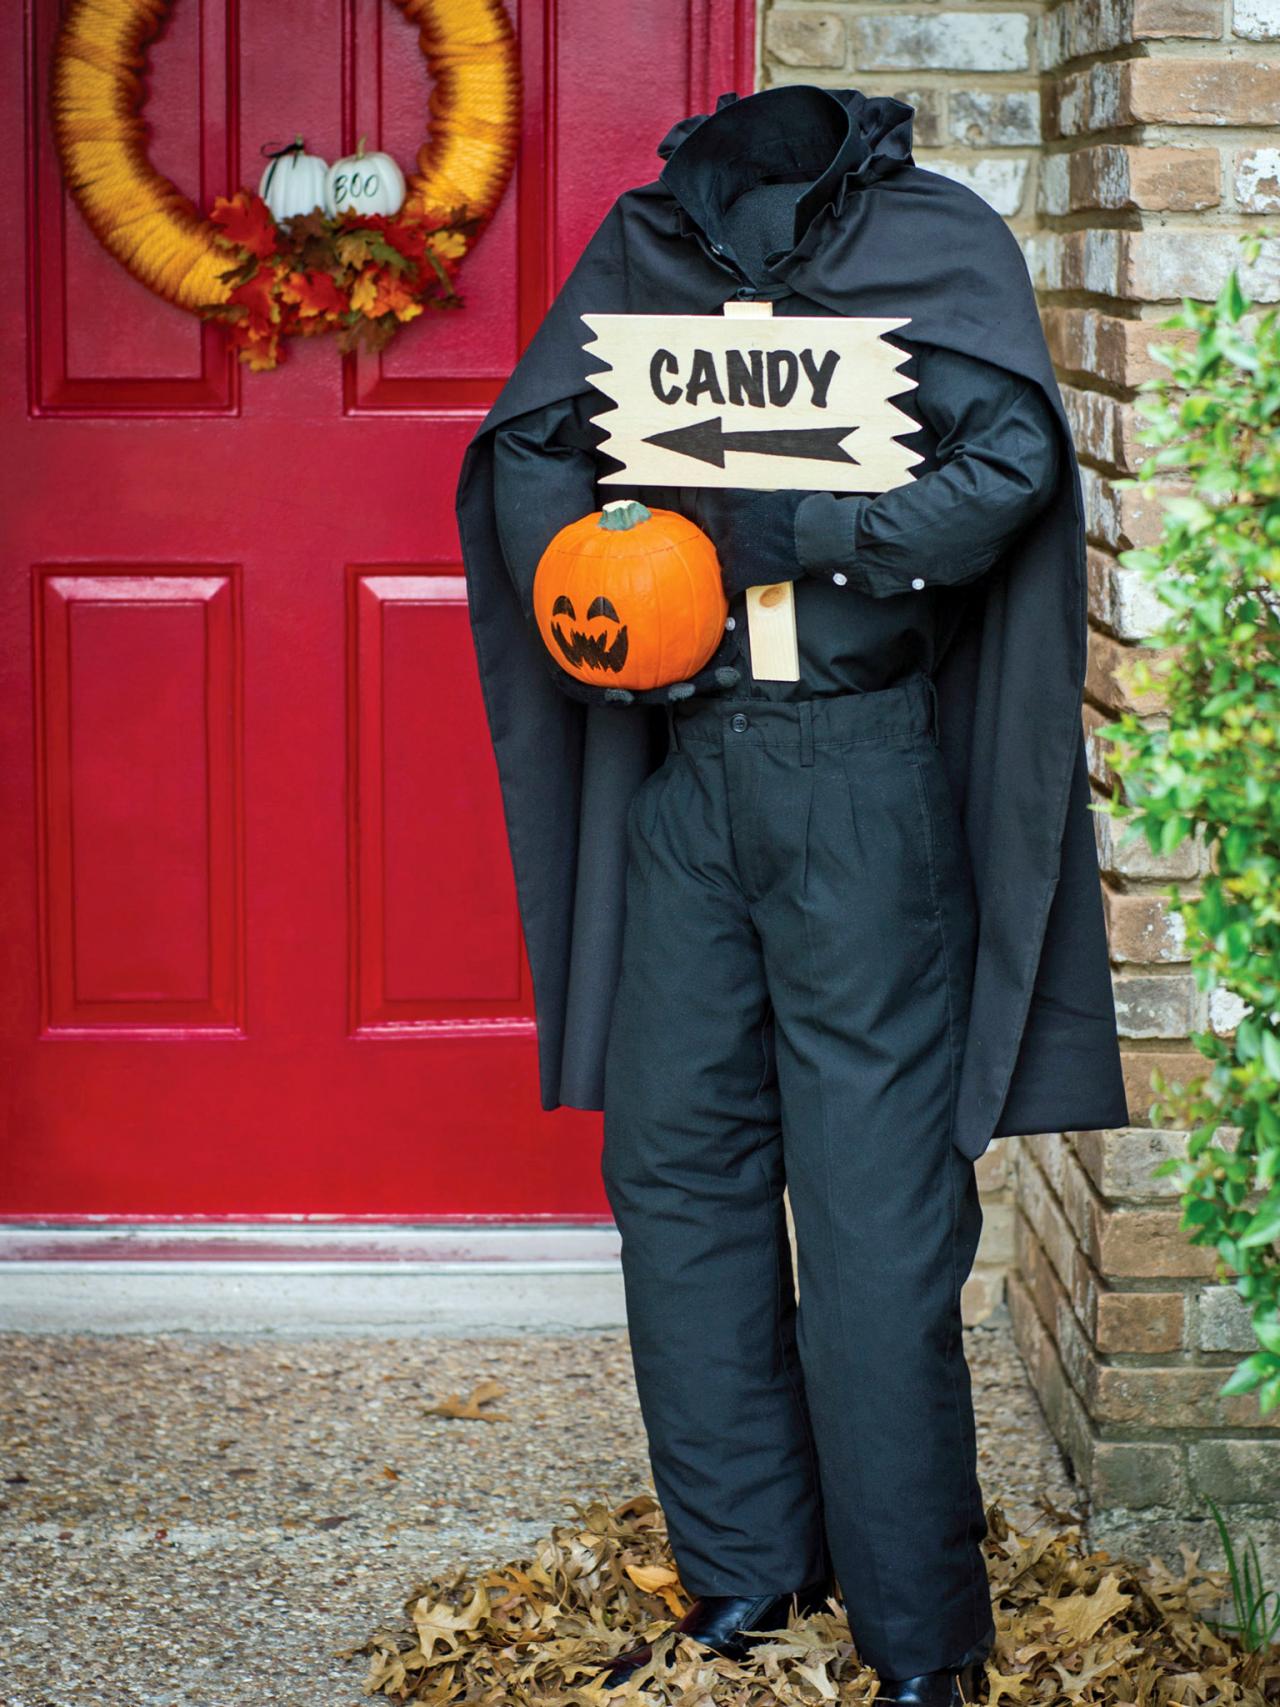
Headless Horseman Door Greeter: Beauty 1
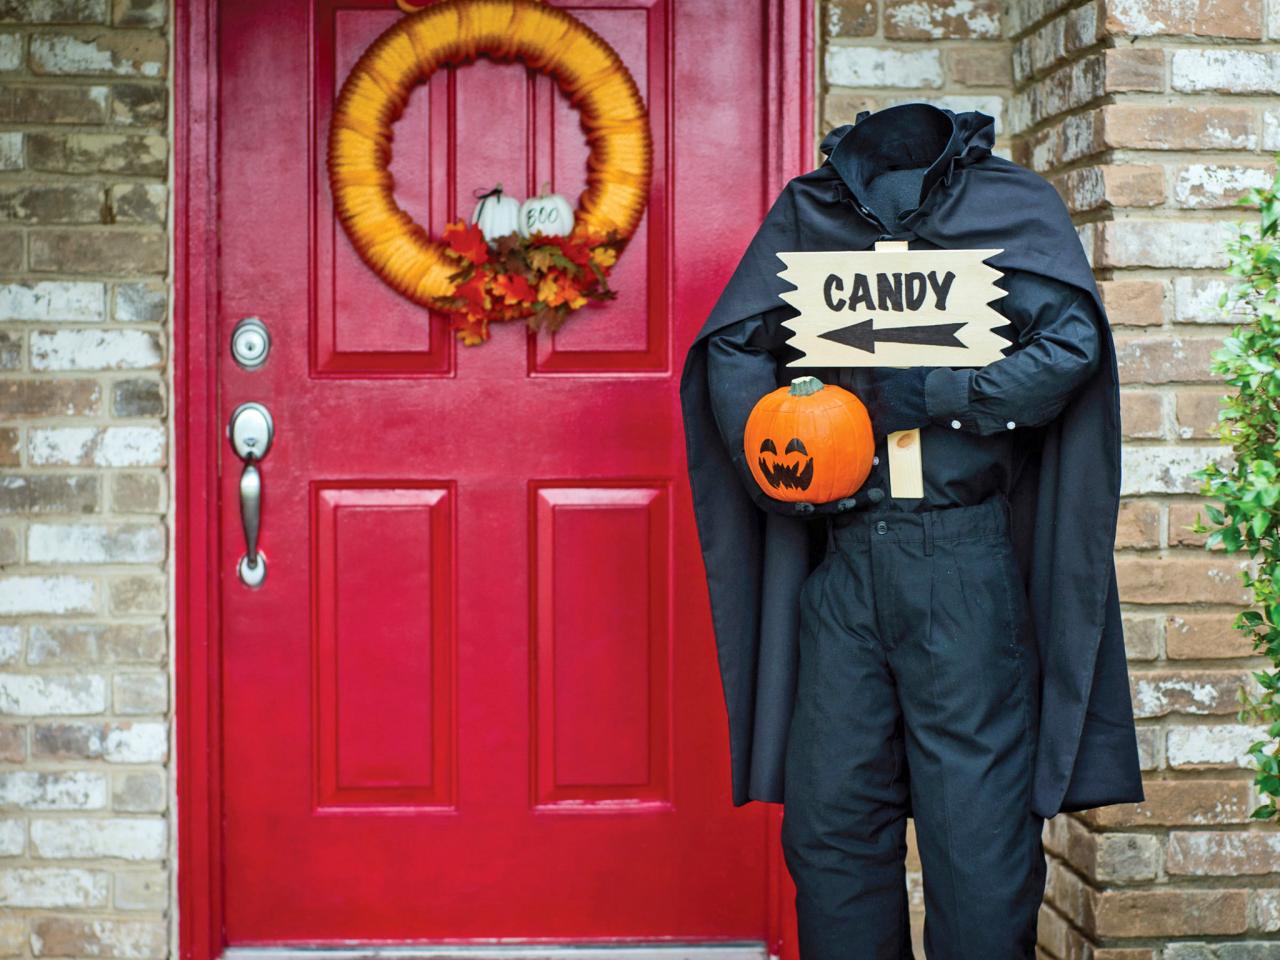
Add some spooky to your steps with this creepy door greeter. The sign tells guests where to find the candy.

Materials Needed:
- 15" x 15" square of 1/2" thick mdf board
- small men's or kid's dress shoes
- (4) 3/4" screws for flange
- 1/2" galvanized floor flange
- 4' galvanized pipe (1/2" diameter)
- 1/2" galvanized T
- (2) 6" galvanized pipes (1/2" diameter)
- 2 wire hangers
- kid's black pants and dress shirt
- safety pins
- 2 yards of black fabric for cape
- 1 yard of black grosgrain ribbon (1/2" wide)
- black trash bags
- shredded paper or fiber fill to stuff clothes
- black child size gloves
- tissue paper
- small foam pumpkin
- craft wood sign and sign holder
- felt tip marker
- needle and thread
- glue gun and glue sticks or heavy duty double-stick tape
- painter's tape
- Download: Candy Sign Template
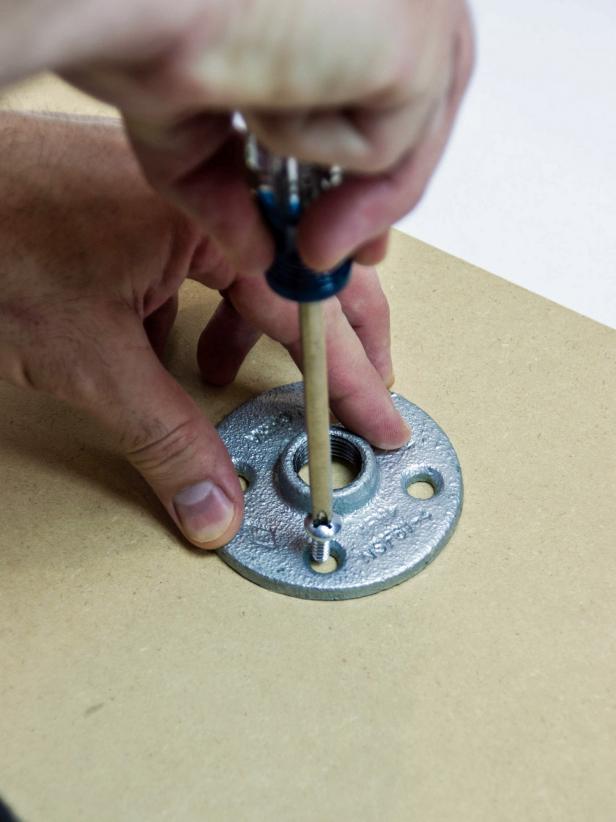
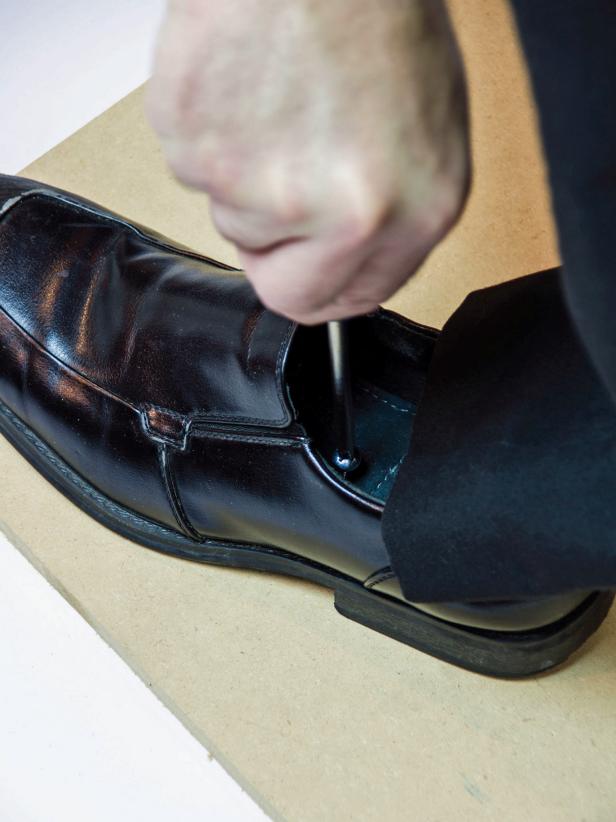
Create the Base
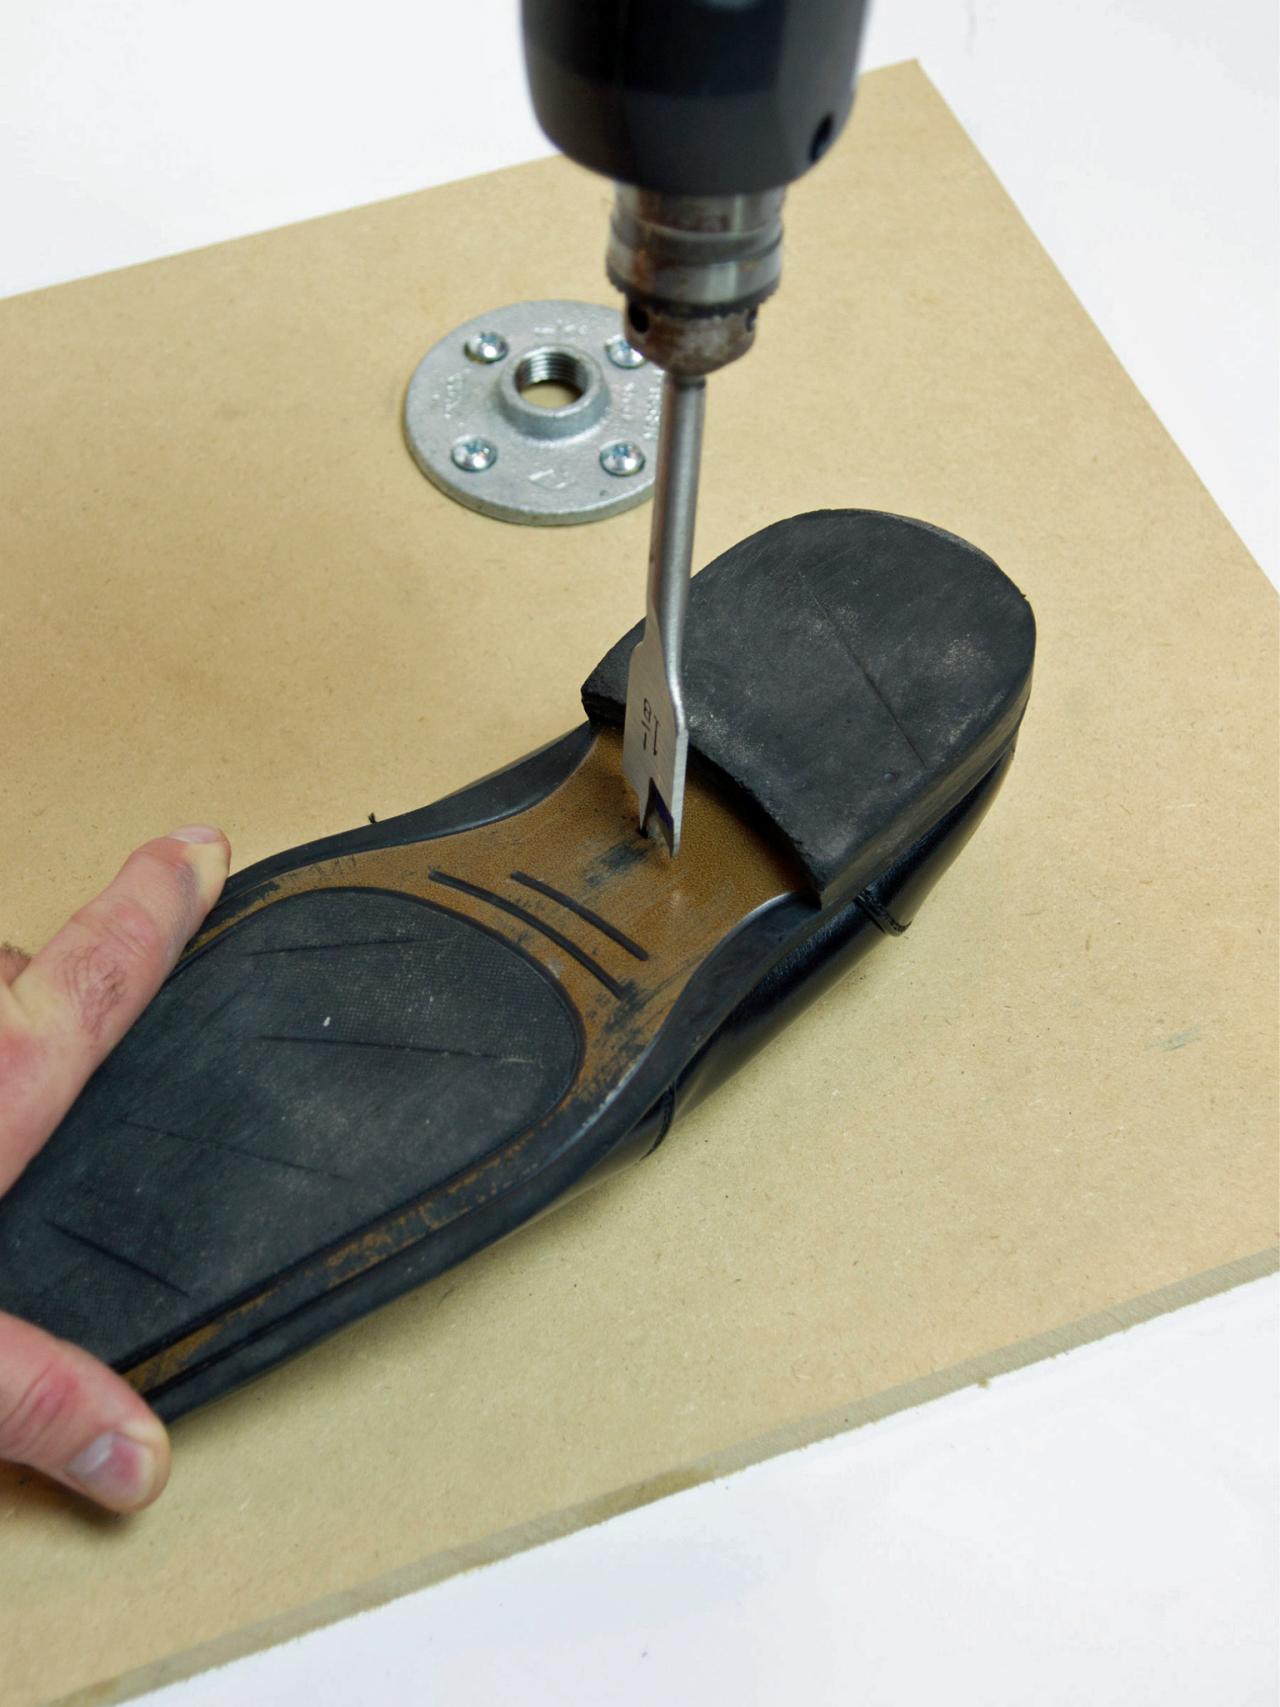
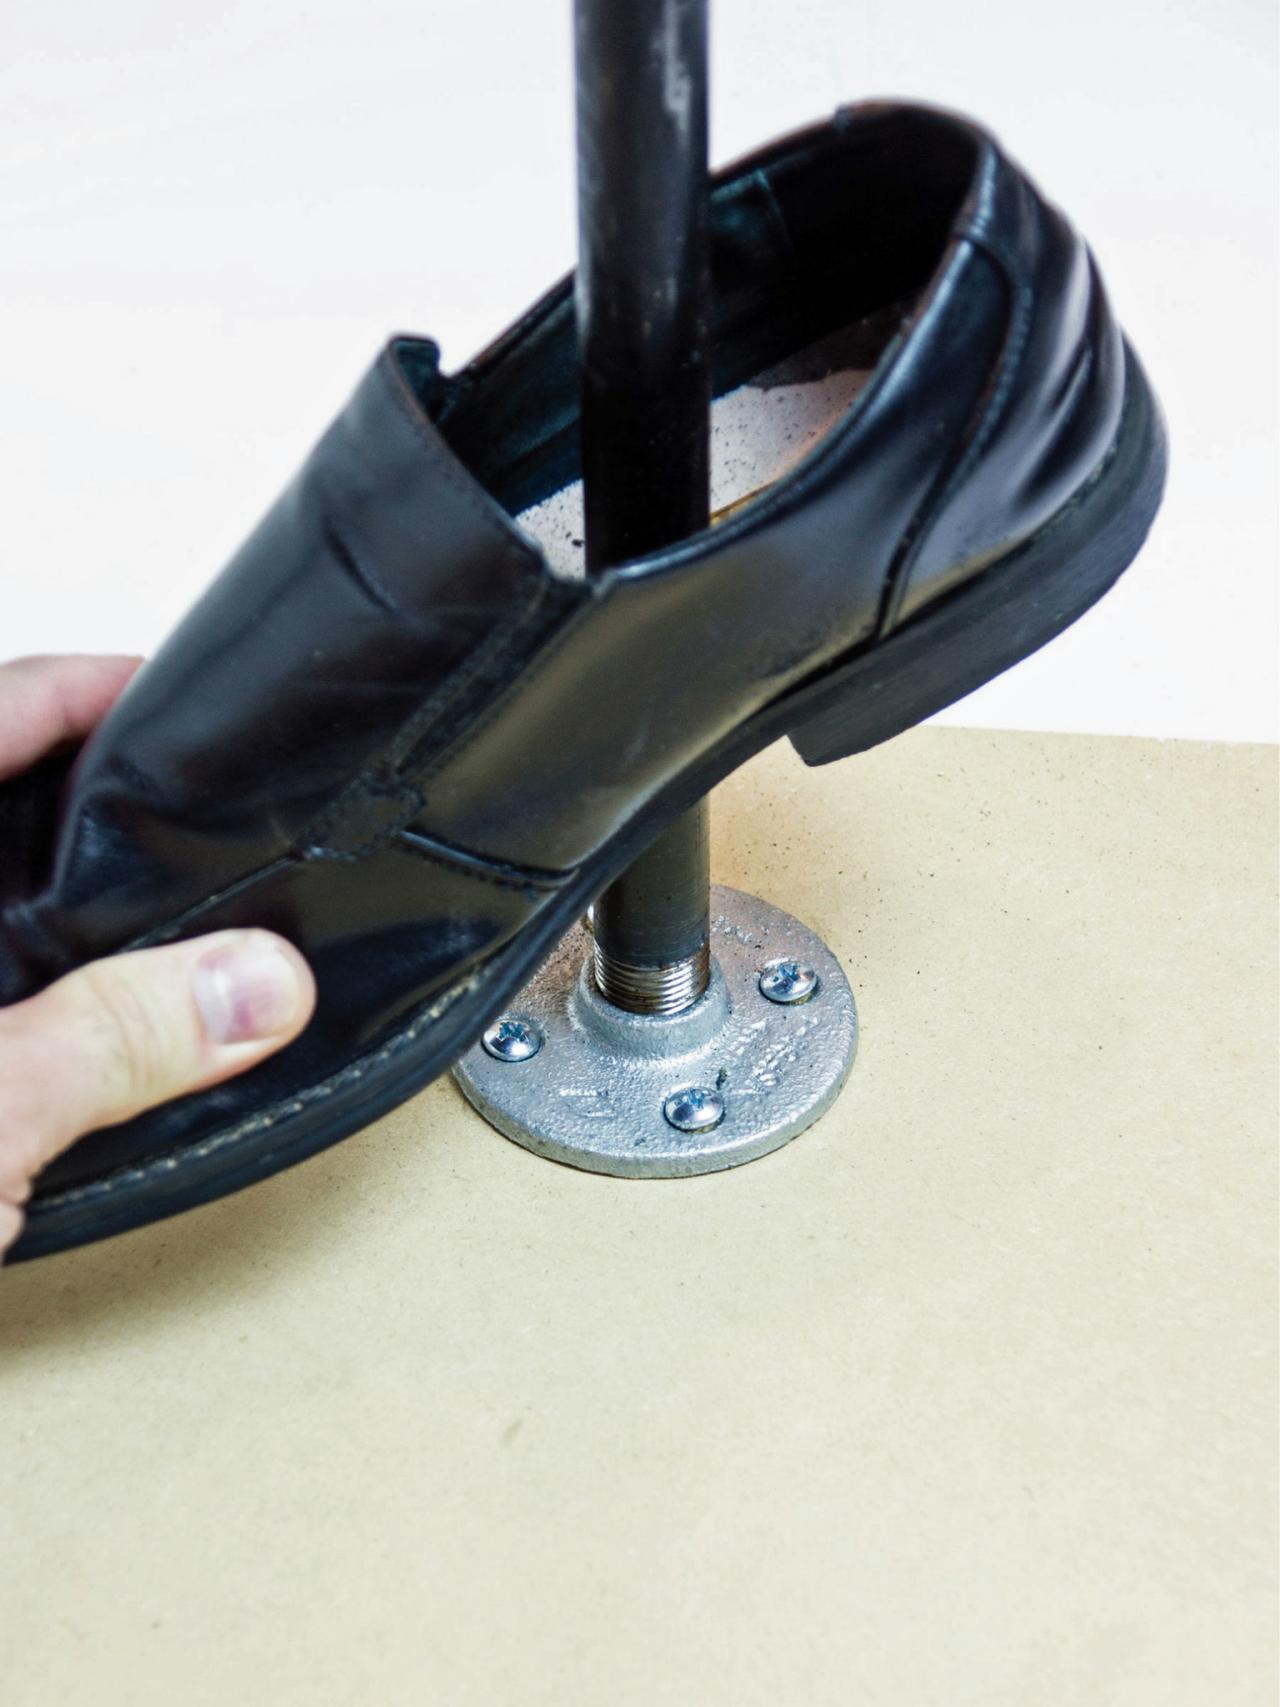
Start by placing the shoes where you want them on the mdf board. Attach the galvanized floor flange to the mdf board under the right shoe, just in front of the heel, using 3/4" screws (Image 1). Then, using a 1-1/8" drill bit, drill a hole in the bottom of the shoe just in front of the heel (Image 2). Tip: If you encounter a metal shank inside the sole of the shoe, remove it with a pair of pliers. Next, attach the galvanized pipe to the floor flange and slide the shoe over the pipe (Image 3).


Headless Horseman Door Greeter: Step 2
Attach the galvanized floor flange to the 15” x 15” mdf square at the spot under the right shoe and just in front of the heel using 3/4” screws.
Headless Horseman Door Greeter: Step 3
Using a 1-1/8” drill bit, drill a hole in the bottom of the shoe just in front of the heel.
Headless Horseman Door Greeter: Step 4
f you encounter a metal shank inside the sole of the shoe remove it with a pair of pliers. Attach the galvanized pipe to the floor flange and slide the shoe over the pipe using the new hole.
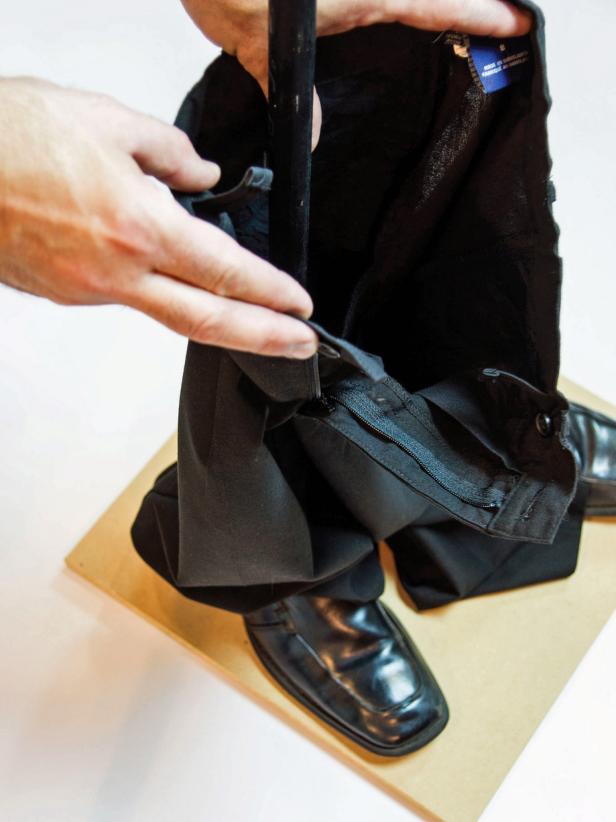
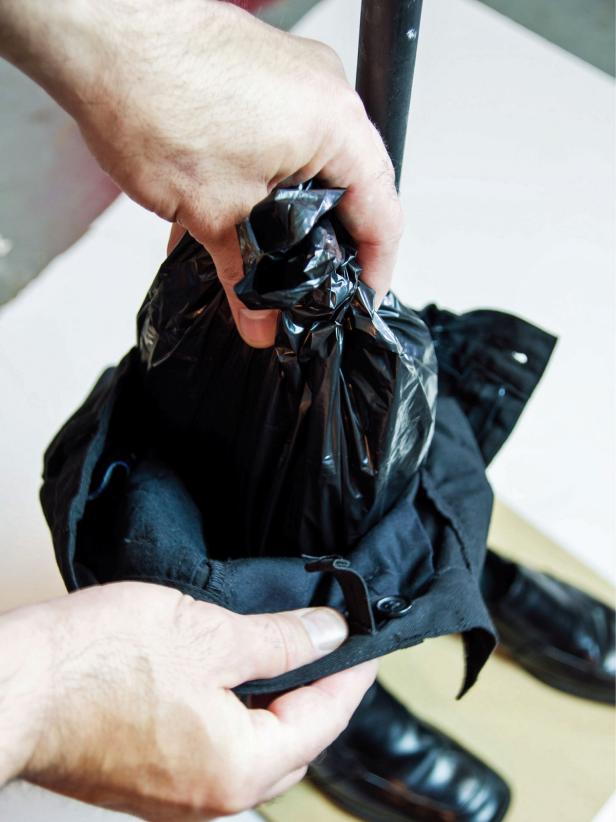
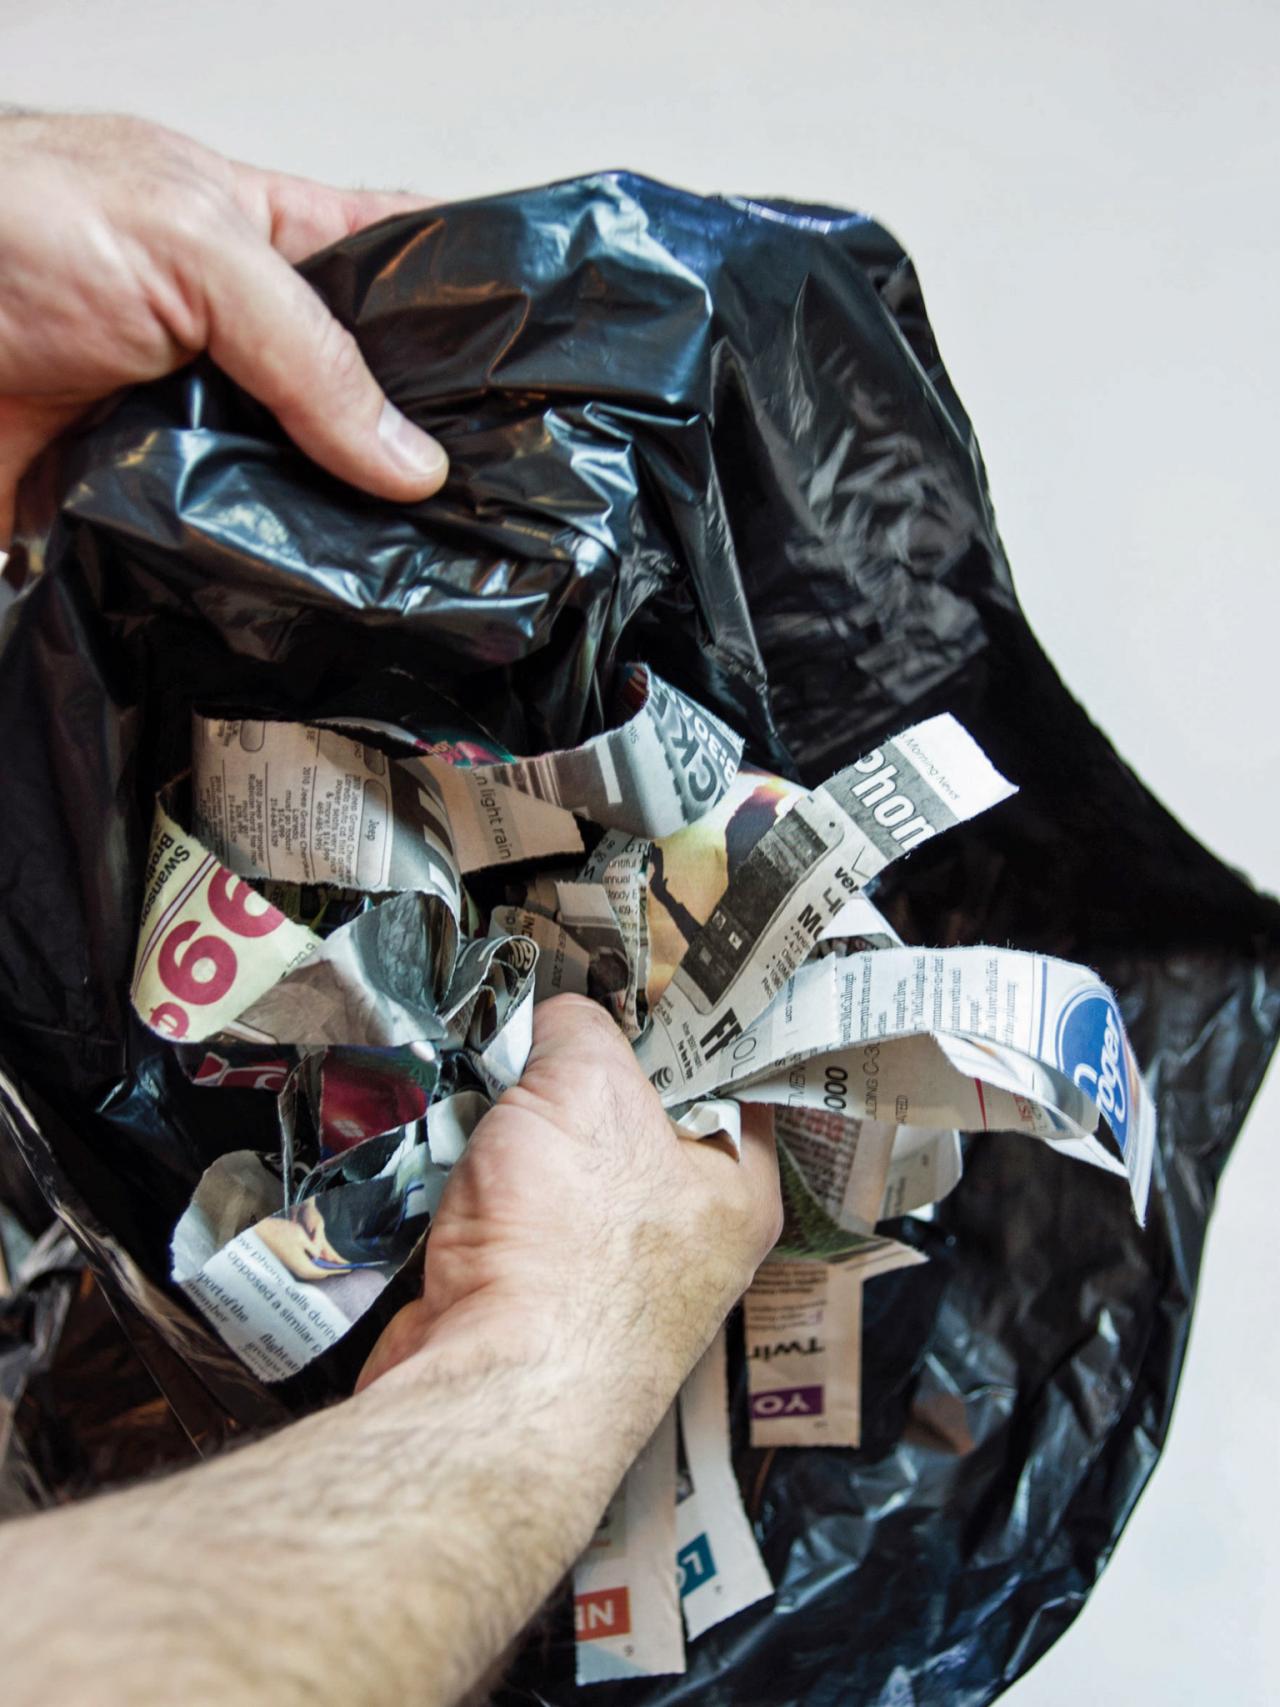
Create Legs
Stuff a black trash bag with shredded paper or fiberfill and roll the bag to make a log shape (Image 1). Place the right leg of the dress pants over the pipe (Image 2) then insert the filled trash bag into the pants leg (Image 3). Add or remove filling to reach the appropriate size and shape of the leg. Next, attach the left shoe to the platform accordingly by screwing a wood screw through the inside of the shoe and into the mdf platform (Image 4). Insert another filled trash bag into the left pants leg and temporarily clamp or tape the bag and waist of the pants to the pipe.

Headless Horseman Door Greeter: Step 8
Add or remove filling to make it the right size. Attach the left shoe to the platform using a wood screw through the inside of the shoe and into the mdf platform.
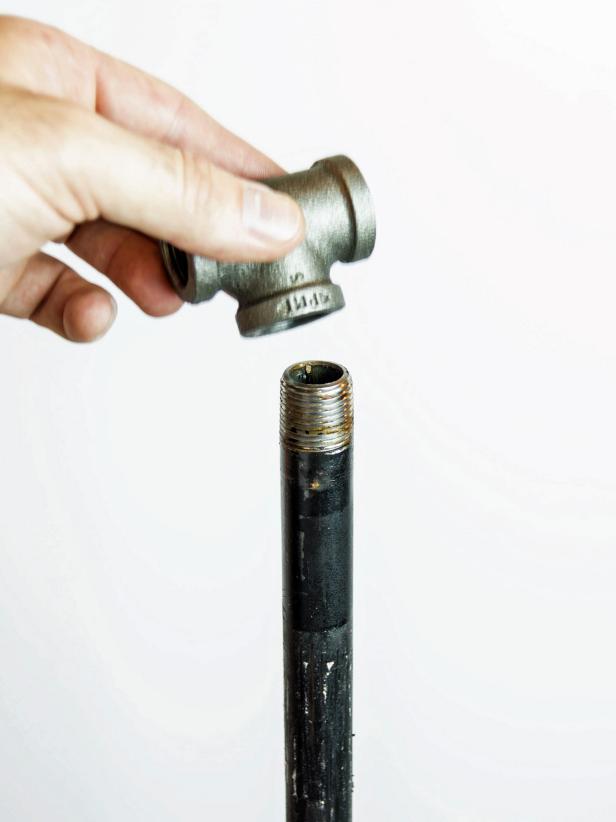
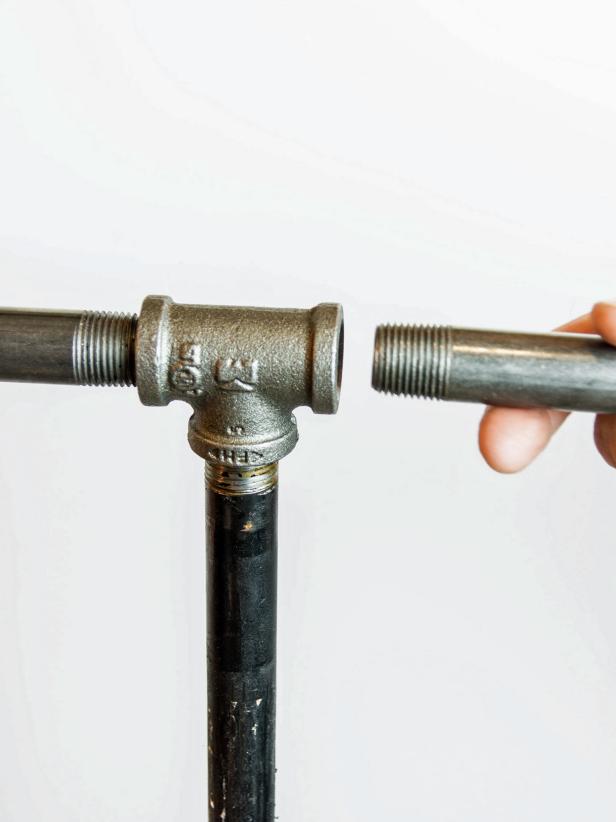
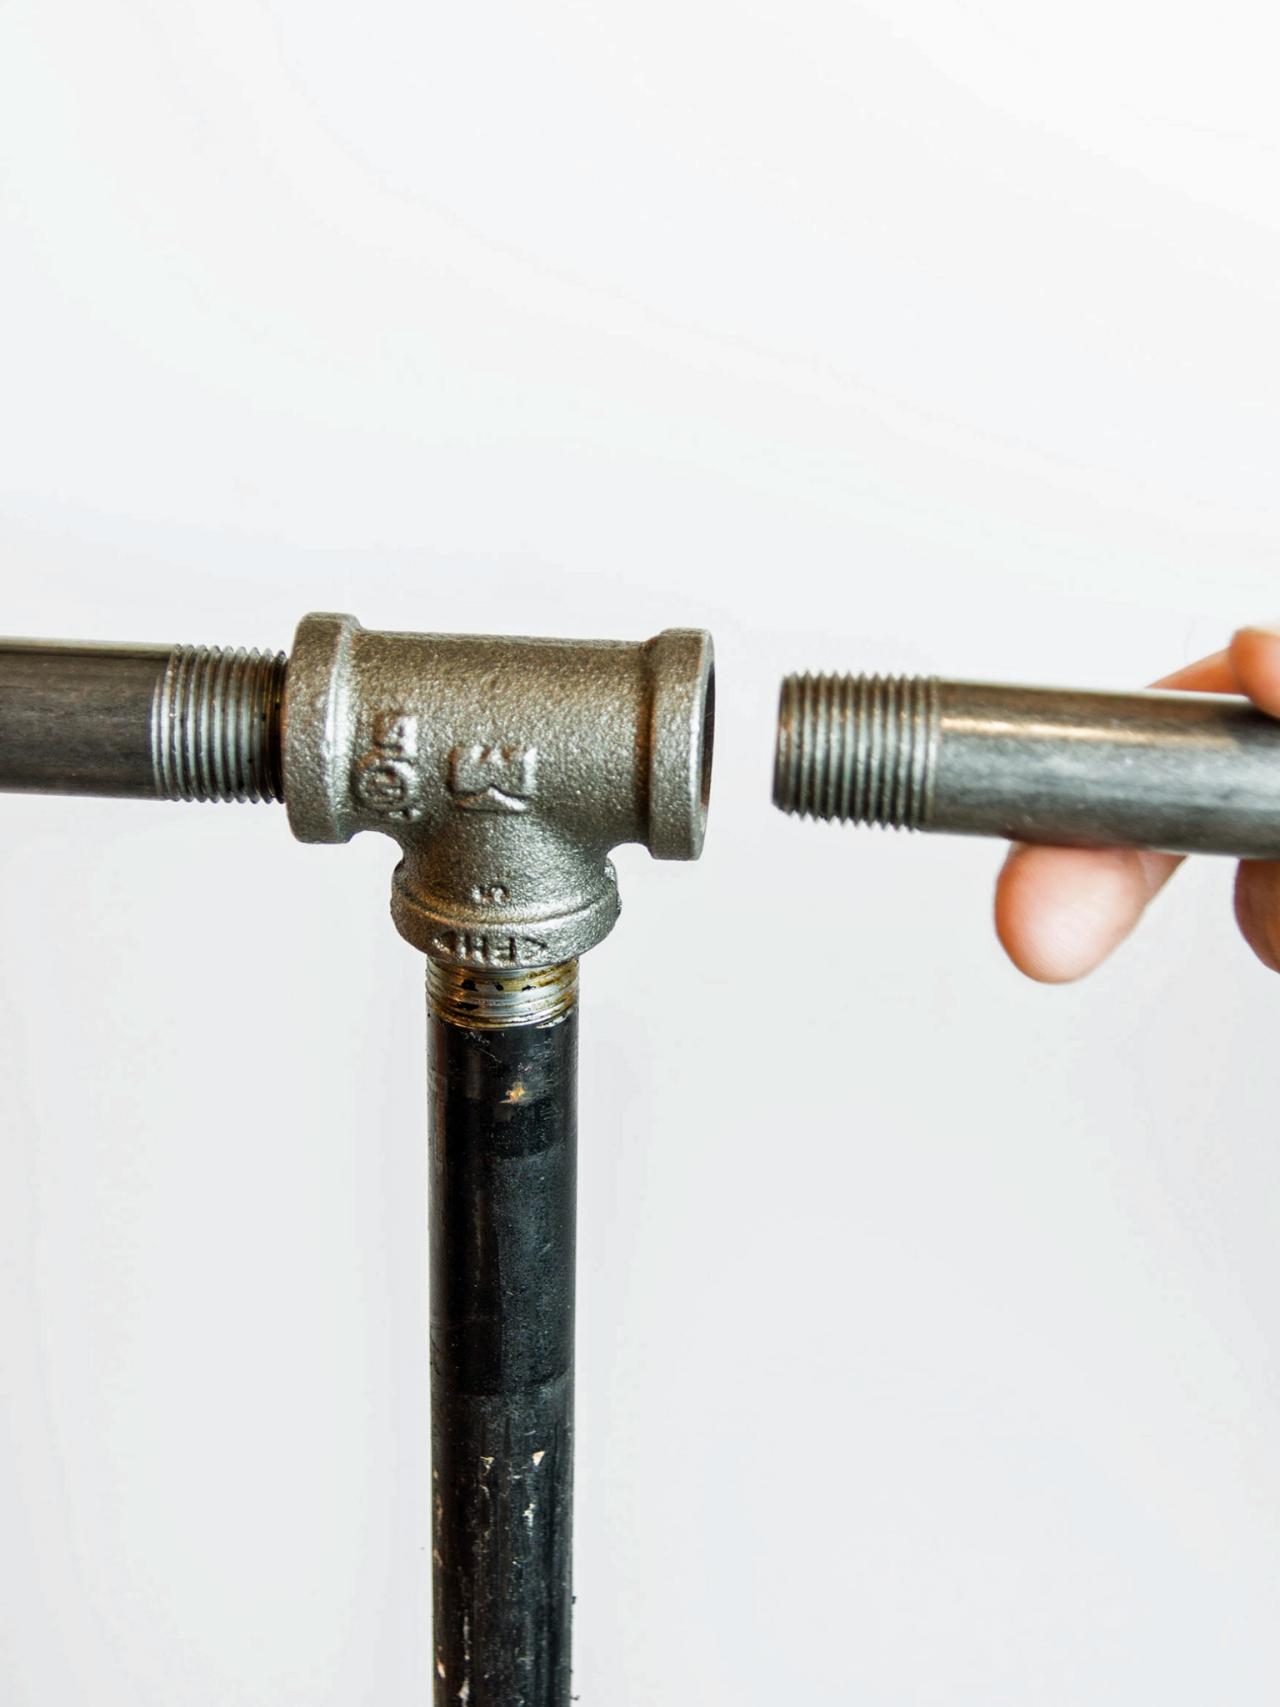
Create the Arms
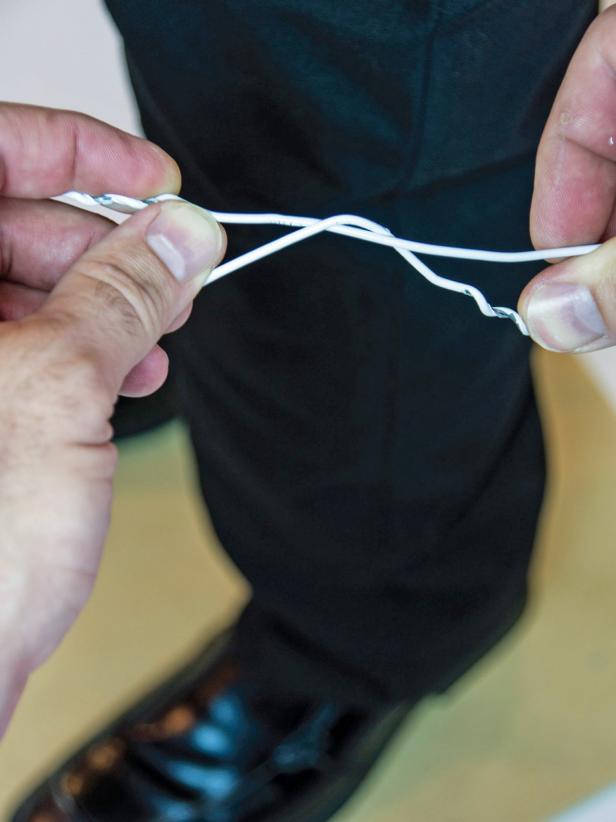
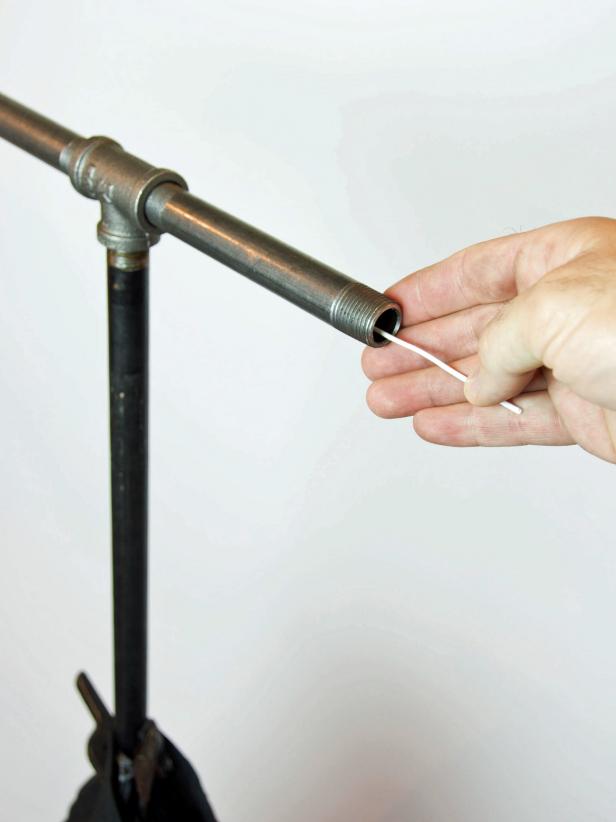
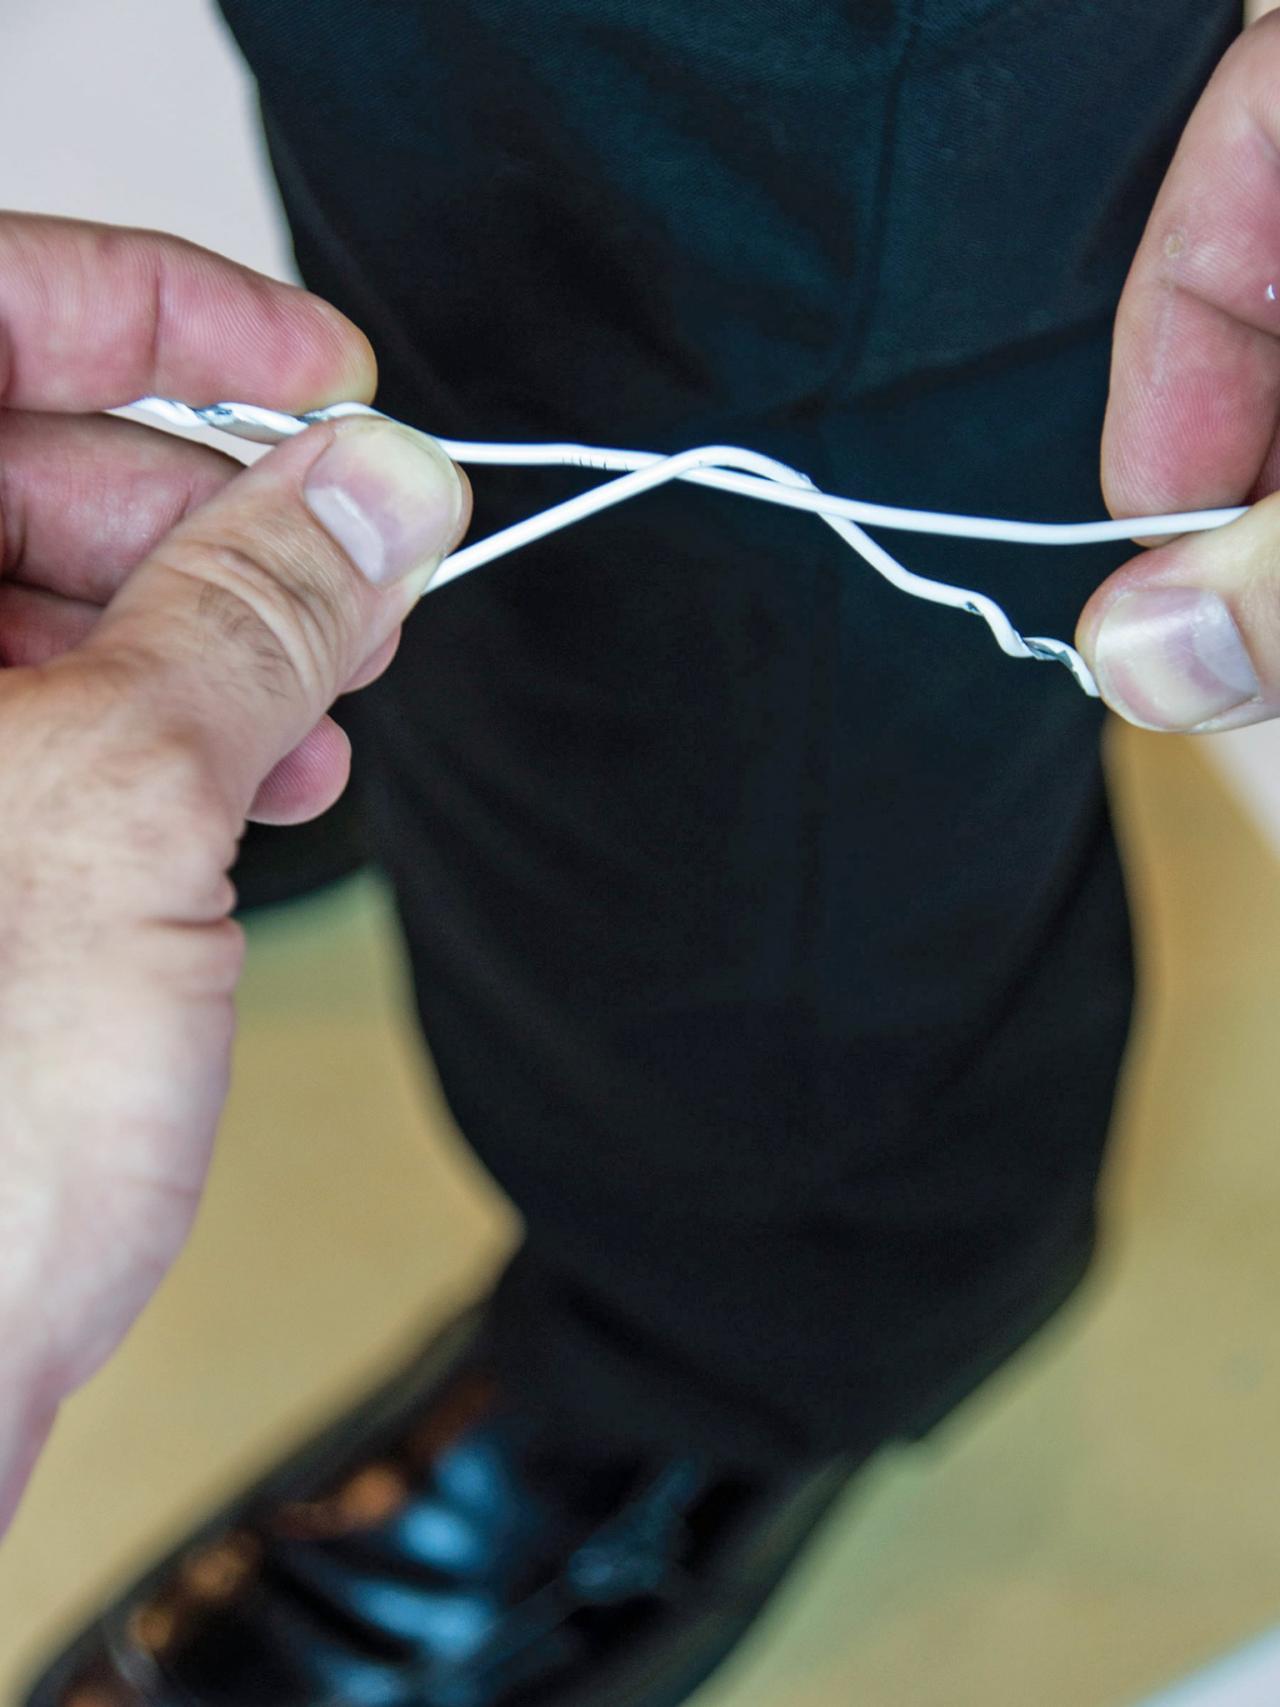
Add the galvanized T to the top of the galvanized pipe (Image 1). Next, attach the 6" pipes to both open sides of the T (Image 2). Untwist 2 wire hangers, straighten them out as much as possible, then twist the ends of both hangers together with at least a 4" overlap (Image 3). Feed the wire through the 6" pipes and T connector with the twisted section of the wire hidden in the middle of the T (Image 4). Next, place a black trash bag inside another black trash bag and roll it up from side to side about half way to create an arm shape with an 'elbow' in the middle. Using tape, attach one end of the trash bag arm to the end of one of the 6" pipes and tape the other end to the wire. Now roll the other side up to the center and secure it in the same way encasing the end of the pipe and the wire. Repeat for the other side (Image 5).

Headless Horseman Door Greeter: Step 9
Make another “log” out of a black trash bag and filling. Place the log inside the left leg of the pants and into the left shoe. Clamp or tape the bag and top of pants to the pipe temporarily. Add the galvanized T to the top of the galvanized pipe.
Headless Horseman Door Greeter: Step 13
Feed the wire through the 6” pipes and T with the wire connection in the middle of the pipes.
Headless Horseman Door Greeter: Step 14
Place a black trash bag inside another black trash bag and roll it up from side to side about half way. Attach one end to the end of one of the 6” pipes with tape. Attach the other end to the wire with tape. Now roll the other side up to the center and secure in the same way encasing the end of the pipe and the wire.
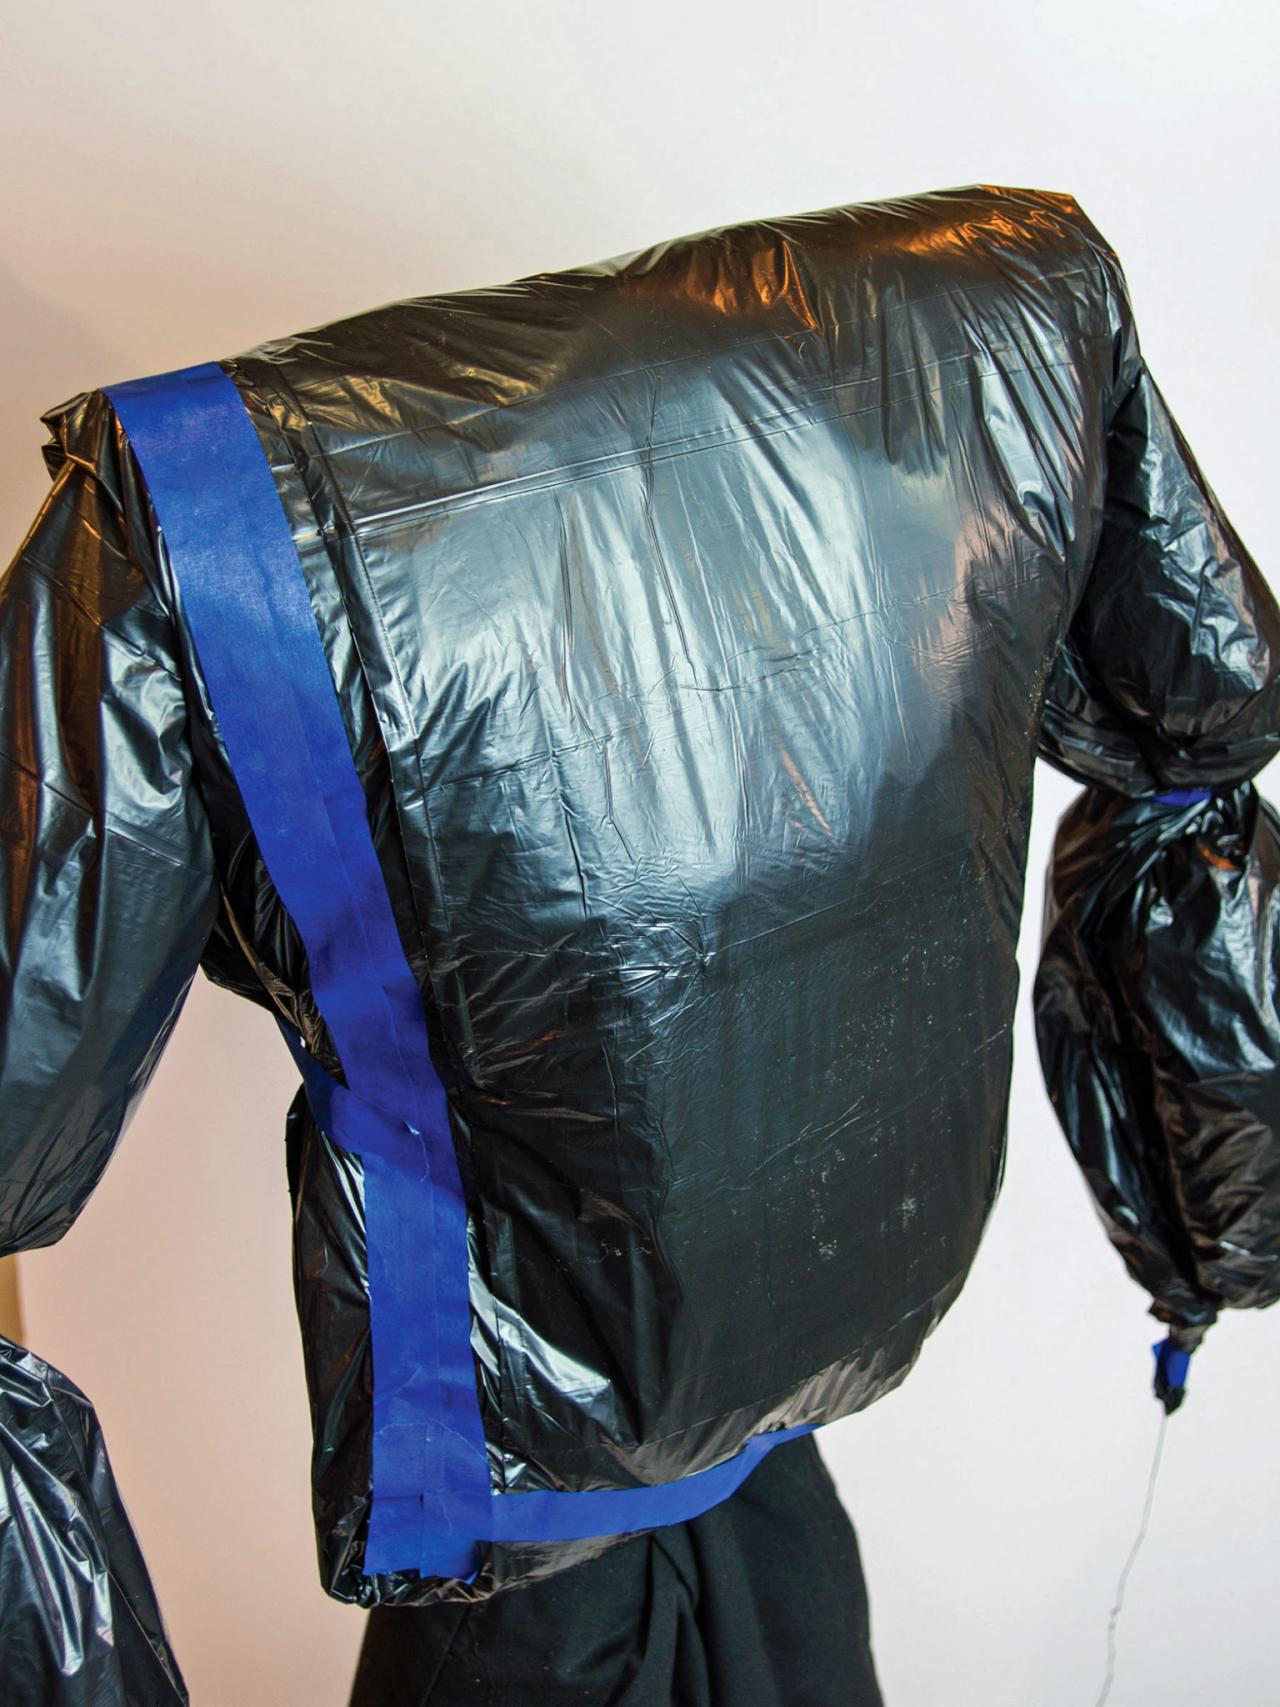
Fill the Torso
Open up a black trash bag and fold it in half lengthwise. Stuff the half bag to create a torso, then tape it closed on the top and bottom. Fold the bag over the top of the pipes and T. On the front, the bag should reach the top of the pants. On the back, it may only come about half way down. Attach the bag's back section to the front with tape.

Headless Horseman Door Greeter: Step 15
Repeat for the other side. Open up a black trash bag and fold it in half lengthwise. Stuff the half bag for the body about 4 inches tall and tape it closed on the top and bottom. Fold the bag over the top of the 6” pipes and T. On the front, the bag should reach the top of the pants. On the back, it may only come about half way down.
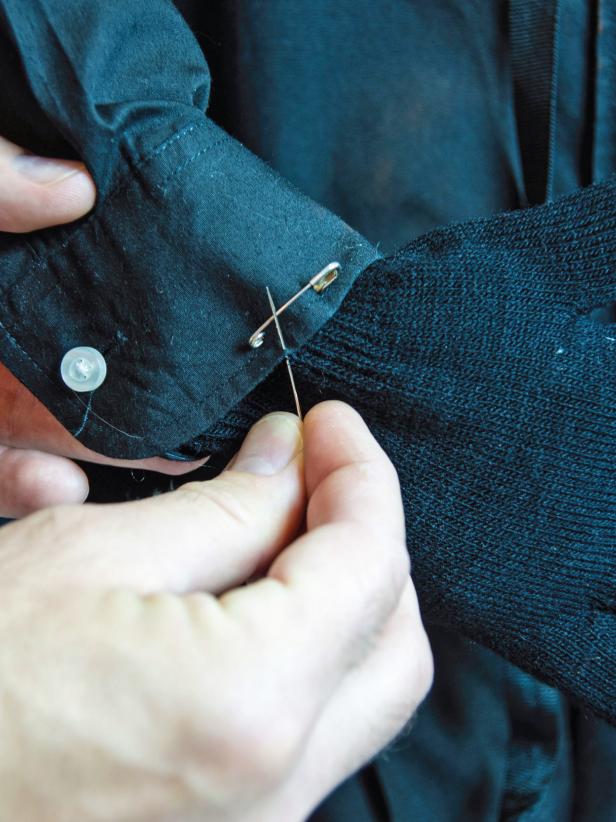
Add Clothing
Carefully add the shirt to your form by feeding the trash bag arms and wires through the sleeves, then button the shirt closed. Tip: If necessary, wrap tape around the torso portion to make it fit properly. Tuck the shirt into the pants and use a safety pin to temporarily hold them together. Fill in the remaining hip and back side of the horseman with shredded paper, then use a needle and black thread to sew the pants and shirt together around the waistband.

Headless Horseman Door Greeter: Step 16
Tape the back to the front. Add the shirt to your form carefully by feeding the wires through the sleeves first. Button it up and wrap tape around the “body” trash bag to make it fit properly. Tuck the shirt into the pants and hold temporarily with a safety pin. Fill in the remaining hip and back side area with filling. Using a needle and black thread sew the pants and shirt together around the waistband.
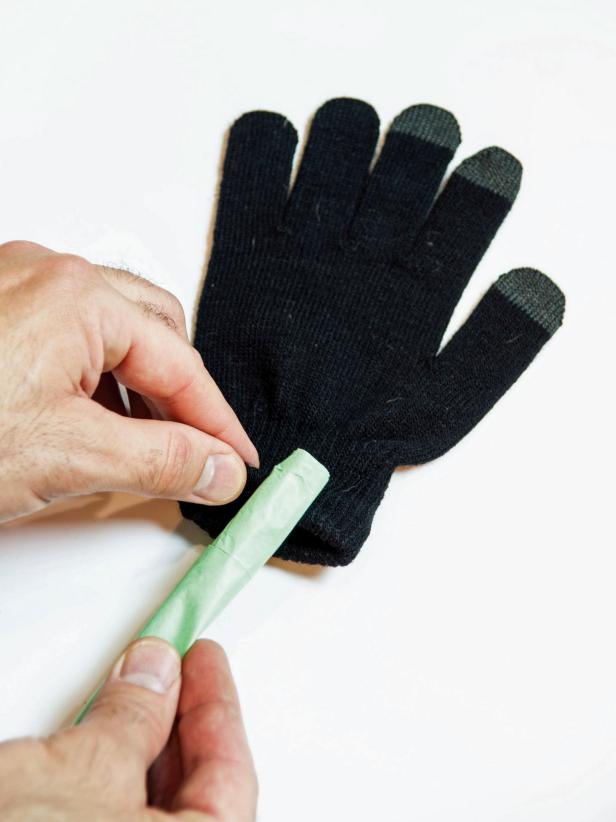
Construct Hands
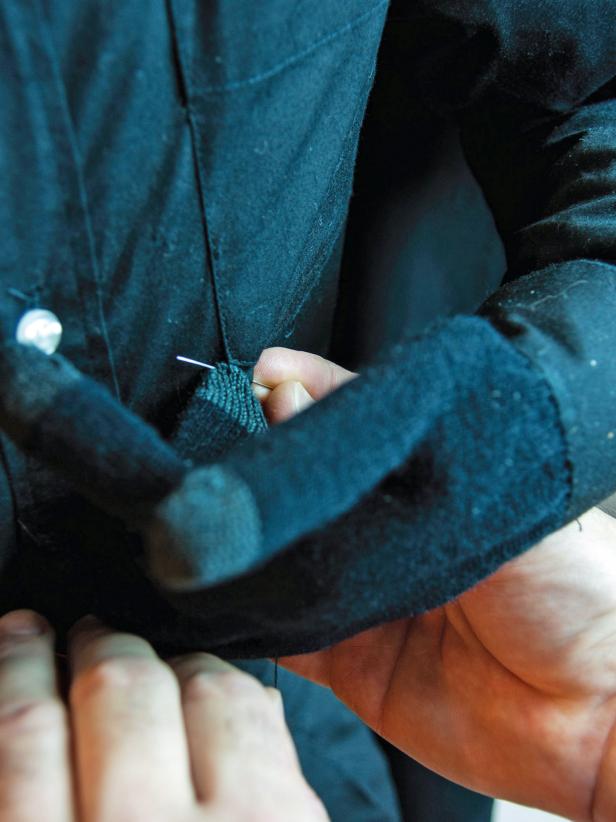
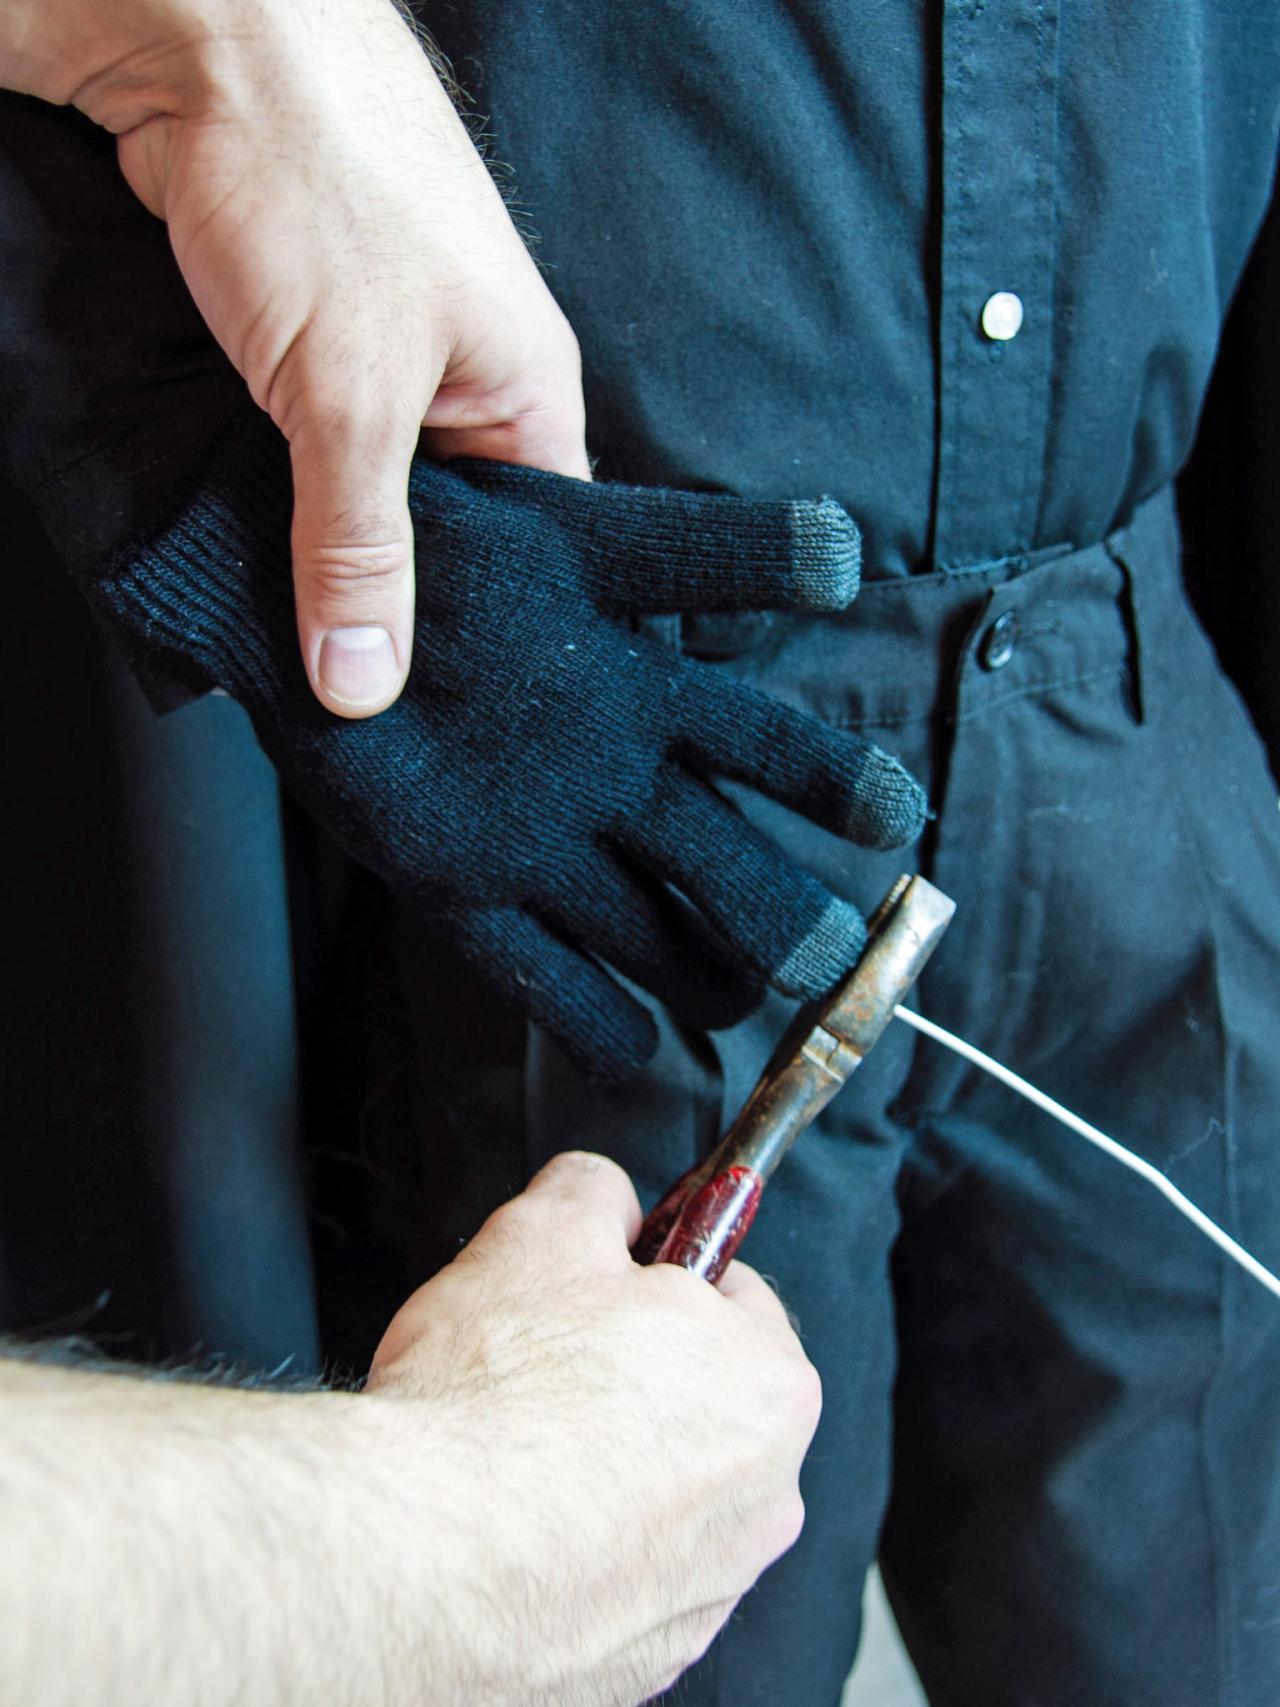
Roll sheets of tissue paper up tightly and insert into the fingers of the gloves (Image 1). Insert folded tissue paper into the palm and back of the gloves to create the look of a hand. Push the filling on one of the arm wires up into the sleeve and bend the wire where the elbow would be. Insert the glove into the sleeve. Measure it against the wire at the tip of the middle finger and cut the excess wire off (Image 2). Insert the wire into the opening of the glove all the way to the tip of the middle finger. Button the cuff around the glove and temporarily safety pin them together. Next, sew the two together all the way around the cuff with needle and black thread (Image 3). Repeat for the other arm.

Headless Horseman Door Greeter: Step 18
Add folded up tissue paper as the palm and back of the hand. Push the filling on one of the wires up into the sleeve. Bend the wire where the elbow would be. Insert the bottom of the glove into the sleeve. Measure it against the wire at the tip of the middle finger and cut the excess wire off.
Headless Horseman Door Greeter: Step 19
Insert the wire into the glove ending in the middle finger. Button the cuff around the glove and sew the two together all the way around the cuff with needle and black thread.
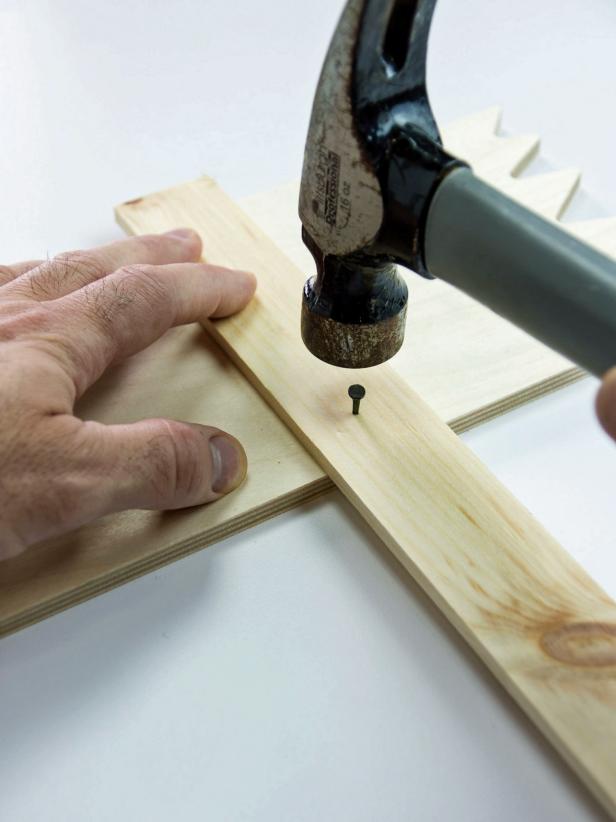
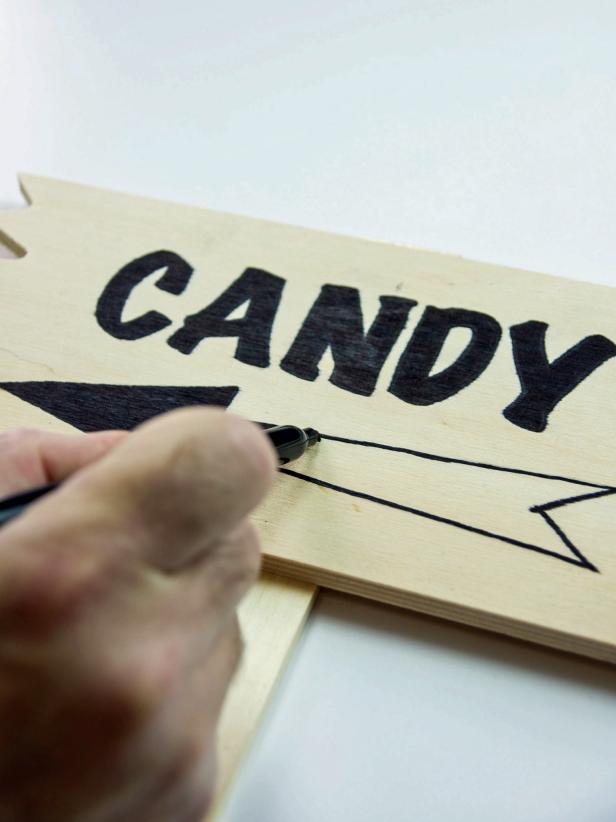
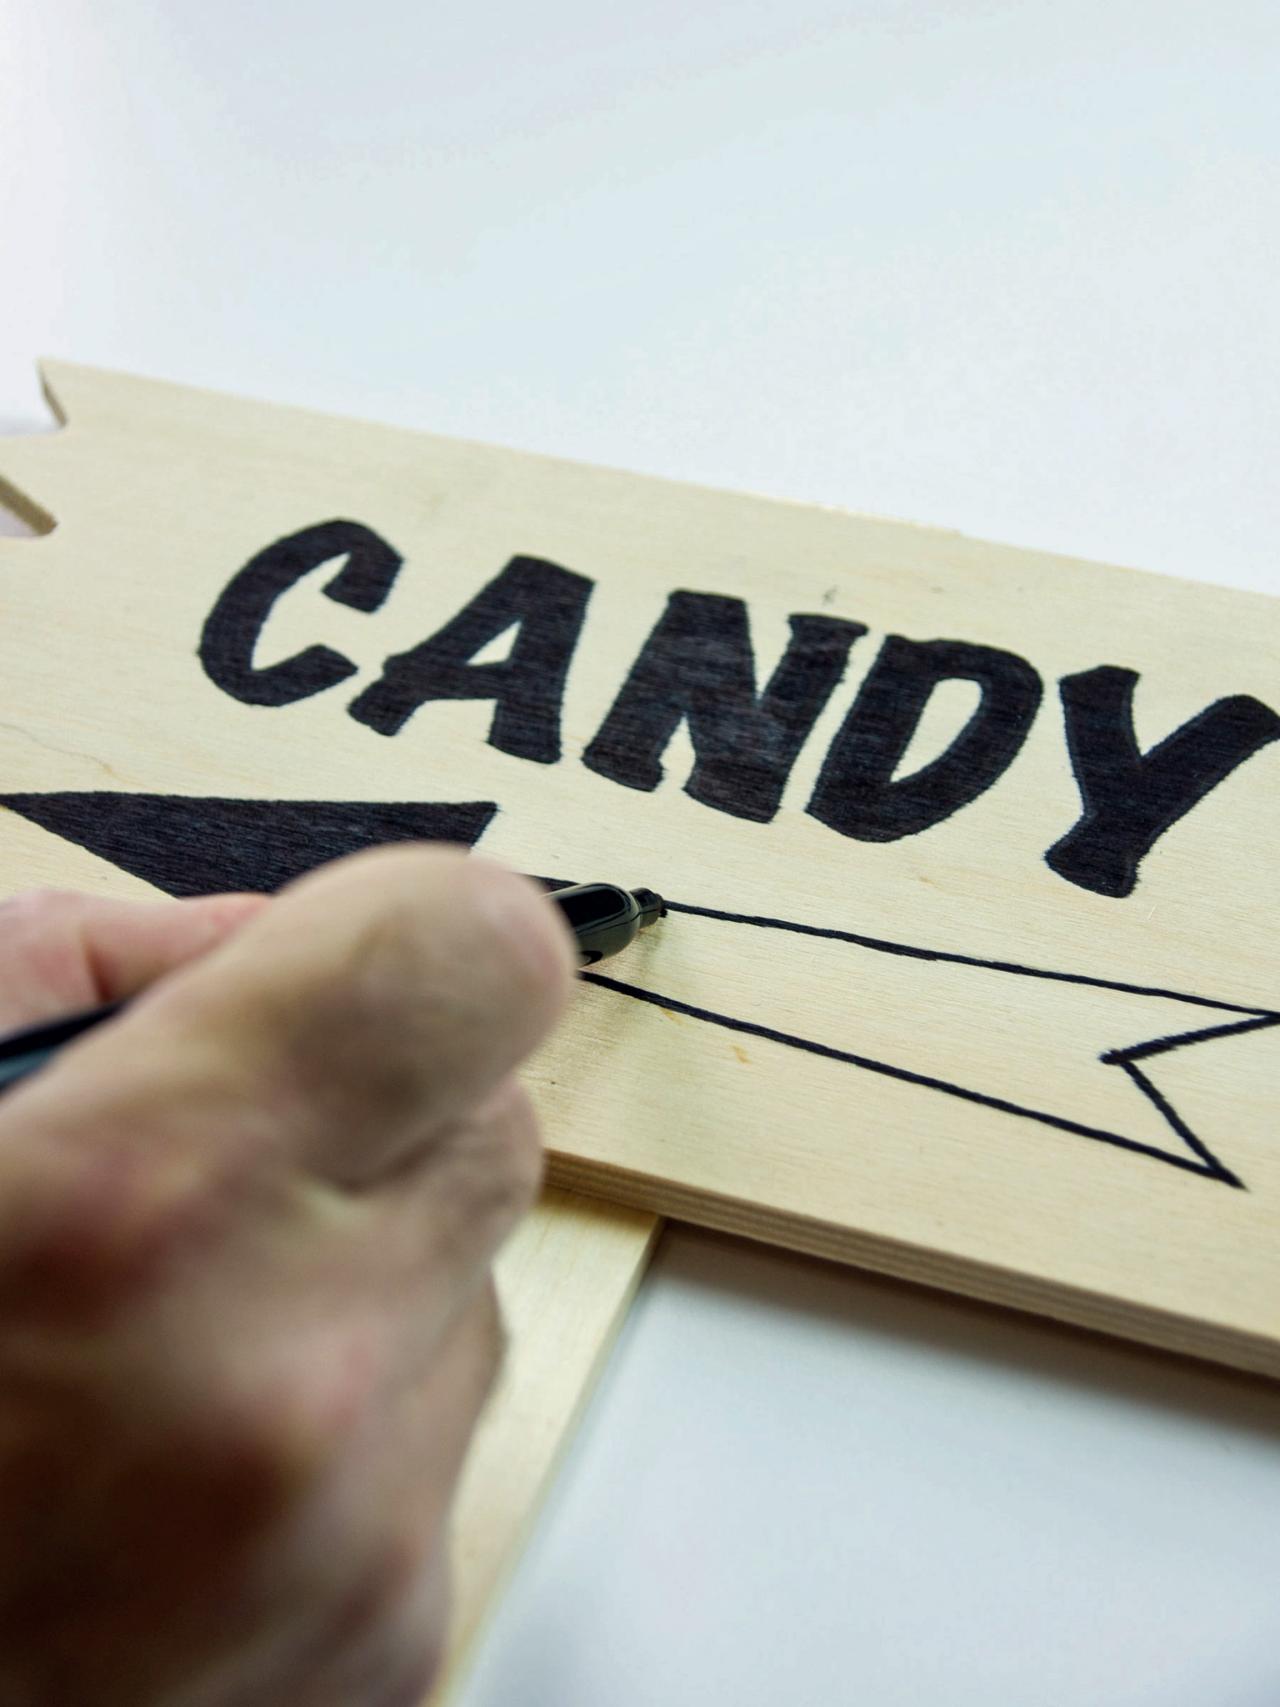
Create Candy Sign
Attach a craft wood sign to a sign holder with two small nails or brads (Image 1). Use provided template or freehand the message onto the sign, filling in the letters with felt tip marker or paint (Image 2). Place the sign in the left hand and curl the middle finger with the wire around the sign holder. Wrap the thumb around the back of the sign holder and sew the tip of the thumb to the tip of the middle finger. Sew both of them to the shirt at the bottom of the pocket (Image 3).
Headless Horseman Door Greeter: Step 20
Repeat for the other side. Make the sign by attaching a craft wood sign to a sign holder with two small nails or brads.
Headless Horseman Door Greeter: Step 22
Place the sign in the left hand and curl the middle finger with the wire in it around the sign holder. Wrap the thumb around the back of the sign holder and sew the tip of it to the tip of the middle finger. Sew both of them to the shirt at the bottom of the pocket.
Finishing Touches
Make the cape by folding the black fabric in half. Sew the open edges all the way around leaving 3" unsewn on either side at the fold. Use one of the 3" open spaces to push the fabric through to turn the cape inside out. Press the seams flat and attach a safety pin to the ribbon feeding it through one side of the cape's 3" opening and out the other side. Move the ribbon as far away from the top edge as possible then sew a 1/2" seam at the top of the cape to create a collar. Gather the neck together and add cape to the form, tying the ribbon to secure it.
Twist the hand on the right side as if it will hold something. Sew the pinky and ring finger of the right glove to the shirt's placket. Paint a jack-o'-lantern face on a foam pumpkin and attach it to the right hand glove with hot glue or heavy duty double-stick tape. To disguise the stand, pile leaves around the horseman's feet.

Headless Horseman Door Greeter: Beauty 3
Add some spooky to your steps with this creepy door greeter. The sign tells guests where to find the candy.


