


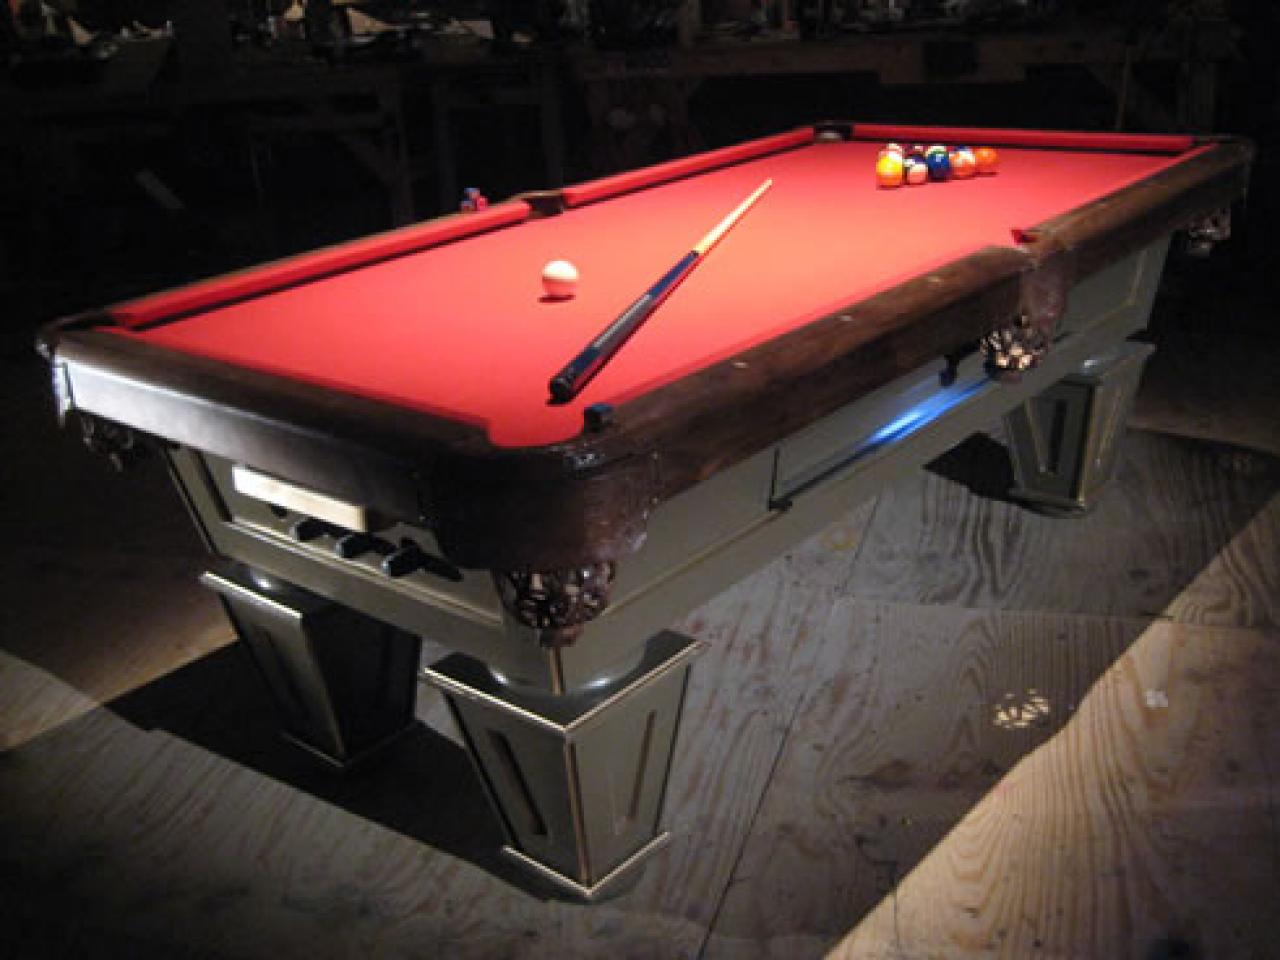
How to Build a Pool Table

The pool table in this project is constructed mostly of medium-density fiberboard (MDF) because it's sturdy and inexpensive. The underside is fitted with a honeycomb grid to preserve the top from warping. The table includes built-in compartments for the rack, cue sticks and billiard-ball tray. Walnut railings and a bright felt cover with gold trim add a touch of class.
Materials:
five sheets of 4-by-8½-inch medium-density fiberboard
five sheets of 4-by-8¾-inch medium-density fiberboard
five oak planks measuring 8 feet by 8 inches by ¾-inch
three walnut planks measuring 8 feet by 8 inches by ¾-inch
five 8-foot pine 2-by-4-inch boards
9-foot precut felt bed and rails (bright red)
two 16.5-oz cans of high-strength spray adhesive
six K-66-style 9-foot cushions (rubber bumbers), cut to fit for project
six Western-style tooled-leather pool pockets
billiard accessory kit (includes pool balls, wooden triangle, brushes, four cue sticks, cue chalks, pool-table cover)
1 gallon of dark brown latex paint
one roll of ½- or ¾-inch-wide white paper tape
two cans of gold spray paint
1 gallon of primer
one can of rich brown furniture wax
Tools:
table saw
chop saw
band saw
jigsaw
hole saw
manual saw
router
nail gun and nails
stapler and staples
wood glue
five to 10 wood clamps
lathe
chisels
sandpaper
orbital sander
drill
screws
biscuit joiner
biscuits
drill press
planers
measuring tape
disposable brushes
shop towels
razor blade
Dimensions:
Surface (playing area) total: 3½ feet by 7 feet
Legs (four):
- Tapered sides: 5 inches by 10 inches by 1 foot high
- Total leg dimensions: 6 inches by 11¾ inches by 16 inches high
- Bun at top: 3 inches high by 10 inches across
- Bun at bottom: 3 inches high by 7 inches across
Molding: 2 inches wide
Square (routered) top: 1 foot
Square (routered) bottom: 6 inches
Tapered Sides of Table:
- Long sides: 6 feet by 6 inches by 13 inches high
- Short sides: 4 feet by 13 inches high
- Molding: 2 inches wide
Ball holster/slot: 37 inches wide by 3 inches high
Holes (six): 4 7/8-inch opening with a 1/4-inch lip (round-over bit for router)
Rails: 2¾ inches (top flat surface) wide by 4 to 5 inches high
Rubber bumpers: 49-inch lengths (cut to fit); end dimensions 1.177 inches by 0.968-inch
Steps:
1. Using a table saw and chop saw, cut ½-inch 4-by-8-foot medium-density fiberboard (MDF) sheets into the tapered sides of the four legs (two of the same side for each leg). There is no exact angle to the taper. Cut an opening in the center of the duplicate side of each leg with a band saw, which forms a 2-inch rim (it looks like a frame).
2. Cut out two ¾-inch MDF squares for each leg - the top is a 1-foot square, and the bottom is a 6-inch square - and router the edges. Cut oak planks into 1-by-1-inch strips to fit the four corners of the tapered sides. Router the strips, mimicking the squares. Everything for the legs should be glued and nailed into place.
3. For the top bun, cut and glue three ¾-inch-by-10-inch squares into a block. Clamp and let dry. Cut a circle out of the block (10-inch diameter). With a router and a lathe, form a convex edge on the bun. For the bottom bun, follow the same process, but use three ¾-inch-by-7-inch squares and form a concave edge on the bun. Sand as necessary. Glue and nail everything into place. Repeat process for all legs.
4. To create the tapered sides, cut four 78-by-13-inch MDF pieces, following the angle of the legs. Cut the 2-inch-wide molding out of two of the four pieces. The molding then goes over the full MDF pieces. Repeat the process for the ends, but use 48-by-13-inch pieces, and adjust measurements accordingly. Apply oak strips as step 2 describes. Glue and nail into place.
5. Once the sides are together, glue and nail 1-inch MDF strips into the inside edge of each corner.
6. On one of the longer sides of the table, centered, cut out a 37-by-3-inch rectangle in preparation for the ball slot. This removed portion will become the back wall of the ball slot, set inside the table. For the outside, cut a rectangle frame from oak strips: the topmost strip is 1 inch wide and about ½-inch beyond either side of the rectangular hole; the side is ½-inch wide plus the height of the hole; the bottom protrudes about 2 inches and slopes up to hold the balls. Router the edges for style. The front-most edge will be ½-inch thick. Glue and nail into place.
7. For support, add 2-by-4’s across the length of the bottom of the table.
8. With the ball rack on your right, with a hole saw, drill four 1½-inch-wide holes spaced 1 inch apart in the short end of the table, and 3 inches above the bottom molding.
9. Each hole has a three-sided rectangular frame inside the table to hold the cues. The sides are 3 inches wide and about 60 inches long and are cut out of ¾-inch MDF. Glue and nail the sides into place and inside the table surrounding each hole accordingly.
10. Cut a 3-inch-high, 1-foot-wide rectangle of MDF 2 inches above the holes for the cues. At the bottom edge of this hole, you will nail and glue in a 9-inch-long, 14-inch-wide platform to hold the triangle. To hold the two angled sides of the triangle, nail snugly between these two pieces.
11. Cut four L-shaped pieces (about 3 by 3 inches) of ¾-inch oak to act as guides for each position on the corners. Find consistent leg positions, and then screw in the guides so the legs always find their place. Sand everything lightly with sandpaper and an orbital sander.
12. Cut a ¾-inch sheet of MDF to fit the top of the table using a circular saw; it will extend 6 inches on each side (for the rail and bumper). Using a jigsaw, cut six holes in the MDF (four corners, two at centers of long sides) at 4 7/8 inches and shaped in a half-circle. The overall angle of the holes is 90 degrees, to accommodate the rails. Create a template for a corner pocket and a middle pocket, and trace it repeatedly. Router the inside edge of each pocket to ¼-inch for a lip for the balls.
13. The rails are made from walnut planks. Each rail portion is triple-segmented to simulate a curve going in toward the table. The top rail piece is 2¾ inches wide, the angled piece is 1½ inches, and the vertical piece is 4 to 5 inches. An additional inner piece (about 1 inch square on the end) that will hide under the rails will help in attaching the rails to the tabletop. There will be six rail segments, two of the same (the ends) and four of the same (the sides) (about 3 feet for each). Attach the rails using a biscuit joiner and glue. Clamp them and set to dry.
14. Flip the MDF tabletop over and, with oak, form a honeycomb pattern that contains 10-inch squares. Center this pattern on the MDF. This will act as support for the table and will help fit it in smoothly.
15. Primer the exterior as a base coat, minus the rails and the tabletop.
16. Unclamp the dried rails. Smooth the curve with a manual saw, planers and a router. Then use an orbital sander. Cut the rails into segments to fit between the holes. Drill holes to accept the bolts of the pockets inside each pocket hole (12 holes in total). Build a jig for consistency, using a drill press for the holes. Try a dry fit of the rails and the pockets, and trim or sand as necessary.
17. Disassemble any joining rails, rub rich brown furniture wax on the rails, and paint the bottom of the table (legs and base) with dark brown latex paint.
18. Cut with a razor and stretch the red felt over the tabletop, smoothing it as you go, and spray-glue it into place. Staple it around the sides for extra support.
19. Begin to assemble the rails and pockets, working your way around the perimeter. Work in small segments. Use the pocket bolts and then screw the pockets up from the bottom until they’re snug. Attach the rails and pockets to the table with spray glue and nails.
20. Cut the rubber bumpers to fit between the holes. Stretch red felt over them, glue and staple them, and then spray-glue them into place on the table’s inside edge.
21. At the routered edges and inside edges of the bottom painted portion of the table, cut and apply strips of white paper tape that has been spray-painted gold.


